- Free up storage space on your Mac
- Find out how much storage is available on your Mac
- Manage storage on your Mac
- Store in iCloud
- Optimize Storage
- Empty Trash Automatically
- Reduce Clutter
- Where to find the settings for each feature
- Other ways that macOS helps automatically save space
- How to free up storage space manually
- How to Clear Purgeable Space on macOS Monterey/Big Sur/Catalina, Sierra, Mojave: Data, Files, Disk Space
- Delete/Clear Purgeable Space on Mac: Clear Disk Space on Mac
- What is Purgeable Space on MacBook, Mac?
- What does Purgeable Space Include? What Type of Files?
- How to Check Purgeable Space on Mac
- Optimize Mac Storage
- Clear Purgeable Space on Mac Without Terminal Command
- Clear Purgeable Space on Mac Using Terminal Command [See Video how to perform]
- Use CleanMyMac Software
- jaysukh patel
- Mac OS How To Remove Purgeable on Hard Drive
- Can’t Remove Purgeable Disk Space
- Optimize Disk Storage
- How to remove Purgeable Disk Space
- Large file, let’s fill the disk!
- Time To Turn Off “Optimize Mac Storage”
Free up storage space on your Mac
Save space by storing your content in iCloud or using built-in tools to find and remove large or unneeded files.
The Optimized Storage features of your Mac help you save storage space by storing your content in iCloud and making it available on demand:
- When storage space is needed, files, photos, movies, email attachments, and other files that you seldom use are stored in iCloud automatically.
- Each file stays right where you last saved it, and downloads when you open it.
- Files that you’ve used recently remain on your Mac, along with optimized versions of your photos.
If you haven’t yet upgraded to macOS Sierra or later, learn about other ways to free up storage space.
Find out how much storage is available on your Mac
Choose Apple menu > About This Mac, then click Storage. Each segment of the bar is an estimate of the storage space used by a category of files. Move your pointer over each segment for more detail.
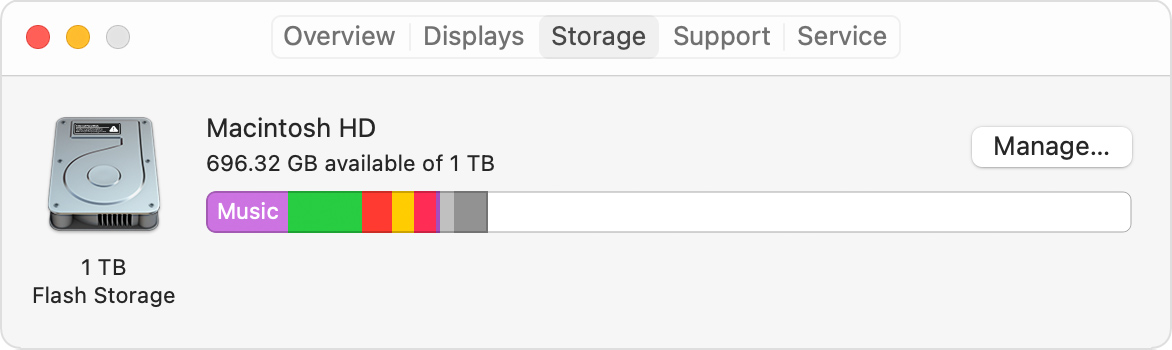
Click the Manage button to open the Storage Management window, pictured below.
Manage storage on your Mac
The Storage Management window offers recommendations for optimizing your storage. If some recommendations are already turned on, you will see fewer recommendations.
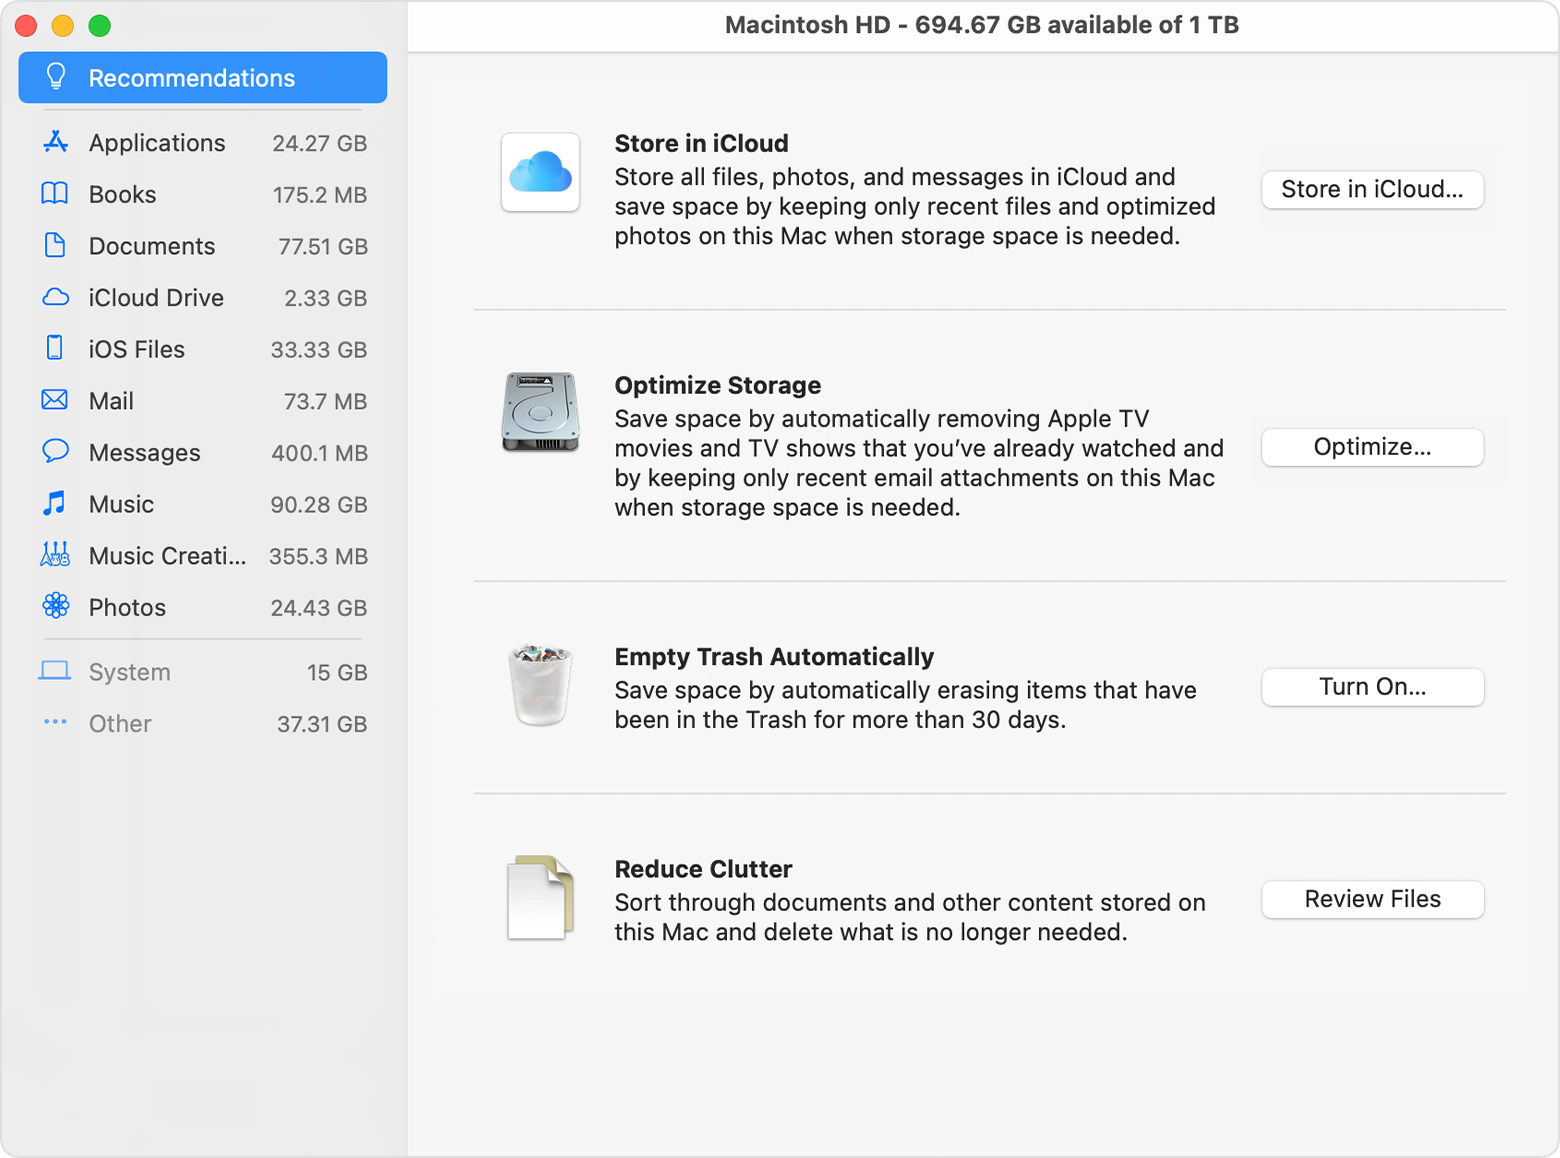
Store in iCloud
Click the Store in iCloud button, then choose from these options:
- Desktop and Documents. Store all files from these two locations in iCloud Drive. When storage space is needed, only the files you recently opened are kept on your Mac, so that you can easily work offline. Files stored only in iCloud show a download icon , which you can double-click to download the original file. Learn more about this feature.
- Photos. Store all original, full-resolution photos and videos in iCloud Photos. When storage space is needed, only space-saving (optimized) versions of photos are kept on your Mac. To download the original photo or video, just open it.
- Messages. Store all messages and attachments in iCloud. When storage space is needed, only the messages and attachments you recently opened are kept on your Mac. Learn more about Messages in iCloud.
Storing files in iCloud uses the storage space in your iCloud storage plan. If you reach or exceed your iCloud storage limit, you can either buy more iCloud storage or make more iCloud storage available. iCloud storage starts at 50GB for $0.99 (USD) a month, and you can purchase additional storage directly from your Apple device. Learn more about prices in your region.
Optimize Storage
Click the Optimize button to save space by automatically removing watched movies and TV shows. When storage space is needed, movies or TV shows that you purchased from Apple and already watched are removed from your Mac. Click the download icon next to a movie or TV show to download it again.
Your Mac will also save space by keeping only recent email attachments on this Mac when storage space is needed. You can manually download any attachments at any time by opening the email or attachment, or saving the attachment to your Mac.
Optimizing storage for movies, TV shows, and email attachments doesn’t require iCloud storage space.
Empty Trash Automatically
Empty Trash Automatically permanently deletes files that have been in the Trash for more than 30 days.
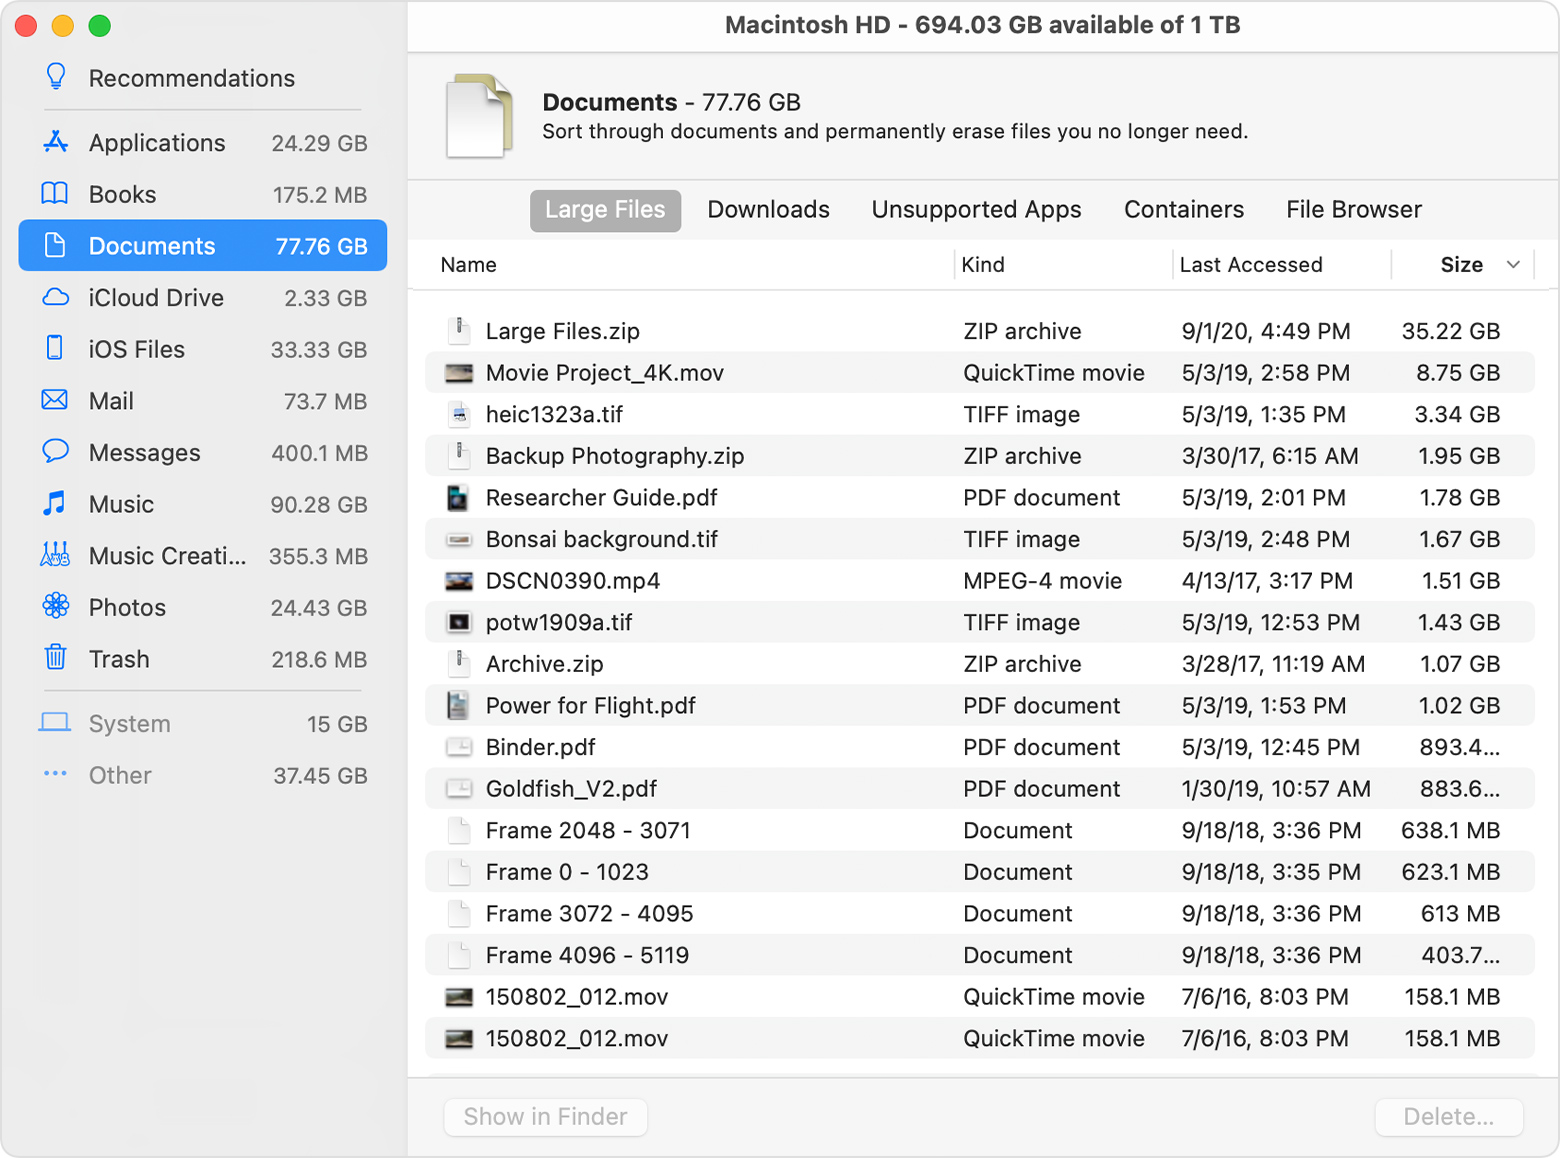
Reduce Clutter
Reduce Clutter helps you identify large files and files you might no longer need. Click the Review Files button, then choose any of the file categories in the sidebar, such as Applications, Documents, Music Creation, or Trash.
You can delete the files in some categories directly from this window. Other categories show the total storage space used by the files in each app. You can then open the app and decide whether to delete files from within it.
Where to find the settings for each feature
The button for each recommendation in the Storage Management window affects one or more settings in other apps. You can also control those settings directly within each app.
- If you’re using macOS Catalina or later, choose Apple menu > System Preferences, click Apple ID, then select iCloud in the sidebar: Store in iCloud turns on the Optimize Mac Storage setting on the right. To turn off iCloud Drive entirely, deselect iCloud Drive.
- If you’re using macOS Mojave or earlier, choose Apple menu > System Preferences, click iCloud, then click Options next to iCloud Drive. Store in iCloud turns on the Desktop & Documents Folders and Optimize Mac Storage settings.
- In Photos, choose Photos > Preferences, then click iCloud. Store in iCloud selects iCloud Photos and Optimize Mac Storage.
- In Messages, choose Messages > Preferences, then click iMessage. Store in iCloud selects Enable Messages in iCloud.
- If you’re using macOS Catalina or later, open the Apple TV app, choose TV > Preferences from the menu bar, then click Files. Optimize Storage selects “Automatically delete watched movies and TV shows.”
- In you’re using macOS Mojave or earlier, open iTunes, choose iTunes > Preferences from the menu bar, then click Advanced. Optimize Storage selects “Automatically delete watched movies and TV shows.”
- In Mail, choose Mail > Preferences from the menu bar, then click Accounts. In the Account Information section on the right, Optimize Storage sets the Download Attachments menu to either Recent or None.
Empty Trash Automatically: From the Finder, choose Finder > Preferences, then click Advanced. Empty Trash Automatically selects “Remove items from the Trash after 30 days.”
Other ways that macOS helps automatically save space
With macOS Sierra or later, your Mac automatically takes these additional steps to save storage space:
- Detects duplicate downloads in Safari, keeping only the most recent version of the download
- Reminds you to delete used app installers
- Removes old fonts, languages, and dictionaries that aren’t being used
- Clears caches, logs, and other unnecessary data when storage space is needed
How to free up storage space manually
Even without using the Optimized Storage features described in this article, you can take other steps to make more storage space available:
- Music, movies, and other media can use a lot of storage space. Learn how to delete music, movies, and TV shows from your device.
- Delete other files that you no longer need by moving them to the Trash, then emptying the Trash. The Downloads folder is good place to look for files that you might no longer need.
- Move files to an external storage device.
- Compress files.
- Delete unneeded email: In the Mail app, choose Mailbox > Erase Junk Mail. If you no longer need the email in your Trash mailbox, choose Mailbox > Erase Deleted Items.
Источник
How to Clear Purgeable Space on macOS Monterey/Big Sur/Catalina, Sierra, Mojave: Data, Files, Disk Space
Last Updated on Jun 24, 2021
Get here, How to purge Mac hard drive? If you are a Mac user from the beginning and well known about each corner of the macOS, then you should have noticed the difference between macOS 12 Monterey, macOS Big Sur, macOS Catalina, macOS Sierra, and macOS Mojave. In an earlier version of macOS, there wasn’t any term like purgeable file storage. If you have listened to it the first time, then you are eager to know what does Purgeable means. It is nothing but files that can be safely deleted when you choose to optimize storage.
we are happy to help you, submit this Form, if your solution is not covered in this article.
Purgeable files can be like cached movies stored in iTunes, language files, and more. There is no harm in deleting these files, and as a bonus, you will get free space on your MacBook. Moving forward to delete purgeable space in macOS Monterey/Big Sur/Catalina/Mojave.
Delete/Clear Purgeable Space on Mac: Clear Disk Space on Mac
What is Purgeable Space on MacBook, Mac?
The concept of Purgeable Space on MacBook, Mac was introduced back with macOS Sierra. Purgeable space is nothing but the storage taken by the files and documents that haven’t been used in a while and targets to reduce redundancy from the Mac. Whenever the Mac is low on storage or needs some space, the files and documents may be removed from the Purgeable Space. Though, it won’t delete any important files as far as I know.
What does Purgeable Space Include? What Type of Files?
- The common files between the Mac local storage and iCloud storage.
- All the full-resolution pictures added in the iCloud.
- Cache and temporary files of applications that are necessary of no use for us.
- The font files that we don’t use.
- Also, the dictionaries that haven’t been used for a long time.
- Watched Movies and TV Shows. No worries, they are still available to download from iTunes.
- The Time Machine data on local Mac Storage, that is not part of the backup drive of Time Machine.
- All the data stored in the Trash may appear as Purgeable Space.
How to Check Purgeable Space on Mac
- Step #1: Click on the “Apple” menu.
- Step #2: Open “About This Mac”.
- Step #3: There, click on the “Storage” tab. Grey Allotted space showing purgeable space. Delete Data from purgeable space we can release Without Terminal Command or Using Terminal Command. Let’s check it out one by one. Also, don’t miss to share the solution that works for you in the comment box.

Optimize Mac Storage
Many folks are confused about whether the Optimize Storage increases the Purgeable Space or helps you clear the Purgeable Space. Try Optimizing Mac Storage on MacBook, see if it works for you.
- Click on the Apple
- Select About This Mac.
- Click Storage >Manage
Find out the way to optimize Mac storage in the best way possible.
Clear Purgeable Space on Mac Without Terminal Command
1. Go to the Apple logo on mac menu.
2. Now, Click on the System Preferences option.
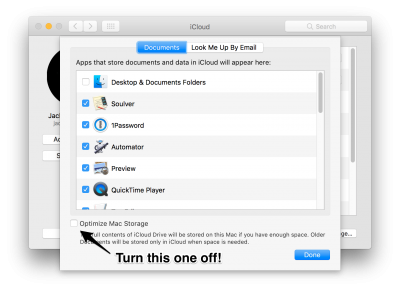
3. Next, Click Apple ID under the System Preferences window. Click on iCloud from the sidebar.
4. Now, Nex to the Cloud Drive select options button and click on it.
5. Next, Uncheck all Apple Service using Cloud Drive. And Tap on done to save it.
6. Now, Restart your Mac. Go to the Apple Logo > Restart.
7. Now again open System preferences [Apple logo > System Preferences] and Click on Time machine.
8. From the Time Machine window, uncheck Time Machine Backup automatically. Now the result is showing under the Mac Storage option. Check Purgeable Space using the above steps. Still not clear then try the second method. [Also Check Video Turorial for more help] Clear Purgeable Space Using Terminal Command line.
Clear Purgeable Space on Mac Using Terminal Command [See Video how to perform]
Do you have any trick or software to clear disk space on Mac then reply in the comments! you can get more ideas on Apple website.
Use CleanMyMac Software
Get a help from #1 mac software for Clean up your Mac and Remove all unused and Junk, Trash, File from your Macs all around the corners.
Just, in a Signal Click find all Mac’s Data and Cleanup without any important Data loss.
Note: Clean My Mac is compatible with macOS Monterey with M1 Silicon & Intel mac.
jaysukh patel
Jaysukh Patel is the founder of howtoisolve. Also self Professional Developer, Techno lover mainly for iPhone, iPad, iPod Touch and iOS, Jaysukh is one of responsible person in his family. Contact On: [email protected] [OR] [email protected]
Источник
Mac OS How To Remove Purgeable on Hard Drive
Can’t Remove Purgeable Disk Space
When trying to install Bootcamp on my MacBook Pro, I had to delete a lot of files to get enough space to be able to accommodate for a Bootcamp partition on the drive. But even after removing around 60 GB of storage, Mac OS Sierra could still not make a large enough partition for Windows. When checking with Disk Utility it showed that indeed I had enough space, but there was a part called Purgeable that was impossible to move. No tools from Apple are available to handle this, but here’s how I fixed it.
Optimize Disk Storage
Apple added a feature called “Optimize Disk Storage” in Mac OS Sierra. The idea is quite good. This feature isn’t well-implemented though. If you have it enabled in System Preferences under iCloud/iCloud Drive settings (which I think is on by default), you essentially have two different values of how much disk space you have available. One “real,” that shows exactly how much there is, and then you have the Purgeable part, that includes software that can be uninstalled on the fly and later restored if enough space is available.
My problem was that Mac OS Sierra refused to remove the Purgeable part of the partition, so when I tried to install Bootcamp, It only showed the “real” free disk space. The problem is, I manually deleted stuff like iMovie and Garageband with the associated files by hand using OmniDiskSweeper, which is a free and excellent application for finding and removing large unused files on your disk. But for some reason, Mac OS Sierra refused to recognize that I had the free disk space. After searching the net, I couldn’t find a good solution. But after a quick hack, I’ve created an easy way of forcing Mac OS to remove the “Purgeable” disk space.
How to remove Purgeable Disk Space
First I created a 20GB file using the Terminal application. It’s easy enough thanks to Mac OS Unix underpinnings. Open the Terminal app, found in the Utility folder in Applications. Don’t let the sparse interface scare you; this thing has superpowers!
Enter the following:
The command creates a file named stupidfile.crap using a device available on Unix/Linux, called /dev/zero which sends zeros which we use to create a large file.
You could do a periodic “Get Info” in the Finder to check on how large the file is. Another is to install Brew and use it to install the great tool watch by entering the command
If you do, open a new Terminal window and enter:
Now we can see how large the file is. When the data is about 10-20GB in size, press ctrl-c in the first window to stop creating a file. You can now quit the Terminal application.
Large file, let’s fill the disk!
So now we have a large file. No need to use the /dev/random function to make a larger file, because it’s faster to duplicate the stupidfile.crap we just created. So go to your home directory, select the file stupidfile.crap and press cmd-d to duplicate the file. Just keep making several duplicates at the same time to speed things up. Now we will make a lot of copies of the file in your home directory. What we are aiming for, is to fill the disk, so the OS starts purging (hence, eating into the “Purgeable” part.)
Sooner or later you’re going to hit the magic wall, and you’ll get messages that the disk is full. Wait a while and see if it has removed parts of the Purgeable section using /Applications/Utilities/Disk Utility. If the system allocates more free space, keep duplicating our dummy file to fill up the disk. Sooner or later, you will have a full disk with either a very small or nonexistent “Purgeable” section on it.
Time To Turn Off “Optimize Mac Storage”
Now you can turn off that pesky Optimize Mac Storage function. So go to System Preferences/iCloud, press the iCloud Drive Options button to get to the setting. Deselect “Optimize Mac Storage.”
Now you can remove all the dummy files we created to fill up the disk and voilá, we now have access to all the empty disk space without that stupid Purgeable part there.
So now I could make a more substantial partition for Windows. Why a larger partition for Windows? Games of course!
Источник


