- Puppy linux and ubuntu
- Puppy Linux advantage
- Yes, but what does it look and feel like?
- First thing first
- Why not try it? Download now! (Official distributions)
- Questions?
- Puppy linux and ubuntu
- Burning an Optical disc or preparing a USB Drive
- Optical
- Booting
- So you want to install Puppy
- 1. Frugal install (Recommended)
- 2. USB Install (Recommended)
- 3. Full Install
- Using Puppy
- Notes
- Как установить Puppy Linux
- Системные требования
- Шаг 1. Загрузка образа
- Шаг 2. Запись образа на флешку
- Шаг 3. Настройка BIOS
- Шаг 4. Настройка загрузчика
- Шаг 5. Загрузка LiveCD
- Шаг 6. Настройка системы
- Шаг 7. Запуск установщика
- Шаг 8. Выбор установщика
- Шаг 9. Запуск Gparted
- Шаг 10. Создание таблицы разделов
- Шаг 11. Создание основного раздела
- Шаг 12. Установка файлов Puppy
- Шаг 13. Установка загрузчика
- Шаг 14. Перезагрузка
- Шаг 15. Запуск системы
- Шаг 16. Меню настройки
- Шаг 17. Настройка сети
- Шаг 18. Локализация
- Шаг 19. Сохранение сессии
- Выводы
Puppy linux and ubuntu
Puppy Linux is a unique family of Linux distributions meant for the home-user computers. It was originally created by Barry Kauler in 2003.
Puppy Linux advantage
- Ready to use → all tools for common daily computing usage already included.
- Ease of use → grandpa-friendly certified ™
- Relatively small size → 300 MB or less.
- Fast and versatile.
- Customisable within minutes → remasters.
- Different flavours → optimised to support older computers, newer computers.
- Variety → hundreds of derivatives (“puplets”), one of which will surely meet your needs.
If one of these things interest you, read on.
Yes, but what does it look and feel like?

First thing first
Puppy Linux is not a single Linux distribution like Debian. Puppy Linux is also not a Linux distribution with multiple flavours, like Ubuntu (with its variants of Ubuntu, Kubuntu, Xubuntu, etc) though it also comes in flavours.
Puppy Linux is a collection of multiple Linux distributions, built on the same shared principles, built using the same set of tools, built on top of a unique set of puppy specific applications and configurations and generally speaking provide consistent behaviours and features, no matter which flavours you choose.
There are generally three broad categories of Puppy Linux distributions:
official Puppy Linux distributions → maintained by Puppy Linux team, usually targeted for general purpose, and generally built using Puppy Linux system builder (called Woof-CE).
woof-built Puppy Linux distributions → developed to suit specific needs and appearances, also targeted for general purpose, and built using Puppy Linux system builder (called Woof-CE) with some additional or modified packages.
unofficial derivatives (“puplets”) → are usually remasters (or remasters of remasters), made and maintained by Puppy Linux enthusiasts, usually targeted for specific purposes.
Why not try it? Download now! (Official distributions)
Get the ISO, burn it to a CD/DVD using your favorite CD/DVD burner, or flash it using dd (Windows version) to your USB flash drive, or visit our download page for more comprehensive information.
| Compatibility * | Architecture | Latest Version | Download link |
|---|---|---|---|
| Ubuntu Focal 64 | x86_64 64-bit | FossaPup64 9.5 | Main — Mirror — Checksum |
| Raspbian Buster | armhf 32-bit | Raspup 8.2.1 | Main — Mirror — Checksum |
| Ubuntu Bionic | x86 32-bit | BionicPup32 8.0 | Main — Mirror — Checksum |
| Ubuntu Bionic 64 | x86_64 64-bit | BionicPup64 8.0 | Main — Mirror — Checksum |
| Ubuntu Xenial | x86 32-bit | XenialPup 7.5 | Main — Mirror — Checksum |
| Ubuntu Xenial 64 | x86_64 64-bit | XenialPup64 7.5 | Main — Mirror — Checksum |
| Slackware 14.2 | x86 32-bit | Slacko Puppy 7.0 | Main — Mirror — Checksum |
| Slackware64 14.2 | x86_64 64-bit | Slacko64 Puppy 7.0 | Main — Mirror — Checksum |
| Slackware 14.1 | x86 32-bit | Slacko Puppy 6.3.2 | Main — Mirror — Checksum |
| Slackware64 14.1 | x86_64 64-bit | Slacko64 Puppy 6.3.2 | Main — Mirror — Checksum |
| Ubuntu Trusty | x86 32-bit | Tahrpup 6.0.5 | Main — Mirror — Checksum |
| Ubuntu Trusty 64 | x86_64 64-bit | Tahrpup64 6.0.5 | Main — Mirror — Checksum |
* Compatibility: A Puppylinux distribution can also be built and assembled using packages and components from another Linux distribution called in Puppy the “binary compatible” distribution. The choice of a binary compatible distribution determines the availability of additional packages, among other things.
Questions?
It has been said that the best experience of Puppy Linux is not from the software itself, but from the community that gathers around it. Whatever you have in mind — praises, curses, questions, suggestions, or just plain chit-chat, we welcome you to join us at Puppy Linux Discussion Forum or just check the discussions for the latest puppylinux woof builds.
Источник
Puppy linux and ubuntu
The fact is that you do not need to install Puppy Linux at all! You can simply download and burn it to an optical disc (CD, DVD, CD±RW, DVD±RW) or dd it to an USB drive and boot it live.
Burning an Optical disc or preparing a USB Drive
Optical
In any Linux, once you have downloaded the ISO image and verified its authenticity by checking its md5sum you can burn it to a DVD or a CD using any Linux optical burning tool. Just make sure you burn it as an image and not data otherwise it will not be bootable.
In Windows we recommend Imageburn (direct link to download) to burn the image to a CD or DVD.
All Linux versions come with a tool name dd. Our ISO images since 2013 come as iso hybrid images so they can be transferred directly to the USB drive using dd. Don’t attempt this with older puppy versions unless you know what you are doing. Here is a simple tutorial on using dd to make a bootable USB drive. Be very careful with your target drive name!
There is a Windows version of dd available on this site.
There is also a graphical tool for Windows called Win32 Disk Imager. A download is available from this page.
Booting
Depending on whether you have optical or USB media you may have to go into your computer’s BIOS Setup program to adjust the boot order of devices. You want to give your optical or USB ports priority over the harddrive.
Once you have your boot media and computer set up just insert the boot media and switch on your computer. You will see a couple of text screens go past and hopefully you will boot to a shiny new desktop with a quick setup screen followed by a welcome screen.
When you are finished you can decide to save the session or not! Not saving the session does not leave a trace of the operating system as Puppy runs entirely in RAM and as soon as the computer is powered off the RAM is flushed. This is ideal from a security perspective for internet banking or other sensitive financial transactions performed over the internet.
Saving the session can be achieved in a number of ways:
You can save the session to a harddrive or an USB drive in a vfat, ntfs or linux [1] partition. This will save all your settings to what is known as a pupsave [2] file or folder. When you boot off the same media next time the pupsave will be found and all your files and settings will be as you left them.
If you booted off of optical media you can save the session and all settings back to that same optical disc.
So you want to install Puppy
Naturally you can actually install Puppy if you wish. Once you boot Puppy and are happy with what you see it is time to open the Puppy Installer from Setup in the main menu. There are 3 main types of install; frugal, USB and traditional full install.
1. Frugal install (Recommended)
This type of install copies the main puppy files from the boot media (either optical or USB) to your harddrive. Firstly, you are presented with some information about your system and what partitions you have available. If you don’t have a suitable partition then you can use the included graphical partition manager GParted to shrink and move partitions as necessary to created a partition for your installation. Once this is done you are prompted for the location of your boot media files (either an iso image, optical media or just the files themselves) and once confirmed these are copied to a folder in your chosen partition. A bootloader is then installed and once finished you can reboot into your new system.
This will be a pristine system that requires you to save your session at shut down if you want to keep your settings. Once saving the session is complete, a pupsave file or folder is created. On you next boot your files and settings will be exactly as you left them at last shutdown.
2. USB Install (Recommended)
This type of install copies the main puppy files from the boot media (either optical or USB) to your chosen USB drive. Firstly, you should insert the USB drive that you want to use for installation. Again using the graphical partition manager GParted you need to make sure that there is a suitable partition on the USB drive. This can be formatted to fat32 Windows™ style filesystem (good for portability if you want to use the drive as storage to be used between Linux and Windows™) or one of the supported Linux filesystems. (Note: not all Puppies support the f2fs filesystem. The installer is intelligent enough to know this.) Again, you are prompted for the location of your boot media files (either an iso image, optical media or just the files themselves) and once confirmed these are copied to a folder in your chosen USB drive. A bootloader is then installed and once finished you can reboot into your new system. This can be booted on any computer you like! This is also a type of frugal installation.
Again, this will be a pristine system that requires you to save your session at shut down if you want to keep your settings. Once saving the session is complete, a pupsave file or folder is created. On you next boot your files and settings will be exactly as you left them at last shutdown.
3. Full Install
This is a traditonal Linux install to its own dedicated partition. If you don’t have a suitable partition then you can use the included graphical partition manager GParted to shrink and move partitions as necessary to created a partition for your installation. You must use a Linux filesystem. Once this is done you are prompted for the location of your boot media files (either an iso image, optical media or just the files themselves) and once confirmed these are expanded in your chosen partition. A bootloader is then installed and once finished you can reboot into your new system.
Once booted this will act like any other Linux installation.
Using Puppy
Puppy is famous for its ease of use. The desktop layout is traditional with a task bar at the bottom (or top) and icons on the desktop. Anyone coming from Windows™, Mac OSX™ or another Linux such as Ubuntu, Fedora or Arch will have little issue getting used to it. The interface is a typical WIMP style (Windows, Icons, Menus and a Pointing device).
While puppy comes with almost everything you need to write, calculate, enjoy videos and music, create artwork, work with your digital camera, and more there invariably comes a time when you need an an extra piece of software. Extra software comes in the form of pet packages which can be installed through the Puppy Package Manager or by downloading from a trusted source and simply clicking on the package. Puppy also has the capability of installing deb, rpm and tgz/txz packages from Debian family, Red Hat family and Slackware family of Linux operating systems.
The way Puppy is designed, if you use a frugal type install, software can be installed as an sfs (Squash File System) package. This is the preferred method to install very large packages such as LibreOffice. In fact the Puppy development environment, including the GNU Compiler Collection (GCC) and development libraries and headers, is shipped as an sfs; a separate download to the main ISO image. There is a tool call SFS Load which makes installing these packages a one step process. The sfs packages do not work on a full install.
Once you have been using Puppy for a little while you may want to try a remaster (see FAQ). This saves the state of your current installed system (minus some the personal stuff) to a burnable ISO image. This enables you to have your system setup and ready to go if you have several computers or you can share your remaster as a puplet with the community.
However you decide to install (or not) Puppy Linux, we hope you enjoy using it for years to come!
Notes
While we recommend frugal or USB installations the choice is entirely yours.
[1] Some common Linux filesystems that Puppy supports are ext2, ext3, ext4, f2fs. Windows™ filesystems supported are fat16, fat32 and ntfs.
[2] A pupsave file is a file that contains a linux filesystem. It can be stored on any supported partition. It is a fixed size and can be as small as 32MB and as large as 4GB (on fat32) and even larger on other filesystems. The pupsave file can be enlarged later on, but the challenge is to keep your system trim and clean by regularly deleting browser cache, cleaning up any stray files and storing other stuff outside the save file.
A pupsave folder can only be created on a linux filesystem. This allows you to store as much as your partition can hold.
Источник
Как установить Puppy Linux
Puppy Linux — это небольшой дистрибутив, созданный Барри Каулером. Его главная задача быть похожим в использовании на Windows, содержать все необходимые программы, но быть предельно маленьким и простым. Дистрибутив отлично работает как на новом, так и на старом оборудовании и работает очень быстро.
Его особенность в том, что вы можете получить полноценную систему просто записав небольшой установочный образ на флешку и запустив в режиме LiveCD. Если вы думаете что в других дистрибутивах тоже так можно, то нет, здесь есть возможность сохранения сессии, которая позволяет вам сохранить все данные, с которыми вы работали.
Также дистрибутив содержит очень большое количество утилит и инструментов для настройки системы, с помощью которых вы сможете настроить все что угодно а в конфигурационные файлы очень часто лезть не придется. У PuppyLinux есть несколько версий, основанных на разных дистрибутивах. Это Ubuntu (только LTS), Slackware и Debian. Редакция с Ubuntu развивается наиболее активно, поэтому в этой статье будем использовать её. Дальше мы рассмотрим как установить Puppy Linux на жесткий диск в качестве полноценной операционной системы.
Системные требования
Требования к аппаратному обеспечению Puppy Linux немного удивляют. Похоже, он может работать практически на любом оборудовании. Для запуска системе необходимо 64 Мб оперативной памяти и процессор с тактовой частотой от 333 МГц.
Но для хорошей работы рекомендуется иметь 256 Мб ОЗУ с разделом подкачки размером 512 Мб.
Шаг 1. Загрузка образа
Первым делом нам нужно скачать установочный образ. Самая последняя версия доступна на официальном сайте. Мы будем использовать версию, основанную на Ubuntu 20.04 под названием FossaPup:

Перейдите на страницу форума Puppy и скачайте образ.Образ весит около 400 мегабайт, так что загрузка пройдет быстро.

Версия, основанная на Slackware немного меньше. Со временем дистрибутивов Puppy Linux может стать больше. Дело в том, что этот дистрибутив может быть создан на основе других дистрибутивов, и быть совместимым с их пакетной базой. Такие дистрибутивы содержат одинаковый набор утилит puppy и все они считаются официальными. Например, сейчас в разработке находится Puppy Linux, основанный на Ubuntu Xenial Xerus.
Шаг 2. Запись образа на флешку
Разработчики советуют использовать для записи на флешку утилиту dd. Команда терминала в Linux будет выглядеть вот так:
/fossapup64.iso of=/dev/sdb bs=5M
Здесь /dev/sdb — имя устройства вашей флешки, никаких цифр туда дописывать не нужно. В операционной системе Windows можно использовать Windows версию этой утилиты. Здесь команда будет выглядеть так:
dd if=fossapup64.iso of=\\.\f: bs=5M
Тут f: — это буква диска вашей флешки. Не забывайте, что запускать командную строку нужно с правами администратора. Но в Windows намного проще будет использовать утилиту Rufus, а в Linux можно воспользоваться Etcher если вы не любите использовать терминал.
Шаг 3. Настройка BIOS
Когда флешка будет записана, перезагрузите компьютер. Во время заставки BIOS нажмите F2, F8, Shift+F2 или Del, чтобы открыть настройку. Там найдите раздел или вкладку Boot и в пункте 1st Boot Device или Boot option #1 выберите вашу флешку:
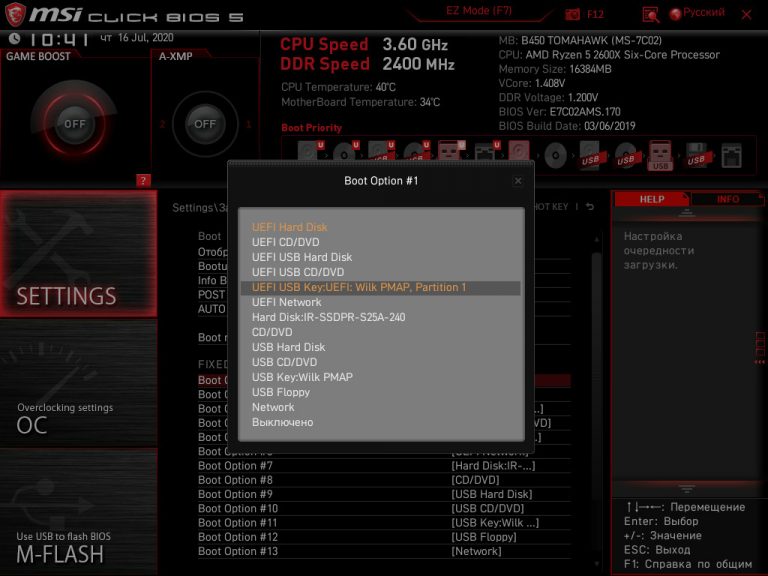
Дальше перейдите на вкладку Exit и нажмите Exit & Save Changes.
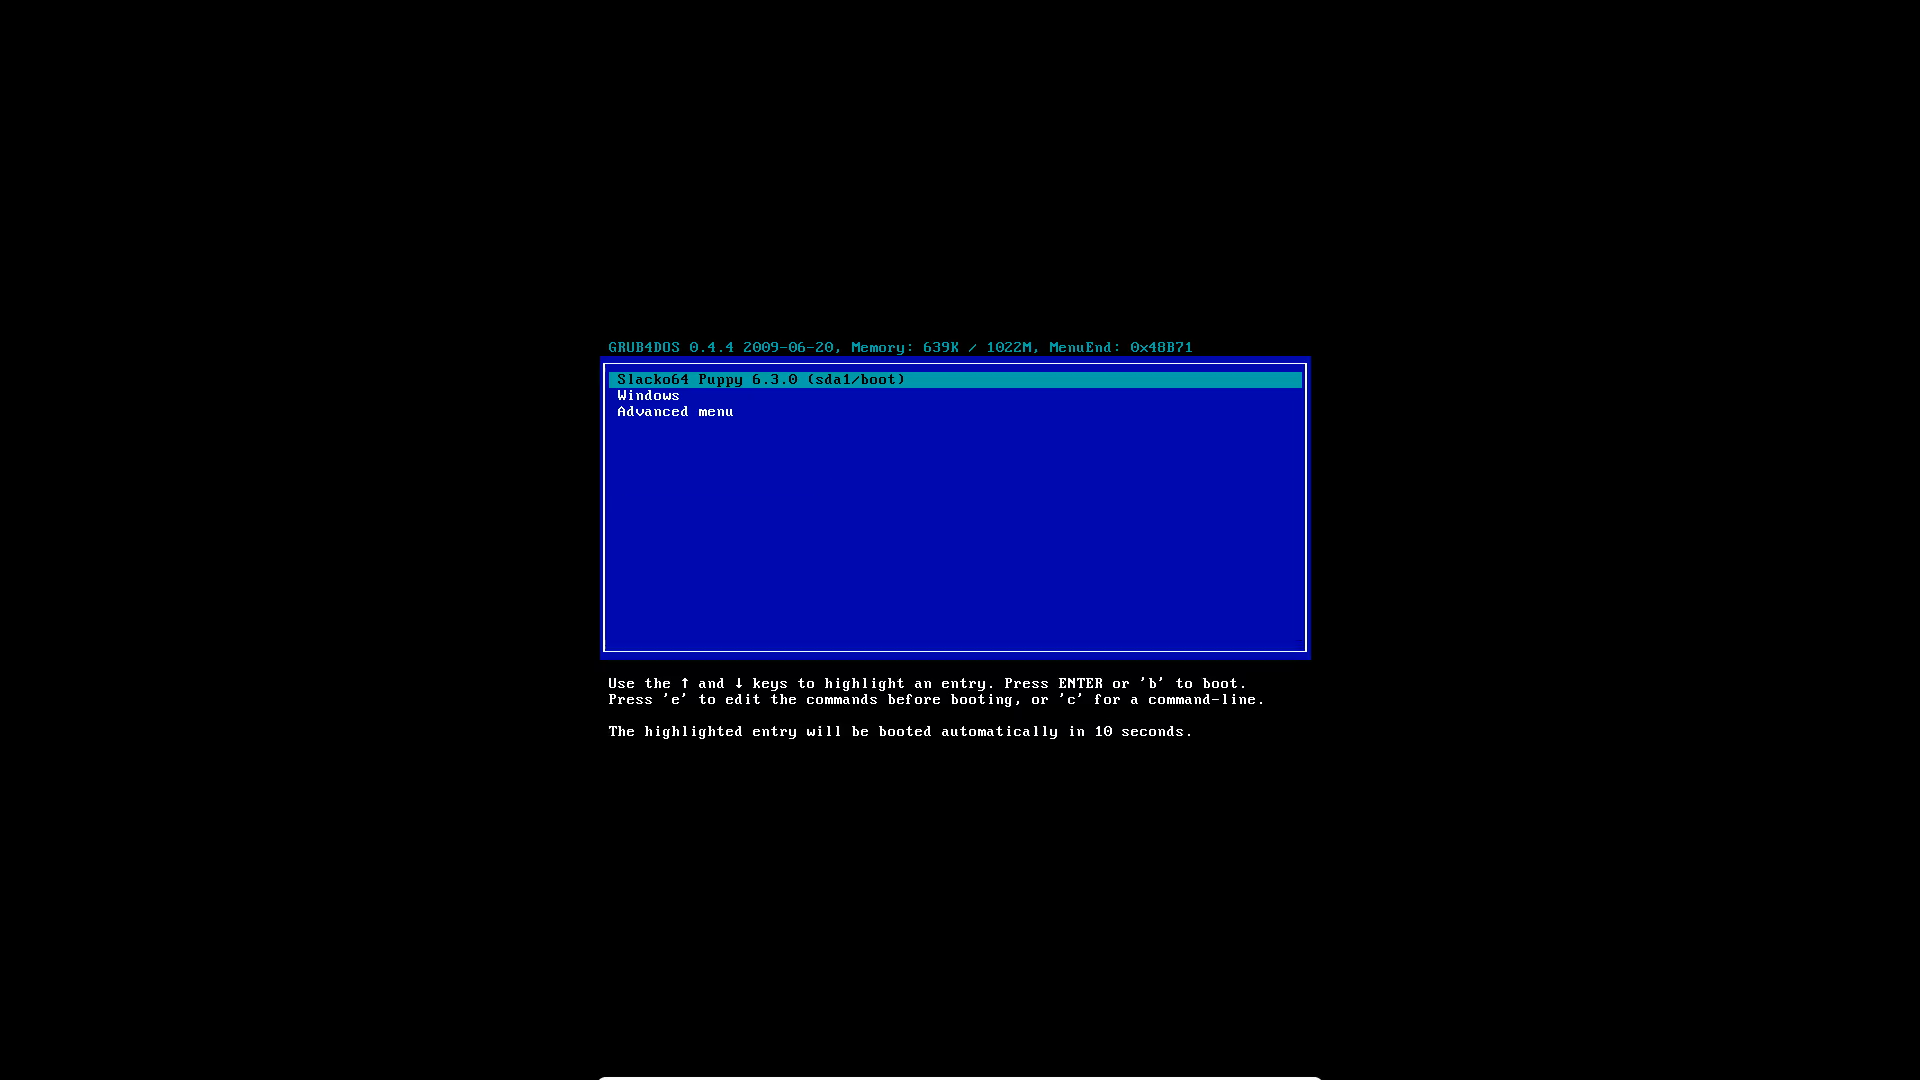
Шаг 4. Настройка загрузчика
На первом этапе загрузки образа вы можете ввести параметры ядра или выбрать особый режим загрузки. Нам будет достаточно варианта по умолчанию:

Шаг 5. Загрузка LiveCD
Дождитесь окончания загрузки:

Шаг 6. Настройка системы
Сразу после старта откроется такое окно настройки системы, настраивать что-либо сейчас бессмысленно, потому что после установки настройки все равно собьются:

Поэтому просто закройте это окно. В следующем окне можно настроить подключение к сети, его тоже можно закрыть:

Шаг 7. Запуск установщика
Ярлык Install можно найти на рабочем столе или в главном меню, в разделе Setup под названием Puppy Install:

Шаг 8. Выбор установщика
На этом шаге мы можем выбрать какой установщик использовать. Доступно несколько: FrugalPup — установка файлов Puppy без распаковки с поддержкой UEFI, BootFlash — для установки на флешку и Installer — полная установка, но без поддержки UEFI. В этой статье я выбираю первый вариант:

Шаг 9. Запуск Gparted
Пока про установщик можно забыть. Надо подготовить диск. Для этого откройте главное меню и там в разделе System найдите утилиту Gparted:

Шаг 10. Создание таблицы разделов
Если ваш диск или флешка ещё не имеет таблицы разделов, следует её создать. Для этого в программе Gparted откройте меню Device и нажмите Create new partition table:

Затем выберите нужный тип таблицы разделов, например msdos или gpt.

Шаг 11. Создание основного раздела
В режиме Frugal можно установить Puppy Linux только на один раздел и этот раздел должен быть отформатирован в файловую систему Fat32. Поэтому в Gparted кликните по свободному пространству правой кнопкой и выберите пункт Create Partition. Для этого раздела выберите файловую систему fat32:

Затем примените изменения нажав кнопку с зеленной галочкой. Или в меню Edit выберите пункт Apply.
Шаг 12. Установка файлов Puppy
Далее необходимо вернуться к установщику. Здесь нажмите кнопку Puppy чтобы установить файлы Puppy Linux на диск:

В следующем диалогом окне надо выбрать источник файлов. Можно выбрать this чтобы использовать Live образ:

Далее надо выбрать раздел для установки, выберите только что созданный раздел и нажмите Ok:

Затем можно выбрать папку, в которую будут установлены файлы системы, чтобы просто разместить их в корне диска нажмите Ok.

После этого надо подтвердить, что всё верно и система начнёт копирование файлов и очень скоро сообщит об успешном завершении.

После этого вы вернетесь в меню загрузчика.
Шаг 13. Установка загрузчика
Для установки загрузчика нажмите кнопку Boot в установщике. В первом окне выберите раздел, на который были установлены файлы Puppy Linux:

Затем папку, в которую они были установлены:

Далее выберите раздел, на который стоит установить файлы загрузчика. В нашем случае этот один и тот же раздел:

Потом надо выбрать тип загрузки, только UEFI, только MBR или оба варианта. Чтобы включить оба варианта выберите Both:

Потом подтвердите что всё верно и дождитесь завершения установки файлов.

Шаг 14. Перезагрузка
На этом этапе уже установка Puppy Linux практически завершена и можно перезагрузить компьютер. Для этого кликните по главному меню и выберите Exit, затем Reboot.

А на запрос надо ли сохранять сессию ответьте No:

Шаг 15. Запуск системы
Выберите первый пункт в меню загрузчика и дождитесь завершения загрузки:
Шаг 16. Меню настройки
После запуска системы перед нами опять откроется меню первоначальной настройки. Здесь вы можете настроить язык, часовой пояс и еще много параметров системы.

Сначала выберите язык, на котором вы хотите использовать систему:

Затем в поле ниже выберите часовой пояс:

Это основные настройки, после которых можно нажать OK и закрыть утилиту.
Шаг 17. Настройка сети
Дальше утилита первоначальной настройки предложит вам настроить сеть. Если вы используете Ethernet соединение, этот шаг можно пропустить.
Шаг 18. Локализация
Для локализации системы недостаточно просто выбрать язык, нужно еще установить пакет с переводами через пакетный менеджер. Но эта версия дистрибутива вышла совсем недавно и для русского языка пакета нет на момент написания статьи. Тем не менее, попробуйте его поискать, возможно он уже вышел.
Для этого кликните по ярлыку Install, перейдите на вкладку Install Applications и выберите Puppy Package Manager:

В списке репозиториев выберите puppy-noarch или puppy-fossa. Здесь в поиске напишите language-ru или langpack-ru и посмотрите есть ли такой пакет. Если есть — установите его. Для установки достаточно выбрать пакет и кликнуть по кнопке Do it в правом верхнем углу.

После завершения установки останется перезагрузить систему. Дальше все будет по-русски.
Шаг 19. Сохранение сессии
Поскольку мы использовали не полный вариант установки, данные на диске всё равно сохранятся не будут. Для того чтобы они сохранялись надо создать специальный файл. Для этого перейдите в меню и нажмите кнопку Exit. Затем выберите один из пунктов, выключающих систему, например Reboot:

После этого кликните по кнопке Save:

Выберите, что файл с сохраненными данными шифровать не надо — Normal (no encrypt):

Выберите файловую систему файла:


Введите имя для будущего файла:

Затем подтвердите сохранение:

После перезагрузки все ваши настройки будут сохранены и будут сохранятся уже при следующих перезагрузках без дополнительных настроек.
Выводы
Вот и все, теперь вы знаете как установить Puppy Linux на жесткий диск и немного ознакомлены с особенностями этого дистрибутива. Как видите, это не совсем обычный Linux дистрибутив, он может быть запущен как в обычном режиме, так и с помощью LiveCD, причем в обоих случаях вы получаете полноценную операционную систему. Если у вас остались вопросы, спрашивайте в комментариях!
Видео с процессом установки puppy linux:
Источник


