- Установка программного обеспечения
- Последовательность установки
- Установка на 64-х системы Windows 7 и выше
- Установка на 64-х системы Windows 10
- Альтернативный способ установки драйвера
- Prusa i3 драйвер windows 10
- Summary
- Support for a GD external FLASH chip
- Reservation in the EEPROM for job ID tracking
- XYZ calibration algorithm improved
- Bug Fixes
- Incorrect G-code reading from a buffer
- «Time Remaining» function bug fixed
- M120 and M121 disabled
- Crash detection during MBL
- Summary
- New “Print from SD” menu
- «Time Remaining» function improved
- Community translation
- Faster and quieter XYZ calibration
- PVB preheat preset
- G-code «M204 T» implemented
- Optimizations for the MK3 filament sensor
- DEDGE support enabled for TMC2130
- Improved filament troubleshooting
- Support for 0.8mm nozzles
- Optimizations for print hosts (e.g. Octoprint)
- G-code M155 support
- SD card status send automatically
- Host Long File Name (LFN) improvements
- LCD status over UART
- Add printer sleep information to the M115
- Serial number in EEPROM
- Printer state in INFO string
- IP address in the Support menu
- Pause/Resume functions improved
- Support for G-codes with thumbnails
- M601/M602 confirmation statuses fixed
- Optimized code size and RAM usage
- Bug fixes
- M0/M1 Stop/Halt not displaying text/waiting for input fixed
- Sensor info screen blocking the function of filament IR sensor fixed
- Move Z up before XYZ calibration
- Firmware retract (G10/G11) fixed
- Babystep insertion fixed
- Summary
- Redesigned XYZ calibration
- Summary
- Redesigned XYZ calibration
- Summary
- XYZ calibration optimization
- Summary
- Major improvements to LA15
- Support for parts from selected vendors
- Ambient temperature check (MK3S/MK3)
- PC Blend preheat added
- Stack corruption fixed
- More precise Belt test (MK3S/MK3)
- Octoprint causing M112 fixed
- Summary
- Further improvements to LA15
- Support for parts from selected vendors
- Ambient temperature check (MK3S/MK3)
- PC Blend preheat added
- Stack corruption fixed
- More precise Belt test (MK3S/MK3)
- Octoprint causing M112 fixed
Установка программного обеспечения
Для работы 3D принтера необходимо скачать и установить следующее программное обеспечение:
- Драйвер виртуального COM-порта
- Управляющая программа Repetier-Host
- Настройки слайсеров и принтера
Некоторые антивирусные программы могут ложно срабатывать на файлы из сети. В таком случае выключите антивирус на время установки.
Последовательность установки
- Сначала установите драйвер — скачайте и запустите от имени Администратора (правая кнопка мыши «запуск от имени Администратора») файл serial_install.exe(примечания и установка на 64 битные системы ниже)
После установки драйвера подключите принтер к USB порту компьютера, он найдет устройство и определит ему COM-порт.
— - Скачайте и установите программу Repetier Host. Вместе с ней установятся необходимые программы, в том числе и программы-слайсеры.
Во время установки рекомендуем отключить установку «Server», т.к. для работы он не нужен и может помешать нормальной работе.
— - Установите настройки для Вашего принтера.
Вместе с настройками будет установлен исправленный русский интерфейс, скрипты и ссылка на раздел помощи.
Обратите внимание! Профили слайсинга «Magnum 3D» и «Magnum 3D Vase» будут перезаписаны! Если Вы делали изменения в них и хотите их сохранить, то просто переименуйте их в слайсере перед установкой.
—
Установка на 64-х системы Windows 7 и выше
Установка на такие системы требует подписанного драйвера.
Перезагрузите компьютер, при загрузке нажмите F8 и выберите вариант
Отключить принудительное подписание драйверов
Установите драйвер как написано в пункте №1. Перезагрузитесь в обычный режим.
Установка на 64-х системы Windows 10
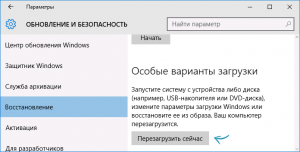
Зайдите меню пуск в «Параметры» — «Обновление и безопасность» — «Восстановление». Затем, в разделе «Особые варианты загрузки» нажмите «Перезагрузить сейчас».
После перезагрузки, пройдите по следующему пути: «Диагностика» — «Дополнительные параметры» — «Параметры загрузки» и нажмите кнопку «Перезагрузить». После перезагрузки появится меню выборов параметров, которые будут использоваться в этот раз в Windows 10.

Для того, чтобы отключить проверку цифровой подписи драйверов, выберите соответствующий пункт, нажав клавишу 7 или F7. Готово, Windows 10 загрузится с отключенной проверкой, и вы сможете установить неподписанный драйвер.
Альтернативный способ установки драйвера
Этот способ рекомендуется при подключении к 64 битным системам, если у Вас не получилось установить драйвер по инструкции выше.
При подключении принтера к компьютеру для неизвестного устройства USB Serial надо выбрать драйвер самому — в разделе Модемы выбрать Compaq а потом устройство Ricochet Wireless USB Modem.
Prusa i3 драйвер windows 10
DRracer released this Apr 16, 2021
Summary
- Support for a GD external FLASH chip
- Reservation in the EEPROM for job ID tracking
- XYZ calibration algorithm improved
- Bug Fixes
This is the second release candidate of the upcoming firmware 3.10.0 with multiple optimizations to the code.
Support for a GD external FLASH chip
As mentioned in the previous firmware releases, the Covid-19 virus is negatively impacting worldwide supplies, and to be able to ship the printers continuously without any significant delay, we have started to look for alternative verified suppliers of the most critical parts.
In this release, we are extending system support for external FLASH chip GD25Q20CEIGR from company GigaDevice to ensure our production of Einsy boards remains unrestricted. For the user, there is no impact on the functionality of the printer, everything remains the same.
Reservation in the EEPROM for job ID tracking
For the host software, there is now a reserved space in the EEPROM to track/identify the print job. Even if the SD card or Raspberry Pi becomes unresponsive, the job ID will prevail. The 4-bytes variable in EEPROM is named «EEVAR_HOST_JOBID». Host software can manipulate the EEPROM variable via D3 commands.
XYZ calibration algorithm improved
During extensive internal testing of the XYZ calibration, it was discovered that in certain rare scenarios the data provided by the sensor are not handled correctly. The developers have improved the algorithm and if this scenario happens, the scan of the recent calibration points is automatically repeated.
Bug Fixes
Incorrect G-code reading from a buffer
There was a bug in the new G-code reading code, which could stop the print in progress. In some scenarios, the system would insert a new line ‘\n’ into the current cached block of the G-code file and change the G-code line syntax. Kudos to @lhecker for reporting the issue and providing a good test case (fixes issue #3077).
«Time Remaining» function bug fixed
If the printer receives G-code “M73 C0”, it disables switching between “Time to finish” and “Time to color change”. However, this caused an issue during the last minute before the color change, when the printer stopped switching between these two values completely.
To avoid this scenario, the firmware was adjusted. It is advised for the slicer software to use a floating-point value for the last minute before the color change (e.g. M73 C0.1) which is technically greater than zero and enables the function to work correctly.
M120 and M121 disabled
From now on, G-codes M120 and M121 have been disabled as they do not function correctly and cause issues when used in the G-code file. If necessary, advanced users can enable them in the FW code and recompile.
Crash detection during MBL
Normally, if prior to Mesh Bed Leveling (MBL) a crash on the Y-axis is detected, the MBL is repeated again and print coordinates are verified, then a purge line is printed. In some scenarios starting firmware 3.9.0 (previous releases are not affected), the purge line was incorrectly placed in the center of the sheet, now this is fixed and the purge line is correctly placed in the front-left position.
DRracer released this Mar 18, 2021
Summary
- New «Print from SD» menu
- «Time Remaining» function improved
- Community translations
- Faster and quieter XYZ calibration
- PVB preheat preset
- G-code «M204 T» implemented
- Optimizations for the MK3 filament sensor
- DEDGE support enabled for TMC2130
- Improved filament troubleshooting
- Support for 0.8mm nozzles
- Optimizations for print hosts (e.g. Octoprint)
- Optimized code size and RAM usage
- Bug fixes
This is the first release candidate of the upcoming firmware 3.10.0 with multiple optimizations to the code.
New “Print from SD” menu
The «Print from SD» menu was rewritten entirely. It is much more responsive when many files need to be displayed. This was accomplished by caching the file positions in memory during sorting. The menu isn’t blocking anymore, so G-code commands can still be processed while the filename is scrolling on the screen. This should improve host software functionality and compatibility.
When the «FlashAir» mode is enabled (for SD cards with Wi-Fi) in the settings menu, a new menu button appears above the files and folders. It causes the menu to sort all items in the current directory again. This is useful when a file uploaded to the FlashAir card doesn’t appear on the uppermost line — the user doesn’t have to reset the printer or disconnect and reconnect the card.
Sorting is improved compared to the previous firmware releases. In general, Alphabetical sorting is now 10-15 % faster. Sorting of the files by time-stamp is now almost 2-4x faster.
«Time Remaining» function improved
Until now, the firmware was only able to display how much time remains until the print is finished. There were multiple suggestions from the community on further improvements. Starting this release, the developers have implemented the first stage. However, to make the function work correctly, the PrusaSlicer dev team also needs to publish a new release because the G-code instructions must be updated.
Once both firmware and PrusaSlicer are updated, the «remaining time» will work the following way. The printer will switch every 5 seconds between «remaining-printing-time» and «time-to-next-color-change.» Therefore the user will be informed in advance when the next filament change is expected.
G-code M73 has been extended with two parameters: C (for normal mode) and D (for stealth mode). Until now, the PrusaSlicer produced pairs of lines in the form of (example):
M73 P15 R30
Once this feature is fully implemented, the code will look as follows:
M73 P15 R30 C15
This means a color change is planned in 15 minutes in normal mode. Note that this feature is still a «work in progress,» and there might be some changes before the final release. In case you would like to try this feature now, you can edit the G-code manually using the code mentioned above. Adjust the parameter «C» according to your model’s requirements.
Community translation
Thanks to the modifications to the part of the system responsible for storing the language dictionaries on the printer (XFLASH), the firmware can now extend the library of the official languages by loading new translations made by the community.
Our first addition is Dutch, which is fully translated thanks to @3d-gussner and @vintagepc. To select this language and other new translations in the future, please head to the LCD menu -> Settings -> Select language -> Community made. In this release, the only option is «Nederlands.»

We welcome everyone to join us and localize the printer to their native language. In case you would like to translate and maintain the translations, contact us at info@prusa3d.com
Along with the community translations, the officially supported languages were updated.
Faster and quieter XYZ calibration
As noted in the previous release notes, the algorithm behind the XYZ calibration was almost completely rewritten, but developers are still looking for improvements. This release brings a bit faster, more precise, and also quieter calibration. The algorithm has both improved acceleration handling and a more robust scan (circle search).
Another improvement to the XYZ calibration is the skew analysis. Previously, the user was informed on the screen about the measured skew. Starting with this firmware release, the calibration values can also be accessed over the serial line for advanced diagnostics if anything goes wrong.
PVB preheat preset
In the preheat preset menu a new entry for PVB filament has been added, with temperatures 215 °C / 75 °C. To learn more about PVB material, visit the blog article.

G-code «M204 T» implemented
Another extension of the G-code support is an implementation of «M204 T», which enables separate acceleration control of travel moves (now separated from the print moves). With this change, the syntax and behavior of M204 are now identical to Marlin 2.
A separate travel acceleration setting allows reducing the number of instructions required while printing. Resetting the acceleration just for travel moves is no longer required and can be done a single time during the print.
M204 has two forms:
the legacy format:
M204 S[print-acc] T[retract-acc]
the newer format:
M204 P[print-acc] R[retract-acc] T[travel-acc]
The distinction is made based on the presence of the P parameter. If P is included in the G-code, the new format is used. To keep backward compatibility, the «M204 S[acc]» will set both print and travel acceleration, which is identical in behavior to existing firmware versions. M500 and M503 will now also report settings using the «new format.»
For more information, see the PR #2838
Optimizations for the MK3 filament sensor
The PAT9125 on the MK3 is attached to the hardware SDA/SCL pins, however, it was using a software two-wire interface (TWI) implementation.
The code now includes the PAT9125_I2C configuration option (enabled by default) to use the hardware TWI module in 400kHz fast mode instead. The change saves a few bytes in all variants while also improving the performance of optical filament sensor checks in the MK3.
For more information, see the PR #2814
DEDGE support enabled for TMC2130
The Trinamic driver TMC2130 supports Double Edge stepping (DEDGE) where both the rising and falling edge of the step pin count as a step instead of requiring a full cycle.
Using DEDGE is beneficial — it removes one extra toggle for each step pulse (plus a delay, in some circumstances), saving a few µs in hot code paths while stepping.
This release introduces 2 macros to step: STEP_NC_HI and STEP_NC_LO. In legacy mode, both perform as their name implies. In DEDGE mode instead, STEP_NC_HI inverts the line, while STEP_NC_LO becomes a no-op. Both modes are still fully supported, but DEDGE is now enabled by default in all supported variants. The macros are specialized for each axis and still respect INVERT_?_AXIS as defined in the variant file.
Additionally, the firmware introduces a few constant definitions for the delays required by the TMC2130 and uses them when appropriate instead of hard-coding delays:
- step pauses (2µs minimum)
- direction changes (100µs minimum)
Existing code that was manipulating the pins directly has been changed to use either the macros or the helper functions defined in tmc2130.h. We also fixed the behavior of TMC2130_INTPOL_* (which was previously ignored) in the variant files.
Note that this feature will only be present on MK3, MK3S and MK3S+ printers.
For more information see the PR #2789
Improved filament troubleshooting
When using the Settings->Move->Extruder menu the filament sensor is now temporarily ignored.
Thanks to this change, it is now possible to use the Move menu to control the extruder while trying to perform a manual filament swap, (e.g. when trying to clear a filament clog or when untangling a stuck flexible filament). There is no need to use the filament-change procedure, which was sometimes used by the users instead to fix the issue.
For more information, see the PR #1758
Support for 0.8mm nozzles
A new 0.8mm nozzle preset has been added to the firmware in the “HW setup” section. The user can set the printer to verify whether the G-code was sliced correctly for the selected nozzle diameter. Currently available sizes are 0.25, 0.4, 0.6 and 0.8 mm.
Optimizations for print hosts (e.g. Octoprint)
To improve the experience while printing using a remote host, there are several changes and optimizations in this release.
G-code M155 support
The firmware introduces support for an M155 G-code (Automatically send temperatures) which creates the same output as M105 (Get Extruder Temperature), but it provides it automatically without the need to periodically receive M105 G-code from Octoprint or other serial devices.
Implementation:
Added G-code M123 to show fan speed tacho and PWM values
Extended Capabilities in G-code M115
AUTOREPORT_FANS
AUTOREPORT_POSITION
Added parameter C to G-code M155 to de-/activate auto report output using a bitmask
SD card status send automatically
Previously the firmware didn’t always properly report the current SD card status over the serial line. This is now fixed and the firmware reports three statuses: Insert, Eject and Error.
Host Long File Name (LFN) improvements
Under the hood, the SD FAT implementation in the firmware only uses 8.3 DOS filenames. This is fine when they’re internal to the firmware, but this has the side effect of requiring Host software to work with 8.3 filenames (SFN) exclusively. To address this limitation, a few changes to existing G-codes are proposed. If these G-codes are used correctly, the Host software can build the full file tree with both SFN and LFN, while also knowing how to start an SD print with M23 (which still requires SFN).
The affected G-code commands are M20 and M27. More info about what was changed can be found in these two pull-requests:
LCD status over UART
When the LCD status changes, the printer will send an «LCD status changed» message to the serial line.
Add printer sleep information to the M115
Extended printer status information by reporting «Print paused» on the serial line as a response to an M115 G-code.
Serial number in EEPROM
It was impossible to retrieve the serial number from the 32u2 IC when the USB cable was unplugged. With this fix, the serial number is cached to EEPROM at startup to have it available at all times even if the USB is not powered. This should also allow a connected RPi to be able to retrieve it.
Printer state in INFO string
Extending printer status information by «Print paused» in serial line as a response for received M115 G-code.
IP address in the Support menu
Previously, when an IP address was assigned to the host/printer, it was displayed on the status screen. However, it was often rewritten by other status information from the system seconds later. In this release, the IP address will be also displayed in the LCD menu -> Support Menu. In case the FlashAir SD card is used, both IP addresses will be displayed.
The host must send it to the printer in the following format:
M552 P192.168.1.14
Note that the IP address is used as an example — yours might be different. The printer remembers the IP address until the restart.
Pause/Resume functions improved
Until this release, the host and the printer weren’t always correctly synced while a Print/Pause/Resume/Stop was applied either in the host interface or directly on the printer using the knob. Now, the user can control the printer from both places without the risk of a print failure. The printer and the host are actively communicating and exchanging information.
Examples of the shared information:
- print: // action:pause
- print: // action:resume
Support for G-codes with thumbnails
There have been significant improvements to how fast G-code files are processed (almost 10x increase) when reading from the SD card, specifically when processing comment lines. This allows for a fast skipping of large comment blocks (especially PNG thumbnails) throughout the file.
This has resulted in several improvements:
- Sliced G-codes for 8bit printers can now contain thumbnails
- The file check right before the start of an SD print is much faster
- More of the (limited) CPU power is now available for other tasks like stepping the motors, linear advance and other core runtime features
The firmware is now able to skip through commented lines at speeds reaching 170 KB/s (the raw read speed of the SD card in SPI mode has a maximum of approximately 250 KB/s). The average PNG thumbnail is less than 100 kB, so skipping over this should take less than a second.
Of course, it is possible to generate many big thumbnails in the G-code. In such a situation, starting the print will take several seconds (based on the size of comment lines you put in). However, it will not crash anymore.
Existing Octoprint plugins which extract thumbnails from the G-code should still work, as there were no changes to the G-code format.
M601/M602 confirmation statuses fixed
Fixed missing “Ok” in M601 and double “Ok” in M602 on the serial line.
Optimized code size and RAM usage
By removing string literals from RAM, the memory usage was decreased below 6 KB. As a result, firmware 3.10.0 can now perform better under certain scenarios.
A lot of old code that was related to serial output or LCD rendering was improved. There were many cases where PROGMEM wasn’t used or string literals were used for a single character. Some locations were updated to use the appropriate function for generating many spaces on the LCD, as opposed to saving a string consisting only of spaces to PROGMEM.
The developers have also refactored some of the serial messages to use fewer function calls (resulting in reduced flash usage). Similarly, some of them were packed to a single printf_P call.
Bug fixes
M0/M1 Stop/Halt not displaying text/waiting for input fixed
Fixes M0 and M1 commands:
- G-code M1 must have a string, while in M0 it is optional
- G-codes M0/M1 were moved to the beginning of the parser to allow reading “M1” first instead of M1nn.
The parser would not be able to «find» M1nn command if the query was “M1 “ instead of “M1” (space behind) to be able to «stop/halt» without sending a string and displaying the default message.
- Use G-code M0 as there are no M0nn G-codes the parser can identify M0 without additional space needed as in M1
- M0/M1 with parameters P or S will NOT show any text as mentioned in #2055 (comment)
In Octoprint, M0 or M1 should not be in «Pausing commands» as these are NOT pause commands — they stop/halt/sleep the printer. Addressing few requests from #2055. Thanks to @vojtech-pavlik and his PR #1900, which we merged with a few improvements.
It is important to note that G-code M0/M1 stops/halts the printer! If you need a pause, please use M601.
Sensor info screen blocking the function of filament IR sensor fixed
Now the function of the filament sensor is not blocked during print if in Support->Sensor info screen is displayed. If the printer is idle the filament sensor actions are disabled while in the ‘Support->Sensor info’ menu. This allows the user to troubleshoot this sensor (broken wire, etc).
Fixes issue #1971
Move Z up before XYZ calibration
The X-axis is now raised up prior to the XYZ calibration to prevent scratching the bed, sheet, and nozzle.
Firmware retract (G10/G11) fixed
When using firmware retract (as controlled by M207/M208), G10 would previously save an incorrect offset, resulting in an incorrect “unretract” move on the subsequent G11. The offset is now saved correctly, fixing the behavior of G10/G11.
For more information, see PR #2572
Babystep insertion fixed
This functionality prevents the user from entering Live Z (through long-press or via the menu) while performing mesh bed leveling, homing, or performing individual Z probes via G30. These actions interfere with each other and can result in an incorrect mesh or Z offset.
The firmware now restricts this by setting/checking for the mesh_bed_leveling/homing flag when relevant. The code around Babystep insertion was also cleaned up (notably, the alternative to BABYSTEP_LOADZ_BY_PLANNER was broken and has been removed).
For more information, see PR #3006
DRracer released this Jan 7, 2021
Summary
This is the final release of the firmware 3.9.3 introducing redesigned XYZ calibration. There are no changes compared to the previous release 3.9.3-RC1.
Redesigned XYZ calibration
Starting with the release of the Original Prusa i3 MK3S+ printer there is a new induction sensor called SuperPINDA, which is temperature-independent, features a much higher quality sensor and better quality components overall, plus, it does not need a thermistor. This sensor is a successor to the P.I.N.D.A. v2 (with thermistor) and is compatible with the following printers:
- Original Prusa i3 MK3/MK3S/MK3S+
- Original Prusa i3 MK2.5/MK2.5S
In order to use the full potential of both sensors, this firmware brings a significantly redesigned XYZ calibration. Previously, the data during the calibration were measured in one direction and approximated. Now, for both P.I.N.D.A. v2 and SuperPINDA the new algorithm measures 1024 points (32×32 bitmap) on the heatbed for each calibration point and utilizes z-hop on the Z-axis (multiple distances from the surface). The reason for multiple measurements is to mitigate the effect of the hysteresis* of the sensor. A similar method is used in the Mesh Bed Levelling (MBL).
*Every measurement sensor has its own hysteresis, which can be explained as a memory effect from the previous measurement. If you measure the first point, some of the energy remains in the sensor and affects the value in the second measured point. This effect has to be eliminated to provide accurate data.

Calibration point on the heatbed «as seen» by the printer
From the measured data, the printer now performs a subpixel processing of the scanned 32×32 bitmap and detects very precisely the center of each calibration point. More precise data of the printer’s overall geometry (e.q. axis skew) helps the printer to apply appropriate adjustments resulting in a better print accuracy. Note that this new XYZ calibration requires more time (around 20-25 minutes) to scan and evaluate all the calibration points.
This new method also replaces the last step of the older process, where the exact center of each calibration point was iteratively searched using a cross-search technique. The previous “whole-pixel” search was providing an accuracy of about 0.6 mm. Now, it is less than 0.1 mm thanks to the sub-pixel analysis.
Performing this new XYZ calibration on a calibrated printer is not necessary unless you are experiencing issues with your prints. Note that 3D printers from the MK3 family recognize this new sensor automatically. However, in the case of MK2.5/MK2.5S, the user needs to toggle a switch in the settings menu (LCD Menu -> Settings -> HW settings -> SuperPINDA -> ON/OFF) to inform the printer that the SuperPINDA sensor is present as the printer cannot recognize it automatically.
DRracer released this Dec 26, 2020
Summary
Redesigned XYZ calibration
Starting with the release of the Original Prusa i3 MK3S+ printer there is a new induction sensor called SuperPINDA, which is temperature-independent, features a much higher quality sensor and better quality components overall, plus, it does not need a thermistor. This sensor is a successor to the P.I.N.D.A. v2 (with thermistor) and is compatible with the following printers:
- Original Prusa i3 MK3/MK3S/MK3S+
- Original Prusa i3 MK2.5/MK2.5S
In order to use the full potential of both sensors, this firmware brings a significantly redesigned XYZ calibration. Previously, the data during the calibration were measured in one direction and approximated. Now, for both P.I.N.D.A. v2 and SuperPINDA the new algorithm measures 1024 points (32×32 bitmap) on the heatbed for each calibration point and utilizes z-hop on the Z-axis (multiple distances from the surface). The reason for multiple measurements is to mitigate the effect of the hysteresis* of the sensor. A similar method is used in the Mesh Bed Levelling (MBL).
*Every measurement sensor has its own hysteresis, which can be explained as a memory effect from the previous measurement. If you measure the first point, some of the energy remains in the sensor and affects the value in the second measured point. This effect has to be eliminated to provide accurate data.
Calibration point on the heatbed «as seen» by the printer
From the measured data, the printer now performs a subpixel processing of the scanned 32×32 bitmap and detects very precisely the center of each calibration point. More precise data of the printer’s overall geometry (e.q. axis skew) helps the printer to apply appropriate adjustments resulting in a better print accuracy. Note that this new XYZ calibration requires more time (around 20-25 minutes) to scan and evaluate all the calibration points.
This new method also replaces the last step of the older process, where the exact center of each calibration point was iteratively searched using a cross-search technique. The previous “whole-pixel” search was providing an accuracy of about 0.6 mm. Now, it is less than 0.1 mm thanks to the sub-pixel analysis.
Performing this new XYZ calibration on a calibrated printer is not necessary unless you are experiencing issues with your prints. Note that 3D printers from the MK3 family recognize this new sensor automatically. However, in the case of MK2.5/MK2.5S, the user needs to toggle a switch in the settings menu (LCD Menu -> Settings -> HW settings -> SuperPINDA -> ON/OFF) to inform the printer that the SuperPINDA sensor is present as the printer cannot recognize it automatically.
DRracer released this Nov 10, 2020
Summary
XYZ calibration optimization
Similarly to the previous release 3.9.1, this firmware release further expands support for parts from selected vendors. The XYZ calibration was optimized to work with a broader spectrum of induction sensors.
The functionality of the current sensors remains unchanged.
DRracer released this Sep 21, 2020
Summary
- Major improvements to LA15
- Support for parts from selected vendors
- Ambient temperature check
- PC Blend preheat added
- Stack corruption fixed
- More precise Belt test
- Octoprint causing M112 fixed
This is the final release of the firmware 3.9.1 introducing improved functionality and several bug fixes. These release notes include information provided in the previous release 3.9.1-RC1.
Before we dive into the detailed description, we would like to thank the entire Prusa community for the feedback, and our special thanks go to all active members, who helped us with this firmware release. Your input is very much appreciated!
This release required:
- 350 different samples of print objects
- 1500+ printing hours of the final tests
- 20 pull requests
- 95 commits
- over 20 participating community members
Major improvements to LA15
The Linear Advance 1.5 (LA15) functionality was first introduced in the firmware release 3.9.0 and brought several improvements both to the print speed and quality. However, in certain scenarios, the algorithm didn’t perform as expected during deceleration, leaving artifacts on specific geometries.
The issue was discovered in a bad timer check, which prevented fast LA ticks to be scheduled, effectively limiting LA as speed increased (such as in long stretch of perimeters or during infill) or with shorter intervals due to geared extruders (commit 173aa2d). This also combined with a bad sign check that would cause over-retraction as extrusion speed/nozzle size increased (commits c08f37d & fb5f09d).
Several other tweaks were done to improve the print quality in specific scenarios and also to reduce CPU load allowing for better results with either high-resolution models or faster printing speeds. See PR #2785 for a detailed list.
After several weeks of tests and hundreds of printed objects, it was clear that aside from fixing the above-mentioned issues, the K-factors also needed adjustments. This has affected not only the LA15 K-factors but also the “LA10 to LA15” conversion curve. Here are the most important changes:
- The start K-factor is now K10 => K0.01 (the previous minimum was K15)
- For PLA K30 => K0.05 (previously K=0.07, optimal range is 0.045-0.06)
- For PETG K45 => K0.08 (previously K=0.13, optimal range* is 0.07-0.11)
*Based on the observations, the PETG optimal K-factor values depend greatly on the material composition (e.g. Prusament PETG differs from other PETG material) and also the temperature of the hotend/nozzle plays an important role. More information below.
The G-codes sliced in PrusaSlicer since March of 2020, might include K-factors for LA15, which are updated with this release. Therefore it is strongly recommended to update the G-codes from this time period. First, make sure you are running the latest PrusaSlicer and print profiles, then you have two options:
- Use the original model (.stl. .3mf) and reslice it again.
- Open the G-code in a text editor and change the values for M900.
Example of PETG:
Replace all M900 K0.13 with MK900 K0.08
Older G-codes with Linear Advance 1.0 (K-factors greater than 10) remain unaffected and will be converted correctly to the LA15 using the new conversion curve.
The results of our research can be seen in the two pictures below, the first with blue test objects is representing the PLA material with two different K-factors. Setting the K-factor too high can lead to missing material or distorted corners in certain geometries.

An even stronger effect of the K-factor can be seen while experimenting with the PETG. The picture below shows the corners of four different boxes printed with individual K-factors. Even a relatively small numerical change (0.12 vs 0.08) can have a great effect on the final print quality.

We will continue testing improving the LA15 and its capabilities and for most of the cases, the firmware together with the PrusaSlicer should provide correct parameters. Therefore no user calibration is needed.
However, we can’t test every available material on the market. In case you are using exotic material, or you are unsatisfied with the print results, we have created calibration patterns, which are used to help you select the most suitable K-factor for a given scenario. To learn more about the K-factor calibration, please visit our article at help.prusa3d.com.
Support for parts from selected vendors
The Covid-19 virus is negatively impacting worldwide supplies and in order to be able to ship the printers continuously without any significant delay, we have started to look for alternative verified suppliers of the most critical parts. This has an impact on the firmware, which must be capable of automatic detection and adjustments based on the used part.
One example is the hotend cooling fan, located on the side of the MK3S extruder. Because different fans from different manufacturers have their own specific speed (RPM) and airflow, starting with this release, the firmware is capable of adjusting the parameters using a technique called pulse-width modulation (PWM). This brings some challenges, which are explained below.
For a printer with stock parts, there are no visible changes to the firmware and no user interaction is needed. When a printer is run for the first time after the assembly, the firmware will automatically detect the fan and set appropriate PWM. This value is stored permanently in the EEPROM memory, stays the same after future firmware updates, and can be only deleted after performing a factory reset.
For modded community printers using different than stock fans, this firmware update will not change anything as stated in the previous paragraph. The only scenario, when the user has to intervene on the modded printer might be after the factory reset when the printer will try to recognize the fan and set the PWM, which might affect the fan’s performance. For this scenario, we have prepared a solution in the form of a hidden service menu.
To turn the PWM off and run the fan on 100 % like in the previous firmware releases, go to LCD menu -> Settings -> HW Setup, then scroll to any menu item and hold the knob for 2-3 seconds. After a “click” sound, the display will flash once and the “service menu” will be opened, where you will see the option “Altfan detection” (Altfan det.) and you can toggle between ON/OFF. Note that setting a custom value of the PWM is currently not possible.
Ambient temperature check (MK3S/MK3)
Every Einsy board is equipped with an NTC thermistor, which is used to measure the surrounding ambient temperature. The sensor is located right above the main power connector at the bottom of the board. This release is introducing two error states, that can occur “AMBIENT_MINTEMP” and “AMBIENT_MAXTEMP”.
The “AMBIENT_MINTEMP” is used to check whether the thermistor works properly ensuring that the second “MAXTEMP” state will be triggered correctly. In a rare case, when this error is displayed, the printer will halt any operation and the Einsy board must be checked by a technician and possibly replaced. Don’t operate the printer, until the problem is resolved.
The “AMBIENT_MAXTEMP” is set to 100 °C, if this temperature is reached, the printer will immediately cut power to the heaters and motors to reduce power draw. Resuming the print is not possible. The only allowed operation is resetting the printer, the user is also highly advised to inspect the board for problems before attempting to continue printing.
PC Blend preheat added
The list of preheat materials is now expanded with the polycarbonate Prusament PC Blend (“PC” in the menu). The default preheat values are 275 °C for the nozzle and 110 °C for the bed. To learn more about this material, please visit our blog article.
Side note to Linear Advance 1.5, the optimal value for this firmware is currently K=0.07, for the previous releases (3.8.1 and 3.9.0) please use the PrusaSlicer profiles, where K=0.09.
Stack corruption fixed
A bug has been discovered in the temperature and filament sensor interrupts that could unpredictably cause the return address to be corrupted and result in a system crash. The root of this issue seems to be the «Static memory overwritten» error messages randomly happening when stepping at high frequency (when ISR is preempted more frequently) and a number of other infrequent and hard-to-reproduce issues such as inexplicable extruder moves.
See PR #2791 for further details.
More precise Belt test (MK3S/MK3)
The Belt test was improved in the previous release 3.9.0 in order to make the measurement process more sensitive and detect any degradation of bearings and rods in the early stages. During the Belt test, the Trinamic stepper motors are supplied by lower current value in comparison with standard operation. The built-in StallGuard function (detecting the movement resistance by an increase of motor current) is, therefore, more sensitive.
This change to the sensitivity might lead to slightly different values measured by the printer compared to measurements done in the past. However, the range is the same as in the previous releases, your printer should be still within 240-300. If your printer measures value below 240, you should check the belt tension first. On an older printer with hundreds of hours of print time, this value indicates your rods and bearings need closer inspection and possibly maintenance.
It is also important to note that the test gives a recommendation, it won’t disable any printing functions, even if the measured values are out of range. To learn more about the Belt test, please visit our article at help.prusa3d.com.
Octoprint causing M112 fixed
The previous firmware versions sometimes incorrectly dropped some parts at the start of communication while connected over a serial line. This resulted in a scenario, where for example the Octoprint evaluated the printer as unavailable and sent G-code M112, which is a full emergency stop. More about the G-code M112 in our article at help.prusa3d.com.
This issue is now fixed and the printer communicates properly over the serial line.
DRracer released this Sep 2, 2020
Summary
- Further improvements to LA15
- Support for parts from selected vendors
- Ambient temperature check
- PC Blend preheat added
- Stack corruption fixed
- More precise Belt test
- Octoprint causing M112 fixed
Further improvements to LA15
The Linear Advance 1.5 was first introduced in the firmware release 3.9.0 and brought several improvements both to the print speed and quality. However, in certain scenarios, the algorithm didn’t perform as expected during deceleration, leaving artifacts on specific geometries.
The issue was discovered in a bad timer check, which prevented fast LA ticks to be scheduled, effectively limiting LA as speed increased (such as in long stretch of perimeters or during infill) or with shorter intervals due to geared extruders (commit 173aa2d). This also combined with a bad sign check that would cause over-retraction as extrusion speed/nozzle size increased (commits c08f37d & fb5f09d).
Several other tweaks were done to improve the print quality in specific scenarios and also to reduce CPU load allowing for better results with either high-resolution models or faster printing speeds. See PR #2785 for a detailed list.
The changes to the algorithm will affect some K-factors in the final release. We are running multiple tests to set proper values. In the case of the PETG, the K-factor was initially set to K=0.12, however, with the adjusted algorithm optimal print results are currently achieved in a range K=0.07 to K=0.1 with dependency on the temperature. The higher the nozzle temperature for PETG, the lower the K-factor (e.g. 260 °C => K=0.07). For other materials like the PLA, the results so far show there is no need for change.
Note that the K-factors are still in development. You can join us in the research by submitting your ideal K-factors with the new firmware 3.9.1-RC1. Once the final values are achieved, the conversion between LA10 and LA15 will be also updated. For the recently sliced G-codes with LA15, there is no need to reslice them, the K-factor can be adjusted manually using a text editor (search for M900 Kx.xx).
While improving the LA15 we have printed multiple samples collected both from the community and our research lab, with the aim to surpass the print quality of both 3.9.0 running LA15 and 3.8.1 running LA10. We will continue pushing the capabilities of the LA15 in this and the upcoming releases.
Support for parts from selected vendors
The Covid-19 virus is negatively impacting worldwide supplies and in order to be able to ship the printers continuously without any significant delay, we have started to look for alternative verified suppliers of the most critical parts. This has an impact on the firmware, which must be capable of automatic detection and adjustments based on the used part.
One example is the hotend cooling fan, located on the side of the MK3S extruder. Because different fans from different manufacturers have their own specific speed (RPM) and airflow, starting with this release, the firmware is capable of adjusting the parameters using a technique called pulse-width modulation (PWM). This brings some challenges, which are explained below.
For a printer with stock parts, there are no visible changes to the firmware and no user interaction is needed. When a printer is run for the first time after the assembly, the firmware will automatically detect the fan and set appropriate PWM. This value is stored permanently in the EEPROM memory, stays the same after future firmware updates, and can be only deleted after performing a factory reset.
For modded community printers using different than stock fans, this firmware update will not change anything as stated in the previous paragraph. The only scenario, when the user has to intervene on the modded printer might be after the factory reset when the printer will try to recognize the fan and set the PWM, which might affect the fan’s performance. For this scenario, we have prepared a solution in the form of a hidden service menu.
To turn the PWM off and run the fan on 100 % like in the previous firmware releases, go to LCD menu -> Settings -> HW Setup, then scroll to any menu item and hold the knob for 2-3 seconds. After a “click” sound, the display will flash once and the “service menu” will be opened, where you will see the option “Altfan detection” (Altfan det.) and you can toggle between ON/OFF. Note that setting a custom value of the PWM is currently not possible.
Ambient temperature check (MK3S/MK3)
Every Einsy board is equipped with an NTC thermistor, which is used to measure the surrounding ambient temperature. The sensor is located right above the main power connector at the bottom of the board. This release is introducing two error states, that can occur “AMBIENT_MINTEMP” and “AMBIENT_MAXTEMP”.
The “AMBIENT_MINTEMP” is used to check whether the thermistor works properly ensuring that the second “MAXTEMP” state will be triggered correctly. In a rare case, when this error is displayed, the printer will halt any operation and the Einsy board must be checked by a technician and possibly replaced. Don’t operate the printer, until the problem is resolved.
The “AMBIENT_MAXTEMP” is set to 100 °C, if this temperature is reached, the printer will immediately cut power to the heaters and motors to reduce power draw. Resuming the print is not possible. The only allowed operation is resetting the printer, the user is also highly advised to inspect the board for problems before attempting to continue printing.
PC Blend preheat added
The list of preheat materials is now expanded with the polycarbonate Prusament PC Blend (“PC” in the menu). The default preheat values are 275 °C for the nozzle and 110 °C for the bed. To learn more about this material, please visit our blog article.
Side note to Linear Advance 1.5, the optimal value for this firmware is currently K=0.07, for the previous releases (3.8.1 and 3.9.0) please use the PrusaSlicer profiles, where K=0.09.
Stack corruption fixed
A bug has been discovered in the temperature and filament sensor interrupts that could unpredictably cause the return address to be corrupted and result in a system crash. The root of this issue seems to be the «Static memory overwritten» error messages randomly happening when stepping at high frequency (when ISR is preempted more frequently) and a number of other infrequent and hard-to-reproduce issues such as inexplicable extruder moves.
See PR #2791 for further details.
More precise Belt test (MK3S/MK3)
The Belt test was improved in the previous release 3.9.0 in order to make the measurement process more sensitive and detect any degradation of bearings and rods in the early stages. During the Belt test, the Trinamic stepper motors are supplied by lower current value in comparison with standard operation. The built-in StallGuard function (detecting the movement resistance by an increase of motor current) is, therefore, more sensitive.
This change to the sensitivity might lead to slightly different values measured by the printer compared to measurements done in the past. However, the range is the same as in the previous releases, your printer should be still within 240-300. If your printer measures value below 240, you should check the belt tension first. On an older printer with hundreds of hours of print time, this value indicates your rods and bearings need closer inspection and possibly maintenance.
It is also important to note that the test gives a recommendation, it won’t disable any printing functions, even if the measured values are out of range. To learn more about the Belt test, please visit our article at help.prusa3d.com.
Octoprint causing M112 fixed
The previous firmware versions sometimes incorrectly dropped some parts at the start of communication while connected over a serial line. This resulted in a scenario, where for example the Octoprint evaluated the printer as unavailable and sent G-code M112, which is a full emergency stop. More about the G-code M112 in our article at help.prusa3d.com.
This issue is now fixed and the printer communicates properly over the serial line.


