- How do I convert a .pem file into a .ppk, and vice versa, on Windows and Linux?
- Short description
- Resolution
- How to covert ppk file to pem file – Linux Private Key?
- What is the purpose of this conversion?
- Please follow the steps pasted below:
- How to install puttygen on Linux machine?
- How to enable key based authentication – Putty
- Post navigation
- Arunlal Ashok
- How to SSH to AWS EC2 Instance from PuTTY using PEM Key Pair
- 1. Download AWS PEM file
- 2. Download PuTTYGen
- 3. Load PEM file to PuTTYGen for Conversion
- 4. Save your Converted PPK Private Key
- 5. Use the PPK File in PuTTY
- 6. PEM and PPK File Formats
- Whats the difference between .ppk and .pem . Where .pem is stored in amazons ec2 cluster?
- 2 Answers 2
- Question #1
- Question #2
- PuTTY : Convert “.pem” file to “.ppk” file – PuTTY Key Generator
- Convert PEM file to PPK file
How do I convert a .pem file into a .ppk, and vice versa, on Windows and Linux?
Last updated: 2020-08-27
How do I convert my Amazon Elastic Compute Cloud (Amazon EC2) Privacy Enhanced Mail (.pem) file to a PuTTY Private Key (.ppk) file? Or, convert a .ppk file to a .pem file?
Short description
PuTTY doesn’t natively support the private key format (.pem) generated by Amazon EC2. You must convert your private key into a .ppk file before you can connect to your instance using PuTTY. You can use the PuTTYgen tool for this conversion.
Resolution
Windows — install PuTTYgen
Most Windows operating systems have PuTTY installed. If your system doesn’t, download and install PuTTYgen.
Windows — convert a .pem file to a .ppk file
Start PuTTYgen, and then convert the .pem file to a .ppk file. For detailed steps, see Convert your private key using PuTTYgen.
Windows — convert a .ppk file to a .pem file
- Start PuTTYgen. For Actions, choose Load, and then navigate to your .ppk file.
- Choose the .ppk file, and then choose Open.
- (Optional) For Key passphrase, enter a passphrase. For Confirm passphrase, re-enter your passphrase.
Note: Although a passphrase isn’t required, you should specify one as a security measure to protect the private key from unauthorized use. Using a passphrase makes automation difficult, because human intervention is needed to log in to an instance or to copy files to an instance. - From the menu at the top of the PuTTY Key Generator, choose Conversions, Export OpenSSH Key.
Note: If you didn’t enter a passphrase, you receive a PuTTYgen warning. Choose Yes. - Name the file and add the .pem extension.
- Choose Save.
Unix or Linux — install PuTTY
Install PuTTY, if it’s not already on your system.
Important: The Extra Packages for Enterprise Linux (EPEL) repository contains the PuTTY package. You must enable the EPEL repository before you install PuTTY.
To install PuTTY, run one of the following commands:
Unix or Linux — convert a .pem file to a .ppk file
On the instance shell, run the puttygen command to convert your .pem file to a .ppk file:
Unix or Linux — convert a .ppk file to a .pem file
Run the puttygen command to convert a .ppk file into a .pem file:
How to covert ppk file to pem file – Linux Private Key?
What is the purpose of this conversion?
Yeah, that’s nice!! Sometimes we need this conversion, if you have Linux and Windows OS on your PC/Laptop. Consider the scenario, you have servers on your AWS account and you downloaded the key on your Windows machine and now you wanna access the server from your Linux machine.
The key you downloaded on your windows machine should be in .PPK format, that you using in your Putty for accessing remote AWS server.
Here we need to convert the .PPK key to .PEM format. So that you can use the same key to access remote machine.
Please follow the steps pasted below:

Step 1: Copy the .PPK key to your Linux machine.
Step 2: Make sure that putty-tools is installed on your Linux machine.
Step 3: The command line tool “puttygen” is required to convert the private key format.
How to install puttygen on Linux machine?
Step 4: Use the following command:
Step 5: Converting PPK file to PEM file
Here “ppkkey.ppk” is the private key which you copied from the Windows machine.
And “pemkey.pem” is the new key in PEM format.
Step 6: Change the permission to 600.
Step 7: Place the pemkey.pem file in your
Step 8: Another way to use the key:
How to enable key based authentication – Putty
It’s time that I had to write a post about this, connecting to Linux server from Windows using Putty via public key. It’s very simple to connect using keys and also it’s highly secure. Putty is the client to connect to Linux based servers from your Windows machine. Here I’m explaining how to generate Key in windows using Putty and how to setup your machine to connect to Linux servers automatically. Read more…
Post navigation
Arunlal Ashok
SRE at NewFold Digital. Linux lover. Traveller. Father of two princesses.
Always happy for an open discussion! Write to arun ((@)) crybit ((dot)) com.
How to SSH to AWS EC2 Instance from PuTTY using PEM Key Pair
In AWS, when you launch any EC2 Linux instance, you should select a key pair for that particular instance.
AWS key pair will be in the standard private key format with .pem file extension
But if you are using PuTTY on your Windows laptop to login to AWS instance, you have a problem.
PuTTY doesn’t support PEM format. PuTTY understands only it’s own PPK format.
PPK stands for Putty Private Key.
So, you should convert your .pem file to .ppk file.
For this conversion, putty provides a tool called PuTTYgen.
1. Download AWS PEM file
In AWS, when you first create a key pair file, that you want to use for your EC2 instances, AWS will allow you to download the PEM file to your local machine. Save this PEM file somewhere on your machine.
In this example, the .pem file I have is called thegeekstuff.pem, which is under C drive.
We’ll be converting this thegeekstuff.pem file to thegeekstuff.ppk and use the .ppk to login to EC2 instance using PuTTY.
BTW, the steps to convert pem to ppk for putty is exactly the same for all the Linux AMI images, including CentOS, RedHat, Ubuntu, SuSE, Fedora, Amazon Linux, etc.
2. Download PuTTYGen
Download PuTTYgen from here.
If you’ve used the PuTTY MSI installer, then all the PuTTY utilities comes with it including puttygen.
If you are already using only putty.exe as a standalone, then you can also download the standalone puttygen.exe
Launch PuTTYgen by double clicking on it.
PuTTYGen is a RSA and DSA key generation utility. But, in our case, we’ll be using this to convert the pem to ppk file.
The main PuTTYGen screen will have the following three sections:
Key Section: This will display the current key that is loaded. i.e The key that you are currently working on. When you first launch the puttygen, this section will say “No Key”.
Actions Section: This section will display all the possible actions that you can perform inside PuTTYGen. The following are the available actions:
- Generate – This will let you generate a brand new public/private key pair
- Load – If you already have an existing private key, you can use that by loading it here
- Save – Once you’ve generated a new key, or loaded an existing key, you can save either the public-key or the private-key to your local machine. Initially the save buttons will be disabled, as we have not loaded a key yet.
Parameters Section: Here you’ll specify the type of key to generate. You have three options here: SSH-1 (RSA), SSH-2 (RSA), SSH-2 DSA. You can also set the value of number of bits for the generated key. By default the type will be SSH-2 (RSA) and 2048-bit.
For our purpose of converting PEM to PPK, leave all the parameters at their default value. i.e SSH-2 (RSA) and 2048 bit.
3. Load PEM file to PuTTYGen for Conversion
In the following PuTTYGen main screen, click on “Load” button, and select your AWS PEM file.
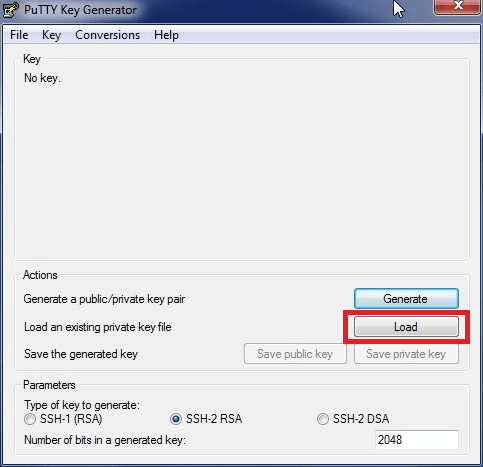
Please note that when you click on “Load”, in the file selection window, by default, it will show “PuTTY Private Key Files (*.ppk)” as the option. Click on this drop-down list and choose “All Files” as shown below. After this, you can browser to the directory where you *.pem file is located, and load it.

Once the *.pem file is loaded, you’ll get a pop-up message saying “Successfully imported foreign key (OpenSSH SSH-2 private key)”. Click on “OK” in this screen.
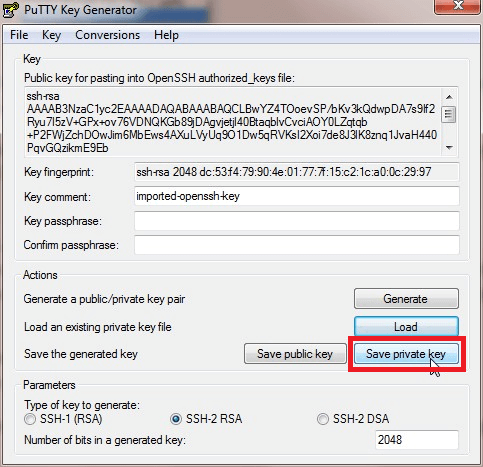
4. Save your Converted PPK Private Key
Now that we have the keys loaded, you’ll see in the top “Key” section, our key information will be displayed. This will display the key fingerprint, key comment. The key passphrase in this case will be empty, as we didn’t have any passphrase for our AWS PEM file in this example.
Also, in the action section, we’ll see the save button enabled.
Click on the “Save Private Key” button, to save our converted ppk private key.
This will display a warning message saying: “Are you sure you want to save this key without a passphrase to protect it?”. Click on “YES”.
Now, give a name to this file. In our case, I’ve named this converted file as thegeekstuff.ppk
5. Use the PPK File in PuTTY
Now, that we have the thegeekstuff.pem AWS PEM file converted to thegeekstuff.ppk PuTTY key file, we can use this to login to our AWS EC2 instance.
For this, launch the putty, and do the following:
First, in the “Host Name (or IP address)” field, enter the public-dns or ip of your AWS EC2 instance.
Second, in the “Saved Sessions” field, enter the name that you would like to give for this AWS-EC2-instance on your putty, and click on “Save” to save this sessions in your putty list.
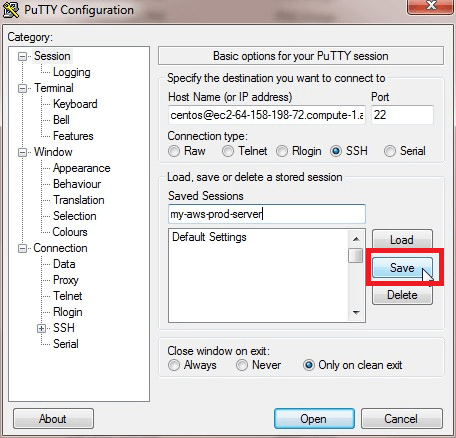
Third, on the left-hand side panel, expand the “Connections” -> expand “SSH” -> select “Auth”. Click on “Browse”, and select your converted ppk file for the “Private key file for authentication” as shown below.

Fourth, at this stage you can click on “Open” to start the connection, but you’ll lose the values that you just entered. So, on the left-panel click on “Sessions” again, and click on “Save” again. This will save the information about the private key that you provided to the putty-session that you saved earlier.
6. PEM and PPK File Formats
Once you’ve converted the file, you can view the content of PEM and PPK file in a text editor, and you’ll see that the content looks different, as they are of different formats.
Whats the difference between .ppk and .pem . Where .pem is stored in amazons ec2 cluster?
I am using Amazon’s EC2 cluster for running GraphLab. They want the location of my .pem file, which is my private key.
After searching I still I could not find the file in ubuntu. I am using PuTTY.

2 Answers 2
.pem file is what you have download from AWS when you created your key-pair. This is only a one time download and you cannot download it again.
Your software is asking for .pem file. Now you are the one who needs to locate that file. You might have downloaded it on you laptop/desktop. etc.
As I said above, .pem is not saved anywhere on EC2. It is a one time download and you have to keep it safe.
For Putty (windows ssh client), it does not support .pem format. Hence you have to convert it to .ppk format using PuTTyGen. Its essentially .pem but in a different format so that Putty can work with it.

You have two questions here. I know I am late on answering this but I’ll proceed anyway.
Question #1
Whats the difference between .ppk and .pem?
The .pem and .ppk files are similar because they are both private key file formats. The .pub file counterpart is the public key file format — but that is a different story.
The differences between .pem and .ppk are the following:
.pem is kind of the de facto standard
- Linux BASH users — .pem file format
- Mac BASH users — .pem file format
- Windows/Linux/Mac PowerShell users — .pem file format
- Windows PuTTY/Cygwin users — .ppk file format
.pem
.ppk
Question #2
Where .pem is stored in amazons ec2 cluster?
In AWS, the .pem files are not directly stored to a single machine.
You can get the .pem file either by:
Starting a new instance
When you create an EC2 instance, you will be given a default .pem file where you can use to access the new instance.
Creating a new .pem file through IAM
PuTTY : Convert “.pem” file to “.ppk” file – PuTTY Key Generator
PEM to PPK file conversion is the first thing we need to do, in order to connect to the Host System with existing PEM file, using PuTTY. As PuTTY doesn’t support Privacy Enhanced Mail (.pem) file; this file has to be first convert to PuTTY Private Key (.ppk) file which is the PuTTY’s native format to store private key information.
Through this Article we are going to discuss the steps, to convert PEM (Privacy Enhanced Mail) file to PPK (PuTTY Private Key) file. These two formats are used to store private key details.
- This article applies to Windows 7 OS & Windows 10 OS
Convert PEM file to PPK file
Assuming, you have installed PuTTY on your Windows System. If not it already installed, you can download it from here.
Step 1. Open PuTTYgen tool. This will display “PuTTY Key Generator” window.
 PuTTYgen
Step 2. PuTTYgen tool is used to generate the new key file(s) or convert the key file(s) to PPK – PuTTY’s own format. Click on Load button to load the PEM file, what you have already on your System. PuTTYgen will open “Load private key:” dialog.
Step 3. From the “Load private key:” dialog, select the “All Files (*.*)” entry from the combo box next to the “File name:” field. And then navigate to the folder location where you saved PEM file and select the file. PuTTYgen will display the below dialog:
—————————
PuTTYgen Notice
—————————
Successfully imported foreign key
(OpenSSH SSH-2 private key (old PEM format)).
To use this key with PuTTY, you need to
use the “Save private key” command to
save it in PuTTY’s own format.
—————————
OK
—————————
Step 4. After clicking OK button, key details are populated in “Key fingerprint:” and other fields . Also observe that “Save public key” and “Save private key” buttons are enabled.
PuTTYgen – Loaded Key details
Step 5. Select RSA option from the “Parameters” group. By default 2048 is the value will be there in “Number of bits in a generated key:” field. Keep the same value.
Step 6. Now we are ready to save the loaded key details into PPK format. Click on “Save private key” button. PuTTYgen will open “Save private key as:” dialog allows to save the file.
Step 7. Observe that “PuTTY Private Key Files (*.ppk)” entry already selected in “Save as type:” combo box. Provide the file name in “File name:” field and click on Save button to save the file. PuTTYgen will display the below warning message:
—————————
PuTTYgen Warning
—————————
Are you sure you want to save this key
without a passphrase to protect it?
—————————
Yes | No
—————————
Step 7. Click on Yes button to save the PPK file.
Now we have PPK file from PEM file. Using this PPK file, we can connect to the Host System, where this key is valid.


