Identify the ports on your Mac
If you’re not sure which port to use with your external display, hard drive, camera, printer, iPhone, iPad, or other device, the port shapes and symbols in this guide should help.
Information about these and other types of Mac ports is in the specifications for your Mac: Choose Apple menu > About This Mac, click Support, then click Specifications. Or check your Mac user guide.
Thunderbolt / USB 4
These Mac models have Thunderbolt / USB 4 ports:
You can connect a single external display and other devices that connect using either a Thunderbolt 3 cable or USB-C cable. You can also connect a USB-C charge cable to charge your notebook, or a USB-C to Lightning cable to charge your iPhone or iPad. If you have a device that doesn’t connect to this port, you might be able to use an adapter to connect it.
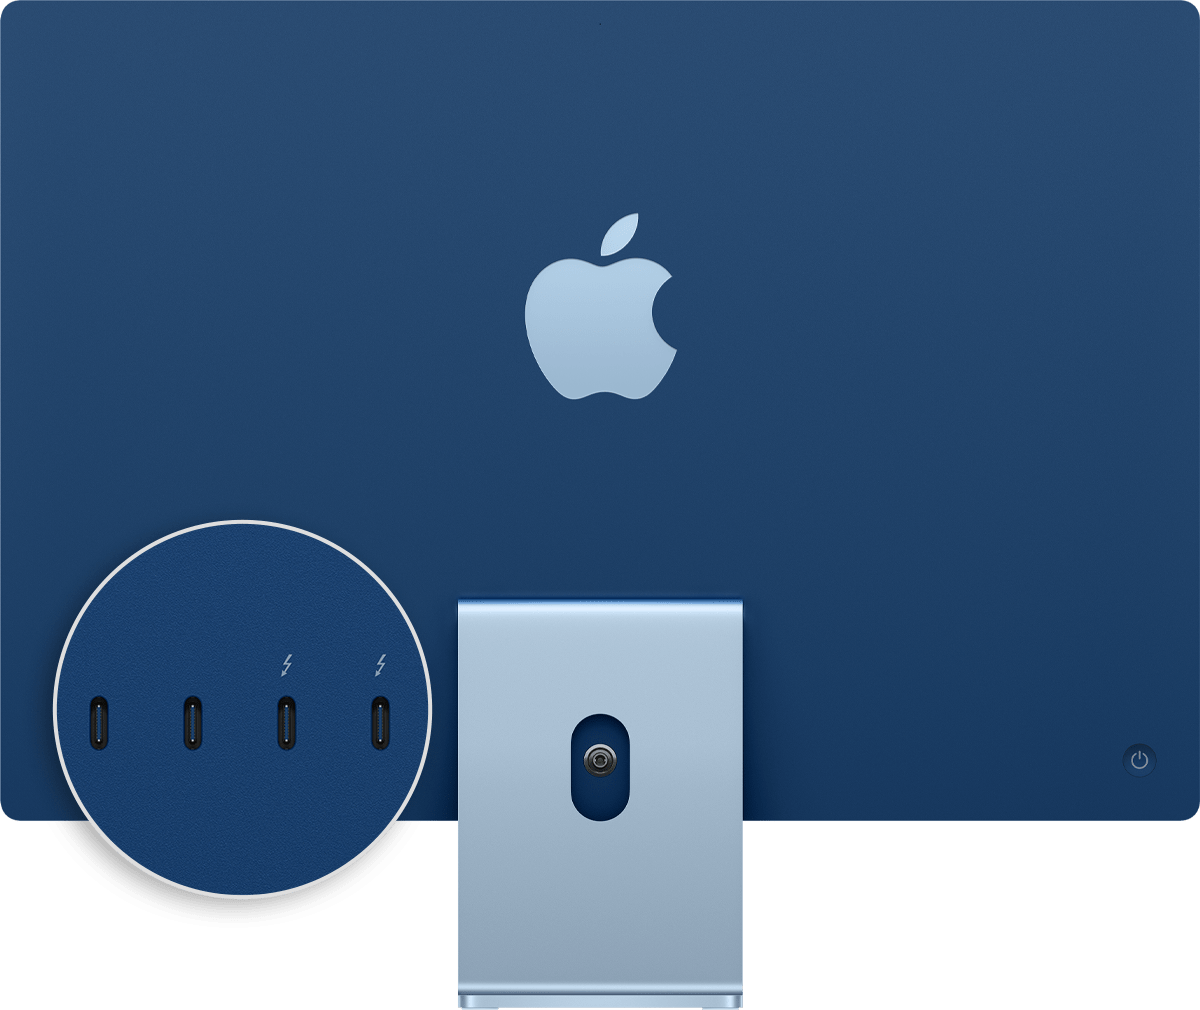
On iMac (24-inch, M1, 2021), the symbol appears above each Thunderbolt / USB 4 port. To connect a display, use either of the ports with the Thunderbolt symbol .

Thunderbolt 3
These Mac models have Thunderbolt 3 ports:
- iMac (Retina 5K, 27-inch, 2020)
- iMac (Retina 5K, 27-inch, 2019)
- iMac (Retina 4K, 21.5-inch, 2019)
- iMac (Retina 5K, 27-inch, 2017)
- iMac (Retina 4K, 21.5-inch, 2017)
- iMac (21.5-inch, 2017)
- iMac Pro
- Mac Pro (2019)
- Mac Pro (Rack, 2019)
- Mac mini (2018)
- MacBook Air (Retina, 13-inch, 2020)
- MacBook Air (Retina, 13-inch, 2019)
- MacBook Air (Retina, 13-inch, 2018)
- MacBook Pro (13-inch, 2020, Two Thunderbolt 3 ports)
- MacBook Pro (13-inch, 2020, Four Thunderbolt 3 ports)
- MacBook Pro (16-inch, 2019)
- MacBook Pro (13-inch, 2019, Two Thunderbolt 3 ports)
- MacBook Pro (15-inch, 2019)
- MacBook Pro (13-inch, 2019, Four Thunderbolt 3 ports)
- MacBook Pro (15-inch, 2018)
- MacBook Pro (13-inch, 2018, Four Thunderbolt 3 ports)
- MacBook Pro (15-inch, 2017)
- MacBook Pro (13-inch, 2017, Four Thunderbolt 3 ports)
- MacBook Pro (13-inch, 2017, Two Thunderbolt 3 ports)
- MacBook Pro (15-inch, 2016)
- MacBook Pro (13-inch, 2016, Four Thunderbolt 3 ports)
- MacBook Pro (13-inch, 2016, Two Thunderbolt 3 ports)
Use these ports with displays and other devices that connect using either a Thunderbolt 3 cable or USB-C cable. You can also connect a USB-C power adapter and cable to charge your notebook computer. If you have a device that doesn’t connect to this port, you might be able to use an adapter to connect it.

If your Mac notebook or desktop computer has more than one port like this, each port supports Thunderbolt 3 and USB-C.
USB 3
These Mac models have USB 3 ports:
- iMac (24-inch, M1, 2021) with four ports
- MacBook (Retina, 12-inch, 2017)
- MacBook (Retina, 12-inch, Early 2016)
- MacBook (Retina, 12-inch, Early 2015)
On MacBook, use this port with displays and other devices that connect using a USB-C cable. You can also connect a USB-C power adapter and cable to charge your notebook computer. If you have a device that doesn’t connect to this port, you might be able to use an adapter to connect it.
On iMac (four-port model only), use the USB 3 ports with external devices that connect using a USB-C cable. To connect an external display, use either of the ports with the Thunderbolt symbol .
Thunderbolt
These Mac models have Thunderbolt or Thunderbolt 2 ports:
- MacBook Pro introduced in 2011 through 2015
- MacBook Air introduced in 2011 through 2017
- Mac mini introduced in 2011 through 2014
- iMac introduced in 2011 through 2015
- Mac Pro introduced in 2013
Use these ports with displays and other devices that connect using a Thunderbolt cable.
Thunderbolt and Thunderbolt 2 are not the same as Mini DisplayPort . They have the same shape, but use different symbols on the cable and port. However, this port does support Mini DisplayPort for video output, so you can use a Mini DisplayPort cable to connect a Mini DisplayPort display.
Mini DisplayPort
These Mac models have Mini DisplayPort:
- MacBook Pro introduced in late 2008 through 2010
- MacBook Air introduced in late 2008 through 2010
- Mac mini introduced in 2009 and 2010
- iMac introduced in 2009 and 2010
- Mac Pro introduced in 2009 through 2012
Use this port with displays that connect using a Mini DisplayPort cable.
Mini DisplayPort is not the same as Thunderbolt or Thunderbolt 2 . They have the same shape, but use different symbols on the cable and port.
Use these ports with devices that connect using a USB-A cable. USB ports are sometimes known by the USB specification of the port, such as USB 2 or USB 3.

Use HDMI with displays and TVs that connect using an HDMI cable.
Ethernet
Use Ethernet with networks and devices that connect using an Ethernet (RJ45) cable.
On some iMac models, the Ethernet port is located on the computer’s power adapter. If your power adapter doesn’t have an Ethernet port, you can use an Ethernet adapter.
FireWire
| FireWire 400 | FireWire 800 |
Use FireWire with devices that connect using a FireWire 400 or FireWire 800 cable.
SD card
Use the SD card slot with SD, SDHC, SDXC, MMC, and UHS-II media cards, such as those used by digital cameras.
Audio
Use Audio-Out — or — with headphones, speakers, and other audio-output devices that connect using an audio cable that has a 3.5 mm (1/8 inch) audio jack.
Use Audio-In with a microphone or other audio-input device that connects using an audio cable that has a 3.5 mm (1/8 inch) audio jack.
Power
Use the power port , if available, to connect your computer to AC power using a MagSafe cable or adapter. This port isn’t available on newer Mac notebook computers, which use Thunderbolt 3 or USB-C for power and charging. Learn more about power adapters and cables for Mac notebook computers.
Learn more
Information about products not manufactured by Apple, or independent websites not controlled or tested by Apple, is provided without recommendation or endorsement. Apple assumes no responsibility with regard to the selection, performance, or use of third-party websites or products. Apple makes no representations regarding third-party website accuracy or reliability. Contact the vendor for additional information.
Источник
Как использовать сканер портов в сетевой утилите Mac OS X
Mac OS X поставляется со встроенным сканером портов, просто одним из множества функций, заправленных в когда-либо полезное приложение Network Utility. Это означает, что вам не нужно беспокоиться о командной строке или устанавливать более сложные инструменты, такие как nmap, для быстрого сканирования открытых портов в заданном IP или домене, вместо этого вы можете сделать это через дружественный графический интерфейс. Несмотря на то, что это довольно продвинутая утилита, на самом деле она очень проста в использовании.
Быстрое оповещение: помните, что более новые версии OS X переместили Network Utility для захоронения в системной папке, это не значит, что ее нельзя использовать, это просто означает, что вам нужно либо сделать псевдоним, либо запустить его из Spotlight, или получить от него информацию о системе. В целях этого пошагового руководства мы будем использовать Spotlight для запуска Network Utility и запуска сканирования, поскольку это самый простой и быстрый маршрут, хотя, если вы планируете часто использовать инструмент, вы, вероятно, захотите сделать псевдоним самостоятельно. Хорошо, давайте перейдем к сканирующим портам.
Сканировать порты по IP или домену из Mac OS X
Вы можете выбрать любой локальный или удаленный IP-адрес для сканирования, если вы одиноки в сети (или даже воздушно-gapped) и все еще хотите попробовать это самостоятельно, используйте в качестве цели IP-адрес «127.0.0.1»:
- Hit Command + Spacebar для вызова Spotlight и введите «Network Utility», а затем ключ возврата для запуска приложения Network Utility
- Выберите вкладку «Сканирование портов»
- Введите IP-адрес или доменное имя, которое вы хотите отсканировать для открытых портов, и выберите «scan»
- Необязательно, но не обязательно рекомендуется, вы можете установить диапазон портов для сканирования между ними, если вы просто хотите найти определенный набор активных служб
127.0.0.1 или «localhost» будет просто проверять локальный Mac для открытых портов, если вы новичок в сканировании портов, что может быть предпочтительным способом, поскольку наиболее разумно хорошо защищенные удаленные домены отклоняют входящие запросы или не реагируют на них ,
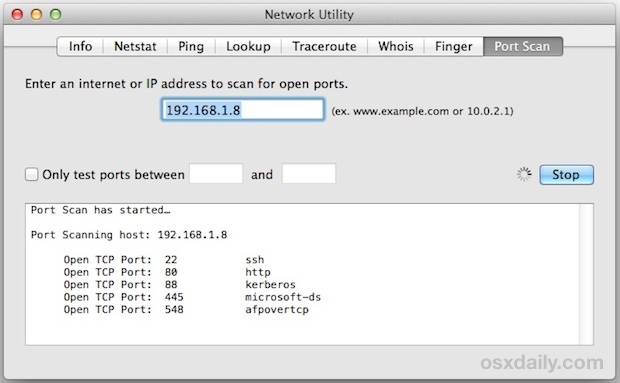
Пусть запущен инструмент сканирования портов, и вы быстро начнете видеть любые открытые порты TCP и их традиционно идентифицированное использование. Например, вы можете увидеть что-то вроде этого, если вы сканируете localhost (127.0.0.1):
Началось сканирование портов …
Хост порта сканирования: 127.0.0.1
Открыть TCP-порт: 22 ssh
Открыть TCP-порт: 80 http
Открытый TCP-порт: 88 kerberos
Открыть TCP-порт: 445 microsoft-ds
Открытый TCP-порт: 548 afpovertcp
Открыть TCP-порт: 631 ipp
Открыть TCP-порт: 3689
Видимые порты будут отличаться для каждой машины в зависимости от того, какие сервисы и серверы доступны, но если вы сканируете Mac и ПК, вы обычно найдете веб-серверы, SMB-порт для совместного использования Windows 445, AFP Apple File Sharing на порту 548, возможно, активный видимый SSH-сервер на 22, UDP-серверах и, возможно, множество других. Сканирование порта будет довольно высоким, поскольку оно сканирует, поэтому просто отпустите его, если вы хотите увидеть все.
Если вы видите абсолютно ничего, но вы знаете, что IP активен с открытыми службами, либо машина не транслируется, машина-получатель отклоняет все запросы, либо может быть настроен сильный брандмауэр. Это делает портативный сканер Network Utility отличным способом быстро проверить безопасность и проверить потенциальные уязвимости или активные службы на соседних компьютерах Mac, iOS, Windows, Linux-машинах и других компьютерах.
Сетевая утилита, очевидно, ограничена Mac, и, хотя на стороне iOS нет встроенных инструментов, можно выполнить сканирование портов с iPhone и iPad с помощью приложения для пальцев — бесплатный инструмент, который очень удобно дополняет расширенный набор инструментов для пользователей iOS.
Источник
Question: Q: Checking TCP/UDP ports!
What’s up everybody,
Does anyobody know how to check if a port is open? (tcp/udp)
Posted on Jan 20, 2011 6:09 PM
Helpful answers
Even this post is rather old, but it still comes up with the search results so I would like to reply a solution to the question.
You can open the Terminal in Mac (type terminal on Spotlight) and then use NetCat command by typing like a sample below to test your specific port like this replacing 1xx with your target IP address, then the port to check.
>nc -vnzu 1xx.xxx.xxx.xxx 53
or if you want to check a range of ports for example from port 1 to 53, just type
>nc -vnzu 1xx.xxx.xxx.xxx 1-53
NetCat is already a built-in command in Mac so no need to install anything.
Hope this helps.
Jul 7, 2015 11:49 PM
There’s more to the conversation
Loading page content
Page content loaded
Use the Network Utility in the /Applications/Utilities/ folder to scan 127.0.0.1 for open ports.
Jan 20, 2011 6:11 PM
isn’t there another way?
would be better if there was a program..
Jan 20, 2011 6:48 PM
Network Utility is a program, no?
Other options include downloading and building nmap, which can be quite useful.
Or +sudo lsof -i+ might possibly be of use?
Jan 20, 2011 7:23 PM
Jan 21, 2011 10:29 PM
Welcome to the forums.
Common Mac OS X tools used here include Network Utility, lsof, and telnet and ping, and dns-sd and ping for Bonjour and mDNS, depending on details are sought.
(With the Windows entries from your footer, various of these tools and equivalents are what can be obtained by loading Cygwin or by loading Microsoft’s SUA/SFU tools, and with some add-ons. PowerShell might or does have analogs here, but the old MS-DOS shell was pretty limited in what diagnostics were available without additions. There was telnet and ping, but some other bits were missing.)
Add-on tools include nmap. (nmap is a fairly gonzo-useful tool for this sort of thing.)
telnet works nicely for brute-force port tests on the LAN.
And FWIW, if those public web site tools do work and if you’re on your own LAN, then definitely also consider checking the settings of and consider upgrading the LAN security. Those tools and those web sites should be blocked by default by the firewall or the gateway device found on most any LAN; whether that’s a low-end NAT device, a server-grade firewall, or otherwise.
Jan 22, 2011 7:31 AM
If you’re trying to figure out whether your client machine is being blocked in the outbound direction (client to Internet) by something like your home firewall, or your ISP, then try http://www.firebind.com.
Firebind is the only tool on the Internet that can test any of the 65535 TCP or UDP ports in the outbound direction. If you want, you can test the entire TCP and UDP range.
Источник


