- Руководство пользователя приложения «Мониторинг системы»
- Закрытие приложений и процессов, которые не отвечают на запросы
- Просмотр энергопотребления Mac
- Просмотр состояния ЦП, сети или диска в Dock в реальном времени
- Установка php5.5+php-fpm+mysql+nginx на Mac OS X Mavericks
- Xcode
- Homebrew
- PHP-FPM
- Настройка PHP в командной строке
- Настройка автозапуска
- MySQL
- Настройка автозапуска
- Обезопасьте установку
- Проверка соединения
- phpMyAdmin
- Nginx
- Настройка автозапуска
- Протестриуйте веб-сервер
- Дальнейшая настройка
- nginx.conf
- Загрузка PHP FPM
- Создание виртуальных хостов
- Настройка SSL
- Включение виртуальных хостов
- Последние тесты
- Управление сервисами
- Nginx
- PHP-FPM
- MySQL
- Личный опыт Web разработки в Mac OS X
- Web сервер
- MySQL
- FTP/SFTP
- MySQL клиент
- Sublime Text
- Php monitor mac os
- About
Руководство пользователя приложения «Мониторинг системы»
для macOS Big Sur
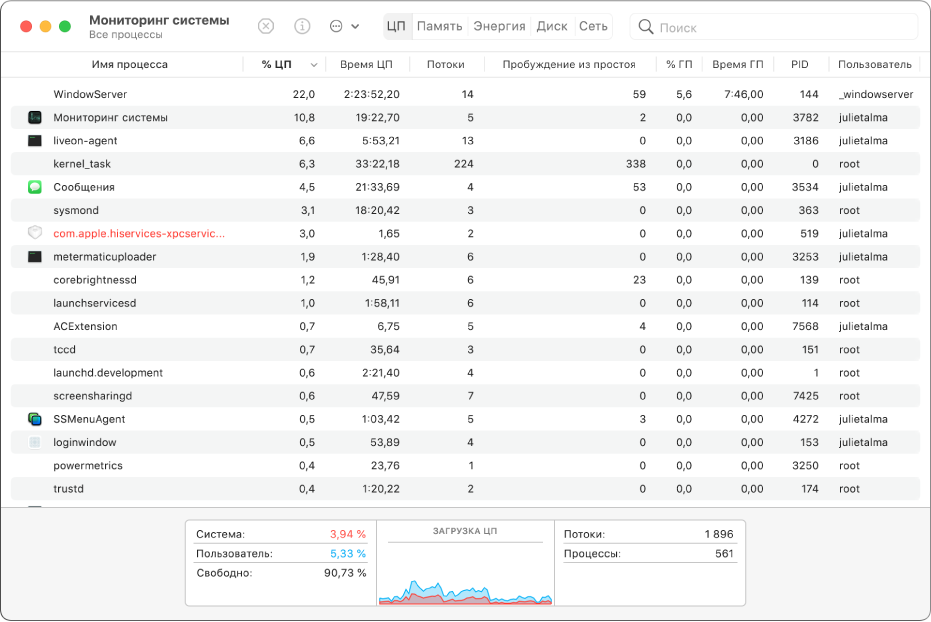
Закрытие приложений и процессов, которые не отвечают на запросы
Если система работает медленно или просто не отвечает на запросы, проблема может быть вызвана приложением или процессом. С помощью Мониторинга системы можно найти проблемные приложения и процессы и завершить их принудительно.
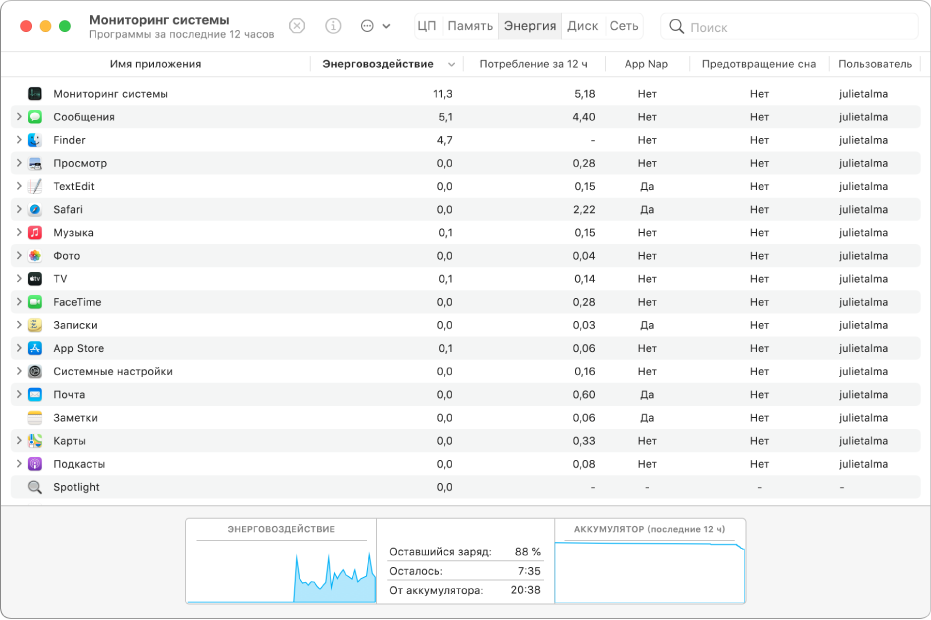
Просмотр энергопотребления Mac
Вы можете узнать, сколько энергии потребляет Ваш Mac, и посмотреть, какие приложения и процессы потребляют больше всего энергии.

Просмотр состояния ЦП, сети или диска в Dock в реальном времени
Можно следить за состоянием системы, даже не открывая окно Мониторинга системы: активность ЦП, загруженность сети и использование диска могут отображаться на автоматически обновляемом графике прямо в панели Dock.
Чтобы изучить Руководство пользователя приложения «Мониторинг системы», нажмите «Оглавление» вверху страницы либо введите слово или фразу в поле поиска.
Источник
Установка php5.5+php-fpm+mysql+nginx на Mac OS X Mavericks
Каждый веб-разработчик, выбравший Mac, после первичной настройки системы ищет рабочий инструментарий. И если c IDE и редакторами всё понятно, то что-либо подобное по удобству win-довым OpenServer или Denwer за бесплатно найти трудно. Есть отличное решение MAMP PRO, но оно стоит две тысячи деревянных. Да и работа через Apache некоторых может смутить.
Занимаясь решением этого вопроса, набрёл на интереснейший материал, который рассказывает о том, как при помощи консольного пакет-менеджера Homebrew настроить рабочее пространство буквально за 5-10 минут. Публикую его перевод, потому что кому-нибудь подобная инструкция по настройке веб-окружения на Mac обязательно пригодится. 
«Только что получил новый MacBook Pro и решил настроить его с чистого листа, потому что я использую тот же бэкап Time Machine примерно уже четверы года. Хороший шанс избавиться от стэка веб-сервера/LAMP (Linux Apache MySQL PHP) и заменить его Nginx и PHP-FPM как реализацию FastCGI. Ниже вы можете прочесть, как настроить Nginx, PHP-FPM, MySQL и PhpMyAdmin на OS X 10.9 / Mavericks.
Xcode
Прежде всего, установите последнюю версию Xcode через Mac App Store:
Скачать Xcode.app (через Mac App Store)
Как только закончится загрузка, откройте Xcode в папке /Applications и согласитесь с лицензией.
Откройте окно Терминала и установите Xcode через следующую команду:
Подтвердите установку при помощи кнопки Install .
Вернитесь обратно в Xcode, нажмите ⌘ + , для доступа к настройкам и перейдите на вкладку Locations. Установите Command Line Tools на последнюю доступную версию, Xcode 5.0.2 (5A3005) в моём примере:

Homebrew
Теперь необходимо установить Homebrew, который является менеджером пакетов для OS X. Вы возможно уже слышали про apt-get или aptitude на дистрибутивах Linux для установки пакетов и зависимостей для конкретный приложений. brew работает также, только на компьютерах под управлением Mac OS X. Он также удостоверится, что вы получите последние обновления для установленных приложений, так что вам не нужно будет беспокоиться из-за просроченных версиях или брешах в системе безопасности, эксплойтах и так далее.
Прежде всего, нам понадобиться Xquarz:
Теперь нам необходимо загрузить и установить Homebrew при помощи следующей команды:
Поверим на любые конфликты и проблемы:
Обновим репозитории и приложения при помощи Homebrew:
PHP-FPM
Потому как Homebrew не имеет репозитория по-умолчанию для PHP-FPM, нам необходимо его добавить:
Установим PHP-FPM при помощи следующих аргументов:
Homebrew загрузит исходный код PHP-FPM и скомпилирует его аз вас. Дайте ему немного времени, это может занять несколько минут.
Настройка PHP в командной строке
Если вы хотите использовать PHP в командной строке, вам необходимо обновить переменную окружения $PATH в файле
Настройка автозапуска
Удостоверьтесь, что PHP-FPM слушает порт 9000:
Вывод должен выглядеть примерно следующим образом:
MySQL
Следующий шаг для установки MySQL:
Настройка автозапуска
И запустите сервер баз данных:
Обезопасьте установку
Для безопасности нашего MySQL-сервера мы вызовем идущий в компоекте бинарник secure_mysql_installation для смены root-пароля, удаления анонимного пользователя и отключения возможности дистанционного логина под root-ом:
Пожалуйста, укажите текущий пароль, если он уже установлен.
Нажите enter, указав пароль для root-пользователя. По желанию сохраните его в менеджерах паролей LastPass или 1Password.
Да, в них нет необходимости.
Да, нет необходимости в авторизации под root с любого другого IP кроме 127.0.0.1.
Да. Нам не нужны тестовые таблицы.
Перезагрузка таблицы привилегий даст нам возможность удостовериться, что изменения вступили в силу.
Проверка соединения
Введите указанный ранее root-пароль и увидите консоль MySQL:
Закончите сессию при помщи команды \q :
phpMyAdmin
Установите autoconf который необходим для phpMyAdmin:
Установите переменную окружения $PHP_AUTOCONF:
Приступим к установке phpMyAdmin:
Nginx
Установите Nginx при помощи команды:
Настройка автозапуска
Так как мы используем 80 порт, необходимо запускать Nginx под пользователем root:
Протестриуйте веб-сервер
Конфигурация по-умолчанию слушает порт 8080 вместо стандартного для протокола HTTP порта 80. Пока проигнорируем это:
Ответ должен выглядеть следующим образом:
Снова остановим Nginx:
Дальнейшая настройка
nginx.conf
Создайте папки, которые понадобятся нам при последующей конфигурации Nginx:
Удалите текущий файл nginx.conf (который всегда будет доступен по адресу /usr/local/etc/nginx/nginx.conf.default , если вы захотите взглянуть на его код) и загрузите созданные мною настройки при помощи curl с GitHub:
Конфиуграционный файл прост и легковесен насколько это возможно: настройки worker, пути/форматы логов и несколько includes. Ничего лишнего в отличие от nginx.conf.default .
Загрузка PHP FPM
Скачайте мои настройки PHP-FPM с GitHub:
Создание виртуальных хостов
Клонируйте тестовый виртуальный хост (включая рерайты для 404, 403 и phpinfo() ) используя git :
И удалите папку /var/www/.git , чтобы git не отслеживал последующие изменнения.
Настройка SSL
Создайте папку для наших сертификатов SSL и частных ключей:
Сгенерируйте 4096bit RSA ключи и само-подписные сертификаты следюущей командой:
Включение виртуальных хостов
Теперь нам нужно создать симлинки в папке sites-enabled для виртуальных хостов с целью включить их:
Снова стартуем Nginx:
Последние тесты
Вот оно, всё должно работать. Щелкайте на ссылках ниже с целью удостовериться в этом:
Управление сервисами
В силу того, чтоы вам рано или поздно понадобиться перезапустить тот или иной вресив, вам возможно понадобятся дополнительные алиасы:
Вы можете или открыть новое окно/сессию Терминала или же вручную перезагрузить
/.bash_profile при помощи команды:
Теперь вы можете использовать алиасы вместо печатания длинных команд launchctl , как то было выше.
Nginx
Вы можете стартовать, остановить и перезапустить Nginx при помощи команд:
Быстрый доступ к логам:
PHP-FPM
Старт, стоп и перезагрузка PHP-FPM:
MySQL
Старт, стоп и рестарт MySQL-сервера:
Дайте мне знать, если застряли или у вас есть какие-либо дополнения!»
Источник
Личный опыт Web разработки в Mac OS X
Web сервер
Apache предустановлен в Mac OS и для локальной разработки его более чем хватает.
Маленькая хитрость – если не нужен виртуальный хост, то очень помогает вот такой трюк:
Осталось кинуть проект в
/Sites/%имя_проекта% и открыть в браузере localhost/
%user_name%/%имя_проекта%
На крайний случай, если нужна полная копия production окружения всегда можно установить Vagrant.
PHP предустановлен в Mac OS. Если его версия устраивает, то просто включаем загрузку модуля php5_module:
Если не устраивает, то можно установить PHP по мануалу отсюда php-osx.liip.ch. Эта версия не заменит системную, сама найдет Apache и вообще установится в /usr/local/php5. Установка предельно проста – одна строка в консоли (пример для PHP 5.5):
MySQL
Установить MySQL можно несколькими способами, например, через Homebrew. Но компилировать из исходников MySQL только потому что это позволяет пакетный менеджер? Мне кажется что проще взять DMG архив с официального сайта и установить. После установки в Системных настройках появится вкладка MySQL:
FTP/SFTP
Кроме работы над основным проектом приходится отвлекаться и исправлять/доделывать что-то у клиентов. Обычно это чужой хостинг с доступом по FTP. Значит нужен FTP клиент. Выбор пал на Cyberduck:
Почему Cyberduck? Потому что хранит пароли в Keychain, переведен на русский, бесплатен и поддерживает FTP, SFTP, WebDAV, Amazon S3, Google Cloud Storage и Rackspace Cloud Files.
MySQL клиент
Долго выбирал рать между MySQL Workbench и Sequel Pro. В силу легкости победил Sequel Pro. 
Почему локальное приложение а не phpmyadmin или mysql в консоли хостинга? Потому что все курируемые базы в одном месте и не надо при задаче «посмотри что там в базе у клиента » открывать консоль, SSH и вспоминать пароли. Да, это удаленное подключение и MySQL на хостинге смотрит наружу. Но доступ по IP или SSH туннель спасают отца русской демократии.
Возможностей у программы достаточно много, лучше почитать на официальном сайте.
Sublime Text
Без него никуда. Маленькая хитрость в настройках:
По-умолчанию выставлено в TRUE и из-за этого Cyberduck открывает новые файлы в новом окне, а не в новой вкладке существующего окна.
Кроме этого, бывает что нужно быстро запустить небольшой кусок PHP кода, а делать это в IDE не удобно. Можно выполнить PHP код из Sublime Text, добавив новую Build System (Tools –> Build System -> New):
Теперь жмем CMD + B и результат работы кода появится в консоли Sublime Text.
Это удобный сборник документации, вот его особенности:
- Автообновление документации с официальных сайтов
- Оффлайн доступ
- Шпаргалки (Cheat Sheets)
- Создание своих сниппетов
- Интеграция в PhpStorm и Sublime Text
Конечно, можно еще начать петь дифирамбы тач-жестам и полноэкранному режиму приложений, но это выходит за рамки статьи.
Источник
Php monitor mac os
If this software has been useful to you, all I ask is that you please star the repository, so I know that the software is being used. You can also send me feedback if the app came in handy.
Thank you! ⭐️
PHP Monitor (or phpmon) is a lightweight macOS utility app that runs on your Mac and displays the active PHP version in your status bar. It’s tightly integrated with Laravel Valet, so you need to have it set up before you can use this.

Screenshot: A menu showing all of the functionality of PHP Monitor.
It’s super convenient to switch between different versions of PHP. You’ll even get notifications (only if you choose to opt-in, of course)!

PHP Monitor also gives you quick access to various useful functionality (like accessing configuration files, restarting services, and more).
PHP Monitor is a universal application that runs on Apple Silicon and Intel-based Macs.
- macOS 10.14 Mojave or higher (works on macOS 11 Big Sur)
- Homebrew is installed in /usr/local/homebrew or /opt/homebrew
- The brew formula php has to be installed (which version is detected)
- Laravel Valet 2.13 or higher
You may need to update your Valet installation to keep everything working if a major version update of PHP has been released.
You can install via Homebrew, or may download the latest release.
To install via Homebrew, run:
To upgrade your existing installation, run:
The app is signed and notarized, meaning all you have to do is approve its first launch.
I wanted to be able to see at a glance which version of PHP was linked, and handle dealing with Laravel Valet in a simple app without having to deal with the terminal every time.
Initially, I had an Alfred workflow for this — but it has now been replaced with this utility, which also does a good job at displaying additional information at a glance, like the current PHP version, memory limits, and more.
🤬 The app won’t start?!
PHP Monitor performs some integrity checks to ensure a good experience when using the app. You’ll get a message telling you that PHP Monitor won’t work correctly in a variety of scenarios.
Follow instructions as specified in the alert in order to resolve any issues.
🙋♂️ FAQ & Troubleshooting
If you are having issues, the first thing you should be doing is installing the latest version of PHP Monitor and Laravel Valet. This can resolve a variety of issues. To upgrade Valet, run composer global update . Don’t forget to run valet install after upgrading.
If you’re still having issues, here’s a few common questions & answers, as well as issues and solutions:
Which versions of PHP are supported?
- PHP 5.6
- PHP 7.0
- PHP 7.1
- PHP 7.2
- PHP 7.3
- PHP 7.4
- PHP 8.0
- PHP 8.1
For more details, consult the constants file file to see which versions are supported.
I want PHP Monitor to start up when I boot my Mac!
You can do this by dragging PHP Monitor.app into the Login Items section in System Preferences > Users & Groups for your account.
I want to set up PHP Monitor from scratch! I don’t have Homebrew installed either, where do I begin?
If you want to set up your computer for the very first time with PHP Monitor, here’s how I do it:
Install PHP, composer, add to path:
Make sure the following line is not in the comments:
If you’re on an Apple Silicon-based Mac, you’ll need to add:
and add the following to your .zshrc:
Make sure PHP is linked correctly:
should return: /usr/local/bin/php (or /opt/homebrew/bin/php )
This should install dnsmasq and set up Valet. Great, almost there!
Finally, run PHP Monitor. Since the app is notarized and signed with a developer ID, it should work.
PHP Monitor tells me `php` is not installed.
Try installing again using brew install php .
This should resolve the issue! If that does not fix the issue, run brew link php —force . (Afterwards, you may need to restart your terminal to make sure the new linked version is detected.)
If you’re visiting your .test domain, and you’re getting a 502 (Bad Gateway) after switching to a different PHP version, you’re dealing with a common issue.
This problem is usually resolved by upgrading Valet and running valet install again.
PHP Monitor tells you that a PHP installation is broken, if the configuration is causing warnings or errors when determining the version number.
Since PHP Monitor changes the linked version via Homebrew, both Valet and your terminal (CLI) should use the new PHP version.
However, this might not be the case on your system. You might have a specific version of PHP linked if that is not the case. In that case, you may need to change your .bashrc or .zshrc file where the PATH is set (depending on the terminal you use).
You can find out which version of PHP is being used by running which php .
You can find out what exactly is causing the issue by running a command. On Intel, you can run (replace 7.4 with the version that is broken):
On Apple Silicon, you can run (replace 7.4 with the version that is broken):
You should see an error or a warning here in the output.
Usually this is a duplicate extension declaration causing issues, or an extension that couldn’t be loaded. You’ll have to solve that issue yourself (usually by removing the offending extension or reinstalling).
One of the limits (memory limit, max POST size, max upload size) shows an exclamation mark!
The value you provided in your INI file is invalid. If that is the case, PHP will attempt to parse your value as bytes, which is usually unintended. ( 1GB will resolve to merely a few bytes, and all of your applications will run out of memory!)
You must a provide a value like so: 1024K , 256M , 1G . Alternatively, -1 is also allowed, or just an integer (which will result in N amount of bytes being the limit).
Example: Trying to use 1GB as the memory limit, for example, will result in this exclamation mark. The correct way to set a 1GB limit is by using 1G as the value. (Note: The displayed value will append B for clarity, so if you set 1G , the value reported by PHP Monitor will be 1 GB.)
One of my commented out extensions is not being detected.
The app searches in the relevant .ini files for a specific pattern. For regular extensions:
For Zend extensions:
The * is a wildcard and the name of the extension. If you’ve commented out the extension, make sure you’ve commented it out with a semicolon (;) and a single space after the semicolon for PHP Monitor to detect it.
Since v3.4 all of the loaded .ini files are sourced to determine which extensions are enabled.
I’ve got two Homebrew installations on my Apple Silicon Mac, can I choose which installation to use with PHP Monitor?
Not at this time, no. PHP Monitor will prefer the /opt/homebrew installation over the classic installation directory.
Why is the app doing network requests?
It’s Homebrew. I can’t prevent brew from doing things via the network when I invoke it.
PHP Monitor itself doesn’t do any network requests. Feel free to check the source code or intercept the traffic, if you don’t believe me.
After running PHP Monitor, Homebrew sometimes has issues with `brew upgrade`!
This is a security feature of Brew. When you start a service as an administrator, the root user becomes the owner of relevant binaries.
You will need to manually clean up those folders yourself using rm -rf (or by manually removing those folders via Finder).
The app has crashed!
Please get in touch and open an issue. PHP Monitor shouldn’t crash 🙂
📝 Having another issue?
I did not include any tracking or analytics software, so if you encounter issues, let me know via an issue.
PHP Monitor is available entirely free of charge, but if you can afford it a donation helps keep the project alive and the app maintained.
You can find a sponsor link at the top of this repo or you could click the link here to be taken to my sponsorship page.
Donations really help with the Apple Developer Program cost, and keep me motivated to keep working on PHP Monitor outside of work hours (I do have a day job!).
While I did make this application during my own free time, I have been lucky enough to do various experiments during work hours at DIVE. I’d also like to shout out the following folks:
- My colleagues at DIVE
- The Homebrew team who maintain
- The developers & maintainers of Valet
- Everyone in the Laravel community who shared the app (thanks!)
- Various folks who reachedout
- Everyone who left feedback via issues
Thank you very much for your contributions, kind words and support.
Loading info about PHP in the background
This utility runs php-config —version’ in the background periodically. It also checks your .ini files for extensions and loads more information about your limits (memory limit, POST limit, upload limit).
In order to save power, this only happens once every 60 seconds.
Switching PHP versions
This utility will detect which PHP versions you have installed via Homebrew, and then allows you to switch between them.
- You have at least the latest version of PHP installed ( php )
- You have installed Laravel Valet ( which valet returns /usr/local/bin/valet )
- You ran valet trust , which means Valet commands can be run without using sudo
The utility runs the following commands:
- Unlink all detected PHP versions & stop the respective php@X.X services
- Link the desired version of PHP, and start the associated service
Want to know more?
If you want to know more about how this works, I recommend you check out the source code.
This app isn’t very complicated after all. In the end, this just (conveniently) executes some shell commands.

If you’d like to build PHP Monitor yourself, you need:
- Xcode (usually the latest version)
- The contents of this repository
Once you have downloaded this repository, open PHP Monitor.xcodeproj , and you should be able to immediately build the app for your system by pressing Cmd-R. This will create a debug build. (If Xcode complains about code signing, you can turn it off.)
If you’d like to create a production build, choose «Any Mac» as the target and select Product > Archive.
About
Lightweight, native Mac menu bar app that interacts with Laravel Valet. Helps you manage multiple PHP installations, locate config files and more. Written in Swift.
Источник


