- Pandora: Windows Agent
- Contents
- 1 Get the last source
- 2 Build from sources
- 2.1 Windows
- 2.2 Cross-compiling from Linux
- 3 Installation
- 4 Configuration
- 4.1 General configuration
- 4.2 Modules definition
- 4.2.1 module_exec
- 4.2.2 module_proc
- 4.2.3 module_service
- 4.2.4 module_freedisk
- 4.2.5 module_cpuusage
- 4.2.6 module_freememory
- 4.2.7 module_freepercentdisk
- 4.2.8 module_freepercentmemory
- 4.2.9 module_tcpcheck
- 4.2.10 module_regexp
- 4.2.11 module_perfcounter
- 4.2.12 module_logevent
- 4.2.13 module_logchannel
- 4.2.14 module_inventory
- 5 Uninstallation
- 6 New features
- 6.1 Watchdog
- 6.2 Secondary server
- 6.3 UDP Server
- 6.4 WMIQuery module
- 6.5 Inventory Module
- 7 Extending agent features with VBS code in agents
- Установка системы мониторинга Pandora FMS
- Остались вопросы?
- категории
- VoIP оборудование
- ближайшие курсы
- Новые статьи
- ближайшие Вебинары
- 10 доводов в пользу Asterisk
- Распространяется бесплатно.
- Безопасен в использовании.
- Надежен в эксплуатации.
- Гибкий в настройке.
- Имеет огромный функционал.
- Интегрируется с любыми системами.
- Позволяет телефонизировать офис за считанные часы.
- Отличная масштабируемость.
- Повышает управляемость бизнеса.
- Снижает расходы на связь.
Pandora: Windows Agent
Contents
1 Get the last source
To get the last source from our repository, you will need a Subversion client. Then execute this:
2 Build from sources
2.1 Windows
In order to build from sources, you will need the latest Dev-Cpp IDE version, with the MinGW tools. Download it from here.
Open PandoraAgent.dev with Dev-Cpp and construct the project. Everything should compile fine in a default installation.
If you found any problem when building from source, please contact us by email (ramon.novoa AT artica DOT es) or the SourceForge project web.
2.2 Cross-compiling from Linux
To cross-compile the Pandora FMS Windows Agent from Linux follow these steps:
- Install MinGW:
- Install the extra libraries needed by the agent: win32api, curl, openssl and zlib. For example, to install openssl:
- Go to http://sourceforge.net/projects/devpaks/files/ and download the file openssl-0.9.8e-1cm.DevPak.
- Uncompress the file openssl-0.9.8e-1cm.DevPak:
- Copy the libraries and include files:
- Install autoconf & autogen
- Go to the Pandora FMS Agent source directory and run:
- Go to the Pandora FMS Agent source directory and run:
3 Installation
Before running the installation of Pandora Windows agent, you must create the Pandora directory and copy the PandoraAgent.exe file into it. It does not matter where it is installled, because Pandora Agent will adapt to any local directory. This directory should also have this content:
Optionally, it could have:
Once these files and directories have been created, you can install the Pandor Windows Agent. To do so, execute these sentences in a Windows command line:
The Agent will be installed into the Windows services system. You can check it on Control Panel -> Administrative tools -> Services. You can run it by clicking the «play button». To stop the service, open the «Services» dialog, search the «Pandora Agent» and click the stop button.
4 Configuration
4.1 General configuration
The Pandora Windows Agent configuration is done via the pandora_agent.conf file. This file is special and has a own syntax. The file is a list of keys/values pairs. Here is an example of this file.
The variables which can be defined are:
The module definitions must be also in the pandora_agent.conf files. Please read underneath to learn how to define a module.
4.2 Modules definition
The modules are defined with a own syntax, which is the same that the UNIX/Linux/Solaris agents. Here is an example of a module. Please notice the syntax:
There are two optional fields, one is the module_description , which defines a human readable description of the module, the other is module_interval wich defines the number of iterations between each module execution, for instance if interval is set to 30 and module_interval is set to 3, that module will be executed every 3 * 30 = 90 seconds.
Actually, the Pandora Windows Agent support these modules:
4.2.1 module_exec
These modules execute a sentence provided in the definition.
4.2.2 module_proc
These modules check if a process is running in the system. It requires the full name, including the extension of the executable.
Since monitoring processes may be critical in some cases, Windows agent now supports asynchronous checking for module_proc. This allow the agent to inform Pandora server whenever a process is down. In the following example, as soon as notepad.exe is closed and stop running, the agent will send a tiny XML including only the status of this module.
4.2.3 module_service
These modules act like the module_proc, but checking if a Windows service is running.
In a similar way like in processes, monitoring services may be critical in some cases. Windows agent now supports asynchronous checking for module_proc, allowing the agent to inform Pandora server whenever a service is down. In the following example, as soon as ServiceSched is stopped, the agent will send a tiny XML including only the status of this module.
There’s also a watchdog mode to services, so the agent can start a service when it’s stopped. In this case, starting a service does not require any parameters, because Windows knows how to do it. So in this case, the configuration is easier and can be like:
4.2.4 module_freedisk
These modules get the amount of free space in the logical drive defined (please notice that the drive must have the : ). The data is in MB.
4.2.5 module_cpuusage
These modules gets the average percentage load of the defined CPU.
It is possible to get the average CPU load on multiprocessor systems.
4.2.6 module_freememory
This module get the amount of free memory. The data is in MB.
4.2.7 module_freepercentdisk
This module returns the percentage of free space in a logical drive.
4.2.8 module_freepercentmemory
This module returns the percentage of free memory.
4.2.9 module_tcpcheck
This module tries to connect to the given host:port. Returns 1 if successful, 0 otherwise. A timeout may be specified.
4.2.10 module_regexp
This module monitors a log file for matches of a regular expression, discarding existing lines at startup. The data returned by the module depends on the module type:
- generic_data_string: All lines that match the regular expression.
- generic_data: The number of lines that match the regular expression.
- generic_proc: 1 if there are any matches, 0 otherwise.
For more information on the regular expression syntax see [1].
4.2.11 module_perfcounter
Retrieves performance counter data through the PDH interface (pdh.dll must be installed).
4.2.12 module_logevent
The logevent module has been improved from version 2.0. It now uses the direct API to load events from file, instead use WMI bridge, as uses in 2.0, this method is much more faster. It has been thoroughly tested on Windows 2003 and Windows 2008 (which uses the new XML based event system) and should work on other versions too.
The new logevent module supports more filters to grab the event:
module_source is mandatory.
As you can see, could be easy to missunderstand the meaming of all fields. Main parameter is «Source» and this defines the windows log (Application, System, Security and others) where to search. Application defines the source of the event inside the windodows log. All this parameters are case sensitive.
A full example, matching the event in the screenshot.

4.2.13 module_logchannel
(Windows only, from 7.0OUM715 on)
Type of module that allows you to obtain information about Windows logging channels. Although module_logevent only has access to Windows Logs, this type of module allows you to extract data from other log files that are configured as channels. In this way, it is possible to obtain the logs included in the services and application logs.
The general format of this module is as follows:
To avoid displaying repeated information, only those events that have occurred since the start of the agent are taken into account.
module_logchannel accepts the following parameters (all case-sensitive):
- module_source: Event channel. With the command wevtutil. exe enum-logs a list of all the local log channels of the machine is obtained. Required field.
- module_eventtype: Event type (critical, error, warning, info or verbose). Optional field
- module_pattern: Pattern to search (substring). Optional field.
- module_eventcode: Numeric ID of the event, e.g. 5112.Optional field.
For example, we would define the following module to show all the events of the channel Microsoft-Windows-TaskScheduler/Operational, information type, with code 201 and with log text code 0:
With this module configuration, the Pandora FMS agent would collect the following log:

4.2.14 module_inventory
See below Inventory Module under New Feaures.
5 Uninstallation
To uninstall the Pandora Agent, run these sentences in a Windows command line:
Please notice that this will not stop the agent, which has to be stopped manually. In the next restart of Windows, the Pandora Agent will not be in the Windows services system.
6 New features
6.1 Watchdog
Another need may be reopen any process that was unexpectedly stopped. Pandora Window agent can now open any monitored process and work like a watchdog. Since opening a process might require some parameters, there’s a new configuration line for this module. Notice that it only works when the module is set to be asynchronous. Here’s an example of how to configure a module_proc module.
These additional parameters are available for proc modules:
- module_retries: Number of consecutive times the module will try to launch the process before disabling the watchdog. If the limit is reached, the watchdog mechanism for this module will be disabled and never will try to launch again the process, even if this proccess is recovered by the user. To get the watchdog system restarted, you need to restart Pandora FMS agent. Please note that there is no limit by default on retry.
- module_startdelay: Number of milliseconds the module will wait before launching the process for the first time. This is a good idea to setup a value of 5000 (5 secs) here for example if your process take a lot on load in system.
- module_retrydelay: Number of milliseconds the module will wait before launching the process after a failure. Has the same meaning that module_startdelay, it’s used to «wait» until process completely load on system.
- module_user_session: It controls in which session you want the process to be launched. If set to’ no’, the process will start in the services session and therefore remain in the background (default setting). Otherwise, if set to’ yes’, the process will be launched in the user’s session and will be visible from the pc desktop.

For versions prior to Windows Vista, the module_user_session token can be configured in a general way by enabling in the Pandora FMS service properties the box «Interactive access with desktop», as shown in the following screenshot:

6.2 Secondary server
A secondary server can be defined in pandora_agent.conf. The configuration options are the same as for the primary server, preceded by secondary_.
There are two modes of operation, specified in secondary_mode:
- on_error: Sends data to the secondary server only if it could not be sent to the primary server.
- always: Always sends data to the secondary server, even if it was already sent to the primary server.
6.3 UDP Server
Pandora FMS’s Windows Agent runs a UDP server that allows it to receive commands from the web console.
To configure the UDP server the following options must be set in pandora_agent.conf:
- udp_server: Set to 1 to enable the UDP server.
- udp_server_port: Port the server listens on.
- udp_server_auth_address: Addresses authorized to send commands to the UDP server.
- process_ _start : Local command to start a process.
- process_ _stop : Local command to stop the process.
- service_ 1: Allows service to be started or stopped.
Agent execution can be forced at any time from the web console.
6.4 WMIQuery module
The new wmiquery module can run any WQL query locally. It is configured by two new parameters:
- module_wmiquery: WQL query to run. Several rows may be returned for string data types.
- module_wmicolumn: Name of the column to be fetched.
For example, we can retrieve a list of installed system services:
Or the current CPU load:
6.5 Inventory Module
Using predefined WMI queries this module retrieves information about different aspects of a the machine, from sofware to hardware.
The module can receive diffferent parameters to mark what kind of information is retrieved. Here is the list of parameters and what kind of information they provide:
- CPU: Gets information about the CPUs on the system (Processor Name, Clock speed and Description).
- CDROM: Gets information about the CDROMs (Name, Description and Drive letter).
- Video: Gets information about the video cards (Descripiton, RAM and Proccessor)
- HDs: Gets information about the Hard Drives (Model, Size and System Name)
- NICs: Gets information about the Network Interface Controlers (Description, MAC address and IP address)
- Patches: Gets informaton about the patches installed (ID, Description and Comments)
- Software: Gets information about the MSI packages installed (Name and Version)
- Services: Gets information about system services (Name, Path and Status)
- RAM: Get information about the RAM modules (Tag, Capacity and Name)
This module has also an optional module_interval line used to specify the interval (in days) to get this module information.
7 Extending agent features with VBS code in agents
Probably you need some post-operation with your WQL queries and WMI modules don’t give you enough power. For example, what if you need a total CPU usage, not per CPU, a global one?. Consider to have a basic VBS script:
Call it «CPUTotal.vbs» and place on c:\program files\pandora_agent\util
Create a new execution module with this syntax:
Voilá!. You have now a CPU global usage counter. There ara a lot more VBS stuff you can use for your own modules. Just checkout excelent documentation from MSDN [2].
Установка системы мониторинга Pandora FMS
В данной статье рассмотрим установку системы мониторинга Pandora FMS. Pandora FMS (Pandora Flexible Monitoring System) — программное решение для мониторинга. Pandora FMS позволяет осуществлять мониторинг c визуализацией состояний и производительностью нескольких параметров из различных операционных систем, серверов приложений и аппаратных систем, таких как брандмауэры, прокси, баз данных, веб-серверов или маршрутизаторов.
Все команды описанные в данной статье необходимо выполнять от имени суперпользователя root. Все действия выполняются в CentOS 6.8 x64 с предустановленным Asterisk 11 и FreePBX.
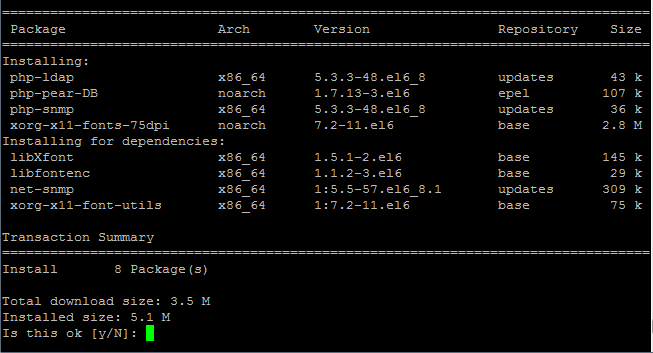
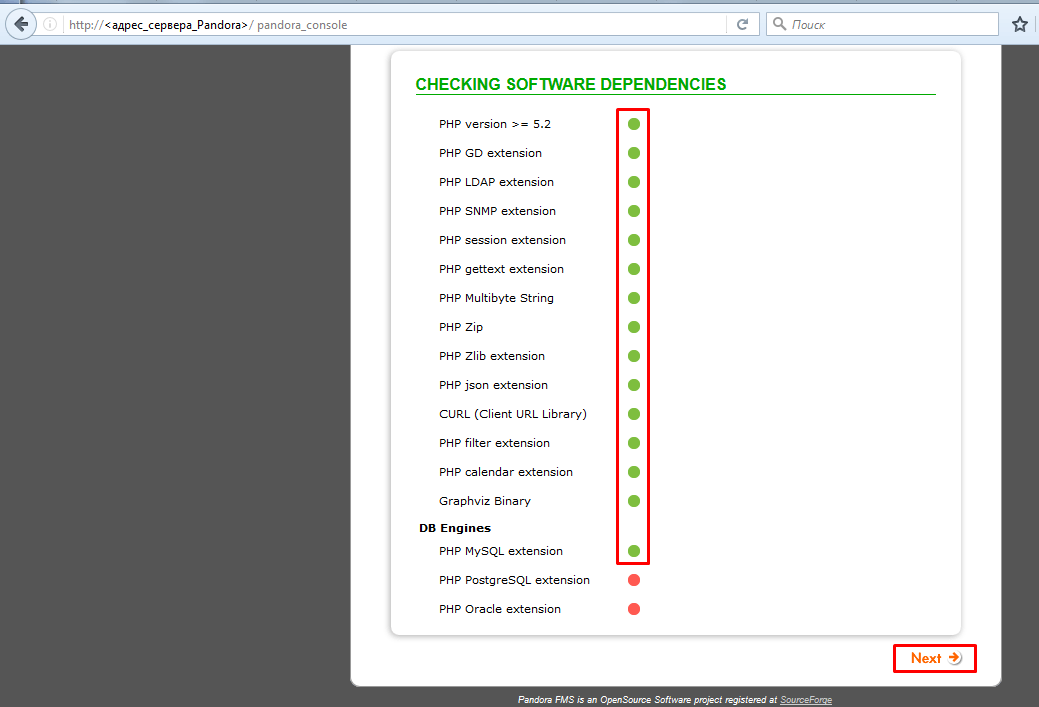
Перед выполнением установки системы мониторинга необходимо выполнить установку ряда зависимостей, командой вида:
# yum install php-snmp php-pear php-ldap php-pear-DB xorg-x11-fonts-75dpi graphvi xorg-x11-fonts-misc graph
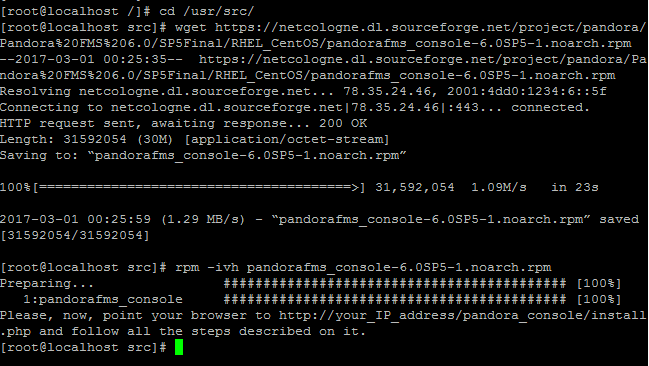
1. Установка Pandora Console
# cd /usr/src/
# wget https://netcologne.dl.sourceforge.net/project/pandora/Pandora%20FMS%206.0/SP5Final/RHEL_CentOS/pandorafms_console-6.0SP5-1.noarch.rpm
# rpm -ivh pandorafms_console-6.0SP5-1.noarch.rpm
# chmod -R 777 /var/www/html/pandora_console/include
# service httpd restart

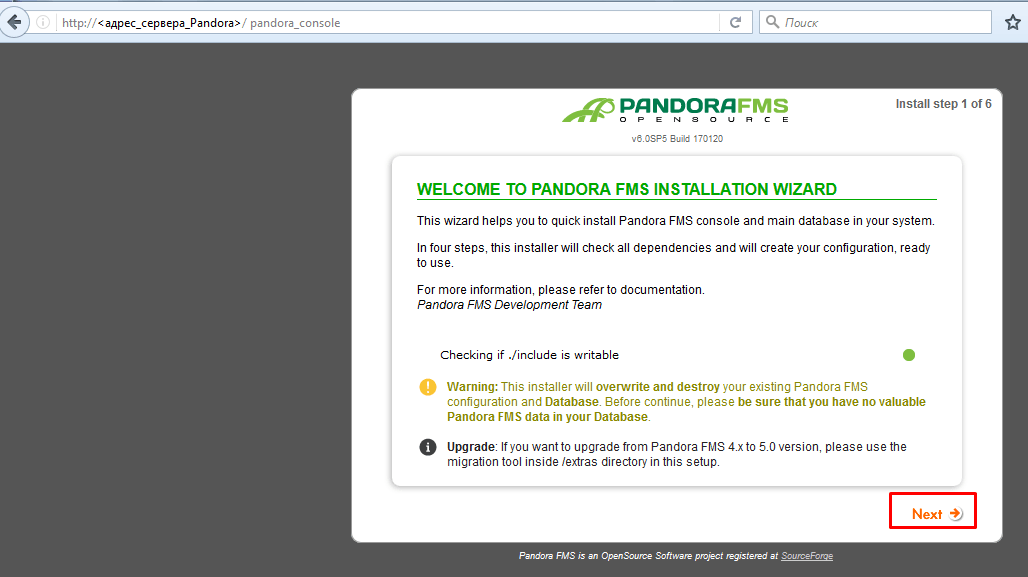
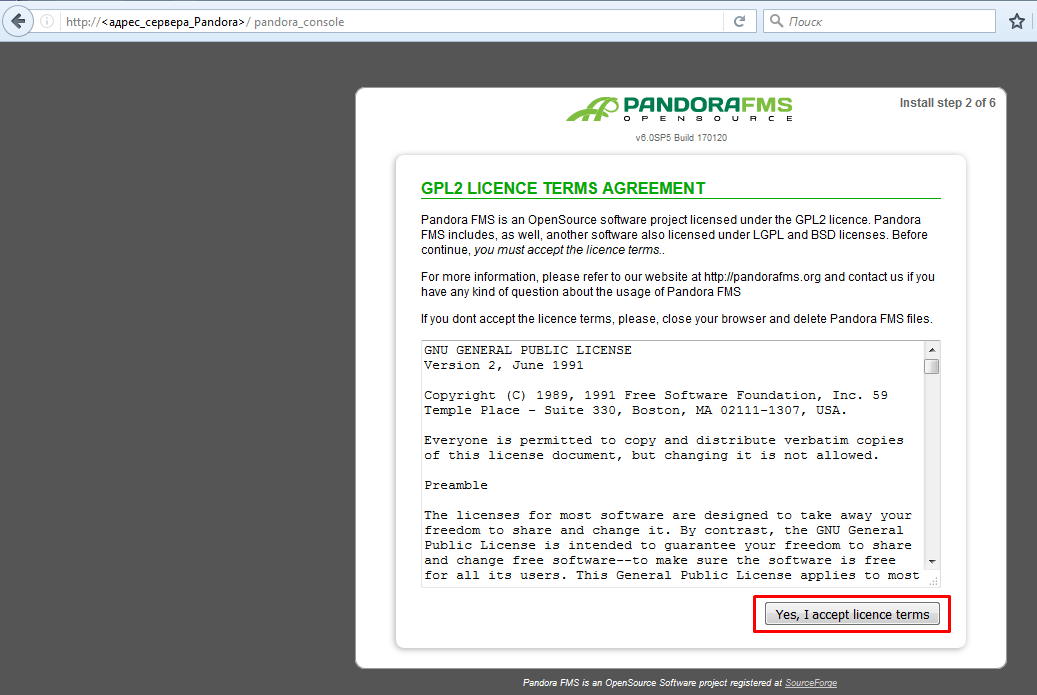
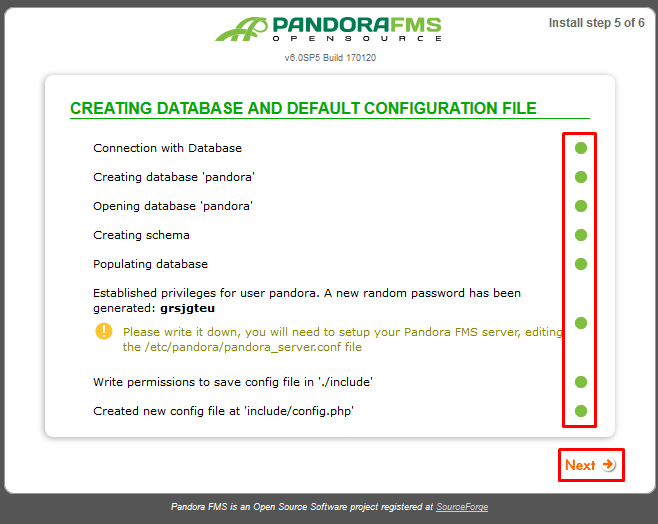
Перейдем в интернет обозревателе по следующему пути: http:// /pandora_console и выполним последовательно ряд переходов согласно графической инструкции:

Перед переходом к следующему шагу, выполним удаление инсталяционного скрипта командой вида:
# rm -rf /var/www/html/pandora_console/install.php
# service httpd restart


Пройдем процедуру авторизации, по умолчанию логин и пароль admin:Pandora

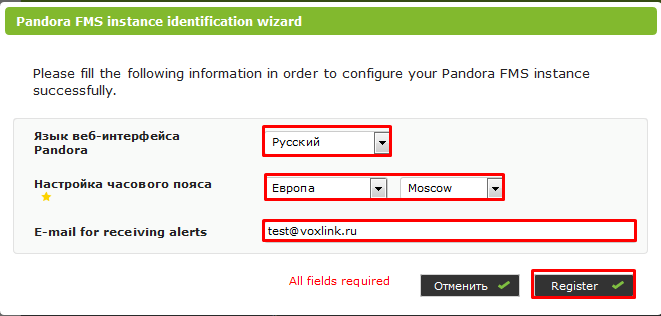
Выберем язык интерфейса, часовой пояс, а так же введем адрес электронной почты для регистрации.
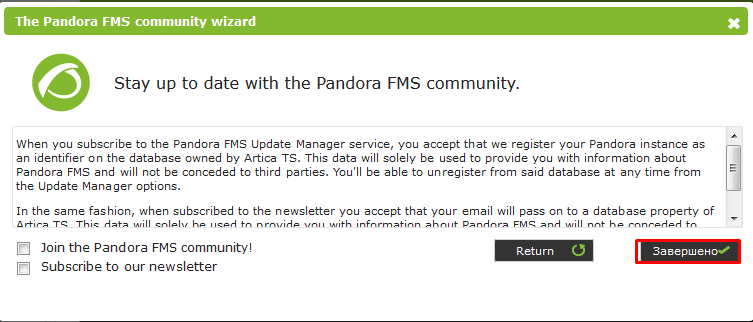
Завершим процесс установки Pandora Console
2. Установка Pandora Server
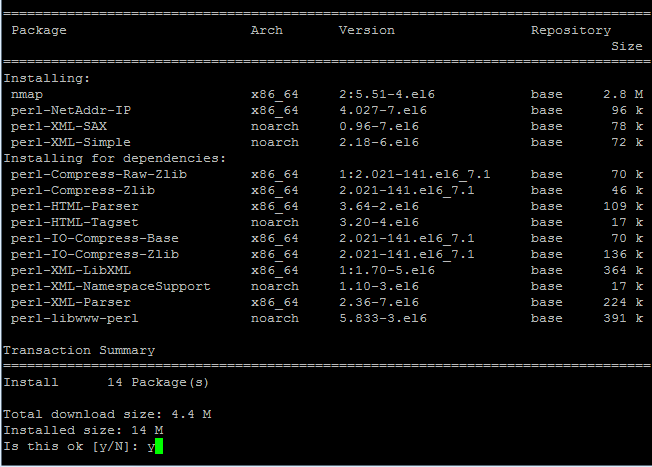
Установим ряд зависимостей командой вида:
# yum install perl-XML-Simple perl-XML-SAX perl-NetAddr-IP nmap wmic perl-XML-Twig net-snmp-utils perl-IO-Socket-INET6 perl-Net-Telnet perl-JSON perl-Time-HiRes perl-Encode-Locale perl-IO-Socket-SSL
При отсутствии wmic в установленных репозиториях, необходимо выполнить установку пакета:
# wget https://excellmedia.dl.sourceforge.net/project/pandora/Tools%20and%20dependencies%20%28All%20versions%29/RPM%20CentOS%2C%20RHEL/wmic-4.0.0tp4-0.x86_64.rpm
# rpm -ivh wmic-4.0.0tp4-0.x86_64.rpm
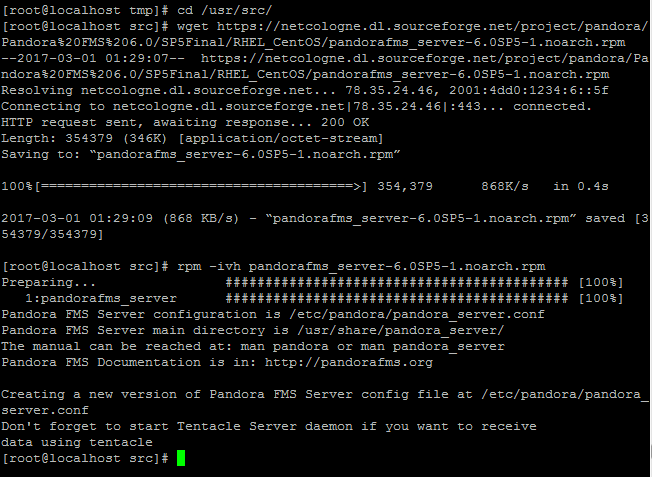
# cd /usr/src/
# wget https://netcologne.dl.sourceforge.net/project/pandora/Pandora%20FMS%206.0/SP5Final/RHEL_CentOS/pandorafms_server-6.0SP5-1.noarch.rpm
# rpm -ivh pandorafms_server-6.0SP5-1.noarch.rpm
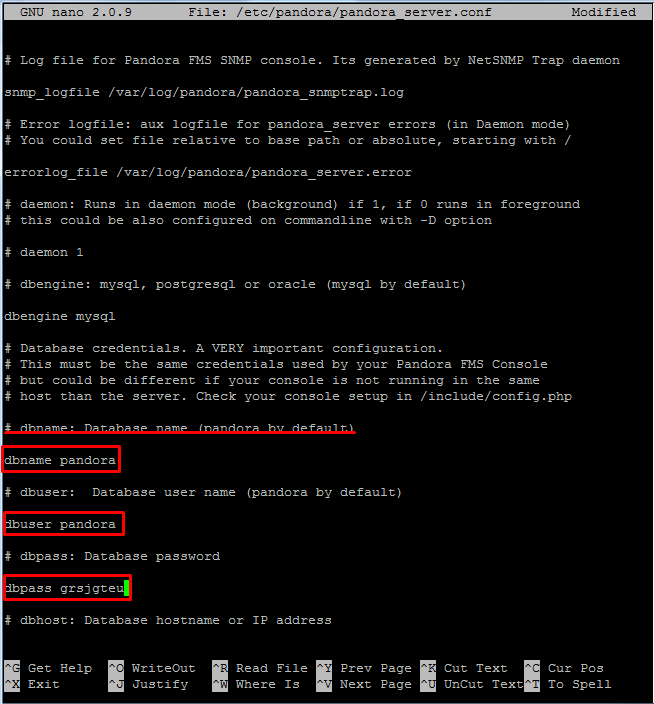
Выполним настройки доступа к БД MySQL в Pandora Server
Выполним запуск Pandora Server
# /etc/init.d/pandora_server start
# /etc/init.d/tentacle_serverd start

3. Установка Pandora Agent
Для установки Pandora Agent выполним ряд команд, вида:
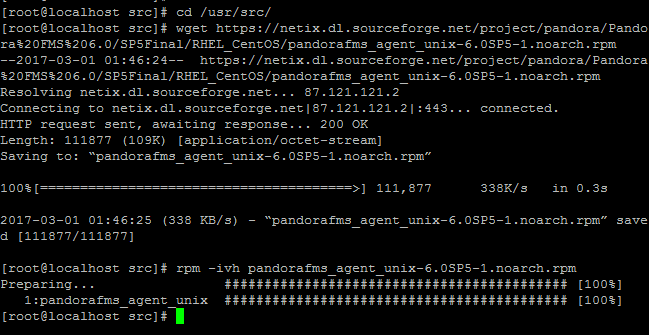
# cd /usr/src/
# wget https://netix.dl.sourceforge.net/project/pandora/Pandora%20FMS%206.0/SP5Final/RHEL_CentOS/pandorafms_agent_unix-6.0SP5-1.noarch.rpm
# rpm -ivh pandorafms_agent_unix-6.0SP5-1.noarch.rpm
# /etc/init.d/pandora_agent_daemon start

Остались вопросы?
Я — Компаниец Никита, менеджер компании Voxlink. Хотите уточнить детали или готовы оставить заявку? Укажите номер телефона, я перезвоню в течение 3-х секунд.
категории
VoIP оборудование
Digium D40
11 100 руб


Digium D40
11 100 руб
Digium D40
11 100 руб
Digium D40
11 100 руб
Digium D40
11 100 руб
Digium D40
11 100 руб
ближайшие курсы
Курсы по Asterisk
последняя неделя
каждого месяца
Новые статьи
Конфиденциальность в протоколе SIP
Интеграция с EnvyCRM

Обзор ПО для мониторинга звонков – OrderlyStats


ближайшие Вебинары
Инструменты troubleshooting сети на MikroTik
LTE-интернет на роутерах Mikrotik SXT LTE. Особенности, плюсы и минусы.
Контроль сайтов и пользователей на Mikrotik: кто куда ходит
Аггрегация каналов в DualWAN на Mikrotik
10 доводов в пользу Asterisk
Распространяется бесплатно.
Asterisk – программное обеспечение с открытым исходным кодом, распространяется по лицензии GPL. Следовательно, установив один раз Asterisk вам не придется дополнительно платить за новых абонентов, подключение новых транков, расширение функционала и прочие лицензии. Это приближает стоимость владения станцией к нулю.
Безопасен в использовании.
Любое программное обеспечение может стать объектом интереса злоумышленников, в том числе телефонная станция. Однако, сам Asterisk, а также операционная система, на которой он работает, дают множество инструментов защиты от любых атак. При грамотной настройке безопасности у злоумышленников нет никаких шансов попасть на станцию.
Надежен в эксплуатации.
Время работы серверов некоторых наших клиентов исчисляется годами. Это значит, что Asterisk работает несколько лет, ему не требуются никакие перезагрузки или принудительные отключения. А еще это говорит о том, что в районе отличная ситуация с электроэнергией, но это уже не заслуга Asterisk.
Гибкий в настройке.
Зачастую возможности Asterisk ограничивает только фантазия пользователя. Ни один конструктор шаблонов не сравнится с Asterisk по гибкости настройки. Это позволяет решать с помощью Asterisk любые бизнес задачи, даже те, в которых выбор в его пользу не кажется изначально очевидным.
Имеет огромный функционал.
Во многом именно Asterisk показал какой должна быть современная телефонная станция. За многие годы развития функциональность Asterisk расширилась, а все основные возможности по-прежнему доступны бесплатно сразу после установки.
Интегрируется с любыми системами.
То, что Asterisk не умеет сам, он позволяет реализовать за счет интеграции. Это могут быть интеграции с коммерческими телефонными станциями, CRM, ERP системами, биллингом, сервисами колл-трекинга, колл-бэка и модулями статистики и аналитики.
Позволяет телефонизировать офис за считанные часы.
В нашей практике были проекты, реализованные за один рабочий день. Это значит, что утром к нам обращался клиент, а уже через несколько часов он пользовался новой IP-АТС. Безусловно, такая скорость редкость, ведь АТС – инструмент зарабатывания денег для многих компаний и спешка во внедрении не уместна. Но в случае острой необходимости Asterisk готов к быстрому старту.
Отличная масштабируемость.
Очень утомительно постоянно возвращаться к одному и тому же вопросу. Такое часто бывает в случае некачественного исполнения работ или выбора заведомо неподходящего бизнес-решения. С Asterisk точно не будет такой проблемы! Телефонная станция, построенная на Asterisk может быть масштабируема до немыслимых размеров. Главное – правильно подобрать оборудование.
Повышает управляемость бизнеса.
Asterisk дает не просто набор полезных функций, он повышает управляемость организации, качества и комфортности управления, а также увеличивает прозрачность бизнеса для руководства. Достичь этого можно, например, за счет автоматизации отчетов, подключения бота в Telegram, санкционированного доступа к станции из любой точки мира.
Снижает расходы на связь.
Связь между внутренними абонентами IP-АТС бесплатна всегда, независимо от их географического расположения. Также к Asterisk можно подключить любых операторов телефонии, в том числе GSM сим-карты и настроить маршрутизацию вызовов по наиболее выгодному тарифу. Всё это позволяет экономить с первых минут пользования станцией.

Подпишийтесь и получайте
только свежие новости и материалы


