- ChapterВ 1В Configuring and Managing Local Accounts
- 1.1В About User and Group Configuration
- 1.2В About Files Storing User and Group Information
- 1.3В Changing Default Settings for User Accounts
- 1.4В Creating User Accounts
- 1.4.1В About umask and the setgid and Restricted Deletion Bits
- 1.5В Locking an Account
- 1.6В Modifying or Deleting User Accounts
- 1.7В Creating Groups
- 1.8В Modifying or Deleting Groups
- 1.9В Configuring Password Ageing
- 1.10В Granting sudo Access to Users
- Linux Groups and Users
- Groups
- Users
- Password expiry
- User Manager
- Switching Users
- Important Files
- Passwordless Login
ChapterВ 1В Configuring and Managing Local Accounts
This chapter describes how to configure and manage local user and group accounts in Oracle Linux 8.
1.1В About User and Group Configuration
You use the useradd and groupadd commands to add and delete users and groups, as well as to modify settings such as passwords, home directories, login shells, and group membership
In an enterprise environment that might have hundreds of servers and thousands of users, user and group account information is more likely to be held in a central repository rather than in files on individual servers. You can configure user and group information on a central server and then retrieve this information by using services such as the Lightweight Directory Access Protocol (LDAP) or the Network Information Service (NIS). You can also create home directories on a central server and then automatically mount or access these remote file systems when the user logs in to a system.
1.2В About Files Storing User and Group Information
Unless you select a different authentication mechanism during installation or use the authselect command to create an authentication profile, Oracle Linux verifies a user’s identity by using the information that is stored in the /etc/passwd and /etc/shadow files.
The /etc/passwd file stores account information for each user such as his or her unique user ID (or UID , which is an integer), user name, home directory, and login shell. A user logs in using his or her user name, but the operating system uses the associated UID. When the user logs in, he or she is placed in his or her home directory and his or her login shell runs.
The /etc/group file stores information about groups of users. A user also belongs to one or more groups, and each group can contain one or more users. If you can grant access privileges to a group, all members of the group receive the same access privileges. Each group account has a unique group ID ( GID , again an integer) and an associated group name.
By default, Oracle Linux implements the user private group ( UPG ) scheme where adding a user account also creates a corresponding UPG with the same name as the user, and of which the user is the only member.
Only the root user can add, modify, or delete user and group accounts. By default, both users and groups use shadow passwords, which are cryptographically hashed and stored in /etc/shadow and /etc/gshadow respectively. These shadow password files are readable only by the root user. The root user can set a group password that a user must enter to become a member of the group. If a group does not have a password, a user can only join the group if the root user adds that user as a member.
A user can use the newgrp command to log into a new group or to change the current group ID during a login section. If the user has a password, he or she can add group membership on a permanent basis. See the newgrp(1) manual page.
The /etc/login.defs file defines parameters for password aging and related security policies.
For more information about the content of these files, see the group(5) , gshadow(5) , login.defs(5) , passwd(5) , and shadow(5) manual pages.
1.3В Changing Default Settings for User Accounts
To display the default settings for a user account, use the following command:
The following output is displayed:
INACTIVE : Specifies after how many days the system locks an account if a user’s password expires. If set to 0, the system locks the account immediately. If set to -1, the system does not lock the account.
SKEL : Defines a template directory, whose contents are copied to a newly created user’s home directory. The contents of this directory should match the default shell defined by SHELL .
You can specify options to useradd -D to change the default settings for user accounts. For example, to change the defaults for INACTIVE , HOME and SHELL :
If you change the default login shell, you would most likely also create a new SKEL template directory that contains contents that are appropriate to the new shell.
If you specify /sbin/nologin for a user’s SHELL , that user cannot log into the system directly but processes can run with that user’s ID. This setting is typically used for services that run as users other than root .
The default settings are stored in the /etc/default/useradd file.
For more information, see Section 1.9, “Configuring Password Ageing” and the useradd(8) manual page.
1.4В Creating User Accounts
To create a user account by using the useradd command:
Create a user account by using the useradd command:
You can specify options to change the account’s settings from the default ones.
By default, if you specify a user name argument but do not specify any options, useradd creates a locked user account using the next available UID and assigns a user private group (UPG) rather than the value defined for GROUP as the user’s group.
Assign a password to the account to unlock it as follows:
The command prompts you to enter a password for the account.
If you want to change the password non-interactively (for example, from a script), use the chpasswd command instead:
Alternatively, you can use the newusers command to create a number of user accounts at the same time.
For more information, see the chpasswd(8) , newusers(8) , passwd(1) , and useradd(8) manual pages.
1.4.1В About umask and the setgid and Restricted Deletion Bits
Users whose primary group is not a UPG have a umask of 0022 set by /etc/profile or /etc/bashrc , which prevents other users, including other members of the primary group, from modifying any file that the user owns.
A user whose primary group is a UPG has a umask of 0002. It is assumed that no other user has the same group.
To grant users in the same group write access to files within the same directory, change the group ownership on the directory to the group, and set the setgid bit on the directory:
Files that are created in such a directory have their group set to that of the directory rather than the primary group of the user who creates the file.
The restricted deletion bit prevents unprivileged users from removing or renaming a file in the directory unless they own either the file or the directory.
To set the restricted deletion bit on a directory:
For more information, see the chmod(1) manual page.
1.5В Locking an Account
To lock a user’s account, use the passwd command with the -l option:
To unlock the account, specify the -u option:
For more information, see the passwd(1) manual page.
1.6В Modifying or Deleting User Accounts
To modify a user account, use the usermod command:
For example, to add a user to a supplementary group (other than his or her login group):
You can use the groups command to display the groups to which a user belongs, for example:
To delete a user’s account, use the userdel command:
For more information, see the groups(1) , userdel(8) and usermod(8) manual pages.
1.7В Creating Groups
To create a group by using the groupadd command:
Typically, you might want to use the -g option to specify the group ID (GID). For example:
For more information, see the groupadd(8) manual page.
1.8В Modifying or Deleting Groups
To modify a group, use the groupmod command:
To delete a user’s account, use the groupdel command:
For more information, see the groupdel(8) and groupmod(8) manual pages.
1.9В Configuring Password Ageing
To specify how users’ passwords are aged, edit the following settings in the /etc/login.defs file:
Maximum number of days for which a password can be used before it must be changed. The default value is 99,999 days.
Minimum number of days that is allowed between password changes. The default value is 0 days.
Number of days warning that is given before a password expires. The default value is 7 days.
For more information, see the login.defs(5) manual page.
To change how long a user’s account can be inactive before it is locked, use the usermod command. For example, to set the inactivity period to 30 days:
To change the default inactivity period for new user accounts, use the useradd command:
A value of -1 specifies that user accounts are not locked due to inactivity.
For more information, see the useradd(8) and usermod(8) manual pages.
1.10В Granting sudo Access to Users
By default, an Oracle Linux system is configured so that you cannot log in directly as the root user. You must log in as a named user before using either su or sudo to perform tasks as root . This configuration allows system accounting to trace the original login name of any user who performs a privileged administrative action. If you want to grant certain users authority to be able to perform specific administrative tasks via sudo , use the visudo command to modify the /etc/sudoers file.
For example, the following entry grants the user erin the same privileges as root when using sudo , but defines a limited set of privileges to frank so that he can run commands such as systemctl , rpm , and dnf :
For more information, see the su(1) , sudo(8) , sudoers(5) , and visudo(8) manual pages.
Copyright В© 2019, 2021 Oracle and/or its affiliates. Legal Notices
Источник
Linux Groups and Users
This article explains how to create, modify and remove local groups and users on Linux, with specific reference to the information needed for the RHCSA EX200 and RHCE EX300 certification exams.
Remember, the exams are hands-on, so it doesn’t matter which method you use to achieve the result, so long as the end product is correct.
Groups
Groups allow multiple users with similar security and access levels to be linked, making management of those users easier. A local group is created with the groupadd command.
The group information is visible in the «/etc/group» file. Each group has a GID. If this is not assigned explicitly, the next largest number is used. We can see group we just defined has been assigned the GID of 500.
If you have the same groups across multiple servers it makes sense to set the GID explicitly to make sure it is the same across all servers.
Existing groups are modified using the groupmod command.
Groups are deleted using the groupdel command.
Users
The useradd command creates new local users.
The user details are visible in the «/etc/passwd» file. If no UID is specified, the next largest UID is assigned. A new group with a group name matching the user name is also created. By default, the users home directory is created under the «/home» directory and the shell is «/bin/bash».
As with groups, if you have the same user across several servers it makes sense to explicitly define a UID so it matches on all servers. If the users should be assigned to an existing group, this can be done while creating the user also.
There are flags to alter the default shell (-s) and default home directory (-d), but for the most part these should be unnecessary.
Most of the user details can be modified using the usermod command.
The passwd command is used to set the password for a specified user, or the current user if no user name is specified.
The userdel command removes a user. The «-f» option deletes the user even if the user is currently logged in. The «-r» flag removes the user’s home directory.
When logged in as the «root» user, the command prompt will display a «#» symbol. For ordinary users, the «$» symbol is displayed.
Password expiry
Password expiry (ageing) is controlled using the chage command. To check the current password expiry information use the «-l» option.
There are a number of options available, but the most commonly used ones are shown below.
Changes are visible using the «-l» list option again.
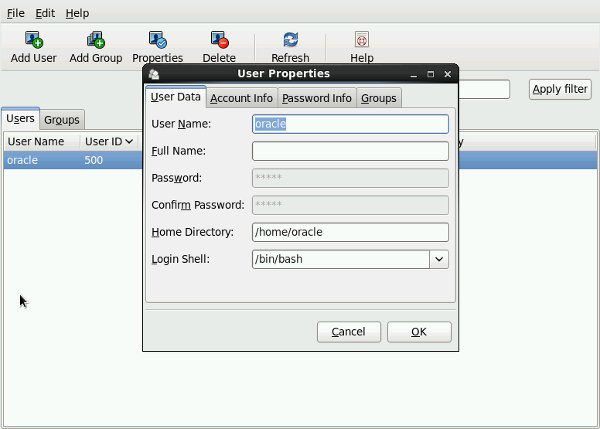
User Manager
The «User Manager» dialog is a GUI tool to manage users and groups. It can be started from the menu (System > Administraton > Users and Groups) or by running the system-config-users command.

Highlighting a specific user and clicking the «Properties» button allows you to amend the user information, account expiration, password expiration and group selection.
# ls -al /etc/skel total 36 drwxr-xr-x. 4 root root 4096 Feb 25 14:11 . drwxr-xr-x. 113 root root 12288 Mar 1 14:38 .. -rw-r—r—. 1 root root 18 Mar 29 2011 .bash_logout -rw-r—r—. 1 root root 176 Mar 29 2011 .bash_profile -rw-r—r—. 1 root root 124 Mar 29 2011 .bashrc drwxr-xr-x. 2 root root 4096 Nov 20 2010 .gnome2 drwxr-xr-x. 4 root root 4096 Feb 25 14:06 .mozilla [root@rhce1 oracle]#
Switching Users
The su command allows you to switch users. Including the «-» option makes the shell a login shell, so you also get the new user’s profile information set.
If no user is specified, it is assumed you are trying to switch to the «root» user.
Use the logout or exit command to return the the original shell.
The «-c» option allows you to pass a single command to the shell to be executed. This command could also be a saved script, or a script defined inline.
Important Files
The «/etc/profile» file contains system wide environment settings and runs all the scripts in the «/etc/profile.d» directory. If you want to make global changes, it is better to define a new «/etc/profile.d/custom.sh» file containing the changes, rather than editing the «/etc/profile» file directly.
When you create new user with the useradd command, the files in the «/etc/skel» directory are copied into the users home directory.
Of these files, probably the most commonly used is the «.bash_profile» file, typically for setting environment variables.
The «.bash_profile» file sources the «.bashrc» file, which is typically used for functions and aliases, although they can be placed in the «.bash_profile» file if you wish.
The first thing the «.bashrc» does is source the «/etc/bashrc» file, which contains system-wide functions and aliases.
It’s worth spending a little time looking through the contents of these files to look at the inter-dependencies, but much of the time I only edit the «.bash_profile» files in the individual user home directories.
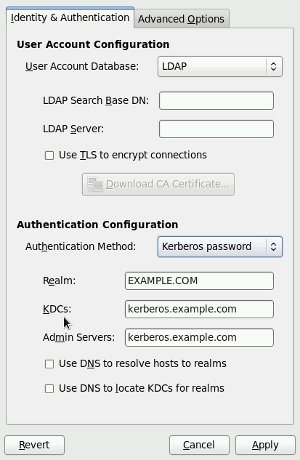
Companies often hold group information and user credentials in a centralized LDAP server. Linux can use LDAP, rather than local user and group informaton. Make sure the necessary packages are installed.
The «Authentication Configuration» dialog is available from the menu (System > Administration > Authentication) or by running the system-config-authentication command from the command line.

Change the «User Account Database» setting to «LDAP». The screen will alter to allow the entry of LDAP server information.
Passwordless Login
On the client, issue the following command and accept all the defaults.
Push the public key in the «
/.ssh/id_rsa.pub» file on the client to the «
/.ssh/authorized_key» file on the server.
Make sure the permissions are correct on the server.
You will now be able to SSH from the client to the server without a password.
Источник


