- Настройка OpenVPN клиента
- Установка
- Windows
- Linux CentOS
- Linux Ubuntu
- Android
- Настройка
- Пример конфигурационного файла
- Параметры конфигурационного файла
- Сертификаты
- Download the official OpenVPN Connect client software developed and maintained by OpenVPN Inc.
- Frequently asked questions
- How do I connect to OpenVPN?
- How do I connect if the OpenVPN client is integrated into my router?
- Ubuntu → Настраиваем OpenVPN клиент Linux на примере Ubuntu
- Connecting to Access Server with Linux
- Client software choice
- Linux Packages Discussed
- OpenVPN 3 Linux Client
- OpenVPN open source OpenVPN CLI program
- Ubuntu network management program
Настройка OpenVPN клиента
В данной инструкции подробно описан процесс настройки клиента OpenVPN на примере операционных систем Windows и Linux. Также, с ее помощью можно настроить скиента на Android.
Установка
Windows
Заходим на официальную страницу загрузки openvpn и скачиваем клиента для нужной Windows:

Запускаем скачанный файл и устанавливаем программу, нажимая «Далее».
Linux CentOS
Устанавливаем репозиторий EPEL:
yum install epel-release
yum install openvpn
Linux Ubuntu
apt-get install openvpn
Android
Установка выполняется из Google Play. Набираем в поиске OpenVPN Connect — нажимаем установить и принимаем условия.
Настройка
После установки программы конфигурационный файл не создается автоматически и его нужно создать вручную.
В системах Windows создаем файл config.ovpn в папке %programfiles%\OpenVPN\config.
* имя файла может быть любым, расширение должно быть .ovpn.
Для создания конфигурационного файла в Linux выполняем команду:
* чтобы служба openvpn автоматически выполняла соединение, необходимо, чтобы конфигурационный файл назывался client.conf.
Пример конфигурационного файла
client
dev tun
proto udp
remote 192.168.0.15 443
resolv-retry infinite
nobind
persist-key
persist-tun
ca ca.crt
cert client.crt
key client.key
dh dh2048.pem
tls-client
tls-auth ta.key 1
float
keepalive 10 120
comp-lzo
verb 0
Параметры конфигурационного файла
| Параметр | Значения | Описание |
|---|---|---|
| client | Строка говорит о том, что конфигурационный файл описывает клиентское подключение (программа сама устанавливает соединение, а не ждет, как сервер). | |
| dev | tap или tun | Выбор виртуального сетевого драйвера. TUN — сетевой уровень модели OSI, оперирует IP-пакетами. TAP — эмулирует Ethernet устройство и работает на канальном уровне модели OSI, оперируя кадрами Ethernet. Настраивая OpenVPN клиента, в большинстве случаев, необходимо выбирать tun. TAP необходимо использовать для работы определенных сервисов, например DHCP. |
| dev-node | любая строка | Параметр используется в системах Windows в случаях, если имеется несколько сетевых интерфейсов. Значение этого параметра должно содержать название сетевого подключения, через который должен работать OpenVPN. |
| proto | udp или tcp | Указывает, какой протокол использовать для передачи данных. В большинстве случаев, лучше использовать UDP, так как данный протокол создает меньше нагрузки на сеть. |
| remote | VPN-сервер и порт | Задает сервер, к которому должен подключаться клиент, а также сетевой порт (по умолчанию 1194), на котором OpenVPN принимает запросы. Можно указать несколько строк. |
| remote-random | Если указано несколько строк remote, данный параметр говорит, что необходимо подключаться к удаленным серверам в случайном порядке. | |
| resolv-retry | количество секунд или infinite | Используется в тех случаях, когда в качестве сервера указано доменное имя. Параметр задает время в секундах для повторного переподключения, если не удалось узнать имя сервера. infinite — держать связь с сервером постоянно. |
| nobind | Клиент использует динамический порт для подключения. | |
| user | учетная запись | Задает определенного пользователя для работы клиента (только для UNIX-систем). |
| group | группа | Задает определенную группу для работы клиента (только для UNIX-систем). |
| persist-key | Не перечитывает ключи при перезагрузке сервиса OpenVPN. | |
| persist-tun | Не перечитывает параметры туннеля при перезагрузке сервиса OpenVPN. | |
| http-proxy | сервер прокси и порт | Использовать прокси-сервер для подключения. |
| http-proxy-retry | Переподключаться к прокси-серверу, если связь была разорвана. | |
| http-proxy-timeout | количество секунд | Время, через которое выполнять попытки переподключения к прокси-серверу. |
| mute-replay-warnings | Параметр стоит задавать при использовании беспроводного соединения. Он отключит дублирование предупреждений пакетов. | |
| ca | пут к сертификату | Корневой сертификат удостоверяющего центра. Генерируем на сервере. |
| cert | пут к сертификату | Открытый ключ клиента. Генерируем на сервере. |
| key | пут к сертификату | Закрытый ключ клиента. Генерируем на сервере. |
| dh | пут к сертификату | Ключ с алгоритмом Diffie-Hellman (Диффи-Хеллмана). |
| remote-cert-tls | сервер | Исключает возможность mitm атаки, включая верификацию сертификата сервера. |
| tls-client | Указание на то, что это клиент TLS. | |
| tls-auth | ta.key 1 | Дополнительный уровень аутентификации посредством ключа TLS. |
| float | Удаленный хост может менять IP-адрес в процессе соединения, при этом последнее не будет разорвано. | |
| keepalive | секунд1 секунд2 | Пинговать каждые секунд1 сервер и если в течение секунд2 не будут получены ответные пакеты, перезапустить подключение. |
| cipher | алгоритм | Указывает алгоритм шифрования. Примеры: AES-256-CBC, AES-128-CBC, BF-CBC, DES-EDE3-CBC. |
| comp-lzo | Использовать сжатие. | |
| verb | число от 0 до 9 | Уровень детализации лога. 0 отключает отладочную информацию. |
| mute | число | Указывает сколько лог-сообщений может отображаться для каждой категории события. |
| auth-user-pass | ничего или путь к файлу | Говорит клиенту, что необходима аутентификация. Если не указан путь к файлу, клиент выкинет окно для авторизации, иначе прочитает данные из файла. |
| ipchange | команда или путь к скрипту | Выполняет команду при смене IP. |
| connect-retry | секунд | Переподключиться к серверу через указанное количество секунд, если соединение было разорвано. |
| connect-retry-max | число | Сколько раз повторять соединение, если оно было разорвано. |
| shaper | байт | Задает максимальную скорость передачи данных для исходящего трафика. |
| tun-mtu | число | Задает MTU. |
| status | путь к файлу | Путь к фалу хранения статуса. |
| log | путь к файлу | Путь к лог-файлу. |
| askpass | путь к файлу | Путь к файлу с паролем для приватного ключа (private key password). |
Наиболее полный и актуальный список параметров для OpenVPN можно получить командой openvpn —help (в Linux и Windows).
Сертификаты
Клиентские сертификаты генерируются на стороне сервера. Процедура следующая.
Источник
Download the official OpenVPN Connect client software developed and maintained by OpenVPN Inc.
Connect to any compatible server
Connect to Access Server, OpenVPN Cloud or any OpenVPN protocol-compatible server or service.
Supports 2FA and SAML authentication. Authenticate prior to profile download and connection.
Easily import connection configuration by just opening a URL.
Frequently asked questions
How do I connect to OpenVPN?
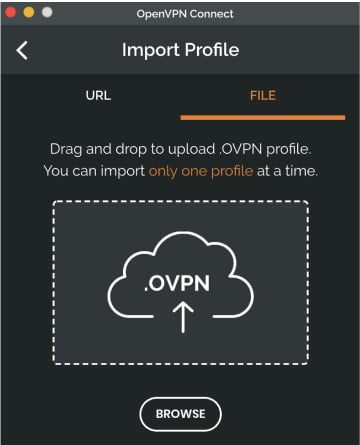
In order to connect to the VPN server or service, you need to obtain a file that contains the specifics needed for the connection. Such a configuration file is called a profile and has an .ovpn file extension.
If your business is using Access Server or OpenVPN Cloud and your IT department has provided you a URL, you can directly import the profile by entering the URL.
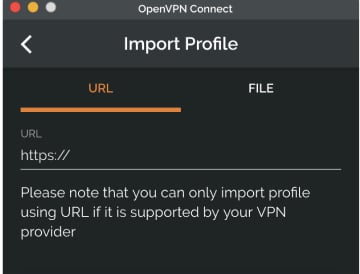
However, if you have received the profile as a file from your IT department or from some other OpenVPN compatible service, you can import the profile by selecting the file.
How do I connect if the OpenVPN client is integrated into my router?
In order to connect to the VPN server or service, you need to obtain a file that contains the specifics needed for the connection. Such a configuration file is called a profile and has an .ovpn file extension.
After receiving the .ovpn file from you IT department, you need to follow instructions specific to the router to extract specific information from the file and use it for configuration. We have made guides for some of the common firmware used in hardware routers and for pfSense:
Источник
 Ubuntu → Настраиваем OpenVPN клиент Linux на примере Ubuntu
 Здравствуйте.
Как и обещал, в выкладываю статью по настройке OpenVPN клиента Linux, мы с вами уже настроили OpenVPN сервер, и нам осталось настроить подключение к нему, иначе для чего он нам нужен, если к нему никто не подключается… С данным мануалом настройка будет весьма проста, эта схема была успешно оттестирована в условиях IT компании и работает по сей день.
Установим пакет OpenVPN:
Поднимем права до root:
Теперь нам необходимо создать конфигурационный файл клиента.
Нам остаётся скачать c OpenVPN сервера, где живет наш удостоверяющий центр, 4 файла:
И положить их в директорию /etc/openvpn рядом с файлом client.conf
т.к. это у нас обычный пользователь, то он должен ходить в нашу локальную сеть, а в интрнет через свое подключение, выясним как ходят пакеты для этого выполним трассировку пакета в локальную сеть:
traceroute 172.16.1.20
traceroute to 172.16.1.20 (172.16.1.20), 30 hops max, 60 byte packets
1 172.16.10.1 (172.16.10.1) 4.066 ms 8.001 ms 7.974 ms
2 172.16.1.20 (172.16.1.20) 7.952 ms 7.931 ms 7.910 ms
Видно что пакет ушел на адрес 172.16.10.1 и с интерфеса eth1 в локальную сеть к целевому IP
Выполним трассировку к google.ru, получаем ответ вида:
traceroute google.ru
traceroute to google.ru (173.194.32.159), 30 hops max, 60 byte packets
1 111.111.111.111 (111.111.111.111) 1.360 ms 1.252 ms 1.177 ms
2 46.61.227.225 (46.61.227.225) 1.865 ms 1.271 ms 1.707 ms
3 95.167.90.39 (95.167.90.39) 18.209 ms 95.167.90.37 (95.167.90.37) 18.170 ms 95.167.90.39 (95.167.90.39) 18.496 ms
4 74.125.146.86 (74.125.146.86) 17.827 ms 17.984 ms 17.946 ms
5 216.239.42.97 (216.239.42.97) 17.771 ms 18.058 ms 18.319 ms
6 216.239.42.83 (216.239.42.83) 17.765 ms 216.239.42.49 (216.239.42.49) 19.130 ms 19.004 ms
7 72.14.236.242 (72.14.236.242) 19.287 ms 18.554 ms 18.802 ms
8 173.194.32.159 (173.194.32.159) 18.025 ms 18.269 ms 18.224 ms
Видно что ответ вылетел черз шлюз сети к которой подключен клиент, а не через наш VPN канал
Для обычного пользователя все работает как надо, чтобы проверить под пользователем supersuer нам необходимо положить ключи в директорию openvpn и поменять запись в client.conf указывающих на названия ключа и сертификата
перезапустить OpenVPN клиента и повторить трасисровку пакетов
traceroute 172.16.1.20
traceroute to 172.16.1.20 (172.16.1.20), 30 hops max, 60 byte packets
1 172.16.10.1 (172.16.10.1) 4.066 ms 8.001 ms 7.974 ms
2 172.16.1.20 (172.16.1.20) 7.952 ms 7.931 ms 7.910 ms
В локальную сеть пакеты ходят без изменений, тут ничего не поменялось
traceroute google.ru
traceroute to google.ru (173.194.122.248), 30 hops max, 60 byte packets
1 172.16.10.1 (172.16.10.1) 6.115 ms 11.448 ms 11.500 ms
2 222.222.222.222 (222.222.222.222) 11.614 ms 11.649 ms 11.676 ms
3 10.158.192.1 (10.158.192.1) 11.691 ms 11.705 ms 11.719 ms
4 v811.m9-3.caravan.ru (212.24.42.49) 11.729 ms 11.744 ms 11.751 ms
5 msk-ix-gw1.google.com (195.208.208.232) 11.736 ms 15.341 ms 15.350 ms
6 66.249.94.100 (66.249.94.100) 15.346 ms 5.884 ms 8.451 ms
7 72.14.252.22 (72.14.252.22) 49.777 ms 49.787 ms 49.796 ms
8 173.194.122.248 (173.194.122.248) 49.510 ms 49.620 ms 49.671 m
А тут видно что пакет попал на наш OpenVPN сервер и вылетел во внешний мир через интерфейс eth0
Значит и эта маршрутизация работает правильно
На этом я свой опус пожалуй и закончу, если нашли ошибку пишите в личку, возникли вопросы оставляйте их в комментариях.
Источник
Connecting to Access Server with Linux
Client software choice
Connecting to OpenVPN Access Server from Linux requires a client program. It will capture the traffic you wish to send through the OpenVPN tunnel, encrypting it and passing it to the OpenVPN server. And of course, the reverse, to decrypt the return traffic.
Linux Packages Discussed
| OpenVPN Access Server | openvpn-as |
| OpenVPN 3 Linux Client | openvpn3 |
| OpenVPN open source | openvpn |
OpenVPN 3 Linux Client
The OpenVPN 3 Linux project is a new client built on top of the OpenVPN 3 Core Library. This client is the official OpenVPN Linux Client program. You can find an overview of the features, frequently asked questions, and instructions on installing the openvpn3 package on our OpenVPN 3 for Linux site.
After following the instructions there to install the client, you’ll need a connection profile. This is a file generated by your OpenVPN Access Server installation for your specific user account. It contains the required certificates and connection settings. Go to the Client web interface of your Access Server (the main address, not the /admin portion). Log in with your user credentials. You will be shown a list of files available to download. Pick the user-locked profile or the auto-login profile, and you will be sent a client.ovpn file. Save this file to your Linux operating system.
Once you’ve moved the file to your Linux system, you can import it.
You can start a new VPN session:
You can manage a running VPN session:
And so on. More details can be found here: OpenVPN3Linux.
OpenVPN open source OpenVPN CLI program
The open source project client program can also connect to the Access Server. The package is available in most distributions and is known simply as openvpn. It supports the option to connect to multiple OpenVPN servers simultaneously, and it comes with a service component that can automatically and silently start any auto-login profiles it finds in the /etc/openvpn folder, even before a user has logged in. This service component can be set to automatically start at boot time with the tools available in your Linux distribution if supported. On Ubuntu and Debian, when you install the openvpn package, it is automatically configured to start at boot time.
To install the OpenVPN client on Linux, it is possible in many cases to just use the version that is in the software repository for the Linux distribution itself. If you run into any connectivity problems when using outdated software, it may be due to a possible lack of support for higher TLS versions in older versions of OpenVPN. Follow the instructions found on the open source openvpn community wiki if you wish to install the OpenVPN client on your Linux system.
After installing, you will need a connection profile. This is a file generated by your OpenVPN Access Server installation for your specific user account. It contains the required certificates and connection settings. Go to the Client web interface of your Access Server (the main address, not the /admin portion). Log in with your user credentials. You will be shown a list of files available to you for download. Pick the user-locked profile or the auto-login profile, and you will be sent a client.ovpn file. Save this file to your Linux operating system somewhere. OpenVPN Access Server supports server-locked, user-locked, and auto-login profiles, but the OpenVPN command line client is only able to connect with user-locked or auto-login connection profiles.
We are assuming you are going to start the connection through either the command line as a root user, or via the service daemon. If you want unprivileged users to be able to make a connection, take a look at the community wiki for more information on how to implement that. Here we are going to focus on the simplest implementation; run the connection as root user directly, or via the service daemon.
Start a connection with an auto-login profile manually:
Start a connection with a user-locked profile manually:
If you use Google Authenticator or another extra factor authentication, add the auth-retry parameter:
To start an auto-login connection via the service daemon, place client.ovpn in /etc/openvpn/ and rename the file. It must end with .conf as file extension. Ensure the service daemon is enabled to run after a reboot, and then simply reboot the system. The auto-login type profile will be picked up automatically and the connection will start itself. You can verify this by checking the output of the ifconfig command; you should see a tun0 network adapter in the list.
One major feature that is missing with the command line client is the ability to automatically implement DNS servers that are pushed by the VPN server. It is possible, but it requires you to install a DNS management program such as resolvconf or openresolv, and it may or may not clash with existing network management software in your OS. The idea here, however, is that you use a script that runs when the connection goes up, and when it goes down, that uses resolvconf or openresolv to implement the DNS servers for you. The reason why this client is not able to manage it completely by itself is mainly because in an operating system like Windows, Macintosh, Android, or iOS, there is already an established single method of handling DNS management. It is therefore easy for us to create a software client for those operating systems that already knows how to handle DNS. But Linux is available in so many variations and also supports different programs and methods of implementing DNS servers, and so it was only reasonable to leave built-in DNS support out of the OpenVPN program and instead to provide, where possible, a script that handles DNS implementation. Such a script could even be written by yourself to do whatever tasks are necessary to implement the DNS servers in your unique situation.
Fortunately on Ubuntu and Debian, for example, there is the /etc/openvpn/update-resolv-conf script that comes with the openvpn package that handles DNS implementation for these operating systems. You need only to activate the use of these by following the instructions:
Open your client.ovpn file in a text editor:
At the very bottom simply add these lines:
The first line enables the use of external scripts to handle the DNS implementation tasks. The up and down lines are there to implement DNS servers pushed by the VPN server when the connection goes up, and afterwards to undo it, when the connection goes down.
Ubuntu network management program
There is also the option of connecting through the GUI using the openvpn extension for the Gnome network manager plugin. But this is currently a bit tricky to set up. There is for example the incorrect assumption that all VPNs will be able to redirect Internet traffic, and older versions might not understand the .ovpn file format, requiring you to split up the certificate embedded in it into separate file. And you would likely have to dig into the options to ensure that a default Internet traffic route going through the VPN server is not always enabled by default, especially for servers where you only give access to some internal resources, and not the entire Internet. However the advantage of using the GUI component is that you can start/stop the connection from the desktop environment on Linux.
Источник


