- Install Homebrew
- What is Homebrew?
- Requirements for installing Homebrew
- Install and uninstall
- Install nmap
- Install sqlmap
- Nmap mac os brew
- Microsoft Windows binaries
- Linux RPM Source and Binaries
- Mac OS X Binaries
- Source Code Distribution
- Other Operating Systems
- Nmap mac os brew
- Executable Installer
- Compile from Source Code
- Compile Nmap from source code
- Compile Zenmap from source code
- Third-party Packages
- Executing Nmap on Mac OS X
Install Homebrew
I am using MacBook for the first time, and I am studying it.
In order to install sqlmap and nmap today, I learned that it is more convenient to install brew in mac. I tried a lot of brew installation methods on the Internet, but different problems appeared during the installation. It took a few hours. I stayed at home after get off work. Next, look at the online process and the meaning of the commands step by step, and finally solved this problem, so I have this article to record the method of successful installation.
What is Homebrew?
homebrew is a software package management tool under the mac os platform. It has many useful functions such as installation, uninstallation, update, viewing, and searching. Package management can be achieved with simple instructions, without worrying about various dependencies and file paths, which is very convenient.
Requirements for installing Homebrew
- intel CPU
- OS X 10.9 or higher
- OS Big Sur 11.1 (My computer is this version)
- Support shell (sh or bash)
Install and uninstall
The biggest reason for the unsuccessful installation of brew according to the existing methods on the Internet is the wrong source. If it is a foreign source, even the source cannot be accessed, let alone downloading. If it can be accessed, the download speed is also very slow, more than a dozen. Start in ten minutes. Therefore, replacing the mirror source with domestic mirror resources is a better solution.
- First get the install file
Use curl to access the content of the install file and save it to the brew_install file (you need «Fan Qiang» to get the file), you can execute the following command
curl -fsSL https://raw.githubusercontent.com/Homebrew/install/master/install >>
brew_install
You can also use a browser to access the URL in the above command, then paste and copy the content of the web page into the brew_install file, and save it. 
2. Change the link resources in the install file, and replace the original link resources with the image resources of the University of Science and Technology of China.
The original mirror source is as follows:
Direct search: github.com/Homebrew/brew, github.com/Homebrew/homebrew-core, replace or re-add them after remarks, and become the following:


- installation
Execute the /bin/bash brew_install command and wait, the process is as follows:
Successful installation!
After executing brew help, you can see the help command.


Install nmap
Execute the brew install nmap command.

nmap is used normally. 
Install sqlmap
Execute the brew install sqlmap command. 
reference:
Источник
Nmap mac os brew
Nmap and Zenmap (the graphical front end) are available in several versions and formats. Recent source releases and binary packages are described below. Older version (and sometimes newer test releases) are available from the dist directory (and really old ones are in dist-old). For the more security-paranoid (smart) users, GPG detached signatures and SHA-1 hashes for each release are available in the sigs directory (verification instructions). Before downloading, be sure to read the relevant sections for your platform from the Nmap Install Guide. The most important changes (features, bugfixes, etc) in each Nmap version are described in the Changelog. Using Nmap is covered in the Reference Guide, and don’t forget to read the other available documentation, particularly the new book Nmap Network Scanning!
Nmap users are encouraged to subscribe to the Nmap-hackers mailing list. It is a low volume (7 posts in 2015), moderated list for the most important announcements about Nmap, Insecure.org, and related projects. You can join the 128,953 current subscribers (as of September 2017) by submitting your email address here:
You can also get updates from our Facebook and Twitter pages.
Nmap is distributed with source code under custom license terms similar to (and derived from) the GNU General Public License, as noted in the copyright page.
Microsoft Windows binaries
Please read the Windows section of the Install Guide for limitations and installation instructions for the Windows version of Nmap. You can choose from a self-installer (includes dependencies and also the Zenmap GUI) or the much smaller command-line zip file version. We support Nmap on Windows 7 and newer, as well as Windows Server 2008 and newer. We also maintain a guide for users who must run Nmap on earlier Windows releases..
Note: The version of Npcap included in our installers may not always be the latest version. If you experience problems or just want the latest and greatest version, download and install the latest Npcap release.
The Nmap executable Windows installer can handle Npcap installation, registry performance tweaks, and decompressing the executables and data files into your preferred location. It also includes the Zenmap graphical frontend. Skip all the complexity of the Windows zip files with a self-installer:
Latest stable release self-installer: nmap-7.92-setup.exe
Latest Npcap release self-installer: npcap-1.55.exe
We have written post-install usage instructions. Please notify us if you encounter any problems or have suggestions for the installer.
For those who prefer the command-line zip files (Installation Instructions; Usage Instructions), they are still available. The Zenmap graphical interface is not included with these, so you need to run nmap.exe from a DOS/command window. Or you can download and install a superior command shell such as those included with the free Cygwin system. Also, you need to run the Npcap and Microsoft Visual C++ 2013 Redistributable Package installers which are included in the zip file. The main advantage is that these zip files are a fraction of the size of the executable installer:
Linux RPM Source and Binaries
Many popular Linux distributions (Redhat, Mandrake, Suse, etc) use the RPM package management system for quick and easy binary package installation. We have written a detailed guide to installing our RPM packages, though these simple commands usually do the trick: You can also download and install the RPMs yourself:
Mac OS X Binaries
Nmap binaries for Mac OS X (Intel x86) are distributed as a disk image file containing an installer. The installer allows installing Nmap, Zenmap, Ncat, and Ndiff. The programs have been tested on Intel computers running Mac OS X 10.8 and later. See the Mac OS X Nmap install page for more details. Users of PowerPC (PPC) Mac machines, which Apple ceased selling in 2006, should see this page instead for support information.
Source Code Distribution
This is the traditional compile-it-yourself format. The Nmap tarball compiles under Linux, Mac OS X, Windows, and many UNIX platforms (Solaris, Free/Net/OpenBSD, etc.) It includes Zenmap, the GUI frontend.
Detailed Linux/BSD/Solaris compilation instructions and options are provided here, though this usually does the trick:
Most Mac OS X users install with our Mac installer, but we also provide Mac OS X source code compilation instructions.
If you are compiling Nmap anyway, you might prefer to get the very latest code from our SVN source code repository rather than downloading a tarball here.
Other Operating Systems
Many other operating systems support Nmap so well that I have no need to create and distribute binary packages myself. You can choose to use the packages below, or compile the source distribution, which is often newer. We have created installation pages for the following platforms:
Источник
Nmap mac os brew
Nmap has supported Mac OS X since 2001, and our support has only improved over time. While Mac users can compile Nmap themselves, we also offer an executable installer. Nmap makes use of Jhbuild and gtk-mac-bundler which are used to build other projects for Mac OS X, such as OpenSSL, libapr, libsvn. Nmap is also available through systems such as MacPorts and Fink which package Unix software for Mac OS X.
Executable Installer
The easiest way to install Nmap and Zenmap on Mac OS X is to use our installer. The Mac OS X section of the Nmap download page provides a file named nmap- .dmg , where is the version number of the most recent release. The .dmg file is known as a “ disk image ” . Installation instructions follow:
Download the file nmap- .dmg . Double-click the icon to open it. (Depending on how you downloaded the file, it may be opened automatically.)
The contents of the disk image will be displayed. One of the files will be a Mac meta-package file named nmap- .mpkg . Open it to start the installer.
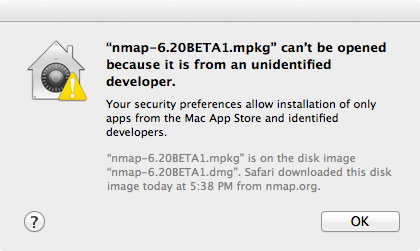
On OS X 10.8 and later, you may see a dialog like Figure 2.2.
Figure 2.2. Apple Gatekeeper block screen
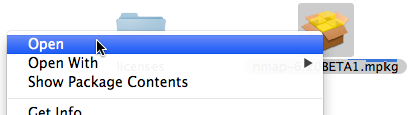
If this happens, it is necessary to right-click or control-click on the .mpkg and select “ Open ” , as shown in Figure 2.3.
Figure 2.3. Apple Gatekeeper Open menu
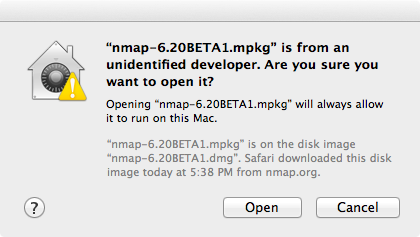
A dialog similar to the first will appear, this time having an “ Open ” button (shown in Figure 2.4). Click the button to continue.
Figure 2.4. Apple Gatekeeper Open screen
Follow the instructions in the installer. You will be asked for your password since Nmap installs in a system directory.
Once the installer is finished, eject the disk image by control-clicking on its icon and selecting “ Eject ” . The disk image may now be placed in the trash.
See the instructions in the section called “Executing Nmap on Mac OS X” for help on running Nmap and Zenmap after they are installed.
The programs installed by the installer will run on Intel Mac OS X 10.5 (Leopard) or later. Users of earlier versions will have to compile from source or use a third-party package. Instructions for PowerPC (PPC) Mac systems (which Apple ceased selling in 2006) are available on our wiki.
Compile from Source Code
Compiling Nmap from source on Mac OS X is no more difficult than on other platforms once a proper build environment is in place.
Compile Nmap from source code
Compiling Nmap on Mac OS X requires Xcode, Apple’s developer tools that include GCC and the rest of the usual build system. Xcode is not installed by default, but can be downloaded free of charge from the Mac App Store. After installing Xcode, open “ Preferences ” , select the “ Downloads ” tab, and click the “ Install ” next to “ Command Line Tools ” .
Xcode installations don’t always include the command line tools. You can install them by opening Xcode from the Applications folder, opening Preferencechoosing the Download header icon and clicking the Install button next to “ Command Line Tools ” .
Once you have installed Xcode and the command-line tools, follow the compilation instructions found in the section called “Linux/Unix Compilation and Installation from Source Code”. Note that on some older versions of Mac OS X, you may have to replace the command ./configure with ./configure CPP=/usr/bin/cpp . Also, on some newer Mac OS X versions, the libpcap version of the library provided by Apple may be too old. You may have to configure Nmap with the command ./configure —with-libpcap=included in order to use the compatible version included in Nmap, or you should update the libpcap installed on your machine.
Compile Zenmap from source code
Zenmap depends on some external libraries that do not come with Mac OS X, including GTK+ and PyGTK. These libraries have many dependencies of their own. A convenient way to install all of them is to use a third-party packaging system as described in Section . Once the dependencies are installed, follow the instructions in the section called “Linux/Unix Compilation and Installation from Source Code” to install Zenmap as usual.
Third-party Packages
Another option for installing Nmap is to use a system which packages Unix software for Mac OS X. The two discussed here are Fink and MacPorts. See the respective projects’ web sites for how to install the package managers.
To install using Fink, run the command fink install nmap . Nmap will be installed as /sw/bin/nmap . To uninstall use the command fink remove nmap .
To install using MacPorts, run sudo port install nmap . Nmap will be installed as /opt/local/bin/nmap . To uninstall, run sudo port uninstall nmap .
These systems install the nmap executable outside the global PATH . To enable Zenmap to find it, set the nmap_command_path variable in zenmap.conf to /sw/bin/nmap or /opt/local/bin/nmap as described in the section called “The nmap Executable”.
Executing Nmap on Mac OS X
The terminal emulator in Mac OS X is called Terminal , and is located in the directory /Applications/Utilities . Open it and a terminal window appears. This is where you will type your commands.
By default the root user is disabled on Mac OS X. To run a scan with root privileges prefix the command name with sudo , as in sudo nmap -sS . You will be asked for a password, which is just your normal login password. Only users with administrator privileges can do this.
Zenmap requires the X11 application to be installed. If it was not installed by default it may be available as an optional install on the Mac OS X installation discs.
When Zenmap is started, a dialog is displayed requesting that you type your password. Users with administrator privileges may enter their password to allow Zenmap to run as the root user and run more advanced scans. To run Zenmap in unprivileged mode, select the “ Cancel ” button on this authentication dialog.
Источник


