- Установка и настройка сервера SSH в Linux
- Установка пакетов SSH
- Настройка SSH
- Connecting to Your Instance
- Before You Begin
- Connecting to Your Linux Instance Using SSH
- Running Administrative Tasks on the Instance
- What’s Next
- Creating an SSH-Enabled User on an Oracle Cloud Infrastructure Compute Classic Oracle Linux Instance
- Options
- Before You Begin
- Purpose
- Time to Complete
- Background
- What Do You Need?
- Generating an SSH Key Pair
- Creating a User and Enabling SSH Access for the User
- Enabling sudo Privileges for the New User
- Want to Learn More?
- Credits
Установка и настройка сервера SSH в Linux
Secure Shell, т. е. SSH – протокол, обеспечивающий защищённые соединения и передачу данных между двумя удалёнными компьютерами. Изначально создавался на замену таким системам как rlogin и rcp. Как понятно из полного названия протокола, система SSH позволяет соединяться и управлять удалённым узлом (компьютером, маршрутизатором и т. д.), при этом защищая весь передаваемый трафик с помощью высоконадёжного шифрования.
SSH широко применяется администраторами серверов для их настройки и управления, да и обычные продвинутые пользователи — владельцы, например, сайтов или виртуальных серверов активно используют SSH для подключения к своей учётной записи на хостинге и использования командной оболочки сервера.
Сразу после окончания разработки система SSH стала активно трансформироваться в закрытый коммерческий продукт в виде версии SSH2. Но благодаря сообществу GNU версии протокола SSH1 и SSH2 были реализованы в виде открытого и свободно распространяемого ПО openSSH. В Linux-системах используется именно этот метапакет.
Метапакет SSH базово включает в себя сервер SSH (sshd) в качестве програмы-демона, а также несколько утилит: ssh – удаленная регистрация и выполнение команд, scp – передача файлов и ssh-keygen – для генерации пар SSH-ключей.
Установка пакетов SSH
Как уже говорилось система ssh в Linux-системах распространяется в виде составного метапакета, поэтому для установки всех требуемых утилит ssh нужно выполнить всего одну команду:
В Ubuntu
После чего начнется процесс установки

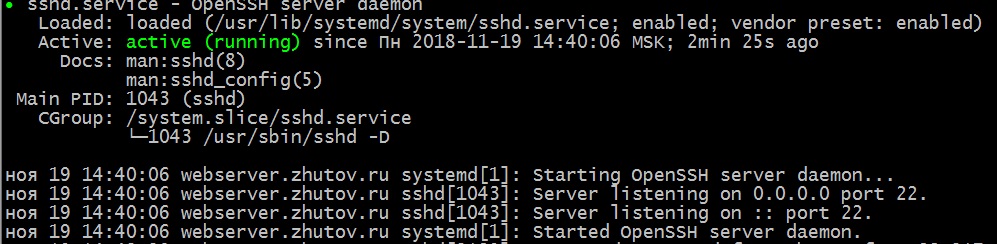
Как видно, менеджер пакетов сам распознает все зависимые и связанные пакеты и установит их. Также, по завершению установки, автоматически будет запущен SSH-сервер в режиме демона. Это можно проверить командой:
$ systemctl status sshd
или:
$ service sshd status даст тот же вывод. Теперь сервер работает с базовыми настройками по-умолчанию.
Настройка SSH
Режим работы SSH-сервера с настройками по-умолчанию хоть и является вполне работоспособным для небольших частных сетей, всё же нуждается в задании некоторых важных параметров для использования на высоконадёжных публичных серверах. Настройки демона хранятся в файле /etc/ssh/sshd_config. Посмотреть его можно командой
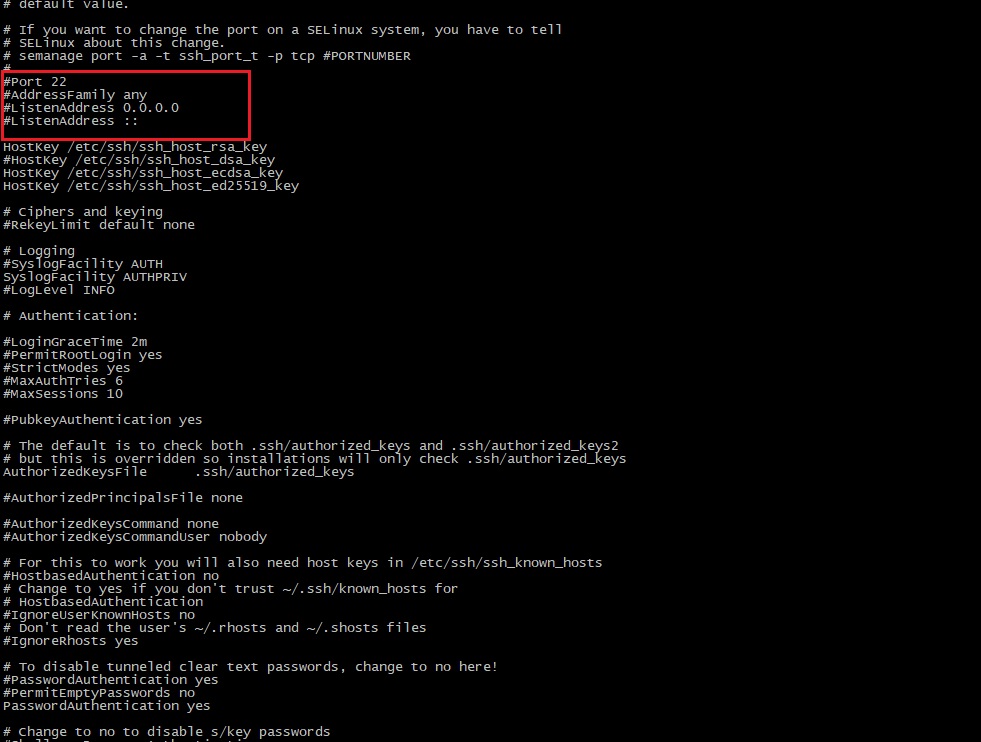
В первую очередь следует обратить внимание на следующие параметры: Port, AddressFamily, ListenAddress. Первый глобально задаёт номер порта, через который будет работать соединение и если оставить его стандартным, т. е. 22, то велика вероятность, что он будет слишком часто сканироваться роботами.
Примечание: для задания активации параметра необходимо раскомментировать соответствующую строку — убрать символ «#» в её начале.
Второй параметр задаёт семейство используемых IP-адресов — IPv4 и IPv6. Если, к примеру, используются только адреса IPv4, то очень рекомендуется установить для параметра
Для адресов семейства IPv6 используется значение inet6.
Параметр ListenAddress позволяет задавать порты для отдельных сетевых интерфейсов:
Поскольку реализация openSSH позволяет работать с протоколами SSH1 и SSH2, то разумно отключить использование SSH1, т. к. эта версия является устаревшей. Работа по SSH1 крайне не рекомендуется: Protocol 2
Очень полезным является параметр, позволяющий проводить авторизацию и шифрование трафика с помощью специальных SSH-ключей:
Следует заметить, что в таком случае серверу необходимо явно указывать, где хранятся открытые ключи пользователей. Это может быть как один общий файл для хранения ключей всех пользователей (обычно это файл etc/.ssh/authorized_keys), так и отдельные для каждого пользователя ключи. Второй вариант предпочтительнее в силу удобства администрирования и повышения безопасности:
AuthorizedKeysFile etc/ssh/authorized_keys # Для общего файла
AuthorizedKeysFile %h/.ssh/authorized_keys # Файл -> пользователь
Во втором варианте благодаря шаблону автоподстановки с маской «%h» будет использоваться домашний каталог пользователя.
Важно также отключать парольный доступ:
Или же, в случае, если всё-таки необходимо использовать доступ по паролю, то обязательно нужно отключать авторизацию по пустому паролю:
Для указания разрешённых или запрещённых пользователей и групп служат директивы DenyUsers, AllowUsers, DenyGroups, и AllowGroups. Значениями для них являются списки имён, разделяемых пробелами, например:
Следует также отключать root-доступ:
Иногда, когда следует задавать мультисерверную конфигурацию, очень удобно использовать алиасы (Aliases), что позволяет настроить сразу несколько режимов доступа (с разными хостами, портами и т. д.) и использовать их, указывая при этом конкретный алиас:
Настройки для алиасов хранятся либо глобально в /etc/ssh/ssh_config, либо раздельно для пользователей в
/.ssh/config. Здесь нужно не спутать с ssh_config! Пример:
Для применения сделанных настроек необходим перезапуск SSH-сервера:
Настройка и использование клиента SSH
Для подключения по к серверу используется команда:
где user_name – имя пользователя в системе, host_name – имя узла, к которому производится подключение, например:
При этом утилита ssh запросит (в зависимости от настроек сервера) логин, пароль или парольную фразу для разблокировки приватного ключа пользователя.
В случае авторизации по ключу, должна быть предварительно сгенерирована пара SSH-ключей — открытый, который хранится на стороне сервера, обычно в файле .ssh/authorized_keys в домашнем каталоге пользователя, и закрытый — используется для авторизации клиента и хранится, как правило, в каталоге .ssh/ домашней директории пользователя. Открытый ключ представляет собой «цифровой слепок» закрытого ключа благодаря которому сервер «знает», кто «свой», а кто «чужой».
Для генерации ключей используется утилита ssh-keygen:
Утилита предложит выбрать расположение ключей (лучше всё оставить по-умолчанию), обычно это каталог
/.ssh/, ввести парольную фразу для закрытого ключа. После чего будут сгенерированы открытый ключ id_rsa.pub и закрытый — id_rsa. Теперь нужно скопировать открытый ключ, т. е. «слепок» закрытого на сервер. Проще всего этого можно добиться командой:
Теперь можно выполнить подключение командой ssh и запустить защищённый сеанс удалённого управления.
Важно заметить, что использование сгенерированных openSSH-ключей несовместимо с PPK-форматом, используемым по-умолчанию в таких комплексах как PuTTY. Поэтому необходимо конвертировать имеющиеся openSSH-ключи в формат PPK. Удобнее всего это делать с помощью утилиты PuTTY – puttygen.exe.
Если вы нашли ошибку, пожалуйста, выделите фрагмент текста и нажмите Ctrl+Enter.
Источник
Connecting to Your Instance
You connect to a running Linux instance using a Secure Shell (SSH) connection. Most Linux and UNIX-like operating systems include an SSH client by default. Windows 10 and Windows Server 2019 systems should include the OpenSSH client, which you’ll need if you created your instance using the SSH keys generated by Oracle Cloud Infrastructure . For other Windows versions, you can download a free SSH client called PuTTY from http://www.putty.org.
Before You Begin
- You know the public IPВ address of your instance. See Launching a Linux Instance.
- You know the path to the private key file.
Connecting to Your Linux Instance Using SSH
Log in to the instance using SSH.
Use the following command to set the file permissions so that only you can read the file:
is the full path and name of the file that contains the private key associated with the instance you want to access.
Use the following SSHВ command to access the instance.
Note
Copy the following example to ensure the correct characters are used. If the wrong character is used in ssh -i , a Could not resolve hostname . No such host is known. error might occur.
is the full path and name of the file that contains the private key associated with the instance you want to access.
is the default username for the instance. For Oracle Linux and CentOS images, the default username is opc . For Ubuntu images, the default username is ubuntu .
is your instance IPВ address that you retrieved from the Console .
If the instance uses a key pair that was generated by Oracle Cloud Infrastructure , use the following procedure.
If this is the first time you are using this key pair, you must set the file permissions so that only you can read the file. Do the following:
- In Windows Explorer, navigate to the private key file, right-click the file, and then click Properties.
- On the Security tab, click Advanced.
- On the Permissions tab, for Permission entries, under Principal, ensure that your user account is listed.
- Click Disable Inheritance, and then select Convert inherited permissions into explicit permissions on this object.
- For Permission entries, select each permission entry that is not your user account and click Remove.
- Ensure that the access permission for your user account is Full control.
- Save your changes.
To connect to the instance, open Windows PowerShell and run the following command:
Note
Copy the following example to ensure the correct characters are used. If the wrong character is used in ssh -i , a Could not resolve hostname . No such host is known. error might occur.
is the full path and name of the file that contains the private key associated with the instance you want to access.
is the default username for the instance. For Oracle Linux and CentOS images, the default username is opc . For Ubuntu images, the default username is ubuntu .
is your instance IPВ address that you retrieved from the Console .
SSH private key files generated by Oracle Cloud Infrastructure are not compatible with PuTTY. If you are using a private key file generated during the instance creation process you need to convert the file to a .ppk file before you can use it with PuTTY to connect to the instance.
Note
If you changed the file permissions on your key to connect from a Windows system using OpenSSH, the key will not work with a PuTTY connection. Use OpenSSH to connect instead.
Convert a generated .key private key file:
Click Load, and select the private key generated when you created the instance. The extension for the key file is .key .
Click Save private key.
Specify a name for the key. The extension for new private key is .ppk .
Connect to the Linux instance using a .ppk private key file:
If the instance uses a key pair that you created using PuTTY Key Generator, use the following procedure.
In the Category pane, select Session and enter the following:
Host Name (or IP address):
is the default username for the instance. For Oracle Linux and CentOS images, the default username is opc . For Ubuntu images, the default username is ubuntu .
is your instance public IPВ address that you retrieved from the Console
Click Browse, and then select your .ppk private key file.
Click Open to start the session.
If this is your first time connecting to the instance, you might see a message that the server’s host key is not cached in the registry. Click Yes to continue the connection.
Tip
If the connection fails, you may need to update your PuTTY proxy configuration.
Running Administrative Tasks on the Instance
When you’re logged in as the default user, opc , you can use the sudo command to run administrative tasks.
What’s Next
Now that you’ve got an instance and have successfully connected to it, consider the following next steps:
Install software on the instance.
If you’re having trouble connecting, see Troubleshooting the SSH Connection.
Источник
Creating an SSH-Enabled User on an Oracle Cloud Infrastructure Compute Classic Oracle Linux Instance
Options
Expand All Topics
Hide All Images
Before You Begin
Purpose
This tutorial shows you how to create an SSH-enabled user on a Compute Classic Oracle Linux instance and grant sudo privileges to the new user.
Time to Complete
Background
When you create a Compute Classic instance using an Oracle-provided Oracle Linux image, a user named opc is created automatically. You can use ssh to log in to your instance as the opc user, using the SSH private key that corresponds to the SSH public key that you specified while creating the instance. After you have logged in to your instance as the opc user, you can create additional SSH-enabled users on your Compute Classic instance.
Note: When a Compute Classic instance that is set up to boot from a nonpersistent boot disk is stopped and re-created, any OS-level changes you may have made before the instance was stopped, including user creation, are lost.
What Do You Need?
You must know the public IP address of the Compute Classic instance on which you want to create new users. In this tutorial, we assume that the public IP address of your instance is 203.0.113.5
Generating an SSH Key Pair
On a local machine (not the Compute Classic instance), generate an SSH key pair for use by the new user, as shown in the following example.
When you are prompted for a file name, enter a file name of your choice. When you are prompted for a passphrase, press Enter to proceed without a passphrase.
In this example, the private key is stored in /home/joe/.ssh/myadmin, and the public key is stored in /home/joe/.ssh/myadmin.pub.
Copy the public key value to a text file. You’ll need this value later in this tutorial.
Creating a User and Enabling SSH Access for the User
Use ssh to connect as the opc user to the Compute Classic instance on which you want to create a new user.
In the ssh command, use the -i option to provide the private key that corresponds to the public key that you specified while creating the Compute Classic instance.
If this is the first time you’re logging in to the instance, a message similar to the following is displayed:
At the prompt, enter yes to proceed.
The following message is displayed:
Create a user, say myadmin .
Create a .ssh directory in the new user’s home directory.
Copy the public key value that you noted in step 2 of Generating an SSH Key Pair to the /home/myadmin/.ssh/authorized_keys file on the Compute Classic instance.
Verify that the public key was copied successfully to the Compute Classic instance.
To enable SSH access for the new user, edit the AllowUsers parameter in the /etc/ssh/sshd_config file by using vi or any other text editor.
The default AllowUsers setting in /etc/ssh/sshd_config is:
Change the AllowUsers setting as shown below:
Change (recursively) the owner and the group of the /home/myadmin/.ssh directory from root to the new user, myadmin.
Restart the sshd service.
Enabling sudo Privileges for the New User
To enable sudo privileges for the new user, edit the /etc/sudoers file by using the visudo command:
Note: This step must be done by the root user or by any other user who has sudo privileges. On instances creating using Oracle-provided Oracle Linux images, the opc user has sudo privileges.
In /etc/sudoers , look for the following line:
Add the following line right after the above line:
Here, myadmin is the autocreated group to which the new myadmin user belongs.
Exit the root user session and exit from the Compute Classic instance.
You can now use ssh to log in to the Compute Classic instance as the myadmin user, by using the private key that you generated in step 1 of Generating an SSH Key Pair.
Note: When a Compute Classic instance that is set up to boot from a nonpersistent boot disk is stopped and re-created, any OS-level changes you’ve made, including user creation, are lost.
Want to Learn More?
Reserving a Public IP Address in Using Oracle Cloud Infrastructure Compute Classic
Attaching an IP Reservation to an Instance in Using Oracle Cloud Infrastructure Compute Classic
Creating a Bootable Storage Volume in Using Oracle Cloud Infrastructure Compute Classic
Credits
Lead Curriculum Developer: Kumar Dhanagopal
Other Contributors: Octave Orgeron, Vimal Patel, Anamika Mukherjee
Источник


