- Установка MariaDB и клиента HeidiSQL в среде Windows
- Ethical hacking and penetration testing
- InfoSec, IT, Kali Linux, BlackArch
- How to install MariaDB on Windows. How to upgrade from MySQL to MariaDB on Windows
- Table of contents
- What is MariaDB
- Why MariaDB is better than MySQL
- Download MariaDB for Windows
- Installing MariaDB on Windows
- Upgrading from MySQL to MariaDB on Windows
- Upgrading from MySQL to MariaDB with saving databases
- Upgrading from MySQL to MariaDB with reset of databases
- Mysql to mariadb windows
- About
Установка MariaDB и клиента HeidiSQL в среде Windows
Ранее была написана статья Установка MySQL в Windows, которая и сейчас является актуальной (только версии необходимо устанавливать новые), но рынок программного обеспечения диктует нам свои правила, за которыми необходимо следить и идти нога в ногу. Как уже известно, вместо традиционного MySQL в Debian 9 по умолчанию используется MariaDB и при обновлении с предыдущих версии MySQL будет автоматически заменен на MariaDB. Поскольку, большинство веб-серверов работают именно на операционной системе Debian, а отладка программ веб-разработчиками в среде Windows, необходимо использовать одинаковое программное обеспечение.
Для начала необходимо скачать последнюю версию дистрибутива MariaDB (https://mariadb.com/downloads/mariadb-tx). На момент написания статьи название файла инсталляции была «mariadb-10.2.9-winx64.ext«
Запускаем данный файл и следуем инструкциям.
В первом окне выводится информация про установку MariaDB на ваш компьютер. Нажмите Next для продолжения или Cancel, чтобы выйти из мастера установки:
Далее необходимо внимательно прочитать лицензионное соглашение и подтвердить согласие. Естественно, никто его не читает, просто ставим галочку и жмем Next.
Следующим окном будет выбор программного обеспечения, которое будет установлено.
MariaDB Server:
— Database instance — установить экземпляр базы данных. С этой функцией можно установить только новую базу данных.
— Client Programs — клиентские программы, которые включают различные полезные инструменты для работы с базами данных.
— Backup utilities — утилиты резервного копирования (устанавливает резервные утилиты Mariabackup и Mbsteam)
Development Components — компоненты разработки (устанавливает файлы C/C++ и необходимые библиотеки):
— Client C API library (shared) — клиентская библиотека API C.
Third party tools — сторонние инструменты:
— HeidiSQL — мощный, простой и бесплатный клиент MySQL/MariaDB GUI от Ansgar Becker.
Установка базы даны происходит взаимосвязано с установкой Web-сервера Apache 2.4 VC15 и интерпретатора PHP 7, поэтому выбираем путь «C:\web_server\MariaDB\» и нажимаем Next.
В следующем окне необходимо дважды ввести пароль к учетной записи Root и подтверждаем пункт использования UTF8 в качестве набора символов сервера по умолчанию:
Далее вводим параметры по умолчанию, а именно устанавливаем как сервис MySQL, TCP порт 3306, размер буферных пулов 1023MB и размер страницы — 16KB:
В следующем окне нам предлагают включить плагин Feedback и отправить анонимную информацию об использовании. MariaDB распространяется под GPL license, то есть совсем бесплатно, поэтому поможем разработчикам программы поставив галочку на данном пункте. Более подробно http://mariadb.org/feedback_plugin/.
После проделанных операций все готово для установки MariaDB. Нажмите Install, чтобы начать установку. Нажмите Back, чтобы просмотреть или изменить любые параметры установки. Нажмите Cancel, чтобы закрыть мастер.
Ждем, пока программа установится:
Подтверждаем завершение установки нажатием на кнопку Finish:
Поздравляем, вы успешно установили систему управления базы данных MariaDB на ваш компьютер.
После установки на рабочем столе появится ярлык HeidiSQL:
Программа HeidiSQL являет собой очень мощную программу для работы с базами данных MySQL, Microsoft SQL и PostgreSQL. Имеет очень понятный и простой интерфейс, обладает высокой скоростью выполнения операций и множеством встроенных функций, таких как создание базы данных, ее наполнение, редактирование и сохранение.
При запуске программы нам необходимо подключится к базе данных. Для этого вводим новое название подключение и пароль:
Далее можно выполнять любые операции, которые допустимы с базами данных:
На этом установка закончена.
Ethical hacking and penetration testing
InfoSec, IT, Kali Linux, BlackArch
How to install MariaDB on Windows. How to upgrade from MySQL to MariaDB on Windows
Table of contents
What is MariaDB
MariaDB is a database management system (DBMS), which is based on MySQL and is largely compatible with it.
MariaDB and MySQL are fully compatible in the syntax of SQL queries. That is, if your program uses MySQL databases (for example, a website in PHP), then when you upgrade to MariaDB, you do not need to change anything in the program.
MariaDB is also binary compatible with MySQL connectors. Therefore, you do not need to change them after the upgrading.
MariaDB is compatible with MySQL database formats, but there are some nuances. If you transfer databases through export/import (for example, using a .SQL file), then the transferred databases will be fully compatible between any versions and do not require any further action. However, if you installed MariaDB on top of MySQL, that is, MariaDB uses database files of MySQL, then compatibility should be considered:
- MariaDB 10.2 is compatible with previous versions of MariaDB data files, as well as with MySQL 5.6 and MySQL 5.7, but is not compatible with MySQL 8.0.
- MariaDB 10.1 is compatible with previous versions of MariaDB data files, as well as with MySQL 5.6.
MariaDB runs on Windows and Linux. This program is completely open source. It is distributed in the form of source codes, as well as compiled executable files for Windows and all popular Linux distributions.
Why MariaDB is better than MySQL
MariaDB supports more Storage Engines.
In addition to the standard MyISAM, BLACKHOLE, CSV, MEMORY, ARCHIVE, and MERGE storage engines, MariaDB also has the following:
- ColumnStore, a column oriented storage engine optimized for Data warehousing.
- MyRocks, a storage engine with great compression, added from version 10.2
- Aria, MyISAM replacement with better caching..
- FederatedX (drop-in replacement for Federated)
- OQGRAPH.
- SphinxSE.
- TokuDB.
- CONNECT.
- SEQUENCE.
- Spider.
- Cassandra.
MariaDB has many different improvements and optimizations in the speed of data processing.
MariaDB is supplemented with new extensions and functions.
Download MariaDB for Windows
MariaDB is free, it is strongly recommended to download it from the official website. Download MariaDB: https://downloads.mariadb.org/
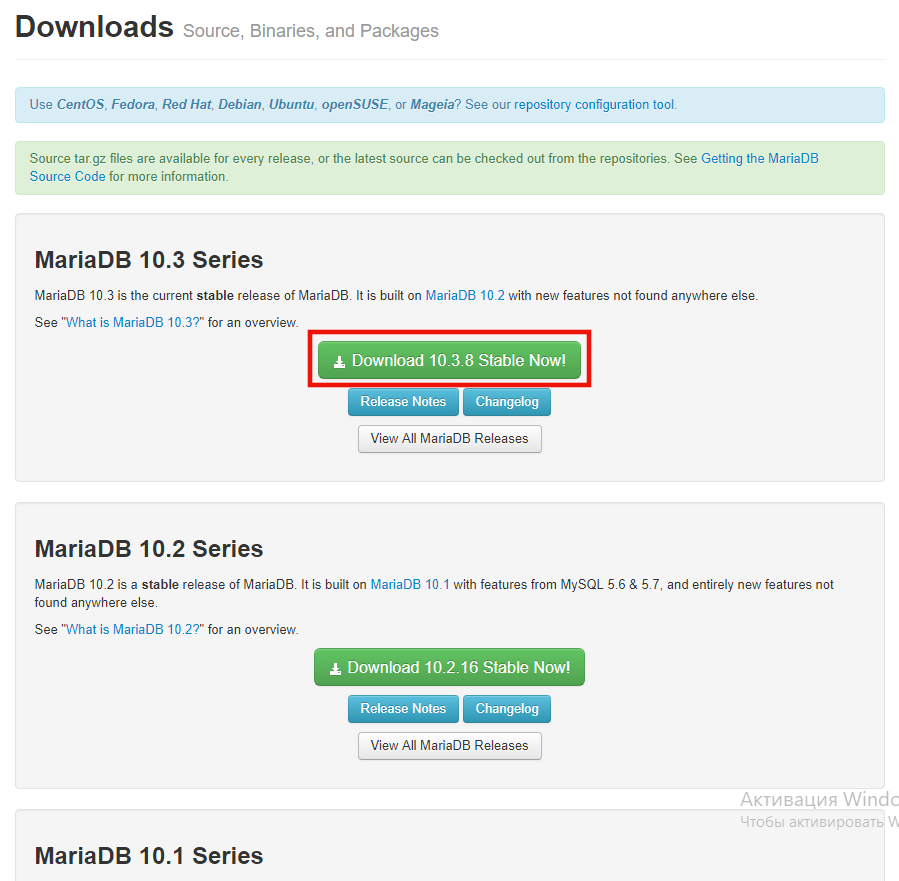
You will see several series – several major versions of the program. If you do not need any specific compatibility with MySQL, then just select the latest version and click the ‘Download’ button.
Since this program runs on different operating systems, in the next window you will see a large selection of files for download.

Windows x86_64 file are 64-bit versions, and Windows x86 are 32-bit versions.
.zip are portable versions that you need to install by yourself, but which give you complete freedom in fine tuning..msi is an installer for Windows.
In this manual, I will use the .zip version.
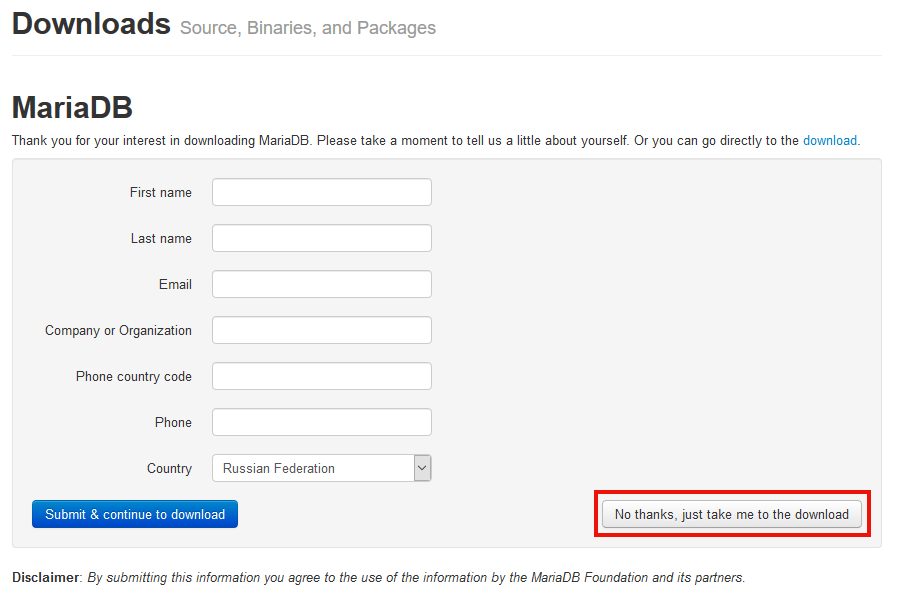
On the next page, you just need to click the button: ‘No thanks, just take me to the download’:
Installing MariaDB on Windows
For Windows, the MariaDB is distributed as an installer and ZIP archive. I prefer installation from a ZIP archive, since it gives full control over the process.
Installation in all the examples I perform in the C:\Server\bin\ folder, because MariaDB is part of the web server installed according to this guide. If your conditions are different, then consider this and make appropriate amendments.
Unzip the downloaded archive from MariaDB, rename the folder to mariadb and move it to C:\Server\bin\.
Move the C:\Server\bin\mariadb\data\ folder to the C:\Server\data\DB\ folder.
In the C:\Server\bin\mariadb\ folder create a my.cnf file and copy into it:
To install and lunch the service, run the following commands:

Upgrading from MySQL to MariaDB on Windows
Upgrading from MySQL to MariaDB with saving databases
You can perform the upgrading in different ways. I will show the most universal method, which guarantees full compatibility and the absence of further problems.
You need to start by creating a backup of the databases. We will do this in the Windows command line using the mysqldump utility (supplied with MySQL and located in the bin folder).
Open a Windows command prompt. To do this, click Win+x and select Windows PowerShell (Administrator). In the opened window, type
Let us move to the folder where this utility is located (you may have another path):
Dump (backup) all databases with the following command:
Now in the C:\Server\bin\mysql-8.0\bin\ folder the all-databases.sql file will appear – be sure to copy it to a safe place!
Now stop the MySQL service and remove it from startup:
In addition, copy the C:\Server\data\DB\data\ folder to the safe place – this is an additional backup of the MySQL database files – in case something goes wrong with MariaDB and you want to roll back to MySQL.
Now delete the C:\Server\bin\mysql-8.0\ (binary files) and C:\Server\data\DB\data\ folders.
Unzip the downloaded archive from MariaDB, rename the folder to mariadb and move it to C:\Server\bin\.
Move the C:\Server\bin\mariadb\data\ folder to the C:\Server\data\DB\ folder.
In the C:\Server\bin\mariadb\ folder create a my.cnf file and copy into it:
To install and launch the service, run the following commands:
To deploy databases from a backup, go to the C:\Server\bin\mariadb\bin\ folder:
And run the command like this:
For example, I have the all-databases.sql file with a backup of the databases located in the h:\Dropbox\!Backup\ folder, then my command is this:
Wait until the import is complete – if the file is large, the process can take for a while.
Upgrading from MySQL to MariaDB with reset of databases
Stop the MySQL service and remove it from startup:
Delete the C:\Server\bin\mysql-8.0\ (binary files) and C:\Server\data\DB\data\ folders.
Unzip the downloaded archive from MariaDB, rename the folder to mariadb and move it to C:\Server\bin\.
Move the C:\Server\bin\mariadb\data\ folder to the C:\Server\data\DB\ folder.
In the C:\Server\bin\mariadb\ folder create a my.cnf file and copy into it:
To install and launch the service, run the following commands:
Mysql to mariadb windows
MySQL to MariaDB
Windows batch scripts to export All MySQL Databases and Users and import into MariaDB (or other MySQL version)
My fist introduction to MySQL was when I installed WampServer on my Windows XP development machine several years ago. At that time it was MySQL version 5.0.45 and I found it really easy, using PhpMyAdmin, just to utilise the «create a new User and a Database with the same name» option for each of my projects. Sure it may of been a bit lazy, but it worked.
Over the years I ended up accumulating 60+ databases and their associated user. Even when I upgraded my version of WampServer I still kept the same database as it seemed «too hard» to migrate everything to the later version of MySQL (5.6.12). I simply moved the old version into the correct location and kept using it.
Recently I decided it was time to upgrade and check out what the newer versions have to offer. In doing my research I discovered that quite a few people were not happy with the memory usage of the later MySQL versions and there seemed to be a general recommendation to try MariaDB.
The 2 scripts that I created enabled me to export all my databases, users and their permissions from MySQL and import them into MariaDB . and I discovered a few things along the way.
So lets start with some assumptions.
- You are running Windows (7,8,8.1,10) — sorry but if you are still running Windows XP (32 bit) this is not going to work for you
- You have an existing MySQL installation with a number of databases and users defined
- You are running WampServer 2.4 or later
- I installed WampServer to D:\wamp so change this out, below, to suit your particular situation
Disclaimer: I have heavily modified the default WampServer v2.4 for my own purposes, but I’m pretty sure this will work on the standard edition.
Downloading the Latest Stable release
- Head over to the MariaDB site and download the latest Stable version (10.1.14 as at the time this is written)
- Make sure you pick the ZIP file Package Type for the Windows x86_64 OS / CPU. Do not use the msi installer!
- Extract the contents of the Zip file into a temporary location. We will move it to the correct location as we progress.
Setting up on WampServer
Make sure you WampServer is running
If you look in D:\wamp\bin\mysql you should find a folder with your current version of MySQL, for WampServer v2.4 it was version v5.6.12 stored in the mysql5.6.12 folder.
Now perform the following tasks.
Create a folder for the new version ensuring the correct name. For version 10.1.14, it should be mysql10.1.14 .
Copy the MariadDB contents from the temporary folder (Step 3 above) into this new folder. Make sure that the bin, data, lib and share folders are directly under the mysql10.1.14 folder.
Note: you do not need to copy the include, mysql-test and sql-bench folders if you want to save space.
Copy the my.ini and wampserver.conf files from the mysql5.6.12 folder and paste into the new mysql10.1.14 folder.
Now you need to edit my.ini with your favourite text editor and modify the basedir , log-error and datadir entries. You should just need to change the version number to point to the new locations.
Because MariaDB is compatible with MySQL there is no need to modify wampserver.conf .
Exporting your existing data
With your current MySQL server running perform the following steps.
- Save the 2 batch scripts ( exportAllDbs.cmd and importAllDbs.cmd ) into the new mysql10.1.14 folder.
- Open a Command Prompt window and change directory to the new location. e.g. cd /d d:\wamp\bin\mysql\mysql10.1.14
- Run the Export script and ensure you pass the root password as the only parameter e.g. exportAllDbs.cmd rootPassword
That’s it. you have now exported all you databases and users to the dump folder. Simple wasn’t it 😄
Importing the exported data
Once you have run the Export command, you should now find a dump folder that contains .sql files for each of your databases. In addition there will be a allUsers.sql file in the current folder.
Now comes the tricky bit. First you need to stop the currently running MySQL instance. You can use any of the following methods to achieve this.
- Use the WampServer utility to stop the MySQL service.
- Use Task Manager’s Service Tab to stop the service
- Use the Administrative Tools/Service applet to stop the service.
- From an Admin Command Prompt use net stop wampmysqld
Now that the current SQL service is stopped, we need to start the new mysqld.exe (MySQL daemon). We will achieve this by running the service manually so we can test everything first.
First though we need to make a quick change to the my.ini file.
If you have copied the my.ini file as instructed you should see the WampServer configuration section has all its settings, for the existing mysqld daemon, under the section called wampmysqld .
Change the file so it looks like the following:
This enables mysqld.exe to use the correct settings when run from the command line. To ensure your changes work as expected run the following command:
The following is the output you are looking for:
If you only see bin\mysqld.exe would have been started with the following arguments: —port=3306 then the section in my.ini is not set correctly.
Once you are happy that the correct settings are being used, you should start the Server with the following command:
Once the server has started you will need a second Command Prompt window and change directory to the same location. e.g. cd /d d:\wamp\bin\mysql\mysql10.1.14
Now run the second script to import the databases.
Once the script has completed, you should run the following command to shut down the mysql daemon.
Note 1: Don’t forget to substitute rootPassword with your real root password!
You have now imported all you databases and user information into the new database server, so lets get it working with WampServer.
First you need to edit the my.ini file and re-instate the service name as the ini section. e.g.
- Now right click on the WampServer icon and click Refresh. This will update the configuration of your system and once complete you should now find a new version listed.
- Click on the new version (10.1.14) to swap to the new server.
What if it does not work?
If you have issues, the first thing is to select the previous version of the MySQL server and make sure that still works.
If you have followed these instructions correctly you can always remove the databases from the new installation and start again making sure you correct the cause of your issues.
Deleting the Data directory
I can’t stress enough that you need to make sure you do not delete the wrong data folder!
- Move into the MariaDB data directory (e.g. cd /d d:\wamp\bin\mysql\mysql10.1.14\data )
- delete all the contents in this folder (e.g. rd /s /q . — that command will remove everything from the current folder.)
- Copy the contents of the data folder you saved in the temporary location when you extracted the zip file. You now have a Blank data set.
- Make what ever changes you need to make
- Run the Import script again.
What I discovered (aka Tips and Traps).
- The default root password for a fresh install of MariaDB is blank — e.g. there is no password!
- After importing all you databases and uses, the root password will be the same as it was in your previous install
- The underscore character, when used as part of a database name, may cause issues on older version of MySQL. The Export script attempts to work around this issue.
To Print out the current setting use the following command:
See what the default settings are for the mysql daemon:
If you have issues or feedback create an issue so we know about it.
About
Windows batch scripts to export All MySQL databases and Users and Import into MariaDB (or other MySQL version)


