- Download and use iTunes for Windows
- If you can’t access the Microsoft Store
- Explore iTunes for Windows
- Manually manage and sync your iPhone, iPad, or iPod touch
- Change settings and manage your account
- Best Windows 10 Music Downloader
- Top Three Windows 10 Music Downloading Programs
- Streaming Audio Recorder
- Music Chow
- Comparison of the Windows 10 Music Downloader
- How to play sound on two devices at once in Windows 10
- How can I output audio to multiple devices in Windows 10?
- 1. Enable Stereo Mix
- 2. Select Output Devices to play audio from specific apps
- Spotify Community
- Windows 10 — Left corner song banner (pause,stop) — FIX IT
Download and use iTunes for Windows
With iTunes for Windows, you can manage your entire media collection in one place. Subscribe to Apple Music to access millions of songs. Buy music and movies from the iTunes Store. And sync content from your computer to your iPhone, iPad, or iPod touch.
If you can’t access the Microsoft Store
![]()
Explore iTunes for Windows
To navigate iTunes, use the buttons in the navigation bar at the top of the iTunes window. To switch to a media type, like Music, Movies, TV Shows, Podcasts, or Audiobooks, click the pop-up menu in the upper-left corner.
Listen to music
Subscribe to Apple Music to access millions of songs, buy music from the iTunes Store, listen to Radio, or listen to music imported into iTunes.
Listen to Apple Podcasts
Discover and subscribe to podcasts that entertain, inform, and inspire. Browse free episodes and shows about a variety of topics.
![]()
Watch movies and TV shows
Browse categories to find movies and TV shows that you can buy, or find movies you can rent.
Listen to audiobooks
Browse categories to find audiobooks that you can buy.
Store availability and features might vary by country or region. See what you can buy in your country or region.
![]()
Manually manage and sync your iPhone, iPad, or iPod touch
You can use iTunes for Windows to back up and update your iPhone, iPad, or iPod touch, and to sync content from your computer to your device.
You can also use iCloud for Windows to access your photos, contacts, calendars, files, and more across all of your devices.
![]()
Change settings and manage your account
- Choose Account > View My Account to view information about your purchase history, manage your subscriptions, change your payment information, and more.
- Choose Account > Sign Out to sign out of iTunes with your Apple ID and remove access to your content from iTunes.
- Choose Edit > Preferences to change things like your language, set restrictions, and more.
If you change your language in iTunes, you might have to quit iTunes and reopen it.
Best Windows 10 Music Downloader
Last September 2014, Microsoft officially unveiled their latest Windows Operating System – Windows 10. And on July 29, 2015, this newest OS has finally reached to the hands of the consumers through Microsoft’s system update. Equipped with the company’s virtual assistant named Cortana, Windows 10 promises new and exciting features such as the return of the overhauled start menu, revamped action center, touch-based browser Edge, optimized Windows Store and many more.
However there’s still one lacking feature to this newest baby from Microsoft, the inability to automatically download songs from the Internet. Thus, a Windows 10 music downloader is indispensable if you need to save tons of free music on the web to PC. Based on the research and personal experience, here handpicks three MP3 downloading tools which are easy, efficient and safe.
Top Three Windows 10 Music Downloading Programs
Streaming Audio Recorder
Not all music downloaders come fully compatible to Windows 10 but luckily, there are those that can run on this OS smoothly. Streaming Audio Recorder is a full-pledged audio tool that enables you to record audio chats, sound from video streaming websites and even music playing from live radio stations. Other than recording music, it can likewise directly search and download songs, auto-add ID3 tags, convert audio file into different formats, transfer files from iTunes, edit audio and other valuable features that users will truly enjoy.

What’s great about this music downloader for Windows 10 is that it is very simple to use, below are the steps to follow:
- Download and install the Streaming Audio Recorder on your PC.
- Click “Search” tab on the left side of the main interface.
- Input the appropriate keywords into the search box, then press the “Enter” key.
- A list of matching results will be displayed, download one or multiple songs and hit “Add to Download” button.
- You will be redirected to the “Download” – “Downloading” panel, there you can check the downloading progress.
- Once done, open the destination folder to enjoy the songs offline.
Aside from the ability to efficiently download music on Windows 10, this program can also add music to iTunes which lets you enjoy music conveniently. All you need to do is to locate the file you want to transfer from your library, open “Tools” menu and select “Add to iTunes” from the drop-down menu. Drag the files into the pop-up window, click “Start” to add them to iTunes. Later, just connect your idevice to Windows 10 for updating the music data.
![]()
Music Chow
Another program you could try is Music Chow, a software provides free music downloads for Windows 10 with no registration or even membership cost at all. It is a desktop music search engine which gathers files from the internet then return the request with matching results. Included on the program is a music player, and various music search categories with multiple language support.

Its operations are also easy to handle, the first step is to install it on your PC. After launching it, you will see a large search bar for you can enter any desired keywords and wait until the result shows up. To download a song, right click the entry and select “Save song” from the available options. Music Chow is straight on convenient to use, but it doesn’t guarantee the validity of results since it gathers data from the Internet in real time. Some links can be good while others can likewise be dead. Also, the risk of downloading an incomplete file is more likely to happen.
Ares is yet another software that can download music on Windows 10. It uses the same technology as what Torrent employs, the P2P file sharing system which allows users to download music and other multimedia files fast and easy. Having a huge network of users, users can quickly search the MP3s they want and save it directly on their computers.
- Install Ares on desktop and run it. On the blank search bar, enter the keywords of the music file you want to download.
- Hit “Search” and choose an option from the available results, play them to check the quality.
- Click “Start” and wait until the files have been completely downloaded.

While the original version of Ares is 100% free, due to financial problems, the developers discontinued the original version and decided to make the new one a paid software. Should you find some websites offering free Ares software, you can download it instantly.
Comparison of the Windows 10 Music Downloader
After knowing some ways to download songs on Windows 10, we find that each one of them differs from the other. When choosing the right software, make sure that it meets your needs without sacrificing price as well as quality. Check out this this mini table below for a quick comparison of the introduced programs.
How to play sound on two devices at once in Windows 10

- Wondering if there’s a way to output audio to multiple devices in Windows 10? We’ve got a few quick tips for you.
- For example, you may easily use the Stereo Mix option in order to adjust it to play audio from two devices at once.
- This Audio Troubleshooting section can also help you remedy any sound issues you may encounter.
- Even if you lack the experience of a tech expert, check out our Windows 10 Tips Hub. The included comprehensive guides shouldn’t scare you off.
There is no secret that Windows plays audio through one connected output device by default.
Thus, users will usually need to switch between alternative connected speakers or headphones to select the required playback device.
However, you can configure Windows 10 so that it plays sound from two connected playback devices simultaneously.
This is how you can play audio from two connected playback devices at once in Windows 10.
How can I output audio to multiple devices in Windows 10?
- Enable Stereo Mix
- Select Output Devices to play audio from specific apps
1. Enable Stereo Mix
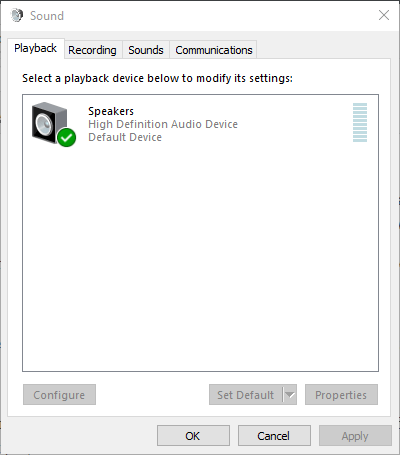
- Right-click the Speakers icon on the system tray and select Sounds.

- Select the Playback tab shown in the snapshot directly below.
- Then select your primary speakers audio playback device and click Set as default. That will be one of the two playback devices that play the audio.
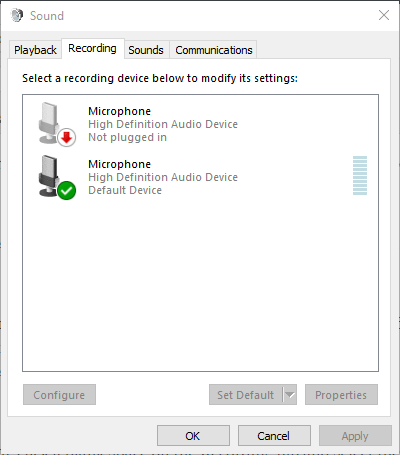
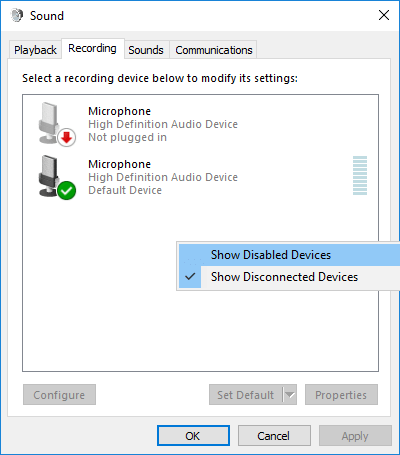
- Select the Recording tab shown directly below.
- Right-click a blank space on the Recording tab and select the Show Disabled Devices option. Then you will usually see Stereo Mix on the Recording tab.
- Right-click Stereo Mix and select the Enable option.
- Then right-click Stereo Mix to select the Set as Default Device option on its context menu.
- Click Properties on Stereo Mix’s context menu to open the Stereo Mix Properties window.
- Select the Listen tab on the Stereo Mix window.
- Then click the Listen to this device checkbox.
- Select the second playback device listed on the Playback this device drop-down menu.
- Click the Apply and OK buttons on both the Stereo Mix Properties and Sound window.
- Restart your desktop or laptop. Thereafter, Windows will play audio at the same time from your primary audio device and the one you selected on the Playback this device drop-down menu.
Windows 10 includes a Stereo Mix option that you can adjust to playing audio from two devices at once. However, that is not enabled by default in Windows 10.
Thus, you’ll need to enable Stereo Mix in Win 10 and then configure its settings as described above.
Note that not all users will always see Stereo Mix on the Recording tab even after selecting Show Disabled Devices. That’s usually due to your laptop’s or desktop’s sound driver.
Some of the latest sound drivers don’t support Stereo Mix anymore. So you might need to install an older sound driver if you can’t enable Stereo Mix.
If your HDMI doesn’t show up in playback devices on Windows 10, check out this step-by-step guide to solve the problem.
Also, if you’re sure that the problem is your driver, to avoid similar issues in the future you can block Windows 10 from auto-updating the driver with the help of this easy to follow guide.
2. Select Output Devices to play audio from specific apps
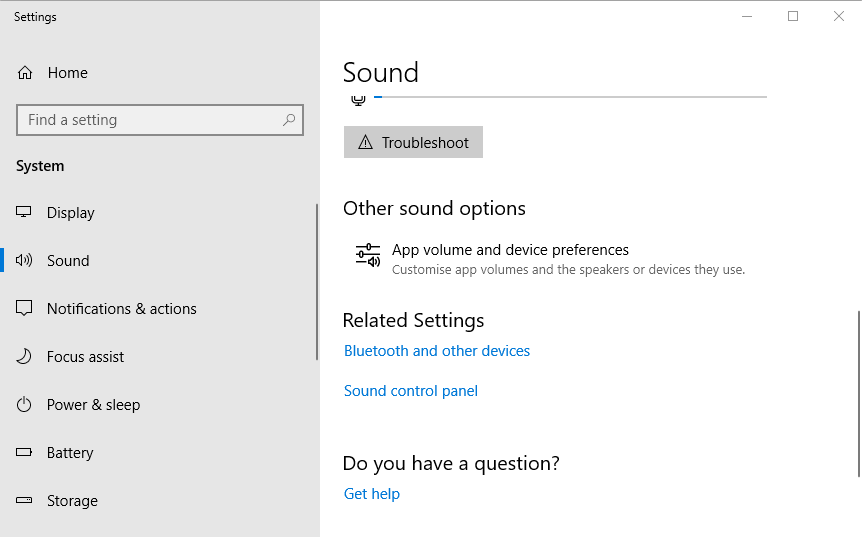
- To select audio output for specific software, right-click the Speakers icon and select Open Sound settings.
- Then click App volume and devices preferences to open the options shown in the image directly below.
- The Settings lists all your open apps. Click the Output drop-down menu adjacent to the software you need to select a playback device for.
- Then you can select a connected playback device from the drop-down menu. Note that Windows will save the chosen output audio device so that it plays audio when you open the software you selected it for.
The latest Window 10 build includes new settings that enable users to customize playback devices for software. Now users can select different audio playback devices for alternative apps.
For example, you could select one set of speakers to play music from Google Chrome and another pair of speakers to play audio from the Movies & TV app.
So you can play audio from two or more playback devices at once by selecting alternative sound output for software.
If you’re having trouble opening the Setting app, take a look at this quick article to solve the issue.
So you can play audio from two, or more, sound devices at once by enabling Stereo Mix or adjusting the volume and device preferences in Win 10.
Note that you can also enable Stereo Mix in earlier Windows platforms, but you can’t configure multiple output devices to play audio from specific apps in Windows 7 or 8.
However, you can still select specific audio playback devices for apps with the Audio Router software.
If you’re aware of another fix for the problem, share it in the comments section below so that other users can try it, too.
If you have any other questions, feel free to leave them there as well.
Spotify Community
Need help? Check out Spotify Answers for solutions to a wide range of topics.
Windows 10 — Left corner song banner (pause,stop) — FIX IT
- Subscribe to RSS Feed
- Mark Topic as New
- Mark Topic as Read
- Float this Topic for Current User
- Bookmark
- Subscribe
- Printer Friendly Page
- Mark as New
- Bookmark
- Subscribe
- Mute
- Subscribe to RSS Feed
- Permalink
- Email to a Friend
- Report Inappropriate Content
Hi Spotify Team, please fix this problem from last update of Spotify 1.0.41.375
In left corner in Windows 10 i see everytime if i change volume this poisonous banner of song.
Please Fix it, or add in Spotify settings — selection fro off this.

- Mark as New
- Bookmark
- Subscribe
- Mute
- Subscribe to RSS Feed
- Permalink
- Email to a Friend
- Report Inappropriate Content
I can assure you that we are not ignoring the issue. It has now been just over 1 week and we have started rolling out yesterday to a small percentage of users.
The update should be reaching you over the coming days towards the end of the week, dependant on our rollout schedule and where your account is in that schedule. We stagger the roll out for quality purposes as there are many kinds of (Windows) machines that we are unable to test on (simply due to the sheer volume of device configurations / permutations) and we want to ensure that we don’t miss any crashes.
To get the update once it is ready, simply restart the application. You can check if an update is ready by going to «About Spotify» in the top navigation. You’ll know you have the latest update if the version becomes 1.0.42.
If by some chance you now have 1.0.42 and this new option to disable the desktop overlay doesn’t show up on (or doesn’t work), please let us know in this thread and we’ll investigate.
I’ve attached an image of what the setting looks like in your Spotify preferences. Again, we’re sorry for the inconvenience that we have caused you and we literally can’t get this fix out the door any faster without jeopardizing the quality of the client.


