- Экспорт и импорт виртуальных машин Export and Import virtual machines
- Экспорт виртуальной машины Export a Virtual Machine
- Использование диспетчера Hyper-V Using Hyper-V Manager
- Использование PowerShell Using PowerShell
- Импорт виртуальной машины Import a Virtual Machine
- Импорт с помощью диспетчера Hyper-V Import using Hyper-V Manager
- Импорт с помощью PowerShell Import using PowerShell
- Регистрация на месте Register in place
- Восстановить Restore
- Импортировать как копию Import as a copy
- Типы импорта Import types
- Moving to a Windows 10 PC
- Step 1: Learn the benefits of a modern Windows 10 PC
- Step 2: Purchase your new PC
- Step 3: Sign in with Microsoft to streamline your experience
- Step 4: Bring your files and favorites with you
- Move Program Files to Another Drive Windows 10/8/7 | 3 Ways
- Why can’t I move program files to another drive directly?
- When need to move program files to another drive?
- Backup the system just in case
- How to move programs files to different drive?
- Method 1: Migrate program files to another drive using Registry Editor
- Method 2: Move program files to different drive using mklink
- Method 3: Move installed program to another drive using “Move” feature
- How to move Stream Games to another drive?
- Conclusion
Экспорт и импорт виртуальных машин Export and Import virtual machines
Область применения: Windows 10, Windows Server 2016, Microsoft Hyper-V Server 2016, Windows Server 2019, Microsoft Hyper-V Server 2019 Applies To: Windows 10, Windows Server 2016, Microsoft Hyper-V Server 2016, Windows Server 2019, Microsoft Hyper-V Server 2019
В этой статье показано, как экспортировать и импортировать виртуальную машину, что является быстрым способом их перемещения или копирования. This article shows you how to export and import a virtual machine, which is a quick way to move or copy them. В этой статье также обсуждаются некоторые варианты, которые необходимо выполнить при экспорте или импорте. This article also discusses some of the choices to make when doing an export or import.
Экспорт виртуальной машины Export a Virtual Machine
Экспорт собирает все необходимые файлы в одну единицу — файлы виртуального жесткого диска, файлы конфигурации виртуальной машины и файлы контрольных точек. An export gathers all required files into one unit—virtual hard disk files, virtual machine configuration files, and any checkpoint files. Это можно сделать на виртуальной машине, которая находится в запущенном или остановленном состоянии. You can do this on a virtual machine that is in either a started or stopped state.
Использование диспетчера Hyper-V Using Hyper-V Manager
Чтобы экспортировать виртуальную машину: To create a virtual machine export:
В диспетчере Hyper-V щелкните правой кнопкой мыши виртуальную машину и выберите пункт Экспорт. In Hyper-V Manager, right-click the virtual machine and select Export.
Выберите место хранения экспортируемых файлов и нажмите кнопку Экспорт. Choose where to store the exported files, and click Export.
После завершения экспорта можно просмотреть все экспортированные файлы в расположении экспорта. When the export is done, you can see all exported files under the export location.
Использование PowerShell Using PowerShell
Откройте сеанс от имени администратора и выполните команду, как показано ниже, после замены и
: Open a session as Administrator and run a command like the following, after replacing and
Дополнительные сведения см. в разделе Export-VM. For details, see Export-VM.
Импорт виртуальной машины Import a Virtual Machine
При импорте виртуальной машины она регистрируется на узле Hyper-V. Importing a virtual machine registers the virtual machine with the Hyper-V host. Вы можете выполнить импорт в узел или на новый узел. You can import back into the host, or new host. При импорте в тот же узел вам не нужно сначала экспортировать виртуальную машину, так как Hyper-V пытается повторно создать виртуальную машину из доступных файлов. If you’re importing to the same host, you don’t need to export the virtual machine first, because Hyper-V tries to recreate the virtual machine from available files. Импорт виртуальной машины регистрирует ее, чтобы ее можно было использовать на узле Hyper-V. Importing a virtual machine registers it so it can be used on the Hyper-V host.
Мастер импорта виртуальных машин также помогает устранить несовместимости, которые могут существовать при переходе с одного узла на другой. The Import Virtual Machine wizard also helps you fix incompatibilities that can exist when moving from one host to another. Обычно это различие в физическом оборудовании, таком как память, виртуальные коммутаторы и виртуальные процессоры. This is commonly differences in physical hardware, such as memory, virtual switches, and virtual processors.
Импорт с помощью диспетчера Hyper-V Import using Hyper-V Manager
Чтобы импортировать виртуальную машину, выполните следующие действия. To import a virtual machine:
В меню действия в диспетчере Hyper-V щелкните Импорт виртуальной машины. From the Actions menu in Hyper-V Manager, click Import Virtual Machine.
Щелкните Далее. Click Next.
Выберите папку, содержащую экспортированные файлы, и нажмите кнопку Далее. Select the folder that contains the exported files, and click Next.
Выберите виртуальную машину для импорта. Select the virtual machine to import.
Выберите тип импорта и нажмите кнопку Далее. Choose the import type, and click Next. (Описание см. в разделе типы импортаниже.) (For descriptions, see Import types, below.)
Нажмите кнопку Готово. Click Finish.
Импорт с помощью PowerShell Import using PowerShell
Используйте командлет Import-VM , следуя примеру для требуемого типа импорта. Use the Import-VM cmdlet, following the example for the type of import you want. Описание типов см. в разделе типы импортаниже. For descriptions of the types, see Import types, below.
Регистрация на месте Register in place
Этот тип импорта использует файлы, где они хранятся во время импорта, и хранит идентификатор виртуальной машины. This type of import uses the files where they are stored at the time of import and retains the virtual machine’s ID. Следующая команда показывает пример файла импорта. The following command shows an example of an import file. Выполните аналогичную команду со своими собственными значениями. Run a similar command with your own values.
Восстановить Restore
Чтобы импортировать виртуальную машину, указав собственный путь к файлам виртуальной машины, выполните команду, подобную следующей, заменив примеры значениями. To import the virtual machine specifying your own path for the virtual machine files, run a command like this, replacing the examples with your values:
Импортировать как копию Import as a copy
Чтобы завершить импорт и переместить файлы виртуальной машины в расположение Hyper-V по умолчанию, выполните команду, подобную следующей, заменив примеры значениями. To complete a copy import and move the virtual machine files to the default Hyper-V location, run a command like this, replacing the examples with your values:
Дополнительные сведения см. в статье Импорт-виртуальная машина. For details, see Import-VM.
Типы импорта Import types
Hyper-V предлагает три типа импорта: Hyper-V offers three import types:
Регистрация на месте — этот тип предполагает, что файлы экспорта находятся в расположении, где вы храните и запускаете виртуальную машину. Register in-place – This type assumes export files are in the location where you’ll store and run the virtual machine. Импортированная виртуальная машина имеет тот же идентификатор, что и во время экспорта. The imported virtual machine has the same ID as it did at the time of export. Поэтому, если виртуальная машина уже зарегистрирована в Hyper-V, ее необходимо удалить перед тем, как будет работать импорт. Because of this, if the virtual machine is already registered with Hyper-V, it needs to be deleted before the import works. После завершения импорта файлы экспорта становятся файлами выполняющегося состояния и не могут быть удалены. When the import has completed, the export files become the running state files and can’t be removed.
Восстановите виртуальную машину . Восстановите виртуальную машину в выбранное расположение или используйте по умолчанию Hyper-V. Restore the virtual machine – Restore the virtual machine to a location you choose, or use the default to Hyper-V. Этот тип импорта создает копию экспортированных файлов и перемещает их в выбранное расположение. This import type creates a copy of the exported files and moves them to the selected location. При импорте идентификатор виртуальной машины такой же, как и при экспорте. When imported, the virtual machine has the same ID as it did at the time of export. Поэтому, если виртуальная машина уже запущена в Hyper-V, ее необходимо удалить перед завершением импорта. Because of this, if the virtual machine is already running in Hyper-V, it needs to be deleted before the import can be completed. После завершения импорта экспортированные файлы остаются неизменными и могут быть удалены или импортированы снова. When the import has completed, the exported files remain intact and can be removed or imported again.
Копировать виртуальную машину — аналогично типу восстановления в, в котором выбирается расположение для файлов. Copy the virtual machine – This is similar to the Restore type in that you select a location for the files. Разница заключается в том, что импортированная виртуальная машина имеет новый уникальный идентификатор. Это означает, что виртуальную машину можно импортировать на один узел несколько раз. The difference is that the imported virtual machine has a new unique ID, which means you can import the virtual machine to the same host multiple times.
Moving to a Windows 10 PC
Making the move to a new Windows 10 PC? We’re happy you’re here and we’ve got you covered.
This guide will help you discover the best Microsoft has to offer and help you transfer your favorite files and apps to your new device so you can get up and running quickly, and get back to doing what you love.
If you’re on a Windows 7 device, note that support has ended and we recommend you move to a Windows 10 PC to stay secure. Learn more about the Windows 7 end of support and how to get Windows 10.
Step 1: Learn the benefits of a modern Windows 10 PC
Shopping for a new PC? Watch videos about common device-related terms you might come across in your research, including storage types, graphics processing units, and more.
Regular updates are built in to Windows 10, meaning you’ll always have the latest features. Explore what‘s new in the latest Windows 10 updates.
Get customized info about your current Windows 7 PC health and performance with the Guide to Windows 10 app (for Windows 7 devices).
Step 2: Purchase your new PC
For quicker startup times, longer battery life, and more responsive apps, a new PC has you covered. Find a new PC that fits your needs.
Step 3: Sign in with Microsoft to streamline your experience

Never forget a password again. Get personal access to all things Microsoft with a single, secure sign-on, plus get free OneDrive storage to help you move your files to your new PC. Good news—if you have an Xbox or Office account, you may already have a Microsoft account. You can also sign in with any email to get started.
Step 4: Bring your files and favorites with you

There’s no need to leave your files or browser favorites behind. Bring them with you to your new PC using one of the following options. We recommend using OneDrive so your files are backed up and protected in the cloud.
Select your current version of Windows to find instructions on how to move your files.
Move Program Files to Another Drive Windows 10/8/7 | 3 Ways
This article is written for users like you who want to move program files to another drive. Scroll down to learn all you need to know.

By Ivy  / Last Updated March 12, 2021
Why can’t I move program files to another drive directly?
Transfering filesВ or foldersВ to another drive is a piece of cake -В just copy and paste them. But when itВ comes to moving program files, you may end up finding it’s a totally different matter.В Why is that?В
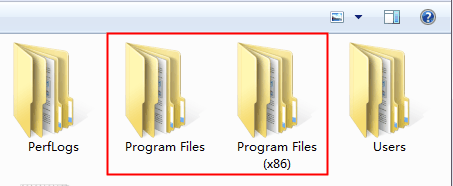
The two application folders,В Program FilesВ for 64-bit programs andВ Program Files (x86)В for 32-bit programs, are hard-wired into Windows.В Things can go wrongВ if they are notВ where they supposedВ to be.В If you drag them to another location directly, most of the programs on Windows 10/8/7 may stop working or does not respond correctly.В
At this time, you may wonder how to move program files to another drive effortlessly. In addition to taking the right approach, another key is toВ make a system image backup, so that you can get the PC back to normal without reinstalling Windows. Then, check the anchor text below to find the solution.
When need to move program files to another drive?
Most programs are installed in C: drive by default. As time goes by, the system partition mayВ run out of space owing toВ increasingly programs, and the PC may slow down as well.В The situation could be more severe ifВ you install a large amount of software on the computer, and if you don’t want to uninstall them, the remaining method might be moving program files to another location.
Take it a step further, you may face the following situations:
Situation 1: Move program files to another drive on the same disk
In this case, you may be bothered low disk space warning and performance but only one internal disk. You could consider moving program files and program files (x86) from C drive to D drive or other partition with enough space, then save the newly installed software to new partition instead of C drive.
Situation 2: Move program files to different physical disk
In this case, you usually have one or moreВ spare physical hard drive, and alreadyВ migrate OS to smaller SSD В in Windows 7/8/10. To retain better experience, you may want to free up the disk space of your SSD and move program files and program files (x86) from SSD to HDD.В
Backup the system just in case
All operations involving system drive are risky, e.g.В a misused registry can cause your computer to crash. And since movingВ programs files from C to D or movingВ program files from SSD to HDD is not just a «copy & paste» problem, you must be extra careful. OtherwiseВ all your apps might not work, and even your system will be affected.
To relocate program files to another drive safely, you need to backup system in advance, andВ AOMEI Backupper StandardВ is a wise and reliable choice to do that.В
It can back up yourВ operation system (Windows 10/8/7/XP/Vista) for free with several clicks, and help you restore system image from external hard driveВ or other devices.
You canВ even restore system image created onВ dissimilar hardware (another computer) with theВ «Universal Restore» feature inВ advanced editions likeВ AOMEI Backupper Professional .
Without further ado, let’s get started to create a system image for your computer and then move program files to another drive in Windows 10/8/7.
Step 1. Download the free backup software В — AOMEI Backupper Standard, then install and launch it on your computer. You will see its deep-blue interfaceВ
Step 2. Then, click System Backup under the Backup tab.В After that, it willВ automatically choose the C drive and boot-related partition(s) required to boot Windows, such as, system reserved partition, EFI system partition. Also, it will backup recovery partition, program,& program files, personal data on it.В

Step 3. Here, you only need to select destination partition to store backup imageВ and then click Start Backup.В

Wait for a while, and you will have a system image backup of your computer. Then, it’s suggested to create a bootable USB , so you can restore computer even when it refuses to boot. You can use CD/DVD, USB drive or directly create an ISO file.
How to move programs files to different drive?
Give up «copy» and «paste», here are 3 ways to help you relocate the program files to another drive. Please remember to create a system image backup first whether you are currently using Windows 10, Windows 8, or Windows 7. It can help you restore system from backup in a very short time.В
Method 1: Migrate program files to another drive using Registry Editor
Before you use this method, there are two things you need to do.
в‘ Create a folder named Program files (x86) on another drive (eg: D: drive)
в‘Ў Copy «Program Files» and «Program Files (x86)» directories to the new location first. Just run CMD as administrator, type the following command prompt and hit Enter.
   • Robocopy «C:\Program Files» «D:\Program Files» /mir
   • Robocopy «C:\Program Files (x86)» «D:\Program Files (x86)» /mir
Now, continue to see below. Please note that this method works at the moment of clean install Windows.
Step 1. Press “Win + R”to summon the Run window, then type Regedit.exe
Step 2. Find the following path on Registry Editor and change drive letter from C: to D:
To Windows 7/8/8.1:
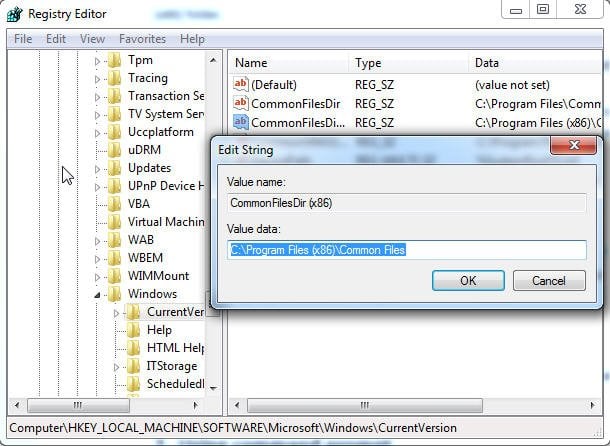
To Windows 10:
Method 2: Move program files to different drive using mklink
The second method is to create a symbolic link using Command Prompt. A symbolic link is a bit like the shortcuts to programs, folders and websites which attach to the desktop. When Windows or any program tries to access the folder, the symbolic link redirects it to the new location. To put it simply, this method change program files location for Windows 10/8/7.
Step 1. Move “C: \Program Files” fodler to “D: \Program Files”.
Step 2. Type cmd in the search box, click it and run as administrator.
Step 3. Create a symbolic link with soft link mklink/D link target.В
To move the whole «C: Program Files» folder to “D: Program Files” folder, you need to type the following in the command prompt window. Then, you can use theВ C:\Programs Files as the default install path but all the installed files will be stored in D:\Program Files.В В
mklink /D “Program Files” “D: Program Files”
“Program Files” is the name of your new symbolic link name.
“D: Program Files” is the path your new link refers to.
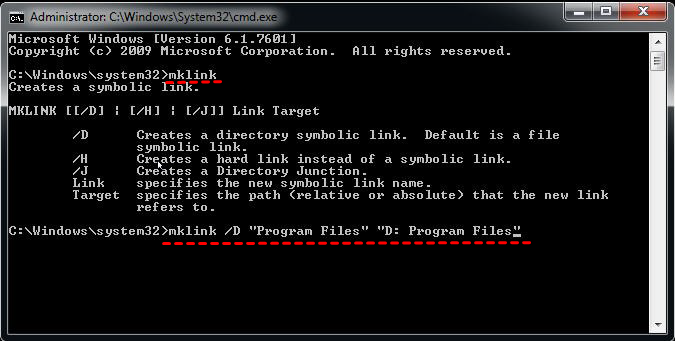
Note: If you do not know how to use it, you can directly typeВ mklinkВ in the command prompt window. You can get some information concerned to create a symbolic link.
Also, you can useВ mklink /J link target (called hard link) to makes the files or folders appears as if it actually exist at the location of the symbolic link.В Based on the above example, you can type asВ mklink /J “Program Files” “D: Program Files”.В
If you want to delete the old program files, you can use “mklink /j” link together with the full drive letter and path of the old and new locations of the program files.
Tip: The same is true for how to move program files from SSD to HDD, you just need to connect your HDD disk to your computer. Aside by that, you still can use disk cloning software to clone entire system drive or hard drive to your HDD. It’s much easier.
Method 3: Move installed program to another drive using “Move” feature
This feature not only move program from C drive to D drive, but also can relocate program files. Just tri it yourself.
Step 1. Go to start menu > Settings > System > Apps & features, then you will see a list programs.

Step 2. Select an app and hit the Move option under the specified app, and then select a location on another drive.
Step 3. Click Move again.
Step 4. Repeat Step 2and Step 3 until the last program is moved to a new drive.
How to move Stream Games to another drive?
Except for entire program files folder, some users just want to move the stream games in the program files, just like the following case. And the migration method will be included later, please scroll down to check.
«I’m on windows 10, and I need to move that folder to my D drive. I have been told that copy pasting it won’t work, and I will need to delete and redownload it. This is a probelm because the file is over 36 GB, and most of them are my steam games. Is there any other way to do this?»
Step 1. Go to the location of your Steam library. If you aren’t sure, you can check this infomation at the Properties of the Steam shortcut.
Step 2. Shutdown the Stream games, then copy and paste the entire Stream Folder to the new location, here is D:\Stream\ folder.В
Step 3. Wait until the process completes, you can start to rerun Stream.exe from the new location.
Tip: It’s suggest to reinstall the Stream.exe first, which will will update all your shorcuts. You can go toВ steampowered.com, then clickВ Install StreamВ at the upper right corner to download the installer and select the new location as destination folder, here is D:\Stream\, at last, please rerun the Strean.
Conclusion
With the help of free backup software — AOMEI Backupper Standard, you can rest assured to move program files to another drive Windows 10/8/7. It greatly reduces the risk of system crash or data loss, and gives you a chance to restore computer without reinstalling Windows. And it will keep everything as it were.В
Also, you can use it to schedule automatic backup Windows 10 later by its daily/weekly/monthly schedule settings or advanced settings like USB plug in AOMEI Backupper Professional.


