- Mounting a raw partition file made with dd or dd_rescue in Linux
- Mounting Raw and qcow2 Images
- Mounting The Raw Image
- Unmounting The Raw Image
- Mounting The qcow2 Image
- Unmounting the qcow2 Image
- Mount raw image of entire disc
- Attach the image to a loop device
- Mount the filesystem
- Detach the image from loop device
- Tutorial: How to mount raw images (.img) images on Linux
- Another Forensics Blog
- Pages
- Friday, January 5, 2018
- Mounting an APFS image in Linux
- Preparing the SIFT Workstation
- Download and build apfs-fuse
- Mounting the E01 Image
- Mounting the raw image to a loopback device
Mounting a raw partition file made with dd or dd_rescue in Linux
This situation might not affect everyone, but it struck me today and left me scratching my head. Consider a situation where you need to clone one drive to another with dd or when a hard drive is failing badly and you use dd_rescue to salvage whatever data you can.
Let’s say you cloned data from a drive using something like this:
Once that’s finished, you should end up with your partition table as well as the grub data from the MBR in your image file. If you run file against the image file you made, you should see something like this:
What if you want to pull some files from this image without writing it out to another disk? Mounting it like a loop file isn’t going to work:
The key is to mount the file with an offset specified. In the output from file , there is a particular portion of the output that will help you:
This means that the filesystem itself starts on sector 63. You can also view this with fdisk -l :
Since we need to scoot 63 sectors ahead, and each sector is 512 bytes long, we need to use an offset of 32,256 bytes. Fire up the mount command and you’ll be on your way:
If you made this image under duress (due to a failing drive or other emergency), you might have to check and repair the filesystem first. Doing that is easy if you make a loop device:
Once that’s complete, you can save some time and mount the loop device directly:
Источник
Mounting Raw and qcow2 Images
Mounting Raw and qcow2 images in order to inspect and use them doesn’t have to be difficult. After searching the internet, we found a couple of recommendations on how to do it. Here is what we did ourselves on an Ubuntu 16.04 Linux host.
Mounting The Raw Image
Associate the raw image with a loop device:
Map the partitions to loop devices:
You should be able to mount the partitions now:
where /mnt/t01 is a previously-existing mount point or directory.
For LVM partitions, determine the volume group name and activate it:
Mount the desired logical volume:
where /mnt/t02 is another pre-existing mount point or directory.
Unmounting The Raw Image
Unmount the previously mounted partitions:
Deactivate the volume group:
Undo the mapping of the partitions to the loop devices:
Destroy the loop:
Mounting The qcow2 Image
Here, we shall use the QEMU Network Block Device Driver for the purposes of mounting the qcow2 image.
First, load the nbd driver.
Connect nbd to the image using qemu-nbd:
Using fdisk, check the existing partitions. Mount the regular Linux partitions as is:
For LVM partitions, associate a loopback device to the LVM partition:
See the LVM partitions under /dev/mapper:
You should also be able to display the logical partitions using lvdisplay and the volume groups with vgdisplay. Use vgchange as above to activate the volume group.
Mount the regular LVM partitions as usual:
Unmounting the qcow2 Image
Unmount the partitions from the qcow2 image:
Deactivate the volume group:
Remove the loopback device:
Disconnect the nbd device:
Finally, remove the nbd kernel module:
We have successfully used the above procedures in mounting and unmounting raw and qcow2 images used in Linux KVM.
The procedures described above have been adapted for this article from these URLs:
Источник
Mount raw image of entire disc
 Raw disc images are very common, they include things like images created using dd for backups and virtual machine disk images. To access the disc image content means the disk image needs to be mounted.
Images from a partition can directly be mounted as the reflect only one particular filesystem. Raw images of an entire disk contain potentially multiple partitions with different filesystems on them. To identify the type of the image, blkid(8) can be used.
The first image shows an image of a single partition with the fat filesystem on it shown via the TYPE=”vfat”. The second image is an image containing a whole disc with partitions. The PTTYPE=”dos” shows the partition table type, indicating that the image contains a partition layout instead of only the file-system.
Attach the image to a loop device
To mount and work with the image, it needs to be attached to a loop device. To do so, losetup(8) can be used. The -f option will search for the next free loop device to attach the image to. The -P option will trigger a scan for partitions on the attached image and create devices for each partition detected.
To verify that the image was detected and the partition(s) were detected, use the following commands.
The first command uses losetup with the -l option to show the attached image to the loop device “loop0”. The second command lists the “loop0” device and the partition(s) found on the disk, “loop0p1”.
Mount the filesystem
With the image attached to the system as a block device, it can be mounted as normal. When the image contains the partition table, the device to mount is not “loop0” as it represents the disc not the partition. The partitions are indicated by “loop0p1”, for example.
Detach the image from loop device
Before the disk image can be detached again from the loop device, the mounted filesystem needs to be unmounted. Depending on whether the disk image is from a single partition or an entire disk, the device to be unmounted needs to be given, like in the mount command.
With the filesystem unmounted, the disk image can be detached from the loop device.
With the “-d” option, losetup is instructed to detach the specified loop device.
Источник
Tutorial: How to mount raw images (.img) images on Linux
If you have a few .img files coming as disk images from devices like floppies, CDs, DVDs, SD cards, etc, you will realize that you cannot mount the in Linux, because they contain a file system that has to be mounted.
In linux you would need to use the mount command as for any physical device, however you need to know the correct syntax that is based on understanding the information related to the partition(s) available in the image.
First step is to read the partition Start point using fdisk:
In the terminal type:
sudo fdisk -l imgfile.img
You will see an output similar to the one below:
Device boot Start End Blocks Id System
imgfile.img1 * 63 266544 722233 C W95 FAT32 (LBA)
imgfile.img2 25679 25367890 245667890+ 83 Linux
As you can see there are two partitions, one that is FAT32 and the other one that it’s ExtFS. This means that to mount the first partition we have to tell Linux that we need to start at the sector 63. The standard sector size is 512 bytes, however there are other possibilities like 128 or 1024. Assuming that the place from where you are downloading the image doesn’t specify any sector size, we can type in the terminal:
sudo mount -t vfat -o loop,offset=$((63 * 512)) imgfile.img /mnt/disk
To mount the second partition, as you can imagine:
mount -t ext4 -o loop,offset=$((25679 * 512)) imgfile.img /mnt/disk1
It’s important to copy the “Start” sector number correctly, otherwise you’ll get an error message like:
mount : wrong fs type, bad option, band superblock on /dev/loop,
missing codepage or helper proggram, or other error
In some cases useful info is found in syslog – try
dmesg | tail or so
One last thing, the standard sector size for CDs and DVDs is 2352 instead of 512. If you are opening such image, you’ll have to use this value instead of 512.
Источник
Another Forensics Blog
Digital Forensics and Incident Response Research,Python Scripts and Musings
Pages
Friday, January 5, 2018
Mounting an APFS image in Linux
As a follow up to my post on how to mount AFPS images on Windows, I wanted to post about how to mount an APFS image on a Linux system. If you are looking for how to mount an APFS image on a Mac, Sarah Edwards wrote a awesome blog post on how to do this. There is also another one over at BlackBag.If you are new to APFS, I would also recommend an informative video by Steve Whalen where he explains APFS in detail.

Options, options, options. It’s always nice to have options in forensics. Sometimes one way may not work for you, or maybe you don’t have access to a Mac at the moment. If you are on a Windows machine and need access to an APFS volume or image (E01 or raw), it’s easy enough to spin up a Linux VM and get to work.
For my testing, I used an experimental Linux APFS driver by sgan81 — apfs-fuse. Note the word «experimental» — and read the disclaimers by the author. I would strongly recommend verifying any results with another tool or method, such as the one detailed by Sarah Edwards. However, this method works in a pinch, and at least you can start analysis until you get things working on a Mac. Oh — and according to the documentation, it will prompt you for a password if the volume is encrypted.
These instructions assume that you already have an image of the Mac, either in E01 or raw format (dd, dmg, etc). For my Linux distro, I used the free SIFT Workstation Virtual Machine on Ubutnu 16.04. If you are using another Linux distro, you may need to install additional dependencies, etc.
Preparing the SIFT Workstation
First things first, some dependencies need to be installed before apfs-fuse will work. As always, run sudo apt-get update before installing any dependencies:
If you are running a version of SIFT prior to the one based on Ubuntu 16.04, a couple of additional dependencies may be needed. This includes a newer version of cmake. This can be installed by following the instructions on the cmake website. In addition to cmake, older version of SIFT may also need the the ICU library:
Download and build apfs-fuse
Next, download the apfs-fuse driver from github:
git clone https://github.com/sgan81/apfs-fuse
Now compile it, and install it:
Mounting the E01 Image
Now that the SIFT workstation has been set up, we can mount the E01 image. If you have a dd/raw image, you can skip to the next step.
I like using the ewfmount tool in SIFT to mount E01s. Once mounted, there will be a «virtual» raw image of the E01 file under the designated mount point. The syntax is simple, and works on split images as well (just specify the first segment for split images).
syntax:
ewfmount
example:
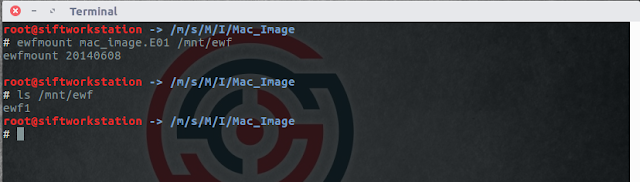
If you have issues with ewfmount, check out this blog post for some alternative tools to mount ewf files.
Mounting the raw image to a loopback device
Now that we have a dd/raw image to work with — either from mounting the E01, or because that is how the image was taken — we’ll mount it to a loopback device. The Linux apfs-fuse driver needs the volume where the APFS container is. Because the disk image may contain additional partitions, we will need to figure out the offset where the APFS partition begins.
Below is a screen shot in X-Ways. Here was can see that X-Ways identified an APFS partition starting at sector 76,806 as well as 4096 bytes per sector (note, although X-Ways identified the partition as being APFS, it did not parse it out).

Alternatively, we can use the Sleuthkit tool mmls to list the partitions on the image. Here was can see that there is a «NoName» partition that starts right after the EFI System Partition. The offset is 76806 and is the largest partition on the drive. The Units are also displayed as 4096 bytes per sector:
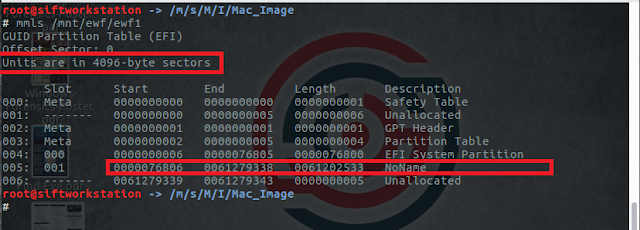
To set up the looback device, we will need to supply the APFS starting partition offset in bytes. Since the offset is given in sectors, we will need to convert from sectors to bytes by multiplying 4096 bytes/per sector times the number sectors:
4096 X 76806 = 314597376
Armed with this information, we can mount the «NoName» partition, aka the APFS partition, to a loopback device:
For the mounted EWF file:

In the syntax above, -r is read only, and -o is the offset in bytes to the start of the APFS partition.
Mount up the APFS filesystem
Ok! Finally! Now we are ready to mount up the APFS partition to the filesystem. The apf-fuse binary will be in a folder name «bin» within the build folder created earlier when the apfs-driver was installed. Change into that directory, and run apfs-fuse by pointing it to the loopback device and a mount point:

In my testing, the cursor just blinks and does not give a status message. I opened another terminal and did an ls command on the mount point to see if it mounted ok:

Success! Now I can run AV Scans, view files, and export out any files as needed.
As I mentioned before — this is an experimental driver and all results should be verified. Hopefully as time passes we will have more ways to mount and access APFS images in Linux, and our mainstream tools.
Источник


