- How to Mount Windows Partitions in Ubuntu
- Mount Windows Using the File Manager
- Mount Windows Partition in Read Only Mode From Terminal
- If You Appreciate What We Do Here On TecMint, You Should Consider:
- Mount a Linux disk in WSL 2 (preview)
- Prerequisites
- Mounting an unpartitioned disk
- Mounting a partitioned disk
- Identifying the filesystem type
- Mount the selected partitions
- Access the disk content
- Unmount the disk
- Mount a VHD in WSL
- Command line reference
- Mounting a specific filesystem
- Mounting a specific partition
- Specifying mount options
- Attaching the disk without mounting it
- Detaching a disk
- Limitations
- Howto mount windows partition onto ubuntu Linux
How to Mount Windows Partitions in Ubuntu
If you are running a dual-boot of Ubuntu and Windows, sometimes you might fail to access a Windows partition (formatted with NTFS or FAT32 filesystem type), while using Ubuntu, after hibernating Windows (or when it’s not fully shutdown).
This is because, Linux cannot mount and open hibernated Windows partitions (the full discussion of this is beyond the ambit of this article).
In this article, we will simply show how to mount Windows partition in Ubuntu. We will explain a few useful methods of solving the above issue.
Mount Windows Using the File Manager
The first and safest way is to boot into Windows and fully shutdown the system. Once you have done that, power on the machine and select Ubuntu kernel from the grub menu to boot into Ubuntu.
After a successful logon, open your file manager, and from the left pane, find the partition you wish to mount (under Devices) and click on it. It should be automatically mounted and its contents will show up in the main pane.
![]() Mounted Windows Partition
Mounted Windows Partition
Mount Windows Partition in Read Only Mode From Terminal
The second method is to manually mount the filesystem in read only mode. Usually, all mounted filesystems are located under the directory /media/$USERNAME/.
Ensure that you have a mount point in that directory for the Windows partition (in this example, $USERNAME=aaronkilik and the Windows partition is mounted to a directory called WIN_PART, a name which corresponds to the device label):
![]() List Mounted Partitions
List Mounted Partitions
In case the mount point is missing, create it using the mkdir command as shown (if you get “permission denied” errors, use sudo command to gain root privileges):
To find the device name, list all block devices attached to the system using the lsblk utility.
![]() List Block Devices
List Block Devices
Then mount the partition ( /dev/sdb1 in this case) in read-only mode to the above directory as shown.
Now to get mount details (mount point, options etc..) of the device, run the mount command without any options and pipe its output to grep command.
![]() List Windows Partition
List Windows Partition
After successfully mounting the device, you can access files on your Windows partition using any applications in Ubuntu. But, remember that, because the device is mounted as read-only, you will not be able to write to the partition or modify any files.
Also note that if Windows is in a hibernated state, if you write to or modify files in the Windows partition from Ubuntu, all your changes will be lost after a reboot.
For more information, refer to the Ubuntu community help wiki: Mounting Windows Partitions.
That’s all! In this article, we have shown how to mount Windows partition in Ubuntu. Use the feedback form below to reach us for any questions if you face any unique challenges or for any comments.
If You Appreciate What We Do Here On TecMint, You Should Consider:
TecMint is the fastest growing and most trusted community site for any kind of Linux Articles, Guides and Books on the web. Millions of people visit TecMint! to search or browse the thousands of published articles available FREELY to all.
If you like what you are reading, please consider buying us a coffee ( or 2 ) as a token of appreciation.

We are thankful for your never ending support.
Источник
Mount a Linux disk in WSL 2 (preview)
If you want to access a Linux disk format that isn’t supported by Windows, you can use WSL 2 to mount your disk and access its content. This tutorial will cover the steps to identify the disk and partition to attach to WSL2, how to mount them, and how to access them.
Administrator access is required to attach a disk to WSL 2. The WSL 2 mount command does not support mounting a disk (or partitions that belong to the disk) that is currently in use. wsl —mount always attaches the entire disk even if only a partition is requested. You can’t mount the Windows installation disk.
Prerequisites
You will need to be on Windows 11 Build 22000 or higher to access this feature. You can join the Windows Insiders Program to get the latest preview builds.
Mounting an unpartitioned disk
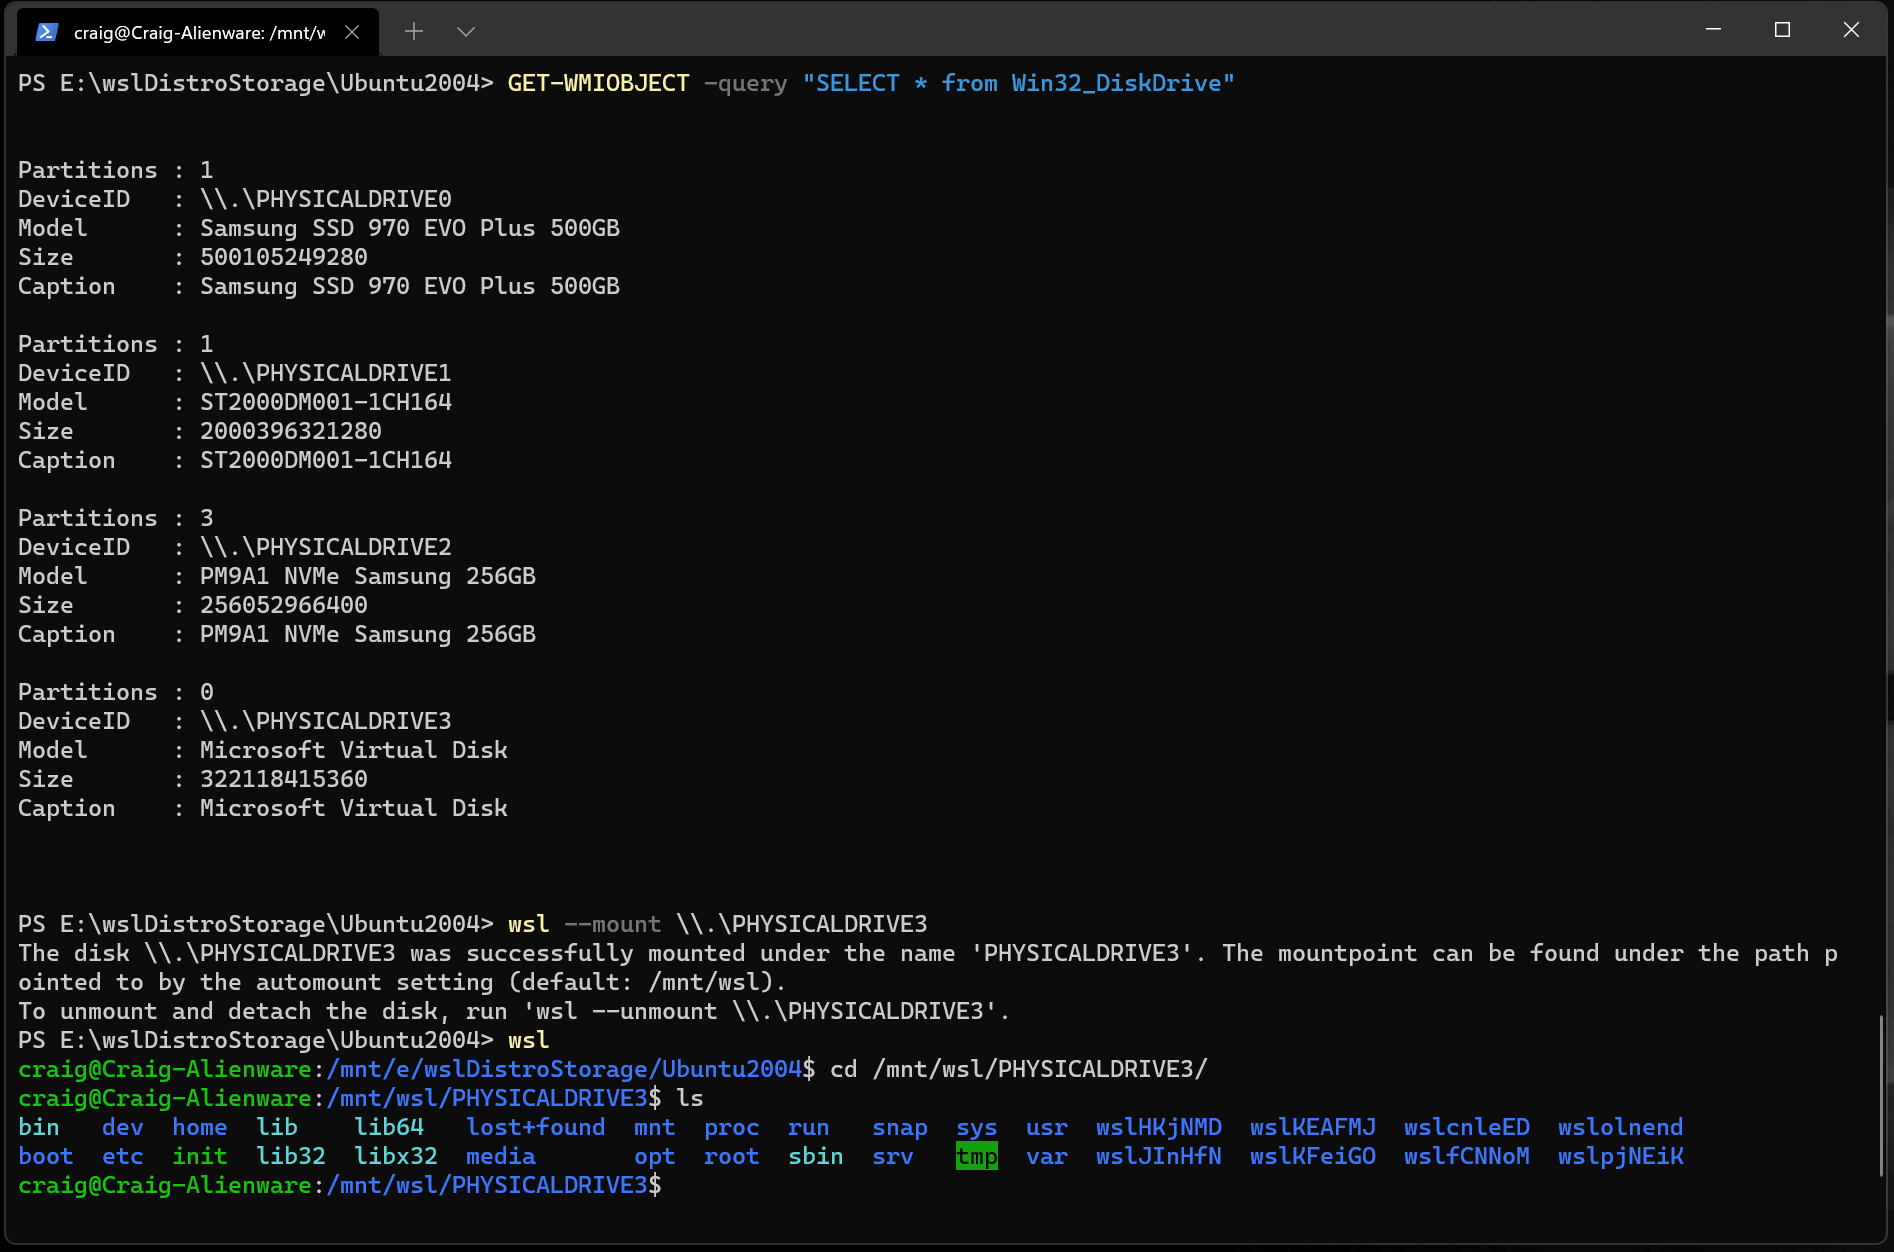
In this simplest case, if you have a disk that doesn’t have any partitions, you can mount it directly using the wsl —mount command. First you need to identify the disk.
Identify the disk — To list the available disks in Windows, run:
The disks paths are available under the ‘DeviceID’ columns. Usually under the \\.\PHYSICALDRIVE* format.
Mount the disk — Using PowerShell, you can mount the disk using the Disk path discovered above, run:
Mounting a partitioned disk
If you have a disk that you aren’t sure what file format it is in, or what partitions it has, you can follow the steps below to mount it.
Identify the disk — To list the available disks in Windows, run:
The disks paths are listed after ‘DeviceID’, usually in the \\.\PHYSICALDRIVE* format.
List and select the partitions to mount in WSL 2 — Once the disk is identified, run:
This will make the disk available in WSL 2. (In the case of our example, the is \\.\PHYSICALDRIVE* .
Once attached, the partition can be listed by running the following command inside WSL 2:
This will display the available block devices and their partitions.
Inside Linux, a block device is identified as /dev/
. For example, /dev/sdb3, is the partition number 3 of disk sdb .
Identifying the filesystem type
If you don’t know the type of filesystem of a disk or partition, you can use this command:
This will output the detected filesystem type (under the TYPE=» » format).
Mount the selected partitions
Once you have identified the partitions you want to mount, run this command on each partition:
If you wish to mount the entire disk as a single volume (i.e. if the disk isn’t partitioned), —partition can be omitted.
If omitted, the default filesystem type is «ext4».
Access the disk content
Once mounted, the disk can be accessed under the path pointed to by the config value: automount.root . The default value is /mnt/wsl .
From Windows, the disk can be accessed from File Explorer by navigating to: \\wsl$\\ \\ (pick any Linux distribution).
Unmount the disk
If you want to unmount and detach the disk from WSL 2, run:
Mount a VHD in WSL
You can also mount virtual hard disk files (VHD) into WSL using wsl —mount . To do this, you first need to mount the VHD into Windows using the Mount-VHD command in Windows. Be sure to run this command with administrator privileges. Below is an example where we use this command, and also output the disk path. Be sure to replace
with your actual VHD path.
You can use the output above to obtain the disk path for this VHD and mount that into WSL following the instructions in the previous section.
You can also use this technique to mount and interact with the virtual hard disks of other WSL distros, as each WSL 2 distro is stored via a virtual hard disk file called: ext4.vhdx . By default the VHDs for WSL 2 distros are stored in this path: C:\Users\[user]\AppData\Local\Packages\[distro]\LocalState\[distroPackageName] , please exercise caution accessing these system files, this is a power user workflow. Make sure to run wsl —shutdown before interacting with this disk to ensure the disk is not in use.

Command line reference
Mounting a specific filesystem
By default, WSL 2 will attempt to mount the device as ext4. To specify another filesystem, run:
For example, to mount a disk as fat, run:
To list the available filesystems in WSL2, run: cat /proc/filesystems
When a disk has been mounted via WSL2 (Linux file system), it is no longer available to mount via an ext4 driver on the Windows file system.
Mounting a specific partition
By default, WSL 2 attempts to mount the entire disk. To mount a specific partition, run:
This only works if the disk is either MBR (Master Boot Record) or GPT (GUID Partition Table). Read about partition styles — MBR and GPT.
Specifying mount options
To specify mount options, run:
Only filesystem specific options are supported at this time. Generic options such as ro, rw, noatime, . are not supported.
Attaching the disk without mounting it
If the disk scheme isn’t supported by any of the above options, you can attach the disk to WSL 2 without mounting it by running:
This will make the block device available inside WSL 2 so it can be mounted manually from there. Use lsblk to list the available block devices inside WSL 2.
Detaching a disk
To detach a disk from WSL 2, run:
If Diskpath is omitted, all attached disks are unmounted and detached.
If one disk fails to unmount, WSL 2 can be forced to exit by running wsl —shutdown , which will detach the disk.
Limitations
At this time, only entire disks can be attached to WSL 2, meaning that it’s not possible to attach only a partition. Concretely, this means that it’s not possible to use wsl —mount to read a partition on the boot device, because that device can’t be detached from Windows.
USB flash drives and SD cards are not supported at this time and will fail to attach to WSL 2. USB disks are supported though.
Only filesystems that are natively supported in the kernel can be mounted by wsl —mount . This means that it’s not possible to use installed filesystem drivers (such as ntfs-3g for example) by calling wsl —mount .
Источник
Howto mount windows partition onto ubuntu Linux
Q. How do I mount NTFS or FAT paritions under ubuntu Linux?
A. You can mount NTFS or FAT windows partition with mount command.
=> Click on Applications
=> Select Accessories
=> Select Terminal
=> Now terminal window will be on screen.
- No ads and tracking
- In-depth guides for developers and sysadmins at Opensourceflare✨
- Join my Patreon to support independent content creators and start reading latest guides:
- How to set up Redis sentinel cluster on Ubuntu or Debian Linux
- How To Set Up SSH Keys With YubiKey as two-factor authentication (U2F/FIDO2)
- How to set up Mariadb Galera cluster on Ubuntu or Debian Linux
- A podman tutorial for beginners – part I (run Linux containers without Docker and in daemonless mode)
- How to protect Linux against rogue USB devices using USBGuard
Join Patreon ➔
First you need to create directory where you can attach windows partition using mount command (for example /media/c for C:): # sudo mkdir -p /media/c Now find out list of partition (click on System > Administration > Disks ) or use following command: # sudo fdisk -l
As you see /dev/hdb1 is NTFS partition. Now type following command: # sudo mount -t ntfs -o nls=utf8,umask=0222 /dev/hdb1 /media/c To unmount Windows NTFS partition type command: # sudo umount /media/c To mount FAT partition type command: # sudo mkdir -p /media/d
# sudo mount -t vfat -o iocharset=utf8,umask=000 /dev/hda1 /media/d
To unmount Windows FAT (mounted at /media/d) partition type command: # sudo umount /media/d
- -t : Specify file system type (such as NTFS or FAT)
- umask=VALUE: Set the umask (the bitmask of the permissions that are not present). The default is the umask of the current process. The value is given in octal.
- iocharset=VALUE: Character set to use for converting between 8 bit characters and 16 bit Unicode characters. The default is iso8859-1. Long filenames are stored on disk in Unicode format.
🐧 Get the latest tutorials on Linux, Open Source & DevOps via
| Category | List of Unix and Linux commands |
|---|---|
| Documentation | help • mandb • man • pinfo |
| Disk space analyzers | df • duf • ncdu • pydf |
| File Management | cat • cp • less • mkdir • more • tree |
| Firewall | Alpine Awall • CentOS 8 • OpenSUSE • RHEL 8 • Ubuntu 16.04 • Ubuntu 18.04 • Ubuntu 20.04 |
| Linux Desktop Apps | Skype • Spotify • VLC 3 |
| Modern utilities | bat • exa |
| Network Utilities | NetHogs • dig • host • ip • nmap |
| OpenVPN | CentOS 7 • CentOS 8 • Debian 10 • Debian 8/9 • Ubuntu 18.04 • Ubuntu 20.04 |
| Package Manager | apk • apt |
| Processes Management | bg • chroot • cron • disown • fg • glances • gtop • jobs • killall • kill • pidof • pstree • pwdx • time • vtop |
| Searching | ag • grep • whereis • which |
| Shell builtins | compgen • echo • printf |
| Text processing | cut • rev |
| User Information | groups • id • lastcomm • last • lid/libuser-lid • logname • members • users • whoami • who • w |
| WireGuard VPN | Alpine • CentOS 8 • Debian 10 • Firewall • Ubuntu 20.04 |
Comments on this entry are closed.
from the get-go, clicking Applications then Accessories does not appear to lead to “Terminal” on Ubuntu 5.04.
Sorry, Ubuntu 5.04 is an old version of the operating system. Try to use version 11.04 of Ubuntu Linux, its the best and terminal program is available.
…and if in WUBI, just open /host directory – it is already mounted.
thanks for the tip it worked!
yeah it works great but when i restart the pc i must do it again isnt there anything more permanent??
kapoios, Please see following url. It explains how to use /etc/fstab file so that share gets automatically mounted at every system start:
there is a tool called ntfs-3g this does allow the mounting of windows ntfs 4.x-6.x (4.x includes all NT 4.0 based and hence forth and 6.x indicates all windows 2003 onwards and not vista, vista has got windows filesystem. and i havent felt like downloading the RTM windows vista so i have no clue. and you are on your own)
scenario 1:
recompile the kernel in debian/ubuntu/kubuntu/ubuntuk blah blah blah debian and ubuntu based arch and add the flag ntfs r/w support enable module. and then mount the filesystem from CLI using the same command as illutrated above by the guy whose site this is.
scenario 2: go to ntfs for linux (google up, wont spoon feed, using debian means you should be confident enough to do this) and in that look up for ntfs-3g which is nothing but it enables you to mount the disk partition which is in ntfs 4-6x in read write mode. they have even simplified the command to one word viz
# mount.ntfs-3g /dev/hda1 /place/to/mount
# umount /dev/hda1
command 1 mounts leaving you the hassle of passing all other parameters and options and arguements and command 2? you are on your own if you dont know what it does. 😉
i have followed the notes on linux-live and rolled my own custom distro based on debian (linux-live is based on slackware) but it works with other distro as well, and i have windows 2003 installed on a 4 GB compressed NTFS USB pen drive, which i often use to fiddle around.
hope this helps apart from the one mentioned above. this is just an addon to the old bunch of tuts from this website.
http://en.wikipedia.org/wiki/NTFS
hope this helps! good luck!
and what a co-incidence, i been looking for how to mount openbsd’s ffs in rw mode in linux and i end up here and the captcha shows “freebsd”
😉
Very simple and helpful tutorial… used it to backup a really crappy old vfat win98 drive 😀
Источник


