- Диск Windows монтируется только для чтения (РЕШЕНО)
- Решение ошибки «Windows is hibernated, refused to mount».
- Гибернация Windows и быстрый перезапуск
- Удаление файла гибернации
- How to Partition NTFS Hard Drive in Windows 10, 8, 7
- About NTFS
- Why partition NTFS hard drive?
- Partition NTFS drive with Disk Management in Windows
- Partition NTFS drive via free hard drive partition tool
- вњ” Create NTFS partition on hard drive
- вњ” Extend NTFS partition on hard drive
- Verdict
- Mount a drive in a folder
- Mounting a drive in an empty folder
- To mount a drive in an empty folder by using the Windows interface
- To mount a drive in an empty folder using a command line
- To remove a mount point
- How Do I Access or Mount Windows/USB NTFS Partition in RHEL/CentOS/Fedora
- How to Mount Windows NTFS Partition in Linux
- If You Appreciate What We Do Here On TecMint, You Should Consider:
Диск Windows монтируется только для чтения (РЕШЕНО)
В настоящее время Windows использует файловую систему NTFS. Linux поддерживает эту файловую систему для чтения, записи, создания, форматирования и выполнения других операций.
Тем не менее, иногда при попытке смонтировать диск Windows может возникнуть одна из двух ситуаций:
- диск монтируется, но только для чтения. Специальное указание опция монтирования с правами записи не помогает
- диск вовсе не монтируется из-за ошибки
К примеру, при попытке смонтировать диск:
может возникнуть ошибка, что диск доступен только для чтения:
А это пример ошибки, когда диск не смонтирован вовсе:
Для решения этой проблемы нужно начать с установки драйвера ntfs-3g. Во-первых, он в любом случае необходим для полноценного функционирования файловой системы NTFS в Linux. Во-вторых, в этот пакет включена утилита ntfsfix, которая может помочь решить проблемы с диском Windows.
Для установки в Debian, Linux Mint, Ubuntu, Kali Linux и их производные:
Для установки в Arch Linux и производные:
Затем вновь попробуйте смонтировать диск — вполне возможно, что в этом случае он будет доступен с правами записи.
Если вновь возникла проблема, то отмонтируйте диск и запустите команду вида:
Пример команды для проверки и исправления проблемы с диском /dev/sdb4:

Команда выводит причину проблемы: диск содержит нечистую файловую систему. Метаданные, хранимые в кэше Windows, препятствуют монтированию.
Затем выполняется ряд операций, каждая из которых заканчивается статусом OK и наконец сообщение was processed successfully говорит о том, что всё прошло успешно.
После этого вновь попытайтесь смонтировать диск — всё должно быть нормально.
Решение ошибки «Windows is hibernated, refused to mount».
Выполнение рассмотренной команды
может завершиться неудачей:
Обратите особое внимание на строку «Windows is hibernated, refused to mount» которая повторяется дважды. Она означает, что работа Windows завершилась гибернацией, такой диск не может быть смонтирован для записи. Если вы специально выключили компьютер таким образом, то перезагрузитесь и выключите без гибернация или быстрого запуска.
Но это может не помочь, поскольку последние версии Windows делают гибернацию автоматически, без ведома пользователя.
Гибернация Windows и быстрый перезапуск
На компьютерах, на которых возможна двойная загрузка в Windows или Linux, Windows должна быть полностью выключена перед загрузкой в Linux, в противном случае файловые системы NTFS на внутренних дисках могут остаться в несогласованном состоянии, а изменения, сделанные Linux, могут быть проигнорированы Windows.
Таким образом, Windows нельзя оставлять в режиме гибернации при запуске Linux, чтобы избежать несоответствий. Кроме того, необходимо отключить функцию быстрого перезапуска, доступную в последних системах Windows. Этого можно добиться, выполнив в качестве администратора команду Windows, которая отключает как гибернацию, так и быстрый перезапуск, а также удаляет файл hiberfile:
Если вы не хотите отключать гибернацию, то для одноразового выключения компьютера Windows без гибернация выключите его командой:
Удаление файла гибернации
Когда том NTFS находится в спящем режиме, монтирование для чтения и записи запрещается, и том принудительно монтируется только для чтения. Необходимо либо возобновить работу Windows и правильно её выключить, либо использовать опцию remove_hiberfile, которая удалит файл гибернации Windows. Обратите внимание, это означает, что сохранённый сеанс Windows будет полностью утерян, но сама Windows не пострадает. Напомним, что в файле гибернация хранится содержимое оперативной памяти на момент выключения. Кстати, именно поэтому размер файла гибернация равен размеру оперативной памяти компьютера. Используйте эту опцию под свою ответственность.
Пример команды с указанием опции remove_hiberfile:
How to Partition NTFS Hard Drive in Windows 10, 8, 7
When you need to partition NTFS hard drive out of certain reasons, you can apply Disk Management or third party hard drive partition software – AOMEI Partition Assistant.

By Bryce  / Last Updated January 7, 2021
About NTFS
NTFS (New Technology File System) is a modern file system, applied by the Windows NT operating system and its advanced versions. Compared with the earlier FAT file system, NTFS has advantages in performance, extensibility, and reliability, which owns various functions like file/folder/partition compression and encryption, etc. Partition beyond 2TB is allowed on NTFS drive and file over 4GB in size can be stored on NTFS drive.
Why partition NTFS hard drive?
In general, your hard drive has only one partition, made by computer manufactures. To protect data and facilitate data management, you may need more partitions on your disk. For instance, if there is one partition, your operating system, programs, and data will be stored in one partition. If there are two or more partitions, you can separate them, so that you can reinstall system and keep data stored in other partitions if your OS is damaged or crashed.
Partition NTFS drive with Disk Management in Windows
It’s simple to partition NTFS hard drive via Disk Management, a Windows built-in tool that offers useful functions like extending, shrinking, deleting, and creating volume, etc. Take a closer look at how to make use of Disk Management.
1. Open Disk Management by pressing Windows + R simultaneously, inputting “diskmgmt.msc” and hitting Enter key.
2. Locate the NTFS hard drive that you need to partition, right click a partition on it and choose “Shrink Volume”.

3. In the small pop-up window, determine the amount of space to shrink and click “Shrink”.
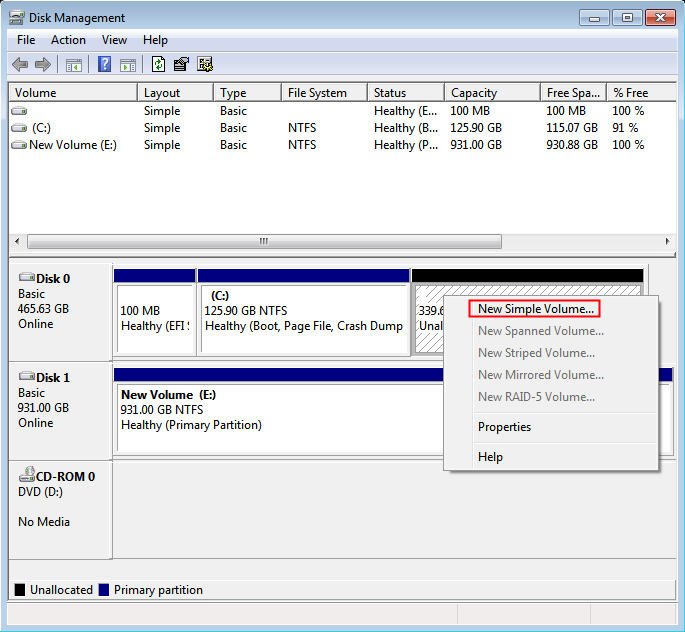
4. You can get an unallocated space behind the partition that you have shrunk. Right-click the unallocated space and choose “New Simple Volume”.
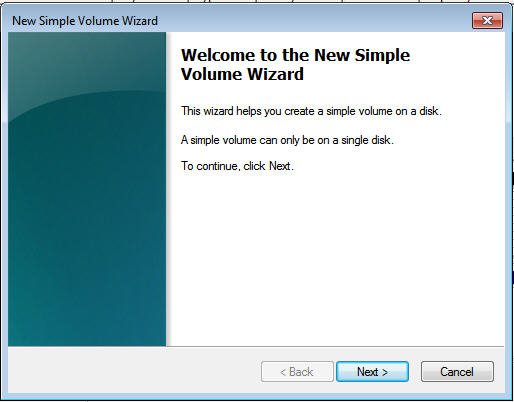
5. Here you open New Simple Volume Wizard, click “Next”.
6. Specify volume size and click “Next”. Then, assign drive letter to it and click “Next”.
7. In the Format Partition window, set the file system to NTFS of the new volume and click “Next”.
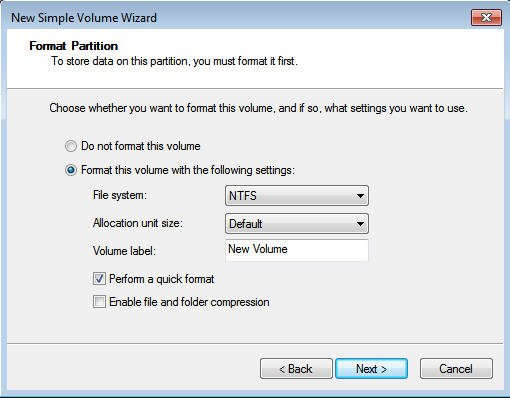
PS.: During this process, it is available to adjust cluster size of this new volume on the hard drive.
Then, click Finish. Within a few seconds, an NTFS partition has been created.
Partition NTFS drive via free hard drive partition tool
Obviously, Disk Management can help you to partition your NTFS hard drive easily and quickly. However, it also is with some defects. Take an example, you’ll find the “Extend Volume” is grayed out when there is no unallocated space just behind the partition that needs extending. At this time, third-party reliable and powerful hard drive partition software, AOMEI Partition Assistant Standard will be a great choice.
Apart from basic features like shrinking and extending partition, AOMEI Partition Assistant is featured with more functions like merging partition, moving partition, and so on. It is with a user-friendly interface so that it can be handled even by green hand in computer. It is specially designed for Windows system, thus you can use it in different Windows systems including Windows 10/8/7, XP, and Vista.
To partition NTFS formatted hard drive, free download AOMEI Partition Assistant Standard at first. Then, follow the steps listed below:
вњ” Create NTFS partition on hard drive
Step 1. Install and run it. Find the NTFS hard drive that needs partitioning, right-click a partition (Here is F drive) on it, and choose “Resize Partition”.
Step 2. Shrink partition by drag the slider bar leftwards to get unallocated space and click “OK”.
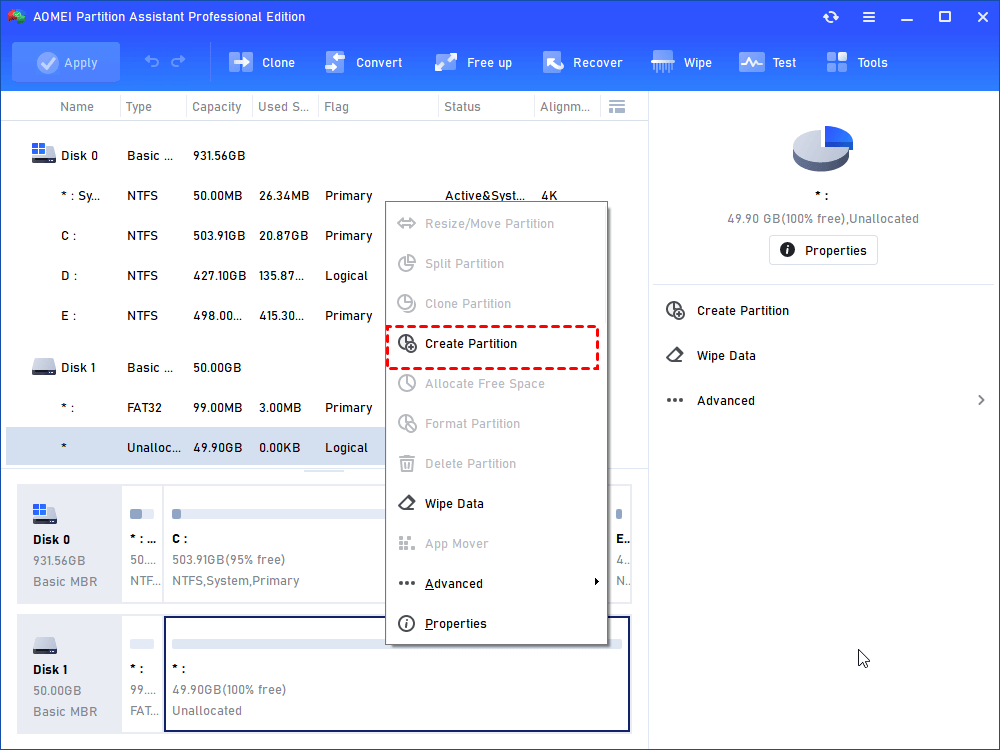
Step 3. Here you can see there is unallocated space behind F drive. Right-click the unallocated space and choose “Create Partition”.
Step 4. You can adjust partition size by dragging the slider bar. Then assign a drive letter and set file system for the new partition. Then, click on “OK” button.
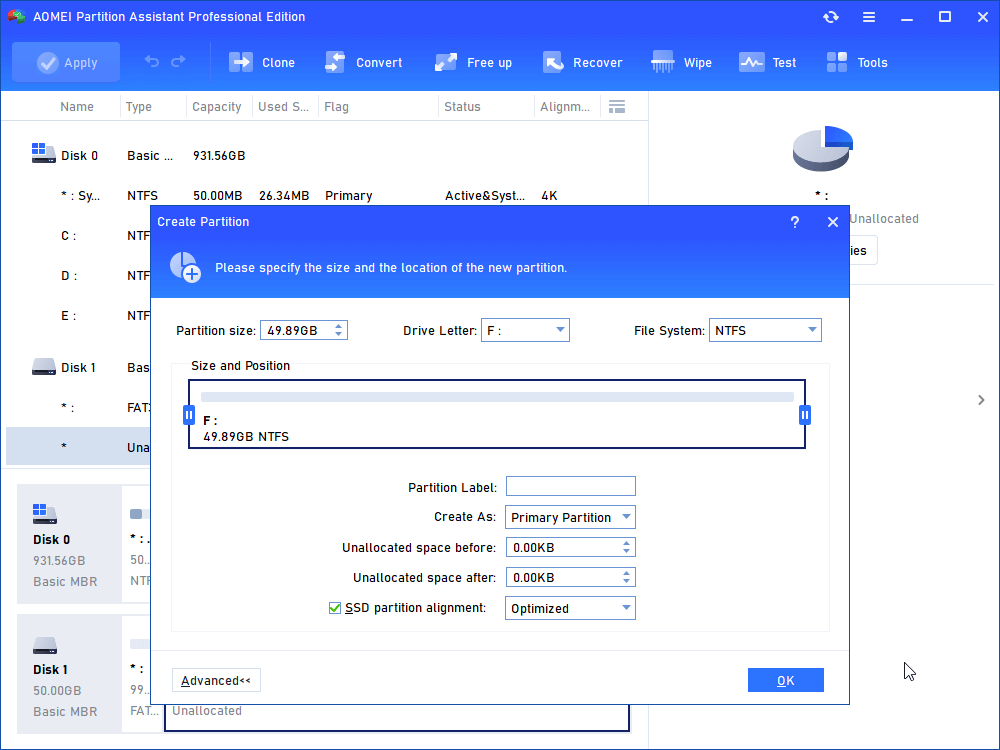
PS.: If you specify the drive letter as “None”, the partition will showing up in File Explorer.
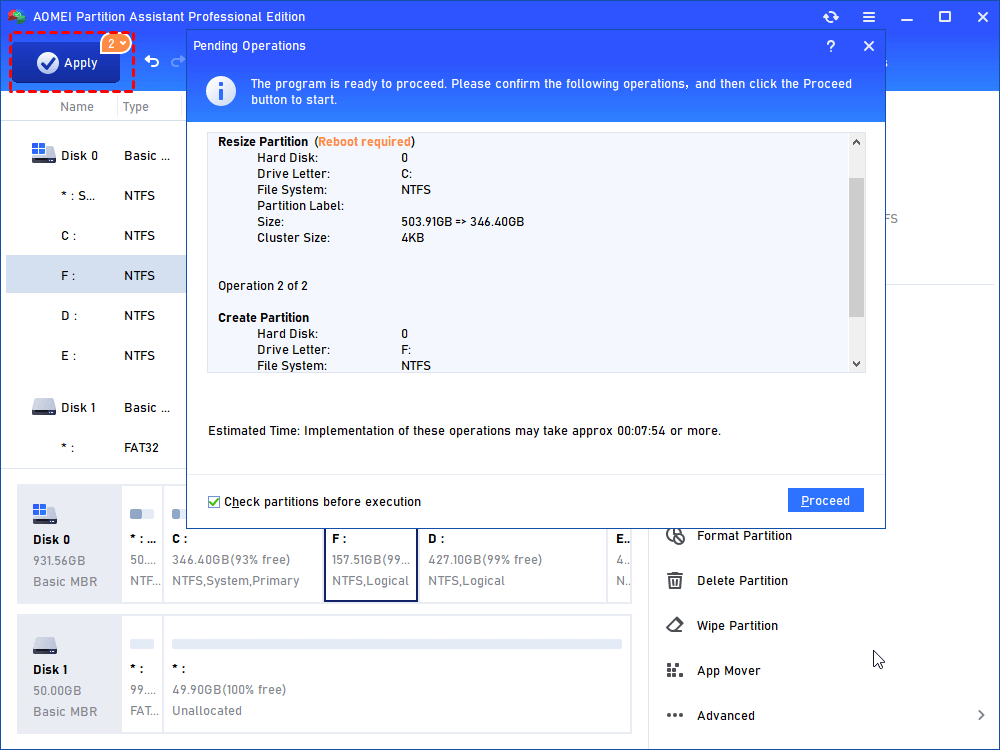
Step 5. In the main interface, preview pending operating and click “Apply” > “Proceed” to perform.
Note: It is allowed to split partition to get new partition via AOMEI Partition Assistant Standard.
вњ” Extend NTFS partition on hard drive
Step 1. Get unallocated space by shrinking one partition on the hard drive you need to partition. If there is unallocated space, skip this step.
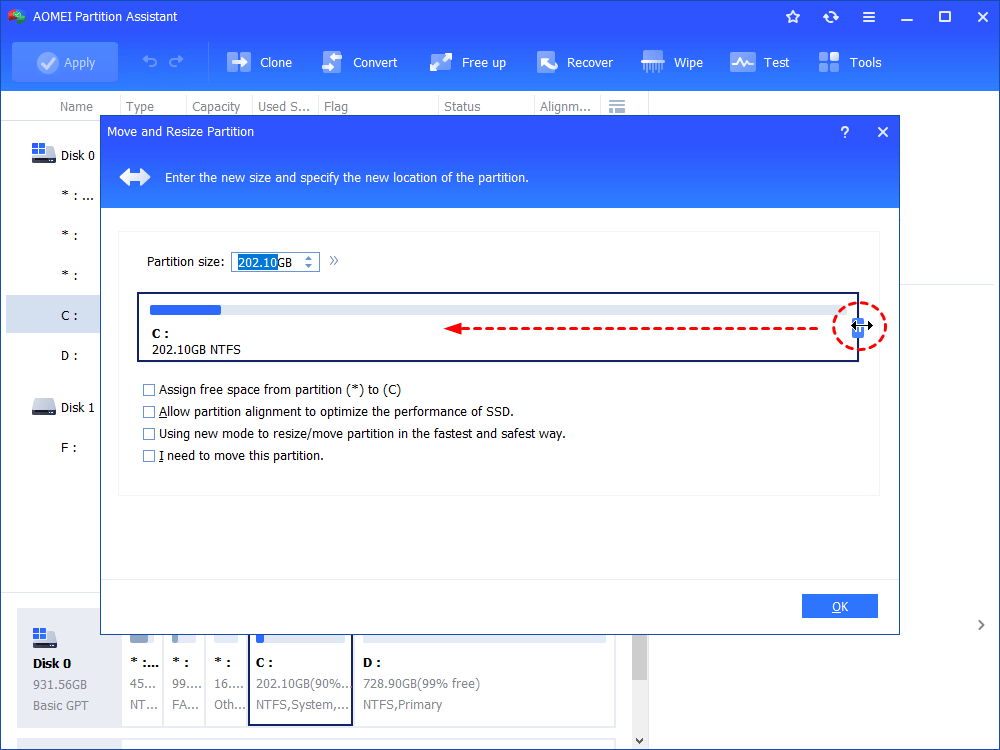
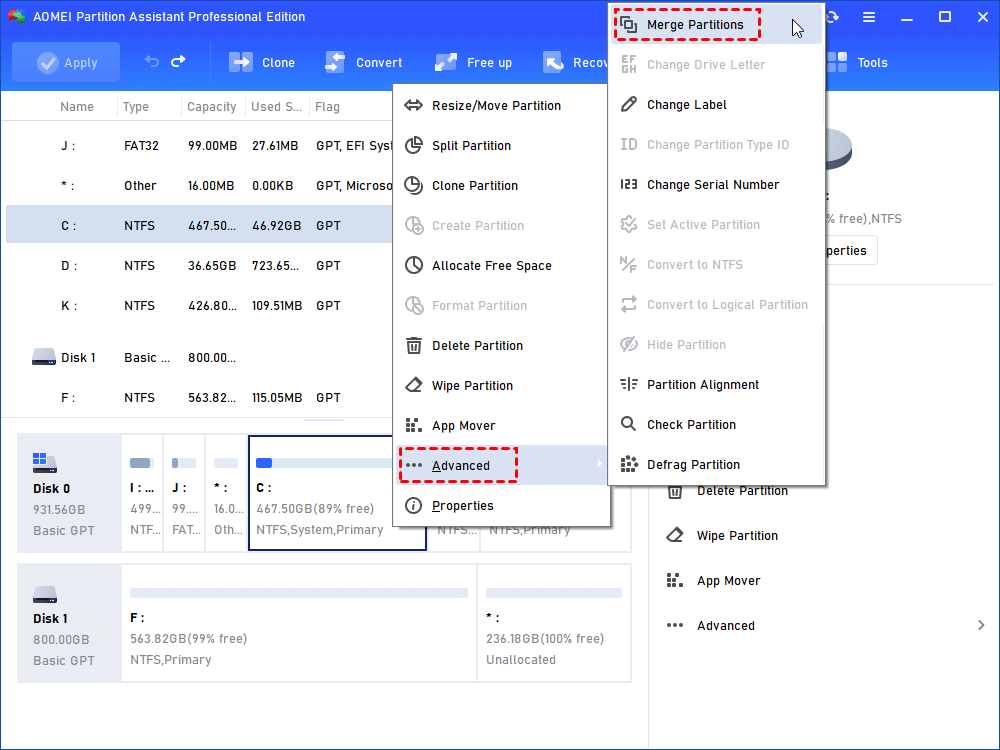
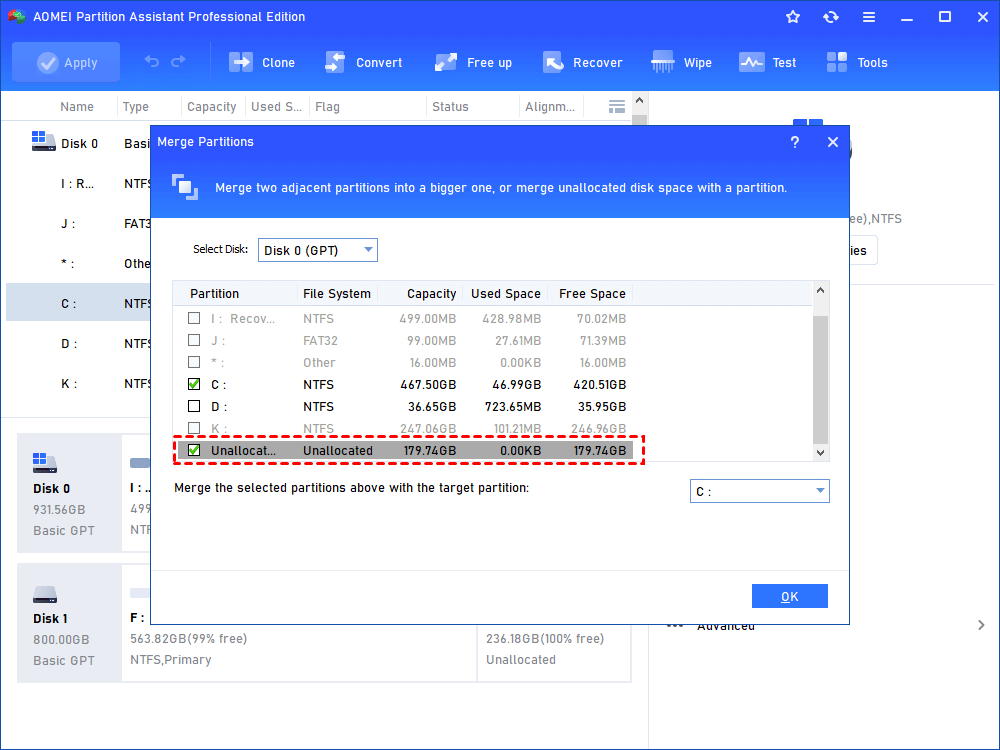
Step 2. Right-click the NTFS partition that you’ll extend (here is C drive) and choose “Merge Partitions”.
Step 3. Tick box before “Unallocated” and click “OK”.
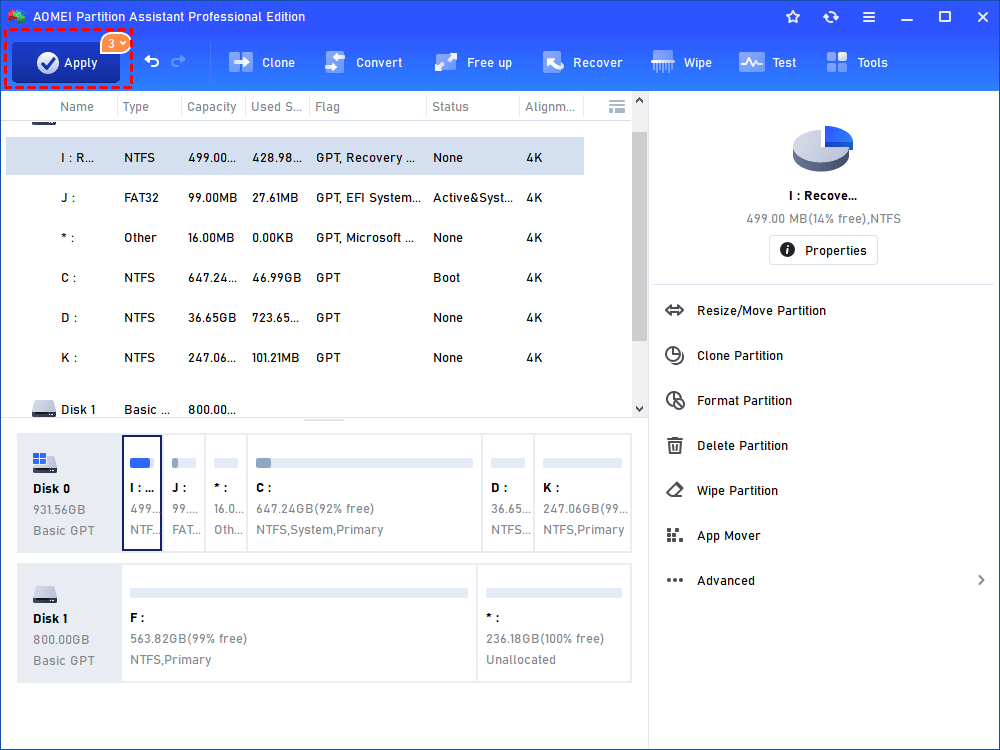
Step 4. You’ll return to the main interface, confirm your operation and click “Apply” > “Proceed” to execute it.
вњЌ Notes:
✔ You can also apply “Move Partition” and “Resize Partition” function to extend NTFS partition.
вњ” It is available to merge one partition into another partition and the merged partition will present as the form of folder.
Verdict
Just within a few steps, AOMEI Partition Assistant Standard can help you to partition NTFS hard drive flexibly and conveniently. In fact, it is able to assist you in partitioning SD card, USB flash drive, and so on. All in all, it’s worth trying this powerful hard drive partition software. And you can experience more features, like recovering deleted NTFS partition, split partition, clone system disk to GPT SSD, etc., by upgrading it to Professional version.
Mount a drive in a folder
Applies To: Windows 10, Windows 8.1, Windows Server 2019, Windows Server 2016, Windows Server 2012 R2, Windows Server 2012
You can use Disk Management to mount (make a drive accessible) in a folder rather than a drive letter if you want. This makes the drive appear as just another folder. You can mount drives only in empty folders on basic or dynamic NTFS volumes.
Mounting a drive in an empty folder
You must be a member of the Backup Operators or Administrators group, at minimum, to complete these steps.
To mount a drive in an empty folder by using the Windows interface
- In Disk Manager, right-click the partition or volume that has the folder in which you want to mount the drive.
- Click Change Drive Letter and Paths and then click Add.
- Click Mount in the following empty NTFS folder.
- Type the path to an empty folder on an NTFS volume, or click Browse to locate it.
To mount a drive in an empty folder using a command line
Open a command prompt and type diskpart .
At the DISKPART prompt, type list volume , making note of the volume number you want to assign the path to.
At the DISKPART prompt, type select volume , specifying the volume number that you want to assign the path to.
At the DISKPART prompt, type assign [mount=
To remove a mount point
To remove the mount point so that the drive is no longer accessible via a folder:
How Do I Access or Mount Windows/USB NTFS Partition in RHEL/CentOS/Fedora
Sometimes it may happens in some stage, you may have to access data on a Windows partition, USB device or any similar device. Today most of the modern Linux systems automatically recognize and mount any disks.
However, in some occasions where you may required to configure your system manually to mount ntfs partitions on your Linux system. Specially when you are using dual boot operating environment. Fortunately, this process is not so complicated task its just very fairly straight forward.
![]() How to mount Windows NTFS Partition in Linux
How to mount Windows NTFS Partition in Linux
This article explains you on how to access or mount Windows XP, Vista NTFS or USB filesystem using the ‘mount‘ command in RHEL/CentOS/Fedora systems.
How to Mount Windows NTFS Partition in Linux
First you need to enable EPEL (Extra Packages for Enterprise Linux) Repository. You may refer the article on how to enable EPEL Repository under RHEL, CentOS and Fedora systems.
To mount any NTFS based filesystem, you need to install a tool called NTFS3G. Before heading up for installation let’s understand NTGS3G.
What is NTFS3G
NTFS3G is an open source cross-platform, stable, GPL licensed, POSIX, NTFS R/W driver used in Linux. It provides safe handling of Windows NTFS file systems viz create, remove, rename, move files, directories, hard links, etc.
Once EPEL is installed and enabled, let’s install ntfs-3g package using the below command with root user.
Fuse Install
Next, install and load FUSE driver to mount detected devices with below command. FUSE module is included in the kernel itself in version 2.6.18-164 or newer.
Identify NTFS Partition
Once fuse module is loaded, type below command to find out NTFS Partitions in Linux.
Mount NTFS partition
First create a mount point to mount the NTFS partition.
Simply run the following command to mount the partition. Replace sda1 with your actual partition found.
Once it’s mounted on /mnt/ntfs, you may use regular Linux ls -l command to list the content of mounted filesystem.
If you want to make mount point permanent at the boot time, then simple add the following line at the end of /etc/fstab file. This will remain as permanent.
Umount NTFS Partition
Simply, use the following command to unmount the mounted partition.
If You Appreciate What We Do Here On TecMint, You Should Consider:
TecMint is the fastest growing and most trusted community site for any kind of Linux Articles, Guides and Books on the web. Millions of people visit TecMint! to search or browse the thousands of published articles available FREELY to all.
If you like what you are reading, please consider buying us a coffee ( or 2 ) as a token of appreciation.

We are thankful for your never ending support.


