- Mongodb how to install windows
- Содержимое пакета MongoDB
- Создание каталога для БД и запуск MongoDB
- Установка драйверов MongoDB
- How to Download & Install MongoDB on Windows
- Step 1 — Download the MongoDB MSI Installer Package
- Step 2 — Install MongoDB with the Installation Wizard
- Step 3— Create the Data Folders to Store our Databases
- Step 4 — Setup Alias Shortcuts for Mongo and Mongod
- Step 5 — Verify That Setup was Successful
- London App Brewery
- Install MongoDB
- What You’ll Need
- Procedure
- Install MongoDB
- Download the binary files for the desired release of MongoDB.В
- Extract the files from the downloaded archive.В
- Copy the extracted archive to the target directory.В
- Ensure the location of the binaries is in the PATH variable.В
- Download the binary files for the desired release of MongoDB.В
- Extract the files from the downloaded archive.В
- Copy the extracted archive to the target directory.В
- Ensure the location of the binaries is in the PATH variable.В
- Run MongoDB
- Set up the MongoDB environment.В
- Start MongoDB.В
- Verify that MongoDB has started successfully
- Connect to MongoDB.В
- Create the data directory
- Set permissions for the data directory
- Run MongoDB
Mongodb how to install windows
Для установки MongoDB загрузим один распространяемых пакетов с официального сайта https://www.mongodb.com/download-center/community.
Официальный сайт предоставляет пакеты дистрибутивов для различных платформ: Windows, Linux, MacOS, Solaris. И каждой платформы доступно несколько дистрибутивов. Причем есть два вида серверов — Community и Enterprise. В данном случае надо установить версию Community. Хотя Enterprise-версия обладает несколько большими возможностями, но она доступна только в триальном режиме или по подписке.
На момент написания данного материала последней версией платформы была версия 4.4 . Использование конкретной версии может несколько отличаться от применения иных версий платформы MongoDB.
Для загрузки нобходиомго функционала выберем нужную операционную систему и подходящий тип пакета:
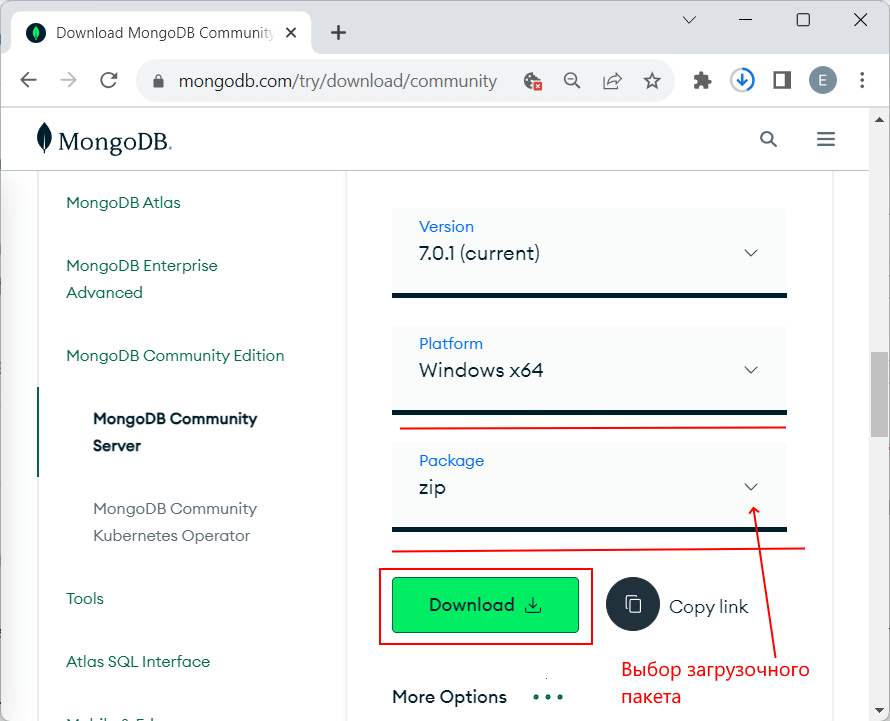
Для ОС Windows можно выбрать тип пакета «ZIP», то есть загрузить сервер в виде архива.
Если до установки уже была установлена более рання версия MongoDB, то ее необходимо удалить и также необходимо удалить все равне созданные базы данных.
После загрузки архивного пакета распакуем его в папку C:\mongodb .
Содержимое пакета MongoDB
Если после установки мы откроем папку bin в распакованном архиве ( C:\mongodb\bin ), то сможем найти там кучу приложений, которые выполняют определенную роль. Вкратце рассмотрим их.
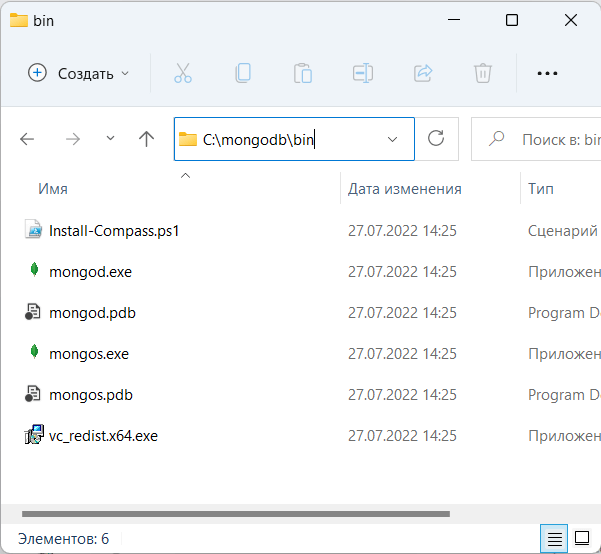
mongo : представляет консольный интерфейс для взаимодействия с базами данных, своего рода консольный клиент
mongod : сервер баз данных MongoDB. Он обрабатывает запросы, управляет форматом данных и выполняет различные операции в фоновом режиме по управлению базами данных
mongos : служба маршрутизации MongoDB, которая помогает обрабатывать запросы и определять местоположение данных в кластере MongoDB
Создание каталога для БД и запуск MongoDB
После установки надо создать на жестком диске каталог, в котором будут находиться базы данных MongoDB.
В ОС Windows по умолчанию MongoDB хранит базы данных по пути C:\data\db , поэтому, если вы используете Windows, вам надо создать соответствующий каталог. В ОС Linux и MacOS каталогом по умолчанию будет /data/db .
Если же возникла необходимость использовать какой-то другой путь к файлам, то его можно передать при запуске MongoDB во флаге —dbpath .
Итак, после создания каталога для хранения БД можно запустить сервер MongoDB. Сервер представляет приложение mongod , которое находится в папке bin. Для этого запустим командную строку (в Windows) или консоль в Linux и там введем соответствующие команды. Для ОС Windows это будет выглядеть так:
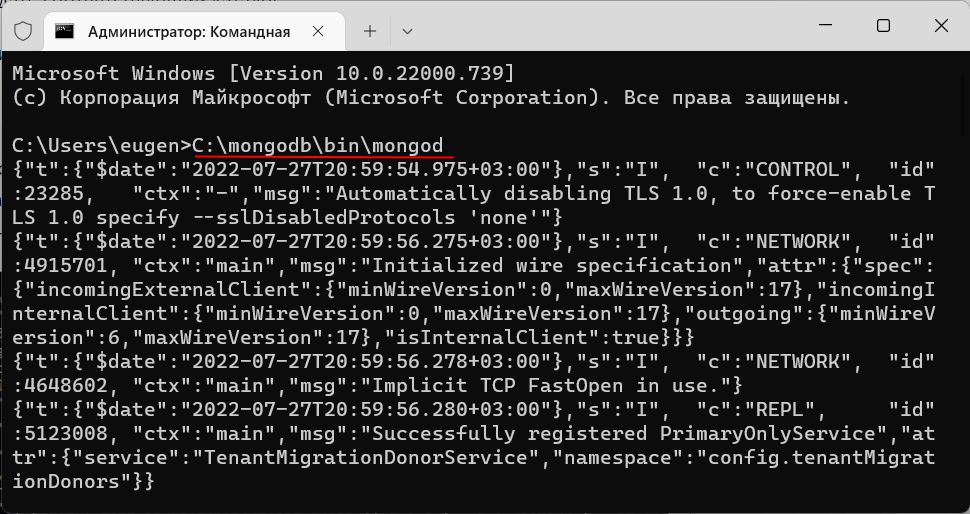
Командная строка отобразит нам ряд служебной информации, например, что сервер запускается на localhost на порту 27017.
И после удачного запуска сервера мы сможем производить операции с бд через оболочку mongo . Эта оболочка представляет файл mongo.exe , который располагается в выше рассмотренной папке установки. Запустим этот файл:
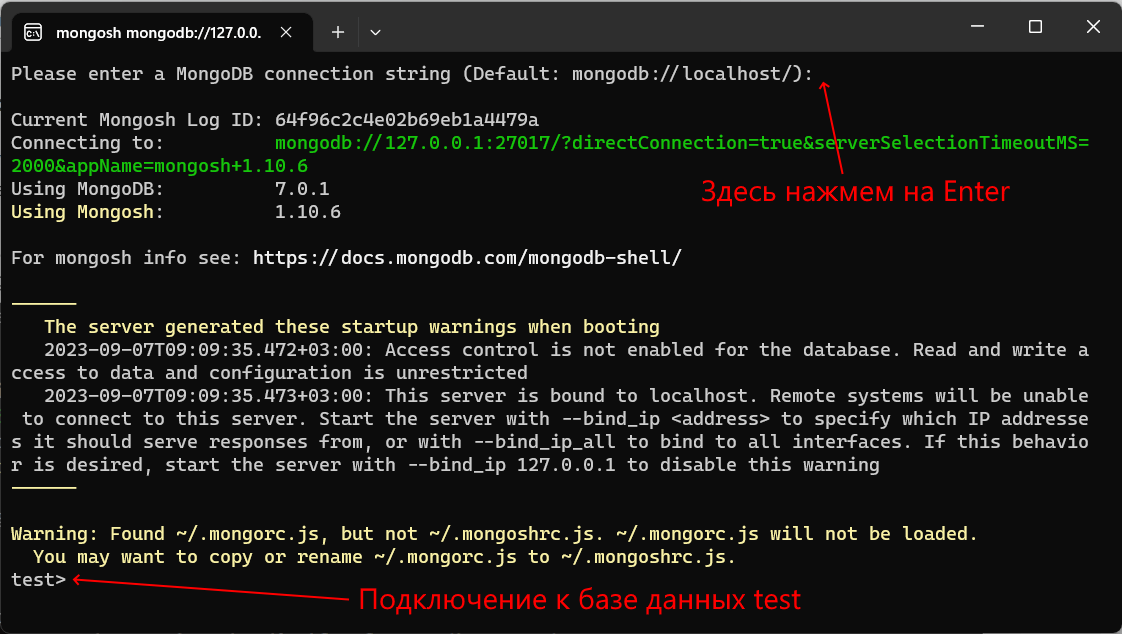
Это консольная оболочка для взаимодействия с сервером, через которую можно управлять данными. Второй строкой эта оболочка говорит о подключении к серверу mongod.
Теперь поизведем какие-либо простейшие действия. Введем в mongo последовательно следующие команды и после каждой команды нажмем на Enter:
Первая команда use test устанавливает в качестве используемой базу данных test. Даже если такой бд нет, то она создается автоматически. И далее db будет представлять текущую базу данных — то есть базу данных test. После db идет users — это коллекция, в которую затем мы добавляем новый объект. Если в SQL нам надо создавать таблицы заранее, то коллекции MongoDB создает самостоятельно при их отсутствии.
С помощью метода db.users.save() в коллекцию users базы данных test добавляется объект < name: "Tom" >. Описание добавляемого объекта определяется в формате, с которым вы возможно знакомы, если имели дело с форматом JSON. То есть в данном случае у объекта определен один ключ «name», которому сопоставляется значение «Tom». То есть мы добавляем пользователя с именем Tom.
Если объект был успешно добавлен, то консоль выведет результа в виде выражения WriteResult(< "nInserted" : 1 >) .
А третья команда db.users.find() выводит на экран все объекты из бд test.
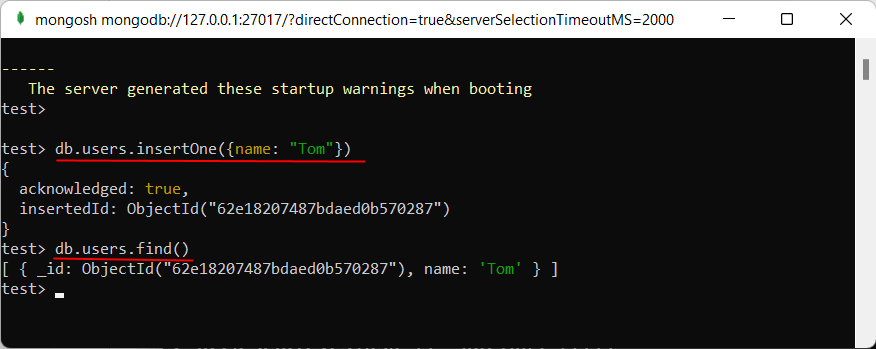
Из вывода вы можете увидеть, что к начальным значениям объекта было добавлено какое-то непонятно поле ObjectId . Как вы помните, MongoDB в качестве уникальных идентификаторов документа использует поле _id . И в данном случае ObjectId как раз и представляет значение для идентификатора _id.
Установка драйверов MongoDB
Конечно, мы можем работать и через консоль mongo, добавляя и отображая объекты в бд. Но нам также было бы неплохо, если бы mongoDB взаимодействовала бы с нашими приложениями, написанными на PHP, C++, C# и других языках программирования. И для этой цели нам потребуются специальные драйверы.
На офсайте на странице https://docs.mongodb.com/ecosystem/drivers/ можно найти драйвера для таких языков программирования, как PHP, C++, C#, Java, Python, Perl, Ruby, Scala и др.
Далее уже, рассматривая взаимодействие отдельных языков программирования с MongoDB, мы подробнее рассмотрим установку и драйвера и всю необходимую конфигурацию для определенных языков программирования.
How to Download & Install MongoDB on Windows

London App Brewery
Oct 23, 2018 · 4 min read

Step 1 — Download the MongoDB MSI Installer Package
Head over here and download the current version of MongoDB. Make sure you select MSI as the package you want to download.

Step 2 — Install MongoDB with the Installation Wizard
A. Make sure you are logged in as a user with Admin privileges. Then navigate to your downloads folder and double click on the .msi package you just downloaded. This will launch the installation wizard.

B. Click Next to start installation.

C. Accept the licence agreement then click Next.

D. Select the Complete setup.

E. Select “Run service as Network Service user” and make a note of the data directory, we’ll need this later.

F. W e won’t need Mongo Compass, so deselect it and click Next.

G. Click Install to begin installation.

F. Hit Finish to complete installation.

Step 3— Create the Data Folders to Store our Databases
A. Navigate to the C Drive on your computer using Explorer and create a new folder called data here.

B. Inside the data folder you just created, create another folder called db.

Step 4 — Setup Alias Shortcuts for Mongo and Mongod
Once installation is complete, we’ll need to set up MongoDB on the local system.
A. Open up your Hyper terminal running Git Bash.
B. Change directory to your home directory with the following command:
C. Here, we’re going to create a file called .bash_profile using the following command:
D. Open the newly created .bash_profile with vim using the following command:
E. In vim, hit the I key on the keyboard to enter insert mode.
F. In your explorer go to C → Program Files → MongoDB → Server
Now you should see the version of your MongoDB.

G. Paste in the following code into vim, make sure your replace the 4.0 with your version that you see in explorer
F. Hit the Escape key on your keyboard to exit the insert mode. Then type
to save and exit Vim.

Step 5 — Verify That Setup was Successful
A. Close down the current Hyper terminal and quit the application.
B. Re-launch Hyper.
C. Type the following commands into the Hyper terminal:
Once you’ve hit enter, you should see something like this:

This means that you have successfully installed and setup MongoDB on your local system!
If you see something that looks like bash mongo command not found, then make sure you check back at all the steps above and follow it step-by-step making sure there are no typos and you haven’t missed any of the steps.
London App Brewery
We teach entrepreneurs how to make apps from beginning to end. Learn iOS & Android app programming, design and marketing.
Install MongoDB
Author: MongoDB Documentation Team
This guide describes how to install MongoDB locally. If you would like to use MongoDB in the Cloud using Atlas , our managed database product, see Get Started with Atlas.
Time required: 10 minutes
What You’ll Need
MongoDB supports a variety of 64-bit platforms. Refer to the Supported Platforms table to verify that MongoDB is supported on the platform to which you wish to install it.
Procedure
Install MongoDB
Download the binaries from the MongoDB Download Center.
Open Windows Explorer/File Explorer.
Change the directory path to where you downloaded the MongoDB .msi file. By default, this is %HOMEPATH%\Downloads .
Double-click the .msi file.
The Windows Installer guides you through the installation process.
If you choose the Custom installation option, you may specify an installation directory.
MongoDB does not have any other system dependencies. You can install and run MongoDB from any folder you choose.
This tutorial assumes that you installed MongoDB in C:\Program Files\MongoDB\Server\4.2\ .
MongoDB only supports macOS versions 10.11 and later on Intel x86-64.
Download the binary files for the desired release of MongoDB.В
Download the binaries from the MongoDB Download Center.
Extract the files from the downloaded archive.В
For example, from a system shell, you can extract through the tar command:
Copy the extracted archive to the target directory.В
Copy the extracted folder to the location from which MongoDB will run.
Ensure the location of the binaries is in the PATH variable.В
The MongoDB binaries are in the bin/ directory of the archive. To ensure that the binaries are in your PATH , you can modify your PATH .
For example, you can add the following line to your shell’s rc file (e.g.
Replace with the path to the extracted MongoDB archive.
These instructions are for installing MongoDB directly from an archive file. If you would rather use your linux distribution’s package manager, refer to the installation instructions for your distribution in the MongoDB Manual.
Download the binary files for the desired release of MongoDB.В
Download the binaries from the MongoDB Download Center.
Extract the files from the downloaded archive.В
Extract the archive by double-clicking on the tar file or using the tar command from the command line, as in the following:
Copy the extracted archive to the target directory.В
Copy the extracted folder to the location from which MongoDB will run.
Ensure the location of the binaries is in the PATH variable.В
The MongoDB binaries are in the bin/ directory of the archive. To ensure that the binaries are in your PATH , you can modify your PATH .
For example, you can add the following line to your shell’s rc file (e.g.
Replace with the path to the extracted MongoDB archive.
Run MongoDB
Do not make mongod.exe visible on public networks without running in “Secure Mode” with the auth setting. MongoDB is designed to be run in trusted environments, and the database does not enable “Secure Mode” by default.
Set up the MongoDB environment.В
MongoDB requires a data directory to store all data. MongoDB’s default data directory path is the absolute path \data\db on the drive from which you start MongoDB. Create this folder by running the following command in a Command Prompt :
You can specify an alternate path for data files using the —dbpath option to mongod.exe , for example:
If your path includes spaces, enclose the entire path in double quotes, for example:
You may also specify the dbpath in a configuration file.
Start MongoDB.В
To start MongoDB, run mongod.exe . For example, from the Command Prompt :
This starts the main MongoDB database process. The waiting for connections message in the console output indicates that the mongod.exe process is running successfully.
Depending on the security level of your system, Windows may pop up a Security Alert dialog box about blocking “some features” of C:\Program Files\MongoDB\Server\4.0\bin\mongod.exe from communicating on networks. All users should select Private Networks, such as my home or work network and click Allow access . For additional information on security and MongoDB, please see the Security Documentation.
Verify that MongoDB has started successfully
Verify that MongoDB has started successfully by checking the process output for the following line:
The output should be visible in the terminal or shell window.
You may see non-critical warnings in the process output. As long as you see the log line shown above, you can safely ignore these warnings during your initial evaluation of MongoDB.
Connect to MongoDB.В
To connect to MongoDB through the
bin.mongo.exe shell, open another Command Prompt .
Create the data directory
Before you start MongoDB for the first time, create the directory to which the mongod process will write data. By default, the mongod process uses the /data/db directory. If you create a directory other than this one, you must specify that directory in the dbpath option when starting the mongod process later in this procedure.
The following example command creates the default /data/db directory:
Set permissions for the data directory
Before running mongod for the first time, ensure that the user account running mongod has read and write permissions for the directory.
Run MongoDB
To run MongoDB, run the mongod process at the system prompt. If necessary, specify the path of the mongod or the data directory. See the following examples.
Run without specifying paths
If your system PATH variable includes the location of the mongod binary and if you use the default data directory (i.e., /data/db ), simply enter mongod at the system prompt:
Specify the path of the mongod В
If your PATH does not include the location of the mongod binary, enter the full path to the mongod binary at the system prompt:


