- Linux Mint настройка Wi-Fi
- Настройка Wi-Fi подключения в Linux Mint 17
- Как включить Wi-Fi
- Как настроить скрытую сеть Wi-Fi
- Не работает Wi-Fi на Linux Mint, или он её не видит: все способы решения
- Подключение
- Подключение к скрытой беспроводной сети
- Причины
- На Ubuntu
- 1 Решение
- 2 Решение
- На Mint
- How to setup WiFi in Linux Mint
- How to connect to your wireless network
- Use your Linux machine as hotspot
- Related Posts
- How to Connect your Android phone to Zorin OS with Zorin Connect
- How to follow your favorite websites with the NewsFlash RSS Feed Reader for Linux
- How to verify your Linux Mint ISO image file
- Follow RealLinuxUser
- Why this website
- How to solve Linux Mint Wi-Fi problems – Updated
- Install driver for Wi-Fi adapters manually
- What if you still can’t bring your Wi-Fi back to life
- Penguin wireless products
- Panda wireless products
- BrosTrend wireless products
- Alternative hardware solutions
- Updating your kernel
- Final words
- About the affiliate links in this article
Linux Mint настройка Wi-Fi

Если в вашем компьютере или ноутбуке имеется Wi-Fi карточка, то глупо будет не воспользоваться беспроводной связью. В данной статье мы рассмотрим как настроить Wi-Fi подключение в Linux Mint 17 и какие при этом могут возникнуть проблемы.
Настройка Wi-Fi подключения в Linux Mint 17
Наш пример будет основан на примере Linux Mint MATA 17.1, но все операции аналогично выглядят и на других версиях. Найдите на нижней панеле в правом углу индикатор сетевых подключений.

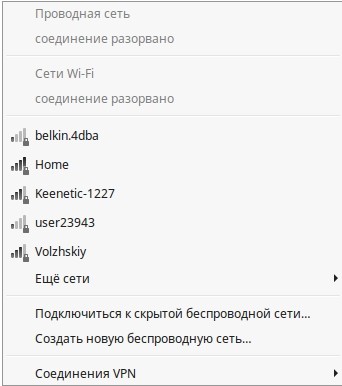
Кликните по нему левой кнопкой мыши и перед вами появится список доступных сетей.

Найдите среди них вашу и нажмите на ее название. Система запросит ввести секретный пароль, а после его ввода нажмите на «ок».

Теперь индикатор сети принял такой вид и вы видите уровень сигнала Wi-Fi по количеству темных полосок.
Как включить Wi-Fi
Если по каким-либо причинам Wi-Fi не работает и у вас не отображается список доступных сетей, то причин для этого может быть несколько.
- Проверьте подключение wi-fi адаптера к компьютеру.
- Проверьте включен ли ваш роутер и проверьте его настройки
- Проверьте установился ли драйвер для вашего wi-fi адаптера
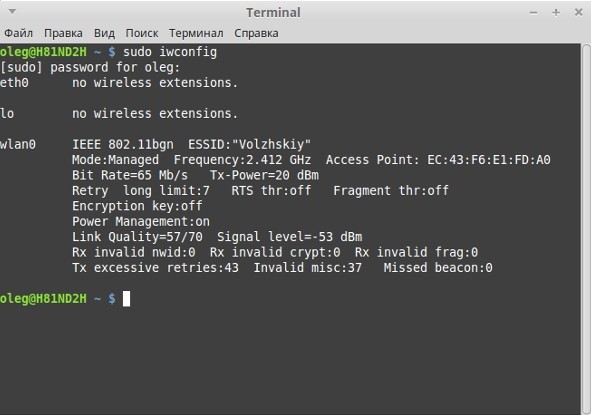
Третий пункт можно проверить из терминала командами
sudo iwconfig
sudo lspci

Чаще всего драйвер можно найти на сайте производителя адаптера, поэтому поищите его там. Бывают случаи, когда подключить Wi-Fi удается, но соединение постоянно отключается (отваливается). В такой ситуации нужно будет переустановить драйвер, но в каждом конкретном случае это делается по-разному. Задайте ваш вопрос на форуме и мы вместе постараемся решить вашу проблему.
Как настроить скрытую сеть Wi-Fi
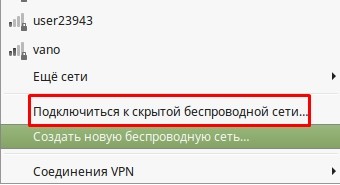
Для создания или подключени к скрытой сети Wi-Fi в менеджере сетевых подключений имеются соответствующие строки.

Нажмите на «подключиться к скрытой беспроводной сети и заполните следующие поля:

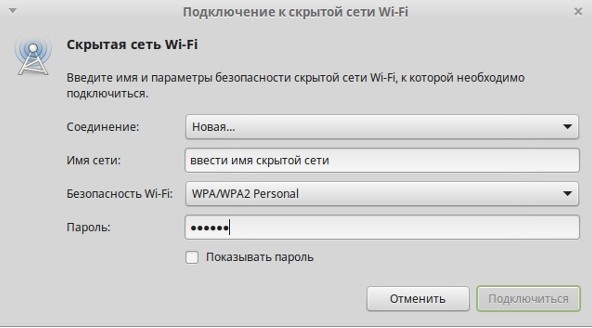
Если вы хотите создань новую скрытую сеть то заполните поля, как на изображении ниже

Как видите, ничего сложного и мы надеемся, что данная статья помогла вам подключиться к интернету и полноценно пользоваться операционной системой Linux Mint.
Источник
Не работает Wi-Fi на Linux Mint, или он её не видит: все способы решения
Всем привет! После использования новой операционной системы периодически сталкивался с проблемой – когда Linux Mint не видит WiFi. Немного поднабравшись опыта, я решил написать более детальную статью, в отличие от тех, которые есть в интернете. Они конечно неплохие, но как правило не полностью решает некоторые мелкие нюансы.
Подключение
Прежде чем паниковать, давайте попробуем подключиться снова. Нажимаем по подключению правой кнопкой.

Далее вы должны увидеть список всех сетей. Если каким-то образом вы все же увидели свою – то нажимаем по ней и вводим пароль.
Если нужной сети нет, то подойдите к вашему роутеру и проверьте, чтобы он был включен. На всякий случай я бы его перезагрузил. Для этого находим на нем кнопку включения и два раза нажимаем по ней. Если кнопки нет, то можно просто выдернуть его из розетки, а потом снова включить.
Если вообще никаких сетей нет, то проверьте, чтобы у вас был установлен драйвер на ваш WiFi адаптер. Для этого можно прописать одну из двух команд:
По установки драйверов вы можете почитать отдельную нашу статью – по этой ссылке. Также данная статья решает проблемы, когда на Linux Mint не работает WiFi.
Подключение к скрытой беспроводной сети
Если драйвера установлены и не видно только одну сеть, то возможно она просто скрыта или невидима. Данная настройка стоит внутри маршрутизатора.
- Подключиться можно по названию, для этого опять открываем список подключений. Далее нужно выбрать «Подключить к скрытой беспроводной сети»;
- Далее вводим название сети, выбираем тип безопасности. Чаще используется именно «WPA/WPA2 Personal» – поэтому если вы не знаете, что именно указать, укажите этот параметр. Ниже введите ключ и нажимаем «Подключиться».
Причины
Я составил список самых частых причин, когда сеть невозможно увидеть.
- Установлены не те драйвера. По установке драйверов я оставил ссылку в самом начале статьи. При чем может быть так, что не видно только одну или несколько сетей.
- Вирусы, сторонние программы, которые мешают работе системы. Конечно в Linux данная проблема встречается реже чем на Windows, но она также есть. Бывает также, что работе модуля мешают обычные программы.
- Роутер находится слишком далеко или сигнал слишком слабый. Посмотрите, чтобы на пути волны не было сильно толстых стен, зеркал и металлических препятствий;
- Проблема в роутере – попробуйте подключиться к нему с других устройств. Если будут такие же проблемы, то сбрасываем его до заводских настроек, а потом заново настраиваем. По настройке маршрутизаторов у нас на портале также есть инструкции по настройке.
На Ubuntu
1 Решение
- Находим раздел «Параметры системы» и переходим туда;
- Далее «Программы и обновления»;
- Найдите в списке тот сетевой адаптер, который используется и выберите пункт «Не используется»;
- Вводим ключ и нажимаем «Аутентифицировать»;
- Ждём обновления системы и перезагрузки;
- Ещё раз пробуем переподключиться.
- Если это не поможет, то полностью удалите драйвер адаптер и установите его заново.
2 Решение
- В терминале прописываем команды:
sudo apt-get update
sudo apt-get upgrade
sudo apt-get install linux linux-headers-generic kernel-package
sudo apt-get install —reinstall bcmwl* firmware-b43-lpphy-installer b43-fwcutter
- Пробуем подключиться, если не помогает, то прописываем ещё и это:
sudo apt-get remove bcmwl-kernel-source
sudo apt-get install firmware-b43-installer b43-fwcutter
- Перезагружаем комп и роутер, а после этого пробуем ещё раз подключиться;
На Mint
- Открываем консоль и прописываем: iwconfig, чтобы узнать о всех интерфейсах;
- Далее вводим две команды:
sudo ip link set wlan0 up
sudo iw dev wlan0 scan | less
- В первой, проверяем включенный интерфейс, второй смотрим доступные сети – авось увидим нужную;
- Теперь прописываем вручную имя сети и ключ
sudo iw dev wlan0 connect [ИМЯ СЕТИ] key 0:[ПАРОЛЬ] network=
sudo wpa_supplicant -i wlan0 -c /etc/wpa_supplicant/wpa_supplicant.conf
sudo dhcpcd wlan0
- Ещё раз вводим первую команду, чтобы проверить подключение.
Я как обычный человек, мог что-то упустить – так что пишите свои решения в комментариях. Также если вы нашли ошибку, то сообщите о ней там же.
Источник
How to setup WiFi in Linux Mint

Setting up WiFi in Linux Mint is pretty easy, but of course you need to setup your WiFi adapter first, which in Linux can be everything between very easy and almost impossible. In the previous chapter of this Linux Mint beginner course I explained how to install WiFi drivers in Linux Mint. It all depends on which hardware components or which laptop you have. For my Dell Latitude E7450 it was a no brainer to have a working WiFi adapter, as it was recognized by Linux Mint out of the box. This is often the case for a lot of A-class laptops, like the Lenovo ThinkPad, HP Stream, Dell XPS and Dell Latitude. But on my custom build i7 workstation it was much more difficult to come up with a working solution for several usb WiFi adapters, so that one is wired. So now it is time to setup the WiFi connection itself.
How to connect to your wireless network
I assume you have a working WiFi adapter (based on the explanation in the previous chapter How to install WiFi drivers in Linux Mint), so it is time now to setup the WiFi connection itself. When you have your Linux Mint desktop in front of you and you didn’t yet connect to your wireless network you will see the following icon on the right hand side of your panel in what we call the system indicator area. This “two arrows with a small x” icon tells you that the wireless connection is not active yet.

If the wireless connection is active then you will see the WiFi indicator. There are embedded four levels in this icon that will give you information on the strength of your received signal. In this example the strength of your signal is approximately 75%.

But let’s assume this is the first time we try to activate a WiFi connection. Start by left-clicking on the “two arrows with a small x” icon and the following screen will pop-up.
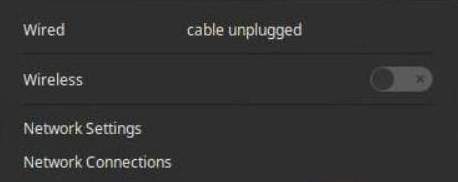
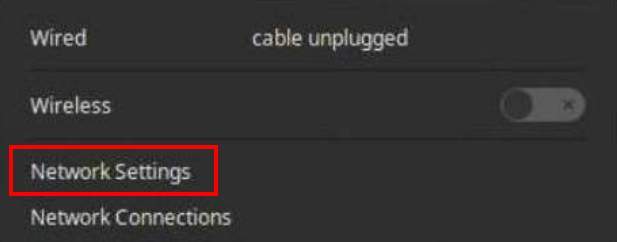
In this screen you see that both the wired and the wireless connections are not active. So click on the on/off switch on the right of the Wireless section.
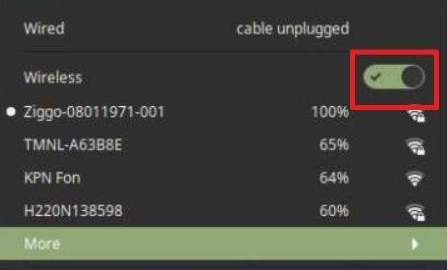
Now the activation switch will change to activated and one or more available WiFi networks will hopefully be shown with their strength levels. Here you can select your own wireless network.
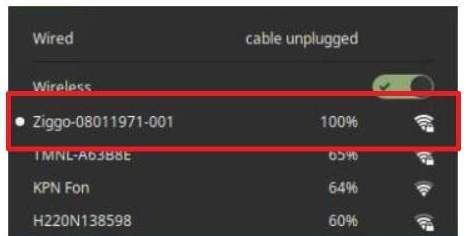
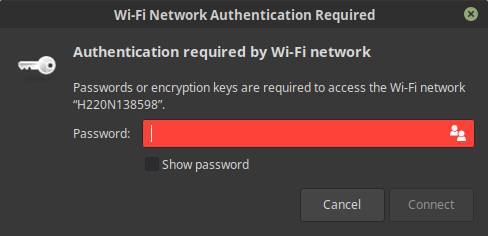
When you selected your preferred wireless network, a WiFi Network Authentication pop-up will be presented to you. Give your administrator password here and click Connect.
If everything goes as expected you are now connected to your wireless network and you can start surfing the web.
Use your Linux machine as hotspot
With respect to wireless connectivity Linux Mint has an additional trick under its sleeve. It is possible to use your workstation or laptop installed with a Linux Mint distribution as a wireless hotspot for other wireless devices like laptops, tablets and mobile phones. The only catch is that this Linux hotspot computer must be connected by wire to your internet router. When wireless connected your computer can’t be used as a wireless hotspot.
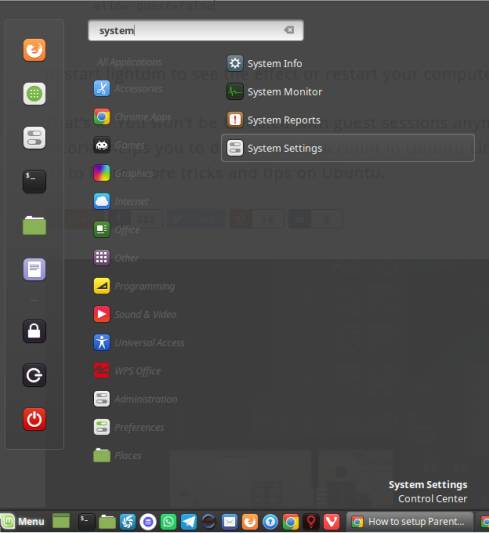
So to setup a wireless hotspot, first make sure your computer has a wired connection. Now left-click on the network icon in the system indicator area on the right hand side of the panel.

Click on Network Settings.
Now the Network settings screen will be opened. Here you find the button “Use as hotspot”.

So click on it to open the hotspot settings.

In the above screenshot you see that a Network Name has been created together with a Password. Now you simply search in the network settings of your mobile phone or tablet or another laptop for this network name and type the provided password to log in this wireless network. That’s all.
Related Posts

How to Connect your Android phone to Zorin OS with Zorin Connect
March 23, 2021 March 23, 2021

How to follow your favorite websites with the NewsFlash RSS Feed Reader for Linux

How to verify your Linux Mint ISO image file
February 20, 2021 February 20, 2021
Follow RealLinuxUser
Why this website
Hi, my name is John. I started this website because I think that many Linux-oriented websites are too technical to be of any interest for novice users or people who just want to be productive with their computer, and that scares off a potentially large group of new people to take the step to Linux. And that is a pity because Linux is a formidable platform and with the right user-centered approach Linux could get a much larger footprint. So this website tries to be different and will be simple and focused on users who just want to be productive with Linux and related software.
Источник
How to solve Linux Mint Wi-Fi problems – Updated
The modern Linux distributions have out of the box terrific support for most of the available hardware components, like graphics cards, printers and Wi-Fi adapters. And with HWE, or Hardware Enablement, it has become even more convenient catching up with the latest hardware technologies in your Ubuntu based Linux distro of choice. But it is always possible that the setup procedure, when installing the distro from scratch, doesn’t come up directly with the correct or most optimized drivers for your devices. In this tutorial I will show you how to install Wi-Fi drivers in Linux Mint or what you can do if there is no solution for your specific hardware.
Install driver for Wi-Fi adapters manually
When you install Linux Mint on a desktop or laptop with a build in Wi-Fi adapter, it is generally speaking to be expected that it will be recognized automatically, but there is also a chance that this adapter is not automatically being recognized during the installation process. So what can you do next?
A real life example
As you can read in my article “Bring your MacBook Aluminum Late 2008 back to life again with Linux“, I have been a very satisfied user of the OS X / macOS operating system for more than 10 years. But due to increasing hardware issues and lack of support by Apple, I looked for something different. One of the things I did was to swap OS X on my still working MacBook with Linux Mint, which was a great decision.
But there was a hurdle. The Broadcom BCM4322 Wireless Controller in the old Apple MacBook late 2008, is not automatically recognized by default during the Linux Mint installation process. But I knew from other websites that Linux Mint should work fine on this specific equipment. So the solution for me and probably for a lot of other devices is simple: if you have the opportunity to temporarily make a wired internet connection, then this issue can be solved within a few minutes by going through the below steps in Linux Mint.
1) Connect your computer via a network cable.
2) Open the applications menu in Linux Mint.
3) Choose Driver Manager under the Administration category and enter your password.
After a standard cache update takes place, Driver Manager displays an overview of device components that require a driver. Here hopefully a driver for your wireless adapter will be available. In the case of my macBook it did.
4) Under Broadcom Corporation, select bcmwl-kernel-source for the recommended option.
The operating system should now be restarted and Wi-Fi on this machine will then work perfectly.
Of course the above example is based on my old macBook and the hardware in it , so in your specific case the above steps will hopefully show the right driver for your device. But what if it doesn’t?
What if you still can’t bring your Wi-Fi back to life
The above approach should be working for a lot of other wireless adapters as well, as more and more adapters are supported out of the box by included driver software. But there is a chance that you have a wireless adapter in your system for which this approach is not working. This could be a kind of an issue as many articles on the internet proves that there are still a lot of problems with Wi-Fi adapters getting to work in Linux. Therefore it is almost impossible to come up with good generic advice to solve problems with respect to specific adapters. But my articles on this website are there to make your Linux life a bit simpler, so if you don’t want to search yourself for solutions for your current not working internal or external Wi-Fi adapter, I simply advise you to buy an external Wi-Fi adapter that has proven to work perfectly fine with Linux (as Wi-Fi USB adapters are very cheap these days).
The most important component of a wireless adapter that guarantees compatibility with Linux is the chipset in the wireless adapter. According to a great article on www.wirelesshack.org (this is a good source of news for electronic projects including Kali Linux, Wireless Security, KODI, SDR, Raspberry Pi, How-To- information, Reviews, Guides and Tutorials) on popular chipsets, called “Top Best Linux Compatible USB Wireless Adapters“, you have to look for Wi-Fi adapters with one of the following chipsets: Ralink 3070, Ralink RT5572, Atheros AR9271, and Realtek 8187.
Based on the analysis of the writer of the above mentioned article, and the analysis I did myself on lots of the reviews on Amazon and other websites, containing user experiences on some specific adapters, I can say that below adapters should be good options to solve your wireless problems.
Penguin wireless products
If you want to go for real Linux compatibility, have a look at some of the products of Penguin:

- Chipset: Atheros AR9271
- Supports Linux Mint 10, 11, 12, 13, 14, 14.1, 15, 16, 17, 17.1, 17.2, 17.3, 18, 18.1, 18.2, 18.3, 19, 19.1, 19.2, 19.3
For in depth information go to https://www.thinkpenguin.com/gnu-linux/penguin-wireless-n-usb-adapter-gnu-linux-tpe-n150usb

- Chipset: Atheros AR9271
- Supports Linux Mint 10, 11, 12, 13, 14, 14.1, 15, 16, 17, 17.1, 17.2, 17.3, 18, 18.1, 18.2, 18.3, 19, 19.1, 19.2, 19.3
For in depth information go to https://www.thinkpenguin.com/gnu-linux/penguin-wireless-n-usb-adapter-w-external-antenna-gnu-linux-tpe-n150usbl
Panda wireless products
Another great brand that has Linux in mind is Panda.
BrosTrend wireless products
Alternative hardware solutions
When you don’t want to or can use usb Wi-Fi dongles or when you have maybe a fixed working place for example at the attic, you have other alternatives as well that don’t require Linux drivers or Linux support. For myself and for family and friends I installed Wi-Fi range extenders with ethernet support, so you can connect the range extender to your Wi-Fi network and you connect your computer via an ethernet cable to the range extender. Another solution is a Passthrough Powerline Wi-Fi kit that runs data through your electrical lines and that connects with your computer via an ethernet cable.
Examples of products that I have great experience with are:
Updating your kernel
Another option to have better driver support is probably not the first thing you’ve thought about, namely upgrading to a newer kernel. If you are already on a recent release of your distribution, you probably already have very up to date drivers, but if you are using for example Linux Mint 17, which was released in May 2014, it is based on an old kernel. When you use an old Linux Mint distribution you can upgrade to the most recent version. If you are already on the most recent version you can still upgrade the kernel, as new kernels are released frequently and often contain driver updates. Upgrading a kernel deserves a completely separate tutorial, so I mention it here for information only.
Final words
On my website and in my free Linux Mint course, I try to show you that Linux Mint is simple and works mostly perfectly fine with all of your hardware. Well, Wi-Fi could be one of those deviations that does not fully match my perfect picture of Linux. It is getting better and better, but if you have one of these problematic wireless adapters, it is probably better to skip solving the problem and just buy a cheap compatible adapter that works right away in your nice Linux Mint distribution, or install a Wi-Fi range extender with ethernet support, a Passthrough Powerline solution with ethernet. I hope this article helped to find a working solution.
About the affiliate links in this article
In this article you can find some clearly indicated affiliate links to products that I have actually used or investigated in and that I believe in. This means that, at no additional cost to you, this website will earn a small commission if you choose to click through and make some purchase via the linked website. Please do not spend any money on these products unless you feel you need them or that they will help you achieve your goals. To read more about affiliate links on this website, go to the Affiliate Disclaimer page.
Источник


