- How to open Windows Device Manager
- How to open the Device Manager in Windows 10
- How to open the Device Manager in Windows 8
- How to open the Device Manager in Windows Vista and 7
- How to open the Device Manager in Windows 2003
- How to open the Device Manager in Microsoft Windows XP and 2000
- Open the Device Manager in Windows 95, 98, 98 SE, and ME
- Microsoft Windows NT 3.x and Windows 3.x users
- Using Device Manager
- How to Open Device Manager
- Here’s where to find Device Manager in Windows 10, 8, 7, Vista, or XP
- How to Open Device Manager via Control Panel
- Other Ways to Open Device Manager
- Microsoft windows device manager
How to open Windows Device Manager
Below are the steps for entering the Device Manager in each of the major versions of Windows. Select a link below for the version of Windows on your computer and follow the instructions.
Press the shortcut key Windows key and Pause key at the same time to open the Device Manager.
How to open the Device Manager in Windows 10
- Press the Windows key + X or right-click Start to open the Power User Menu.
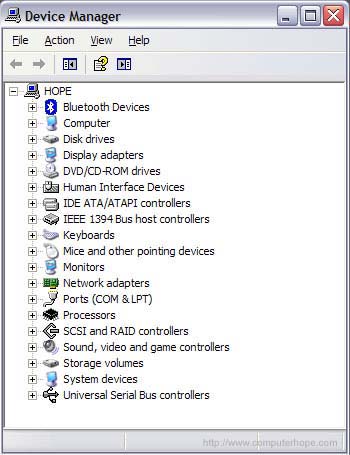
- Select Device Manager in the menu. In Device Manager, you see something similar to the example below.

In the Windows search box, you can type device manager and click Device Manager in the search results to open the Device Manager.
Once in the Device Manager, you can start identifying problems in Windows Device Manager.
How to open the Device Manager in Windows 8
- Access the Windows Start screen.
- Type device manager and press Enter .
- Access the Windows desktop.
- Press the Windows key + C key on the keyboard to open the Charms menu.
- Click Settings, then click the Device Manager icon. In Device Manager, you see something similar to the example below.
In Windows 8.1, you can also access the Device Manager by pressing the Windows key + X key to open the Power User Tasks Menu. In the menu that opens, select Device Manager.
Once in the Device Manager, you can start identifying problems in Windows Device Manager.
How to open the Device Manager in Windows Vista and 7
- Click Start.
- In the Start menu search box, type device manager and press Enter . In Device Manager, you’ll see something similar to the example below.

Once in the Device Manager, you can start identifying problems in Windows Device Manager.
How to open the Device Manager in Windows 2003
- Open the Administrative Tools from the Control Panel.
- In the Administrative Tools, click Computer Management.
Once in the Device Manager, you can start identifying problems in Windows Device Manager.
How to open the Device Manager in Microsoft Windows XP and 2000
- On the desktop or in the Start menu, right-clickMy Computer, and select Properties.
- In the System Properties window, click the Hardwaretab.
- On the Hardware tab, click the Device Manager button.
- Open the Control Panel.
- In the Control Panel, double-click the Systems icon.
- In the System Properties window, click the Hardware tab.
- On the Hardware tab, click the Device Manager button and you see something similar to the example below.
Once in the Device Manager, you can start identifying problems in Windows Device Manager.
Open the Device Manager in Windows 95, 98, 98 SE, and ME
- On the desktop, right-clickMy Computer and select Properties.
- Click the Device Manager tab.
- Open the Control Panel.
- In the Control Panel, double-click the Systems icon.
- Click the Device Managertab and you see something similar to the example below.

Once in the Device Manager, you can start identifying problems in Windows Device Manager.
Microsoft Windows NT 3.x and Windows 3.x users
These versions of Windows do not have a Device Manager feature.
Using Device Manager
To start Device Manager, in File explorer, select and hold (or right-click) This PC, select Manage, and then select Device Manager from the System Tools that are listed in the resulting dialog.
Device Manager displays information about each device. This includes the device type, device status, manufacturer, device-specific properties, and information about the driver for the device.
If your device is required to start the computer, a problem with your device installation can prevent the computer from starting. In these cases, you have to use the kernel debugger to troubleshoot your device installation. For more info, see Getting Started with WinDbg (Kernel-Mode).
If your device is not required to start the computer, Device Manager places a yellow exclamation point next that device’s name in the Device Manager dialog. Device Manager also provides an error message describing the problem. For more information about the error messages, see Device Manager Error Messages.
Device manager can show hidden devices. This is helpful when you are testing the installation of a new PnP device. For more information, see Viewing Hidden Devices.
Device Manager provides detailed information in the Properties dialog for each device. Select and hold (or right-click) the name of the device, and then select Properties. The General, Driver, Details, and Events tabs contain information that can be useful when you debug errors. For more information, see Device Manager Details Tab.
How to Open Device Manager
Here’s where to find Device Manager in Windows 10, 8, 7, Vista, or XP
:max_bytes(150000):strip_icc()/tim-fisher-5820c8345f9b581c0b5a63cf.jpg)
:max_bytes(150000):strip_icc()/ryanperiansquare-de5f69cde760457facb17deac949263e-180a645bf10845498a859fbbcda36d46.jpg)
There are plenty of reasons you might need to open Device Manager in Windows but usually, it’s to troubleshoot some kind of problem with your computer’s hardware.
It doesn’t matter if you’re updating device drivers, adjusting system resources, finding Device Manager error codes, or even just checking in on a device’s status—you’ll need to open Device Manager before you can do any of it.
Device Manager isn’t listed next to your regular programs, so it can be difficult to find if you don’t already know where it is. The Control Panel method is probably the most straightforward way to get there, but we go over all your options below.
Follow the easy steps below to open Device Manager in Windows:
Instructions in this article apply to Windows 10, Windows 8, Windows 7, Windows Vista, and Windows XP.
Time Required: Opening Device Manager should only take a minute or so, no matter which version of Windows you’re using. See Other Ways to Open Device Manager towards the bottom of the page for some other, arguably faster ways in at least some versions of Windows.
How to Open Device Manager via Control Panel
In Windows 10 and Windows 8, assuming you’re using a keyboard or mouse, the fastest way is through the Power User Menu—just press the WIN (Windows) key and the X key together.
In some versions of Windows 10, you may also be able to open Device Manager directly from the Start menu, as a submenu under Control Panel.
:max_bytes(150000):strip_icc()/002_how-to-open-device-manager-2626075-5bc6651ec9e77c005149f5ce.jpg)
Depending on your version of Windows, Control Panel is usually available from the Start menu or Apps screen.
:max_bytes(150000):strip_icc()/003_how-to-open-device-manager-2626075-5bc664fac9e77c005149ef17.jpg)
What you do next depends on what Windows operating system you’re using:
- In Windows 10 and Windows 8, select Hardware and Sound. You could also jump right to Device Manager through the Power User Menu and not have to go through Control Panel.
- In Windows 7, choose System and Security.
- In Windows Vista, select System and Maintenance.
- In Windows XP, pick Performance and Maintenance.
If you don’t see these options, your Control Panel view may be set to Large icons, Small icons, or Classic View, depending on your version of Windows. If so, find and choose Device Manager from the big collection of icons you see and then skip to Step 4 below.
:max_bytes(150000):strip_icc()/004_how-to-open-device-manager-2626075-5bc66547c9e77c005111c714.jpg)
From this Control Panel screen, look for and choose Device Manager:
In Windows 10 and Windows 8, check under the Devices and Printers heading. In Windows 7, look under System. In Windows Vista, you’ll find Device Manager towards the bottom of the window.
:max_bytes(150000):strip_icc()/005_how-to-open-device-manager-2626075-5bc6656ec9e77c0051983818.jpg)
In Windows XP, you have a few extra steps since Device Manager isn’t as easily available in your version of Windows. From the open Control Panel window, select System, choose the Hardware tab, and then use the Device Manager button.
:max_bytes(150000):strip_icc()/windows-xp-system-properties-ac6530c33e654ec88e0dce57aae172fc.png)
With Device Manager now open, you can view a device’s status, update the device drivers, enable devices, disable devices, or do whatever other hardware management you came here to do.
Other Ways to Open Device Manager
If you’re comfortable with the command-line in Windows, specifically Command Prompt, one really quick way to start Device Manager in any version of Windows is via its command:
:max_bytes(150000):strip_icc()/006_how-to-open-device-manager-2626075-5bc6659c46e0fb0026f9d8dd.jpg)
The command-line method really comes in handy when you need to bring up Device Manager but your mouse won’t work or your computer is having a problem that prevents you from using it normally.
While you probably won’t ever need to open Device Manager this way, you should know that it’s also available in all versions of Windows via Computer Management, part of the suite of built-in utilities called Administrative Tools.
Device Manager takes on a slightly different look in Computer Management. Just select it from the left margin and then use it as an integrated feature of the utility on the right.
Another way to open Device Manager, at least in Windows 7, is through GodMode. This is a special folder that gives you access to tons of settings and controls found throughout the operating system. If you already use GodMode, opening Device Manager there might be your preferred way to use it.
Microsoft windows device manager

Описание:
Неофициальный многофункциональный менеджер Windows Phone. Обсуждение TouchXperience.
Изменения в версии 1.10:
Поддержка Windows 8.
Изменения в версии 1.9:
Улучшен удаленный экран (свыше 30 fps);
Улучшена общая стабильность;
Исправлена ошибка резервирования приложений на разблокированных устройствах;
Исправлена проблема снятия скриншотов, которая была связана с ограничением памяти для фоновых задач;
Файлы, помещенные в \My Documents теперь копируются в хаб «Office»;
Исправлены ошибки;
Изменения в версии 1.8:
Публичный релиз;
Полный доступ к isolated storage;
Отображение уведомления, когда требуется запуск TouchXperience;
Исправлены недоработки.
Изменения в версии 1.7:
Полная поддержка Windows Phone 7.5;
Добавлена поддержка Nokia Lumia 800, Samsung Focus S, HTC TITAN и HTC Radar;
Улучшенное соединение;
Автоматическое определение версии системы при подключении телефона к ПК;
Уведомление пользователя, об установке приложения, использующего сервисы interop на interop-залоченном аппарате;
Поддержка Mango API мелодий звонка;
Уведомление пользователя о состоянии подключения телефона к ПК (подключен/отключен);
Уведомление пользователя об окончании установки приложения;
Автоматическая проверка обновлений TouchXperience
Исправлены недоработки.
Изменения в версии 1.6:
Проверка, не залочен ли аппарат на оператора и не заблокирован ли у него экран;
Возможность изменения разрешения и качества изображения удаленного экрана
Полноэкранный режим во время создания скриншотов;
Отображение оставшегося времени работы от батареи;
Уведомление пользователя о полном заряде батареи;
Автоматическая блокировка запуска Zune, пока запущено приложение;
Исправлено падение приложения в случае, если Windows Phone Developer Tools не установлен;
Улучшенны диалоговые окна состояния;
Улучшена общая стабильность;
«Возможно», исправлен доступ к файловой системе на устройствах LG.
Изменения в версии 1.4:
Создание резервной копии/сосстановление документов и данных приложений;
Улучшено надежность соединения;
Улучшена передача больших файлов;
Улучшено качество соединения через Wi-Fi;
Исправлены некоторые проблемы с соединением;
Исправлено сообщение об ошибке «Newer version required»;
Подключение в ручном режиме путем ввода IP-адреса ПК;
Возможность смены портов на аппарате;
Автоматическое добавление правил в Windows Firewall;
Отображение прогремма получения информации о приложении;
Сортировка списка приложений (по имени, размеру, дате установки, и т.д.);
Сортировка списка файлов (по имени, размеру, дате изменения, и т.д.);
Сохранение UIстатуса при выходе;
Отображение модулей и файлов прошивки синими/темно-синими;
Открытие папки приложения прямо из списка приложений;
Отправка звуков (также, как вы отправляете мелодии звонка, для изменения мелодий в Advanced Config);
Поддержка Mango developer tools beta;
Исправлены ошибки локализации;
Улучшена отладка;
Автоматический поиск обновлений для Device Manager & TouchXperience;
Сотни улучшений и исправлений.
- Управление приложениями: Просмотр, установка/удаление
- Управление файлами: просмотр файловой системы устройства, обмен файлами
- Синхронизация файлов, папок, избранного с телефоном
- Отправка на Windows Phone (файлов, приложений, мелодий, ссылок в один щелчок мышки)
- Подробная информация об устройстве (CPU, ROM, RAM, storage, network, battery, OS. )
- Добавление собственных мелодий звонка и управление ими
- Отправка СМС, E-mail, заметок прямо с компьютера (без необходимости в облачных сервисах)
- Создание скриншотов с экрана телефона
- Программирование отправляемых на телефон уведомлений
- Общий буфер обмена у телефона и компьютера
- Интеграция в Windows explorer (drag & drop, copy/paste, просмотр иконок и деталей приложений)
- Интеграция с панелью управления (Device Stage, ссылки задач)
- Неплохая интеграция с Windows Vista/7 (jumplists, виджеты, aero эффекты. )
- Возможность инициировать подключение как с компьютера, так и с телефона
- Поддержка подключения через Wi-Fi
- Связь происходит автоматически (нет необходимости вводить IP адрес компьютера и телефона)
- Уведомление об обновлениях приложений, установленных на телефоне
- Создание резервной копии приложений
- Использование вашего телефона для удаленного управления вашим компьютером (управление мышью, клавиатурой, навигация в Windows Media Center)
- Открытие marketplace для некоммерческих приложений (если разработчикам будет интересно)
Updated: Если у вас win7 x64 и при подключении телефона программа вызывает ошибку — установите  EasyBCD_2.0.2.exe ( 1,31 МБ )
В ней нажмите advanced settings, далее вкладка advanced и там поставьте галку «Allow installations of unsigned drivers on 64-bit Windows», а затем «save settings». Будьте внимательны, это разрешает установку неподписанных драйверов.
Также, если возникают какие-то проблемы, попробуйте установить предыдущую версию программы.
Updated 2.05.2011:
Добавлен фикс реестра для тех, у кого возникают проблемы с соединением («TouchXperience version 1.2.3.0 or later is required») на windows7 x64. Нужно применить этот файл на ПК —  WPDeviceManagerFix.reg ( 306 байт )
Также, у кого проблемы с соединением, просто подключайтесь через вай-фай:
- Подключите ваш телефон к компьютеру через usb. Не забудьте перед этим включить вай-фай
- Запустите WPDM
- После получения сообщения «TouchXperience version 1.2.3.0 or later is required» должен запуститься touchXperience(если не запустится — сделайте это вручную)
- Отключите телефон от usb
- В WPDM нажмите «connect»
- Телефон должен определиться WPDM
Инструкция:
1. Скачайте Windows Phone Device Manager и запустите WPDeviceManager.exe
2. Подключите ваш телефон, система автоматически определит его, если нет — нажмите Connect в меню
3. При первом подключении телефона к компьютеру Windows Phone Device Manager автоматически установит на него TouchXperience. Если этого не произошло, установите xap-файл вручную.
Требования:
1. Зарегистрированный и разблокированный Windows Phone 7.5 аппарат;
2. Windows Vista или Windows 7 32/64-бит;
3. .NET Framework 4.0;
4. Windows Phone SDK 7.1 или более поздний;
5. Zune 4.8 или более поздний;
6. Zune WMDU (опционально);
В настоящий момент поддерживаются следующие устройства:
HTC HD7, HTC 7 Mozart, HTC 7 Trophy, HTC 7 Surround, HTC 7 Pro, HTC Arrive, HTC HD2, Samsung Focus, Samsung Omnia 7, Dell Venue Pro, LG Optimus 7, LG E900, LG C900, Nokia Lumia 800 и 710, Samsung Focus S, HTC TITAN и HTC Radar.
Версия 1.9 WPDeviceManager_v.1.9.exe ( 9,82 МБ )
Версия 1.8 WPDeviceManager.exe ( 9,8 МБ )
Версия 1.3 WPDeviceManager.exe ( 9,19 МБ )
Версия 1.2 WPDeviceManager_1.2.exe ( 9,17 МБ )
Сообщение отредактировал kirk999 — 12.08.12, 22:10


