- Как создать загрузочный USB для Windows 10 в Linux
- Сделать загрузочную Windows 10 USB на Linux
- 1] Во-первых, вам нужно установить WoeUSB
- 2] Приступить к созданию загрузочного USB
- Download Windows 10
- Windows 10 May 2021 Update
- Create Windows 10 installation media
- Create installation media for Ubuntu
- On Ubuntu
- On Windows
- On macOS
- Learn more
Как создать загрузочный USB для Windows 10 в Linux
Вы все в значительной степени знакомы с процедурой создания загрузочного носителя Windows 10 на компьютерах с операционной системой Windows. В этом посте мы покажем вам процедуру создания загрузочного USB / CD с Windows 10 на компьютерах с операционной системой Linux.
Все слишком известный процесс создания загрузочного USB / CD с Windows 10 с помощью Media Creation Tool (MCT) работает только в операционной системе Microsoft, Windows 10. Следовательно, необходимо показать вам, как выполнить то же действие на компьютере с Linux.
Некоторые могут спросить, действительно ли этот учебник необходим. Ответ на этот вопрос — да. Эта процедура для создания загрузочного носителя Windows 10 на компьютере с Linux будет полезна, если, например, ваш рабочий компьютер с Windows 10 упаковывается, и вам нужно подготовить другой компьютер на лету, но все компьютеры, к которым у вас есть доступ, — все Машины Linux, на которых вы не можете создать загрузочный носитель Windows 10 обычным способом. Итак, это ценные технические ноу-хау, которые вы должны иметь в своем наборе.
Сделать загрузочную Windows 10 USB на Linux
Для успешного создания загрузочного USB для Windows 10 в Linux вам потребуется следующее;
- Флешка
- Компьютер под управлением ОС Linux
- Windows 10 ISO
- WoeUSB, простой инструмент, который позволяет вам создать свой собственный установщик Windows USB-накопитель из образа ISO или реального DVD.
Примечание . Если вы загружаетесь в устаревшем режиме (BIOS) и эта процедура не работает, вместо создания загрузочного USB-устройства используйте загруженный ISO-образ и запишите его на DVD-диск, а затем продолжите загрузку компьютера с Windows 10 с него. после того, как вы убедились, что сначала установите BIOS для загрузки с DVD-привода.
1] Во-первых, вам нужно установить WoeUSB
Если вы используете Ubuntu или дистрибутив на основе Ubuntu, такой как Linux Mint , сначала добавьте PPA с помощью следующей команды:
Если вы получили сообщение о том, что «add-apt-repository» не найден, перейдите к установке с помощью следующей команды:
Затем снова запустите указанную выше команду « add-apt-repository ».
Если следующая команда « apt install woeusb » не работает, потому что она не может найти пакет, сделайте это вручную, используя следующую команду:
Затем установите WoeUSB с помощью этой команды:
В Fedora установите с помощью команды:
На OpenSUSE вы можете получить WoeUSB отсюда.
2] Приступить к созданию загрузочного USB
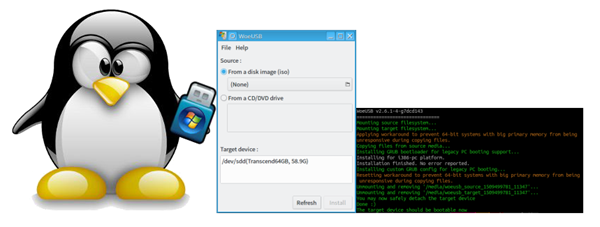
Подключите USB и запустите WoeUSB GUI из меню запуска. Если вы не можете найти его там, вызовите его с помощью этой команды:
Если на вашем USB-устройстве есть файловая система, она будет автоматически смонтирована операционной системой. Откройте браузер файлов и размонтируйте его, нажав на стрелку извлечения рядом с ним.
Теперь выберите поле в поле « Из образа диска (iso)» и перейдите в папку, в которую вы загрузили ISO-образ Windows.
Далее в разделе « Файловая система» выберите переключатель для NTFS .
Наконец, в разделе «Целевое устройство» нажмите на свое USB-устройство.
Нажмите «Установить» и дождитесь завершения процесса. Не закрывайте приложение и не извлекайте USB-устройство, пока не получите сообщение об успешном завершении операции.
И вот как вы можете создать загрузочный USB для Windows 10 на компьютере с Linux.
Источник
Download Windows 10
Before updating, please refer to the Windows release information status for known issues to confirm your device is not impacted.
Windows 10 May 2021 Update
The Update Assistant can help you update to the latest version of Windows 10. To get started, click Update now.
Create Windows 10 installation media
To get started, you will first need to have a license to install Windows 10. You can then download and run the media creation tool. For more information on how to use the tool, see the instructions below.

Here’s when to use these instructions:
- You have a license to install Windows 10 and are upgrading this PC from Windows 7 or Windows 8.1.
- You need to reinstall Windows 10 on a PC you’ve already successfully activated Windows 10.
If you are installing Windows 10 on a PC running Windows XP or Windows Vista, or if you need to create installation media to install Windows 10 on a different PC, see Using the tool to create installation media (USB flash drive, DVD, or ISO file) to install Windows 10 on a different PC section below.
Note: Before you install Windows 10, check to make sure your PC meets the system requirements for Windows 10. We also recommend going to the PC manufacturer’s website for any additional info about updated drivers and hardware compatibility.
- Select Download tool, and select Run. You need to be an administrator to run this tool.
- On the License terms page, if you accept the license terms, select Accept.
- On the What do you want to do? page, select Upgrade this PC now, and then select Next.
After downloading and installing, the tool will walk you through how to set up Windows 10 on your PC. All Windows 10 editions are available when you select Windows 10, except for Enterprise edition. For more information on Enterprise edition, go to the Volume Licensing Service Center.
- If you don’t have a license to install Windows 10 and have not yet previously upgraded to it, you can purchase a copy here: https://www.microsoft.com/en-us/windows/get-windows-10.
- If you previously upgraded to Windows 10 on this PC and you’re reinstalling it, you don’t need to enter a product key. Your copy of Windows 10 will automatically activate later using your digital license.
Follow these steps to create installation media (USB flash drive or DVD) you can use to install a new copy of Windows 10, perform a clean installation, or reinstall Windows 10.
Before you download the tool make sure you have:
- An internet connection (internet service provider fees may apply).
- Sufficient data storage available on a computer, USB or external drive for the download.
- A blank USB flash drive with at least 8GB of space or blank DVD (and DVD burner) if you want to create media. We recommend using a blank USB or blank DVD, because any content on it will be deleted.
- When burning a DVD from an ISO file, if you are told the disc image file is too large you will need to use Dual Layer (DL) DVD Media.
Check a few things on the PC where you want to install Windows 10:
- 64-bit or 32-bit processor (CPU). You’ll create either a 64-bit or 32-bit version of Windows 10. To check this on your PC, go to PC info in PC settings or System in Control Panel, and look for System type.
- System requirements. Make sure the PC meets the system requirements for Windows 10. We also recommend going to the PC manufacturer’s website for additional info about updated drivers and hardware compatibility.
- Language in Windows. You’ll need to choose the same language when you install Windows 10. To see what language you’re currently using, go to Time and language in PC settings or Region in Control Panel.
- Edition of Windows. You should also choose the same edition of Windows. To check what edition you’re currently running, go to PC info in PC settings or System in Control Panel, and look for Windows edition. Windows 10 Enterprise isn’t available in the media creation tool. For more info, go to the Volume Licensing Service Center.
- Microsoft Office products. If you just purchased a new device that includes Office 365, we recommend redeeming (installing) Office before upgrading to Windows 10. To redeem your copy of Office, please see Download and install Office 365 Home, Personal, or University on your PC. For more information, check How to upgrade to Windows 10 on new devices that include Office 365.
If you have Office 2010 or earlier and choose to perform a clean install of Windows 10, you will need to locate your Office product key. For tips on locating your product key, check Find your Office 2010 product key or Enter the product key for your Office 2007 program.
Using the tool to create installation media:
- Select Download tool now, and select Run. You need to be an administrator to run this tool.
- If you agree to the license terms, select Accept.
- On the What do you want to do? page, select Create installation media for another PC, and then select Next.
Select the language, edition, and architecture (64-bit or 32-bit) for Windows 10. This table will help you decide which edition of Windows 10 you’ll choose:
| Your current edition of Windows | Windows 10 edition |
|---|---|
| Windows 7 Starter Windows 7 Home Basic Windows 7 Home Premium Windows 7 Professional Windows 7 Ultimate Windows 8/8.1 Windows 8.1 with Bing Windows 8 Pro Windows 8.1 Pro Windows 8/8.1 Professional with Media Center Windows 8/8.1 Single Language Windows 8 Single Language with Bing Windows 10 Home Windows 10 Pro | Windows 10 |
| Windows 8/8.1 Chinese Language Edition Windows 8 Chinese Language Edition with Bing | Windows 10 Home China |
- USB flash drive. Attach a blank USB flash drive with at least 8GB of space. Any content on the flash drive will be deleted.
- ISO file. Save an ISO file to your PC, which you can use to create a DVD. After the file is downloaded, you can go to location where the file is saved, or select Open DVD burner, and follow the instructions to burn the file to a DVD. For more info about using an ISO file, see Additional methods for using the ISO file to install Windows 10 section below.
After completing the steps to install Windows 10, please check that you have all the necessary device drivers installed. To check for updates now, select the Start button, and then go to Settings > Update & Security > Windows Update, and select Check for updates. You may also wish to visit your device manufacturer’s support site for any additional drivers that may be needed.
Note: Drivers for Surface devices may be found on the Download drivers and firmware for Surface page.
Before you install Windows 10, it’s a good idea to save any work and back up your PC before you start. If you used the media creation tool to download an ISO file for Windows 10, you’ll need to burn it to a DVD before following these steps.
- Attach the USB flash drive or insert the DVD on the PC where you want to install Windows 10.
- Restart your PC.
If your PC does not automatically boot to the USB or DVD media, you might have to open a boot menu or change the boot order in your PC’s BIOS or UEFI settings. To open a boot menu or change the boot order, you’ll typically need to press a key (such as F2, F12, Delete, or Esc) immediately after you turn on your PC. For instructions on accessing the boot menu or changing the boot order for your PC, check the documentation that came with your PC or go to the manufacturer’s website. If you do not see the USB or DVD media device listed within the boot options, you may need to reach out to the PC manufacturer for instructions for temporarily disabling Secure Boot in your BIOS settings.
If changing the boot menu or order doesn’t work, and your PC immediately boots into the OS you want to replace, it is possible the PC had not fully shut down. To ensure the PC fully shuts down, select the power button on the sign-in screen or on the Start menu and select Shut down.
If you downloaded an ISO file for Windows 10, the file is saved locally at the location you selected. If you have a third-party DVD burning program installed on your computer that you prefer to use for creating the installation DVD, that program might open by going to the location where the file is saved and double-clicking the ISO file, or right-click the ISO file, select Open with and choose your preferred DVD burning software.
If you want to use the Windows Disk Image Burner to create an installation DVD, go to the location where the ISO file is saved. Right-click the ISO file and select Properties. On the General tab, click Change and select Windows Explorer for the program you would like to use to open ISO files and select Apply. Then right-click the ISO file and select Burn disc image.
If you want to install Windows 10 directly from the ISO file without using a DVD or flash drive, you can do so by mounting the ISO file. This will perform an upgrade of your current operating system to Windows 10.
Источник
Create installation media for Ubuntu
These steps will walk you through creating a bootable Ubuntu image SD Card or USB flash drive.
WARNING: This will erase any existing content on the removable drive!
View instructions for: Ubuntu, Windows, or macOS.
On Ubuntu
Download the Ubuntu image for your device in your `Downloads` folder
Insert your SD card or USB flash drive
Identify its address by opening the «Disks» application and look for the «Device» line. If the line is in the /dev/mmcblk0p1 format, then your drive address is: /dev/mmcblk0 . If it is in the /dev/sdb1 format, then the address is /dev/sdb
Unmount it by right-clicking its icon in the launcher bar, the eject icon in a file manager or the square icon in the «Disks» application
Open a terminal ( Ctrl+Alt+T ) to copy the image to your removable drive
If the Ubuntu image file you have downloaded ends with an `.xz` file extension, run:
Then, run the sync command to finalize the process
You can now eject your removable drive. You are ready to install Ubuntu on your device ›
On Windows
Download the Ubuntu image for your device in your `Downloads` folder
If the Ubuntu image file you have downloaded ends with an .xz file extension, you will need to extract it first. To do so, you might have to install an archive extractor software, like 7-zip
Insert your SD card or USB flash drive
Download and install Win32DiskImager, then launch it
Find out where your removable drive is mounted by opening a File Explorer window to check which mount point the drive is listed under.
Here is an example of an SD card listed under E:
In order to flash your card with the Ubuntu image, Win32DiskImager will need 2 elements:
- an Image File: navigate to your Downloads folder and select the image you have just extracted
a Device: the location of your SD card. Select the drive on which your SD card is mounted
When ready click on Write and wait for the process to complete.
You can now eject your removable drive. You are ready to install Ubuntu on your device ›
On macOS
Download the Ubuntu image for your device in your Downloads folder
Insert your SD card or USB flash drive
Open a terminal window (Go to Application » Utilities, you will find the Terminal app there), then run this command:
In the results, identify your removable drive device address, it will probably look like an entry like the ones below:
Your removable drive must be DOS_FAT_32 formatted. In this example, /dev/disk3 is the drive address of an 8GB SD card.
Unmount your SD card with this command:
When successful, you should see a message similar to this:
You can now copy the image to the SD card:
When finished you will see this message:
You can now eject your removable drive. You are ready to install Ubuntu on your device ›
Learn more
You can start your Ubuntu Core journey by either reading or asking.
Источник


