- В Windows 10 есть режим супер производительности, но нужно активировать
- Как активировать режим «Ultimate Perfomance» (Максимальная производительность)
- Что это даст?
- Как включить максимальную производительность на Windows 10. Показываю по шагам
- How to optimize your Windows 10 pc for gaming and maximum performance
- Step-1 Ultimate Power Plan settings-
- Step-3 Disable Startup items-
- Step-4 Set the paged file settings-
- Step-5 Use Graphics specifics for high performance in games-
- Step-7 Use Quick CPU-
- Related Posts:
- Reader Interactions
- Comments
В Windows 10 есть режим супер производительности, но нужно активировать
Мы знаем один способ, как выжать из вашего ПК реально все мегагерцы и вывести на по-настоящему космические скорости. Необходимо просто активировать в Windows 10 скрытый режим управления питанием. Но поймут его не все.
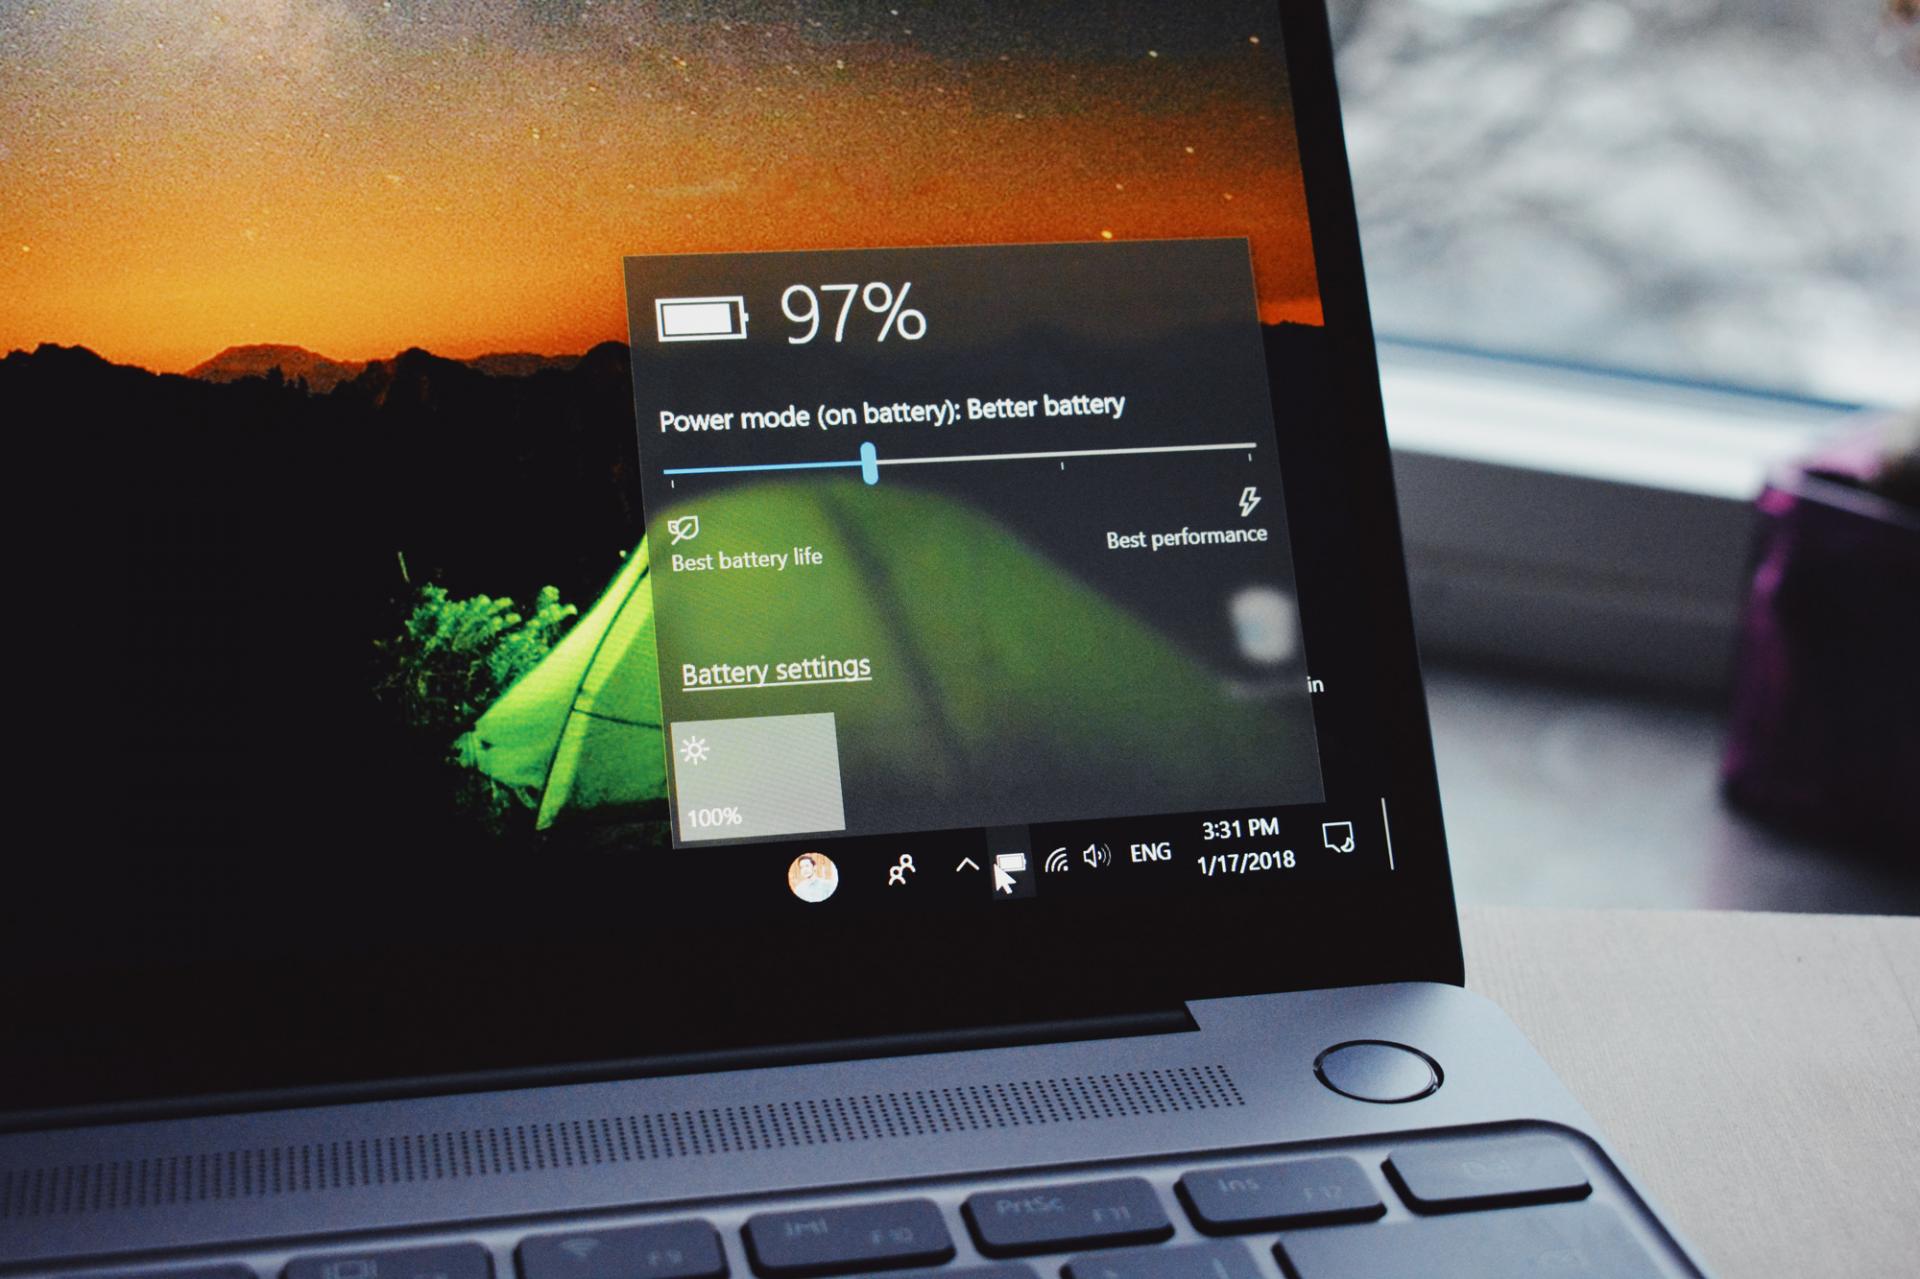
В каком режиме сейчас работает ваша Windows 10? Максимальной производительности, экономии энергии или сбалансированном? переключаясь между тремя назваными планами управления питанием можно не только контролировать, как будет расходоваться заряд аккумулятора, если речь идёт лаптопах, но и влиять на скорость работы гаджета.
Экономящий питание режим окажется актуален в большинстве случаев лишь для ноутбуков, а для систем, питающихся от розетки, лучше использовать сбалансированный или максимальной производительности. Разница между ними, кстати, невелика. Основное отличие влияющее на производительность вашей системы здесь в том, что сбалансированный разрешает процессору скидывать частоту, например аж до 0,8 Ггц, а производительный будет всегда держать его на максимальной частоте, которую тот может обеспечить.
Там есть, конечно, ещё моменты с отключением устройств, через какое время будет отключаться монитор или весь ПК перейдет в режим сна при неактивности (в сбалансированном), могут ли отключаться жёсткие диски, если к ним нет обращений и т.д. Здесь пользователю будет заметен в основном лишь переход в спящий режим, да отключение монитора. Остальное окажется слишком слабо сказывающимся на производительности ПК, но энергию сможет экономить.
Однако, в Windows 10 ещё один скрытый режим, получивший название «Ultimate Perfomance», то есть самая максимальная производительность, на которую способно ваше железо. Если хочется использовать именно его, для начала придётся активировать. О таких фишках ОС и не только мы постоянно рассказываем в Telegram.
Как активировать режим «Ultimate Perfomance» (Максимальная производительность)
Да-да, смешное ,что кроме шуток в русской редакции Windows 10 он называется именно так. У вас в настройках окажется два разных режима с таким названием.
Для начала переходим в меню «Пуск», набираем там сразу же «cmd» выбираем либо в самом меню «Пуск», либо в контекстном меню по клику правой кнопкой мыши на cmd вариант запуска под правами администратора.
Далее в открывшейся командной строке выполняем команду без кавычек «powercfg -duplicatescheme e9a42b02-d5df-448d-aa00-03f14749eb61».
Теперь снова переходим в меню «Пуск» и вводим там «power». Это будет работать и в английской и в русской версии ОС.
Выбираем «параметры питания и спящего режима», а далее справа пункт «Дополнительные параметры питания» (Additional power settings).
Затем активируем из доступных режим «Максимальная производительность», но будьте внимательны — нужен именно новый.
Что это даст?
Ваш ПК теперь работает вообще без каких-либо ограничений. Все компоненты всегда на максимуме, не отключаются и не уходят в сон. Для ноутбука это скажется также на количестве времени, которое он может работать без подзарядки, с ПК всё значительно проще.
Однако плюс от такого режима вы увидите только при выполнении каких-то очень тяжёлых задач и в течение длительного времени. Потому что здесь ещё меньше устройств отключается, процессор на максимальной частоте, как и в предыдущем режиме, но даже пробуждение компонентов сейчас происходит настолько быстро, что человеческий глаз это точно не сможет зафиксировать. Можно разве что замерить бенчмарками, но и здесь в силу того, что бенчмарк проводит тестирование не слишком долго, изменения окажутся, скорее на уровне погрешности.
Вероятно поэтому Microsoft не афиширует такую возможность Windows 10, что подавляющее большинство пользователей просто-напросто не смогут её оценить.
Если вам интересны новости мира ИТ также сильно, как нам, подписывайтесь на наш Telegram-канал. Там все материалы появляются максимально оперативно. Или, может быть, вам удобнее «Вконтакте» или Twitter? Мы есть также в Facebook.
Как включить максимальную производительность на Windows 10. Показываю по шагам
По умолчанию в Windows нельзя настроить режим максимальной производительности. Мощные ПК возможно могут обойтись и без него, но для тех, кто хочет выжать из своего железо все, просто необходим этот режим. Как его настроить?
Режим максимальной производительности доступен тем, у кого установлена Windows 10 Pro. Для тех, у кого WIndows 10 домашняя, данная возможности отсутствует. Но попробовать все равно стоит, возможно у вас специфическая сборка.
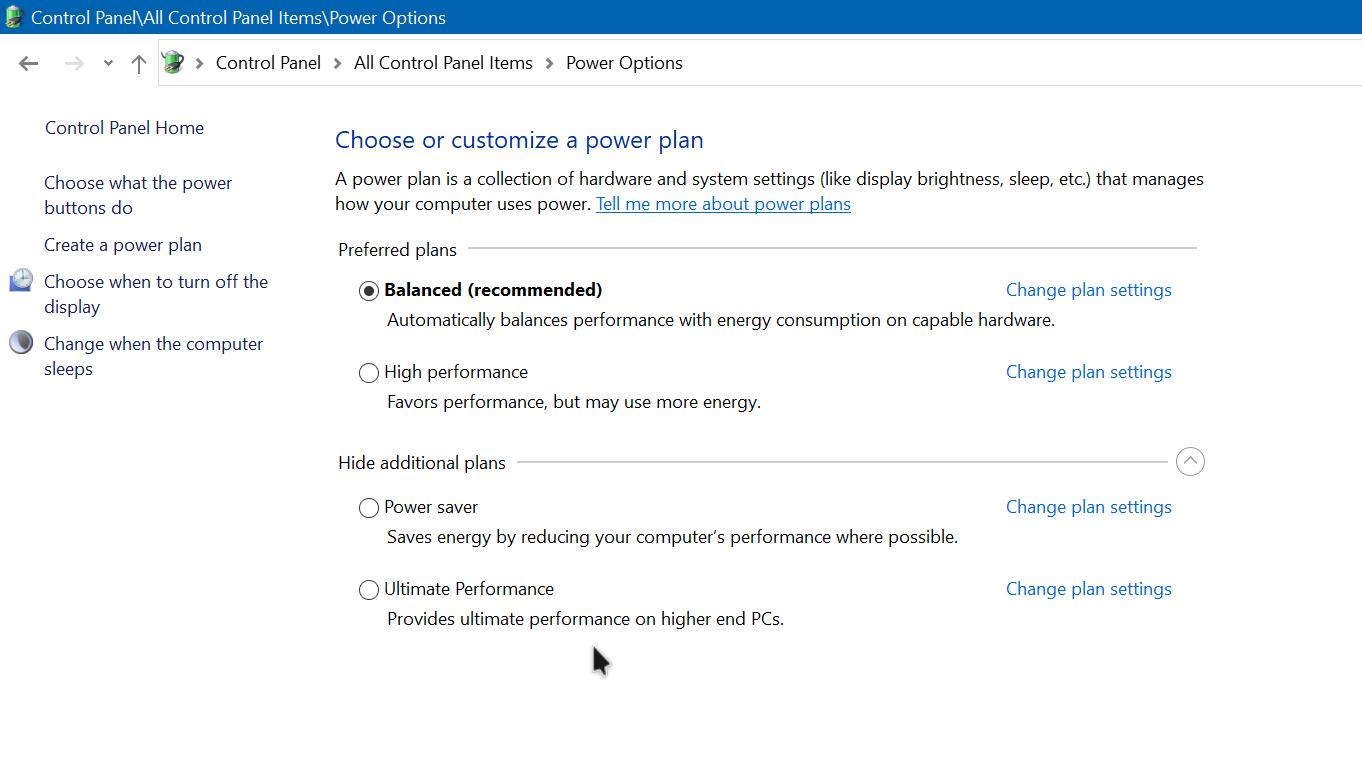
Если зайти в Панель управления и Электропитание, мы увидим несколько стандартных схем электропитания
Как правило спо стандарту стоит Сбалансированная . Она для тех, кто хочет и экономить электроресурсы, и когда нужно, максимально использовать мощь ПК.
Еще могут быть Экономия энергии и Высокая производительность .
Но Высокая производительность , это не Максимальная производительность , поэтому нам нужно сейчас ее включить.
Для того чтобы ее разблокировать, заходим в PowerShell. Для этого просто введите это в поиске. Запускаем ее от имени администратора.
После этого скопируйте и вставьте следующую строку:
Это » powercfg.exe -duplicatescheme e9a42b02-d5df-448d-aa00-03f14749eb61 » вставляем и нажимаем Enter.
После этого заходим в Электропитание и видим новую открытую схему работы.
Ее включение позволит максимально расходовать ресурсы компьютера и эффективно его использовать. При этом возможно небольшое увеличение использования энергоресурсов, но оно будет совсем незначительным.
Система будет работать плавнее. Даже в играх будет заметна небольшая плавность, не увеличение FPS, а именно плавность.
How to optimize your Windows 10 pc for gaming and maximum performance
August 18, 2020 By Sambit Koley
In this article, we are going to show how to optimize your Windows 10 device for gaming and maximum performance. Many games that are being released this year or which are upcoming will require higher firepower to run smoothly on Windows 10 computers. So it is necessary to configure your existing system to run at maximum caliber all-time for smooth operation.
Follow our guide to decrease CPU load and increase CPU performance significantly by simple tricks and tweaks in Power Plan and by using Quick CPU.
Step-1 Ultimate Power Plan settings-
Follow these steps to enable ultimate Power plan settings on your computer.
1. At first click on the search box and type “cmd”.
2. After that right-click on “Command Prompt” in the elevated search result and choose “Run as administrator“.
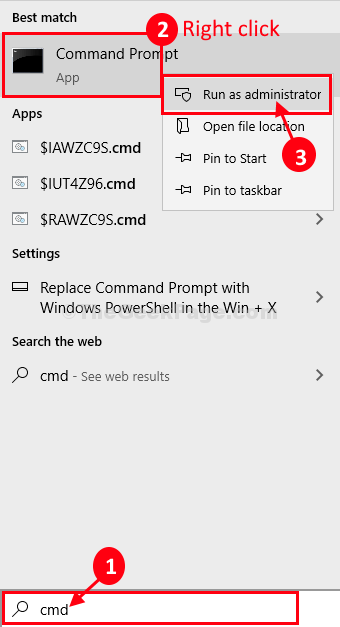
Command Prompt with administrative rights will be opened.
3. Now, to initialize a new ultimate power mode, execute this command by copy-pasting in CMD window and hitting Enter.

Once you have executed the command, close the Command Prompt window.
Now, let’s choose this powerplan created and select it and tweak it also.
1. Press Windows key+R to open a Run terminal.
2. In Run window, type or copy-paste “powercfg.cpl” and then press Enter.
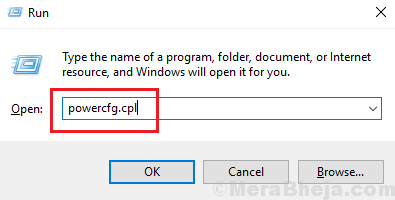
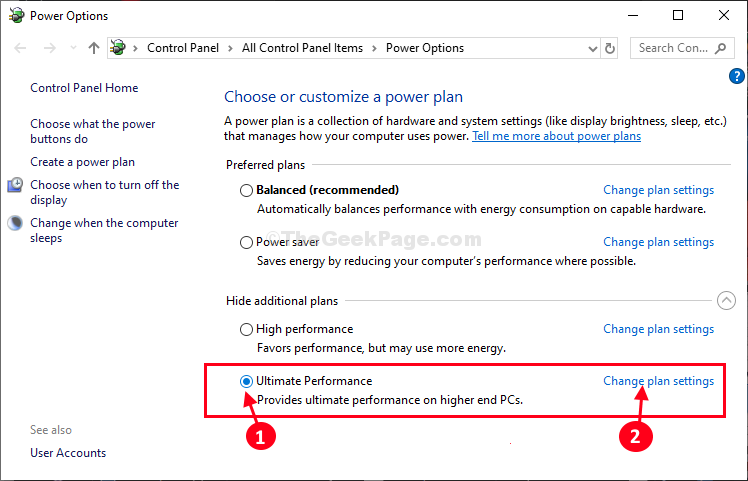
3. In the Power Options window, choose “Ultimate Performance“.
4. Now, click on “Change plan settings” to edit the power plan settings.
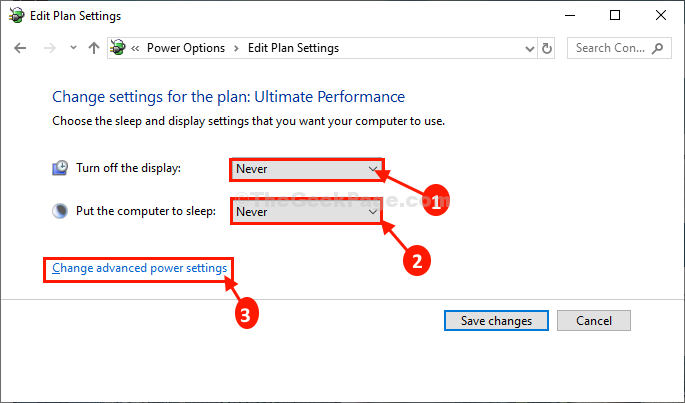
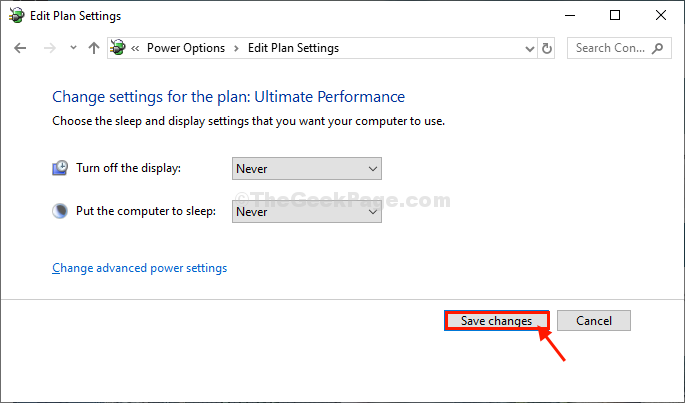
5. In Edit Plan Settings window, set ‘Turn off the display:‘ to “Never“.
6. Now, set ‘Put the computer to sleep:‘ to “Never“.
7. Click on “Change advanced power settings“.
Now, we are going to tweak a few settings in the Power Options window.
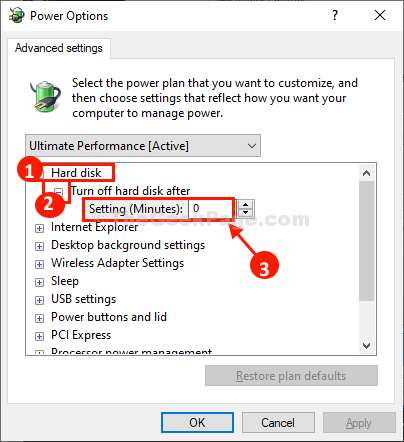
8. In the Power Options window, click on “Hard disk” to expand it.
9. Again click on “Turn off hard disk after” to expand it and then set the ‘Settings(Minutes)‘ to “0“.
[NOTE– If you are using a laptop, you may notice additional settings “On Battery:” in the same window. Whatever settings you are applying to “Plugged in:” settings, do the same for the “On Battery:” parameter also.]
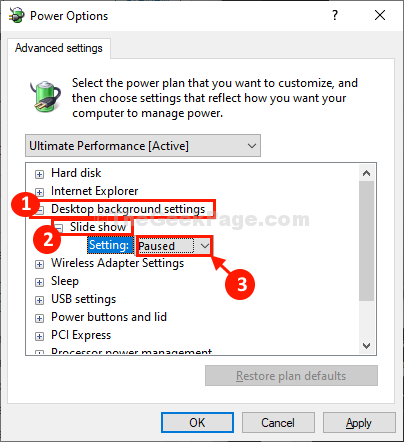
10. Same way, expand another parameter “Desktop background settings” and then expand “Slide Show“.
11. Now, change the “Settings:” to “Paused“.
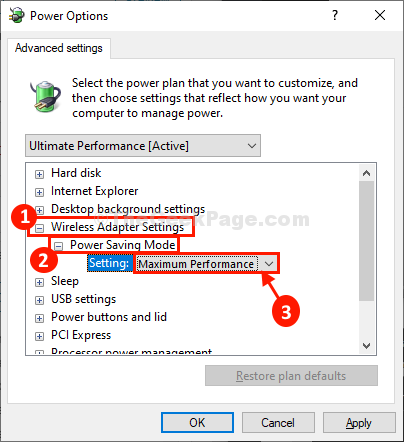
12. Now, expand “Wireless Adapter Settings“.
13. Again expand “Power Saving Mode” and then set the ‘Settings‘ to “Maximum Performance“.
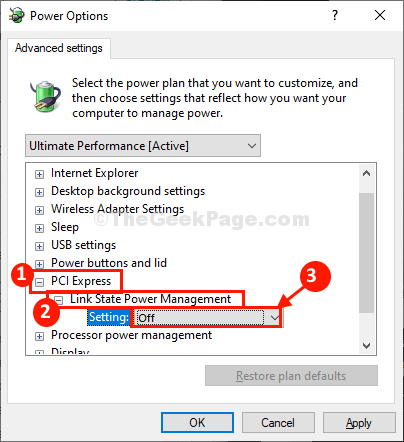
14. Now, expand “PCI Express” and then expand “Link State Power Management“.
15. Tweak the settings to “Off“.
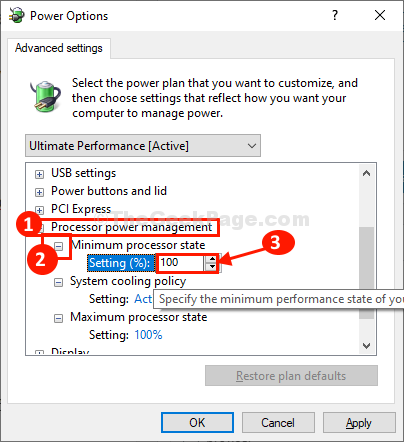
16. Then, expand “Processor power management” and then expand “Minimum processor state“.
17. Set ‘Settings:’ to “100” to squeeze the highest performance out of it.
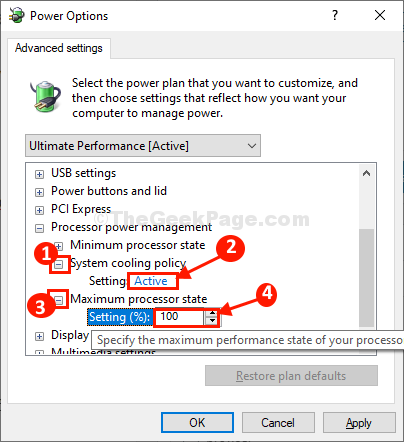
18. Now, expand “System cooling policy” and set it to “Active“.
19. Same way, expand “Maximum processor state” and then ‘Settings(%)‘ to “100“.
20. In the Power Options window, expand “Display” and then expand “Turn off display after“.
21. Set the ‘Settings (Minutes)‘ parameter to “0“.
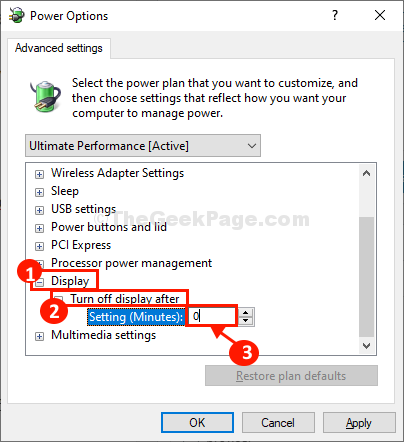
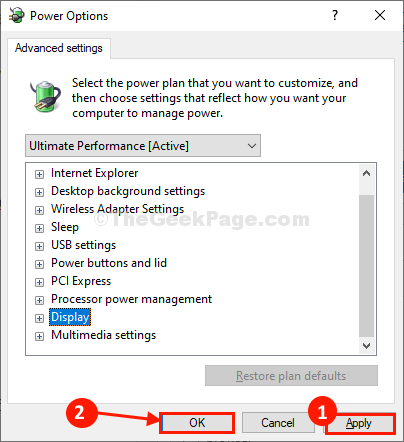
22. Finally, after changing all the settings, click on “Apply” and “OK” to save the changes on your computer.
23. Coming back to Edit Plan Settings window, click on “Save changes” to save the changes on your computer.
Close Control Panel window.
Step-3 Disable Startup items-
Disabling the startup of unnecessary applications on your computer will reduce the booting time, affecting the overall system performance significantly.
1. Press Ctrl+Shift+Enter to open the Task Manager window. In Task Manager, go to the “Startup” tab.
2. Now, right-click on any unnecessary startup item and then click on “Disable” to disable it.
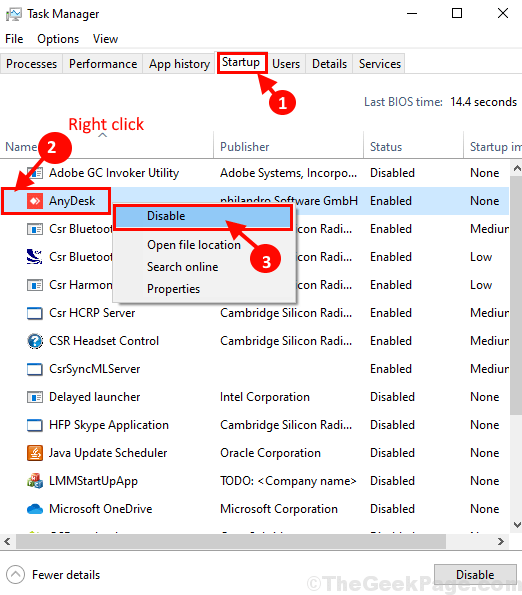
Now, repeat the same feat for any unnecessary startup items in the Task Manager window.
Once you have disabled all unnecessary tasks, close the Task Manager window.
This process will decrease the booting time significantly.
Step-4 Set the paged file settings-
You can use unused disk space as virtual memory for your system.
1. Press Windows key+R to open Run window on your computer.
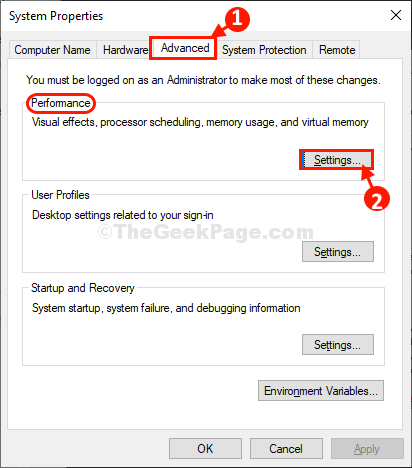
2. In Run window, type “sysdm.cpl” and then hit Enter to open System Properties.

3. In System Properties window, go to the “Advanced” tab.
4. Under the ‘Performance‘ tab, click on “Settings“.
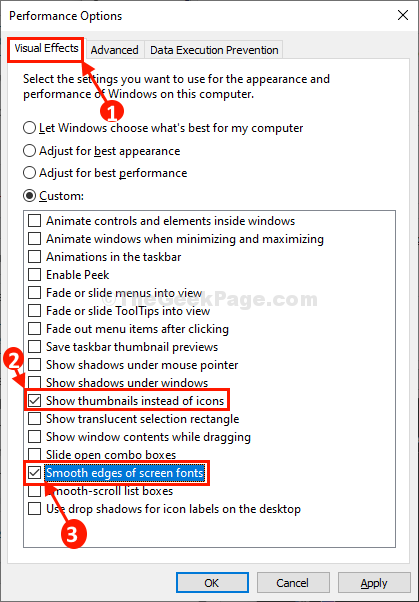
5. Now, go to the “Visual Effects” tab.
6. Check both of these options “Show thumbnail instead of icons” and the option “Smooth edge of screen fonts“.
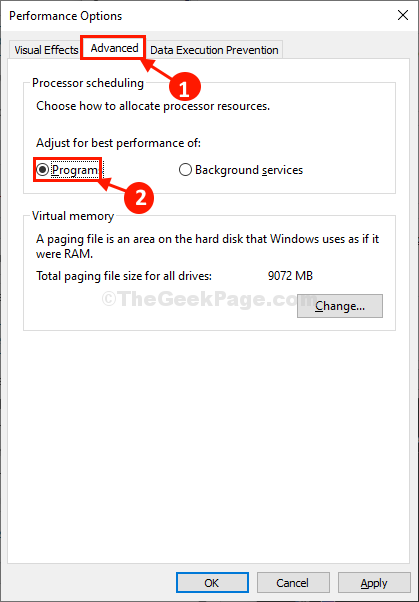
7. In the Performance Options window, no go to the “Advanced” tab.
8. Now, in the option ‘Adjust for best performance of:‘ settings to “Program“.
9. Now, under the ‘Virtual memory‘ section, click on “Change” to change paged file size change.
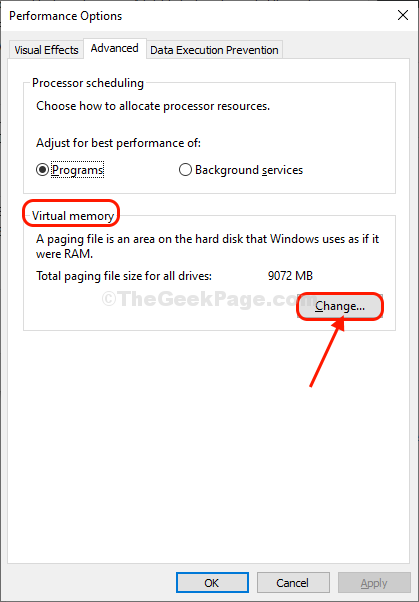
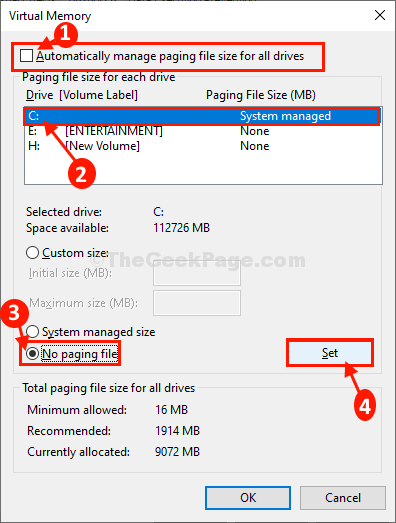
10. In the Virtual Memory window, uncheck the option “Automatically manage paging file size for all drives“.
Now, you can decide any storage option (Windows drive/ SSD drive) to utilize as paged file resources.
(Our suggestion will be to choose an SSD to get the best outcome.)
11. If you decide to free your Windows drive of paging files to increase the performance, go for these steps-
a. Select “C:” drive.
b. Click on “No paging size“.
c. Click on “Set” to set it.
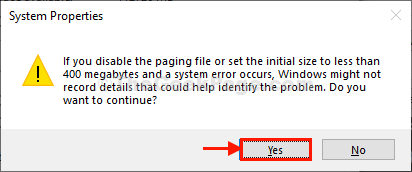
13. If you see a warning message, click on “Yes” to confirm the change.
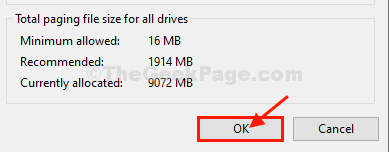
14. Click on “OK” when you have done setting page files.
15. In the Performance Options window, click on “Apply” and then click on “OK” to save the changes.
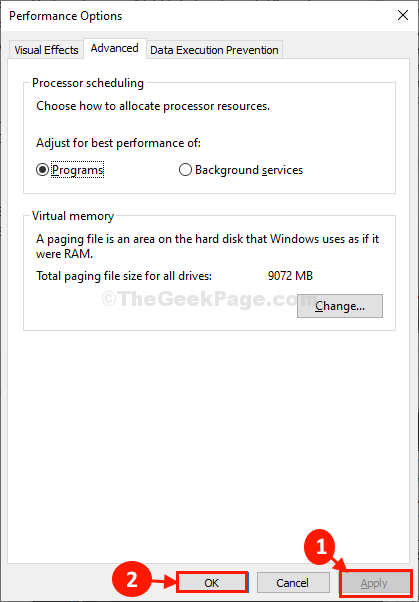
16. Finally, click on “Apply” and then on “OK” to save the changes on your computer.

Now you have successfully increased the virtual RAM of your system.
Step-5 Use Graphics specifics for high performance in games-
You can set your games to utilize a higher amount of graphical resources to deliver the best results.
1. Press Windows key+I to open the Settings window on your computer.
2. Click on “Gaming” to open gaming settings.
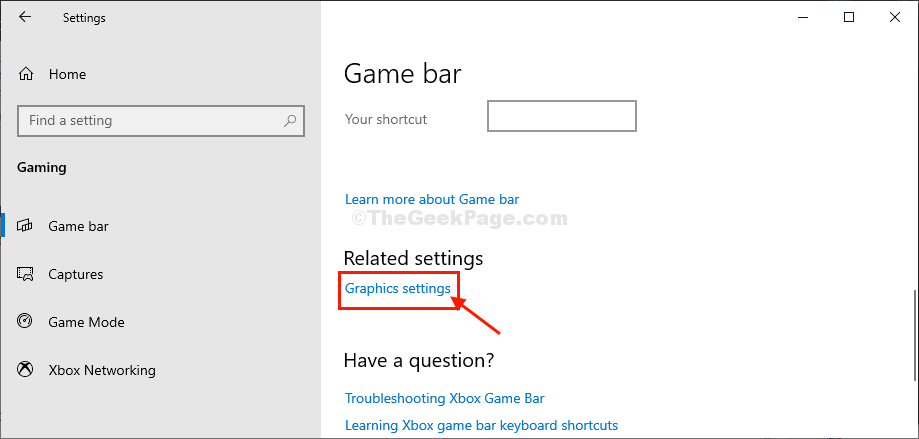
3. Now, under ‘Related settings‘, click on “Graphics settings” to open graphics settings.
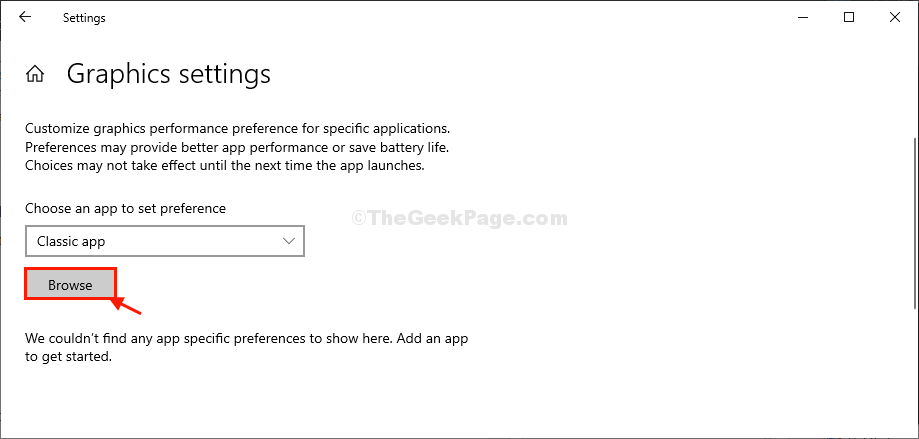
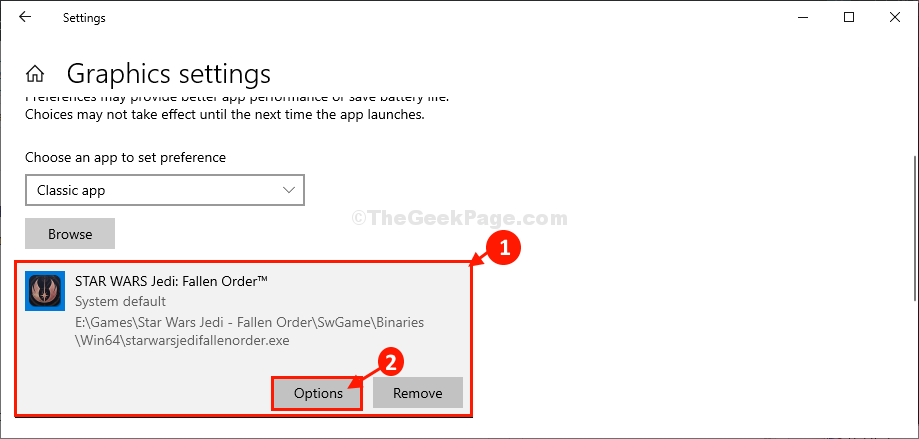
4. Now, click on “Browse“.
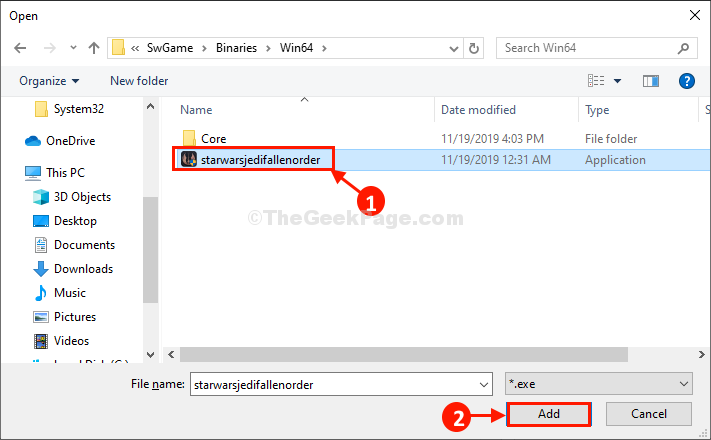
5. Now, go to the file location where the game is installed on your computer, select the .exe file ( i.e. the game file) and then click on “Add“.
( Example- In this case, I have selected “starwarsjedifallenorder” file on my computer).
Now, in the Graphics settings window, you will be able to see the game you have selected.
7. Click on the game and then click on “Options“.
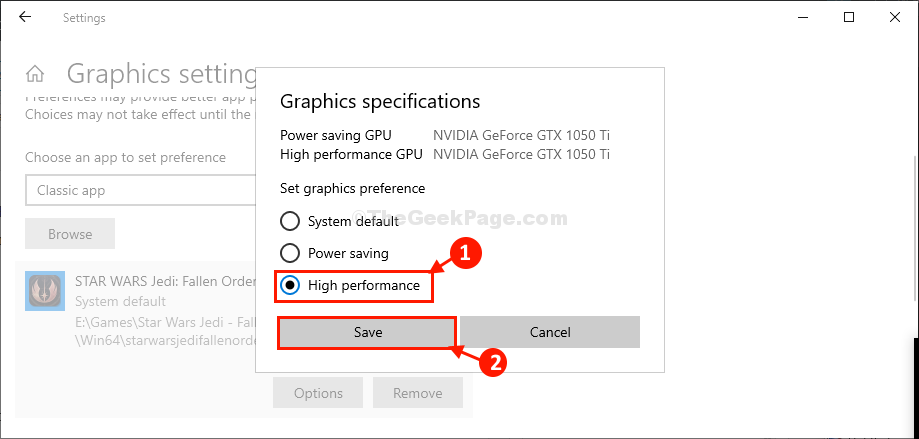
8. In Graphics Specifications panel, click on “High Performance“.
9. Click on “Save” to save the settings.
Now, add any game and set it to ‘High performance’ by following the method.
Close Settings window.
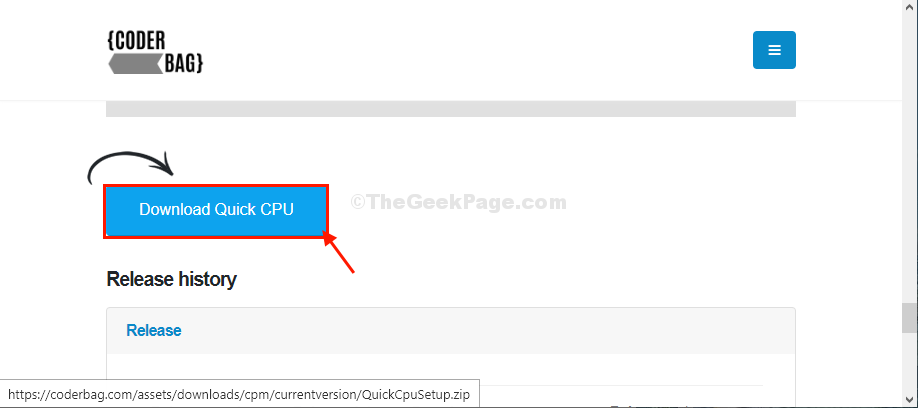
Step-7 Use Quick CPU-
Use Quick CPU to get the most performance out of the CPUs on your computer.
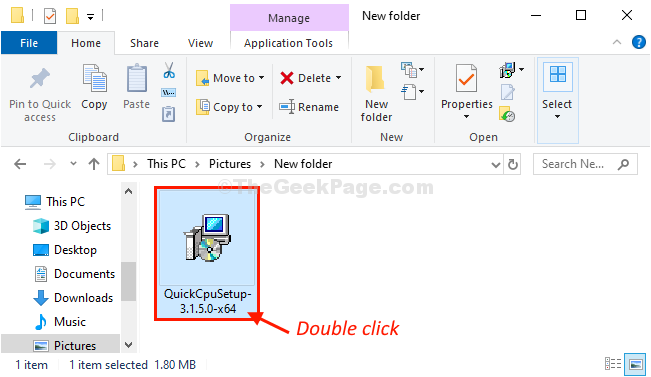
1. Go to this website and download a Quick CPU on your computer.
2. After downloading the file, go to the download location on your computer.
3. Extract the file on your computer.
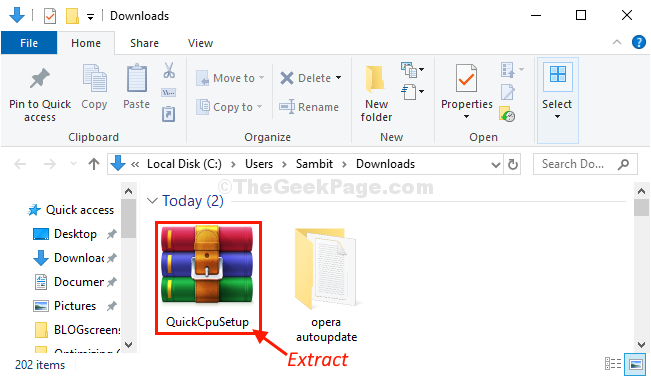
4. Now, double click on “QuickCpuSetup” to run the setup file.
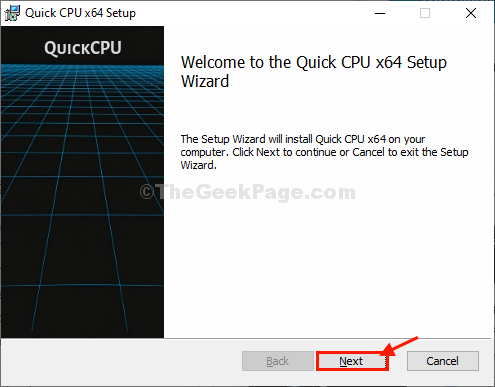
5. In Quick CPU Setup window, click on “Next“.
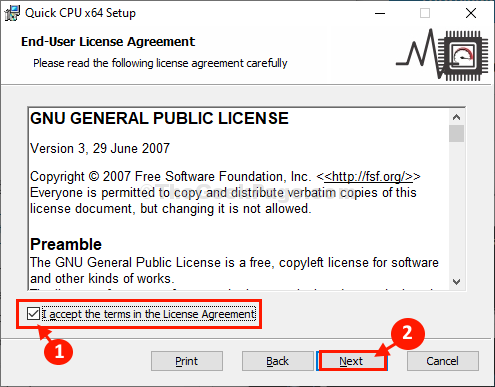
6. Now, check the option “I accept the terms in the License Agreement“.
7. Now, click on “Next“.
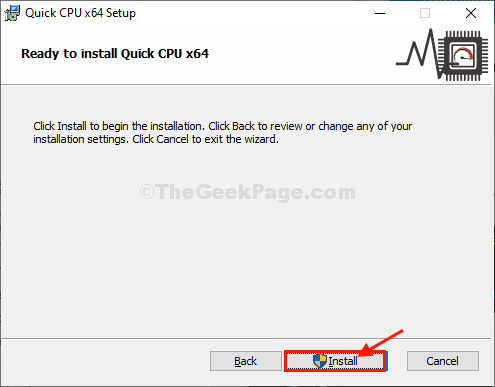
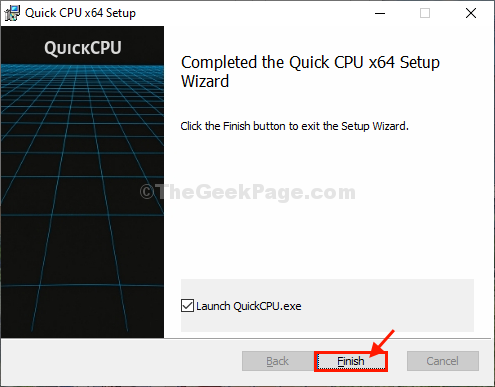
8. Finally, click on “Install” to initialize the installation process.
9. Finally, click on “Finish‘ to finish the installation process.
Quick CPU will automatically be opened.
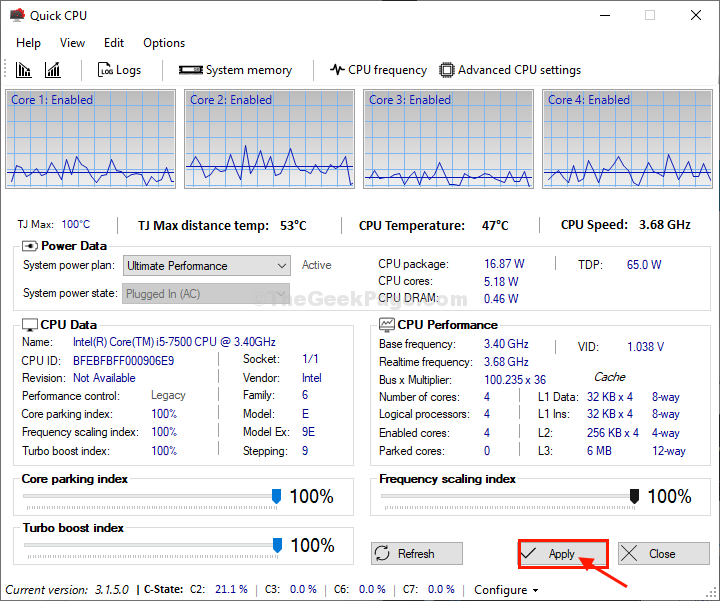
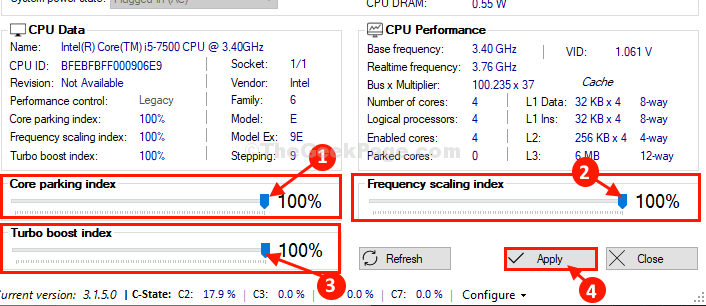
10. In Quick CPU window, set the ‘Core parking index‘ to “100%“.
11. Similarly, set ‘Turbo boost index‘ to “100%” and ‘Frequency scaling index‘ to “100%“.

12. Finally, click on “Apply” to apply the settings on your computer.
NOTE (FOR LAPTOP USERS ONLY)–
If you are implementing this on a laptop, follow these steps also-
a. Now, click on “System power state” and choose “On battery” from the drop-down.
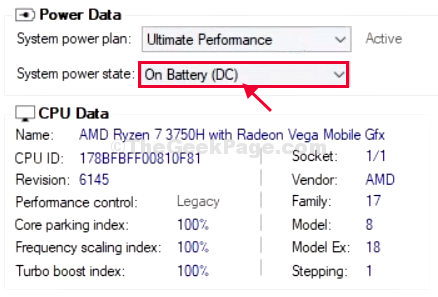
b. Set the ‘Core parking index‘ to “100%“.
c. Similarly, set ‘Turbo boost index‘ to “100%” and ‘Frequency scaling index‘ to “100%“.
d. Now, click on “Apply” to save the changes on your computer.
Close Quick CPU window.
Restart your computer to save all of these changes you have just made.
These are the steps to walk through to optimize your pc and to get the maximum performance from it.
Additional Tips–
Use CCleaner to clear temporary files from your computer and make it faster.

Sambit is a Mechanical Engineer By qualification who loves to write about Windows 10 and solutions to weirdest possible problems.
Related Posts:
Reader Interactions
Comments
This article was very useful, I can finally run my games without the computer lagging uncontrollably, thank you Mr.Sambit
I can’t seem to run Apex Legends now…
Sometimes gaming (on gaming laptops) is better optimised by NOT setting this at 100% or utilising Turbo mode. Especially where the CPU is of a higher spec than its paired GPU. I find that setting the power plan lower (even to 70% of max) better pairs CPU render time to GPU render time, allowing the CPU to run FAR cooler (10-15 degrees cooler) without sacrificing any FPS or performance in game. —> The CPU running at lower frequencies across all of its cores is far healthier. The option to invoke Turbo mode is always there when moving the Power slider to maximum performance. This would obviously benefit things like video encoding, 3D rendering and if it floats your boat, Benchmarking. This method here, together with undervaluing, is really worth a try.
Sambit Koley says
As it seems that you are using a pc with Ryzen CPUs at its core. The thresholds are limit values, which you should choose the highest to increase the performance. Set the increase threshold at 80 and the decrease one at 40. All the other settings you can leave alone as their effect is negligible.
I have additional options under my power options and processor power management which I’m trying to find out what they do, would you happen to know what Processor performance increase threshold, decrease threshold, performance decrease policy, idle demote threshold, promote threshold, core parking over utilisation threshold, options do?


