- Adjust SMB browsing behavior in macOS
- Speed up browsing on network shares
- SAMBA настройка подключения Windows, Mac OS X и Android
- SAMBA НАСТРОЙКА В АНДРОИДЕ
- ПРИЛОЖЕНИЯ ДЛЯ ANDROID
- Настройте CX Explorer или X-Plore с помощью SAMBA
- Подготовка ПК с Windows
- ПОДКЛЮЧАЕМ СЕТЬ SAMBA В MAC OS X.
- Question: Q: Catalina SMB problem
- All replies
- Mac os smb version
Adjust SMB browsing behavior in macOS
In macOS High Sierra 10.13 and later, the default settings for browsing network folders such as Server Message Block (SMB) shares are ideal for most organizations and users. But you can make adjustments to optimize SMB browsing in enterprise environments.
This article is intended for enterprise and education system administrators.
Your Mac determines how each window and its contents should appear by collecting file information such as labels, tags, and other forms of metadata.
In macOS Sierra 10.12 and earlier, your Mac gathers all metadata for the files in a folder, compares it to the folder’s .DS_Store file, and then displays the folder’s contents. In macOS High Sierra 10.13 and later, this behavior is changed slightly: If a folder is sorted alphanumerically, the contents are displayed immediately, then the Finder collects and compares the rest of the folder’s metadata.
Speed up browsing on network shares
To speed up SMB file browsing, you can prevent macOS from reading .DS_Store files on SMB shares. This makes the Finder use only basic information to immediately display each folder’s contents in alphanumeric order. Use this Terminal command:
defaults write com.apple.desktopservices DSDontWriteNetworkStores -bool TRUE
Then log out of your macOS account and log back in.
To reenable sorting, use this command:
defaults write com.apple.desktopservices DSDontWriteNetworkStores -bool FALSE
Information about products not manufactured by Apple, or independent websites not controlled or tested by Apple, is provided without recommendation or endorsement. Apple assumes no responsibility with regard to the selection, performance, or use of third-party websites or products. Apple makes no representations regarding third-party website accuracy or reliability. Contact the vendor for additional information.
Источник
SAMBA настройка подключения Windows, Mac OS X и Android

SAMBA настройка: мы хотим просто объяснить, как подключить любое из наших устройств Android к локальной сети через SAMBA . Самый распространенный протокол на компьютерах с Windows и Mac OS . С помощью этого метода мы можем воспроизводить мультимедийный контент или запускать файлы любого типа в нашем ТВ-БОКСЕ, смартфоне или планшете, хранящиеся на нашем ПК, из локальной сети. Очень практичная система, которая как мы увидим, не имеет особых сложностей, если мы настроим ее правильно.
SAMBA НАСТРОЙКА В АНДРОИДЕ
Протокол SAMBA является одним из наиболее распространенных. Когда речь идет о совместном использовании устройств или сетевых папок между компьютерами Windows. Который совместим со многими другими системами, такими как Android. Этот протокол по умолчанию активируется в версии SMB v.2 во всех установках Windows и других системах. Которые позволяют устанавливать его в качестве альтернативной сетевой системы.
ПРИЛОЖЕНИЯ ДЛЯ ANDROID
Для подключения к нашему ПК мы должны использовать файловый браузер Android, совместимый с SMB v2 , у многих администраторов есть этот способ или через дополнительный модуль, мы рекомендуем несколько простых вариантов.
- CX Explorer oX-plore — простой в использовании с основными функциями
- MiXplorer +аддон SMB v2 , без рекламы и функционала также на Android TV (рекомендуется)
— Платная версия MiXplorer Silver есть в Google Play, ссылки официального проекта MiXplorer + аддон SMBv2
Настройте CX Explorer или X-Plore с помощью SAMBA
Все эти приложения имеют одинаковую систему конфигурации, в меню вы должны найти раздел сети и добавить наш удаленный сервер, используя IP-адрес, где находится ПК, в дополнение к указанию имени пользователя и пароля, если они у нас определены.
- В CX Explorer выберите «Сеть»> «Удаленная»> «Локальная сеть»> «Выбрать компьютер», если он отображается в списке.
- В X-Plore перейдите в LAN> Добавить сервер> Вручную или сканируйте, если он обнаружит ПК.
- Мы добавляем IP (192.168.0.xxx) в дополнение к данным пользователя и пароля, если мы не оставляем их как анонимные.

CX Explorer
X-Plore
Подготовка ПК с Windows
Чтобы подключиться к ПК, на котором у нас есть файлы для совместного использования. Нам нужно выполнить несколько предварительных шагов, которые мы объясним. Необходимо идентифицировать наш компьютер в сети и дать ему необходимые разрешения, чтобы мы могли подключаться.
- Заходим в ПОИСК и набираем ПАНЕЛЬ УПРАВЛЕНИЯ. и заходим туда.
- Переходим в ПРОГРАММЫ И КОМПАНЕНТЫ
- И переходим во вкладку ВКЛЮЧЕНИЕ ИЛИ ОТКЛЮЧЕНИЕ КОМПОНЕНТОВ WINDOWS.
- В открывшемся окне находим и ставим галку SMB 1.0/CIFS File как на фото.
- НЕЗАБЫВАЕМ ПЕРЕЗАГРУЗИТЬ WINDOWS!
- После перезагрузки в разделе сеть появятся все гаджеты подключенные к SAMBA
ПОДКЛЮЧАЕМ СЕТЬ SAMBA В MAC OS X.
Чтобы напрямую подключиться к файловому серверу, используйте функцию «Подключение к серверу» в окне Finder. Выберите меню «Переход» > «Подключение к» и введите URL-адрес, IP-адрес или доменное имя.
- Вводим адрес например моей ТВ ПРИСТАВКИ UGOOS X3 CUBE где уже расшарен доступ.
Источник
Question: Q: Catalina SMB problem
I have issue after updating to macOS Catalina Version 10.15 on macbook pro 2017.
I have a network drive(HD) connected to a router using SMB:// Fritz-nas
This has always connected automatically and is primarily used as a music . Since the update this has been unavailable and if I try to connect I get the error :
«There was a problem connecting to the server «ServerName». The server may not exist or it is unavailable at this time. Check the server name or IP address, check your network connection, and then try again.»
If I try to browse it shows the drive but will not connect. This is shared with a Windows 10 machine and that can connect as normal.
Any help would be appreciated.
Posted on Oct 10, 2019 10:14 AM
All replies
Loading page content
Page content loaded
Since macOS was updated to 10.15.2 I have the same problem with SMB shares, every
24 hours I can’t reconnect the SMB shares from a Qnap, the only fix I found is to reboot my mac (that’s very annoying!) Restarting SMB service on the NAS or rebooting it didn’t help and, as I said, the problem began after macOS was updated from 10.15.1 to 10.15.2, I never experienced such a problem before.
Dec 23, 2019 1:07 PM
Did not work. Same as before. 🙁
Dec 24, 2019 2:49 PM
Same here. I can connect randomly, but sometimes it’s so slow that the entire system collapses and I have to reboot. Not even a shut-down, start works, as it keeps the slow transactions I’d already started, on process.
Dec 26, 2019 3:06 AM
I have been struggling connecting to my QNAP NAS via SMB for a while now too (Catalina 10.15). First I switched to afp protocol which seemed to work better, but I hate workarounds instead of solutions. In the end, this seems to have fixed the problem for me: delete the Finder preferences.
Use the Finder menu to go to a folder (Shift Cmd G) and copy this path in:
Then locate the file: com.apple.finder.plist and Delete it (move to trashcan).
I always empty my trash too, not sure if that’s important here.
SMB is lightning fast now, faster than it’s ever been.
Hope this helps!
Dec 29, 2019 11:54 AM
Deleting the finder preferences didn’t fix the problem for me. After a while the mappings have disconnected and I can’t reconnect them. I also tried to force a restart of the finder, but that didn’t work either. The only known workaround in my case is a complete reboot of the computer which isn’t convenient.
Jan 1, 2020 11:43 AM
For me restarting finder does resolve the issue temporarily (holding OPTION and then right click Finder to restart) but after a day or sometimes 2 days I get the same error again.
Jan 3, 2020 2:16 AM
Just happened again, tried to relaunch the finder, but it didn’t fix. When I try to connect to the SMB I get the small «connecting» window, but it never connects. Thanks for sharing, but rebooting seems to be the only working fix in my case.
Jan 3, 2020 2:00 PM
Not a fix, but at least better than rebooting: Go to System Preferences, Sharing. Untick «File Sharing» and then tick it again. This will restart some services. It fixes the issue for me temporarily without rebooting.
Jan 5, 2020 12:46 PM
Fritz!OS as of yet supports only SMB version 1 which is deprecated and no longer supported on Mac OS Catalina. This applies to the current stable branch of Fritz!OS.
The «Labor»-branch (not yet labelled as stable, but usually quite mature) of Fritz!OS supports SMBv3. So you ought to download the most current «Labor-Version» applicable to your router.
It seems to be the same basic problem with the other posts here: NAS-OSes or 10 year old MacOSes that still offer only SMBv1 and a modern client that out of security concerns refuses to talk this outdated protocol. NAS-vendors will probably roll out updates, too.
BTW, de novo installations of Win10 (not updated ones) also do not support SMBv1 out of the box without tinkering…
Jan 9, 2020 1:24 PM
Eye spy, this problem has nothing to do with smb1. The smb1 problem is solved in other threads. This one happens with smb2 and 3 with previous macos working fine. Please read before giving an answer.
Jan 9, 2020 1:29 PM
I faced same issue with Samba shares today. After migrating my old profile from High Sierra to Catalina, noticed that all my Samba shares stopped working, with the exception of one that was mapped through a static IP address. Rest of shares that required DNS resolution didn’t. So I tried everything mentioned in this thread nothing worked.
I then deleted one of the saved shares and created a new one, filling the same network information as before, and noticed the new saved shares had a different icon as before (see pic). The protocol was also determined automatically as I was typing «smb» in the input field.
In a nutshell, the Samba shares need to be recreated, after deleting the old ones. If they show the old way, which is a small blue-ish icon, they won’t work (it seems the OS don’t even use Samba to attempt to connect to the remote share).
They need to show as gray squared storage icon. See pic below (the first 2 work, the 3rd won’t):
Источник
Mac os smb version

Настройка общего доступа к файлам и принтерам является обязанностью любого сисадмина. Но иногда компьютерных сетях используются машины не с Windows. Что делать? Как извесно macOS X не поддерживает фирменных технологий Microsoft вроде HomeGroup. А Windows не поддерживают в свою очередь AFP. Зато обе операционные системы могут использовать SMB. Старый добрый SMB (он же CIFS) появился в 1983 году как совмесная работа компаний IBM, Microsoft, Intel и 3Com. В последнее время этот протокол развивал в основном Microsoft и с выходом Windows Vista стала доступна вторая его версия. В Windows 8 появилась третья версия SMB. Стабильность его сильно выросла видимо из-за сильного упрощения внесённого во вторую версию. Сейчас этот протокол используется на очень большом количестве операционных систем, хотя ассоциируется он прежде всего с работой сетевого окружения в MS Windows.
Для тех кто не хочет тратить своё дорогое время на изучение данного мануала предлагаем нашу платную помощь.
Настройка SMB в Windows 7 и macOS X, если глубже разобраться очень похожи. Создание пользователей, которым предоставляется общий доступ, открытие файлов, настройка доступов к файлам на диске. В ряде случаев может использоваться упрощённая настройка мастером без создания в ручном режиме учётной записи Guest и настройки доступа к диску. В данной статье рассматривается ручная настройка.
Перейдём к системным настройкам щёлкнув иконку с шестернями в Dock. Нас интересуют две иконки: «Общий доступ» и «Пользователи и группы».

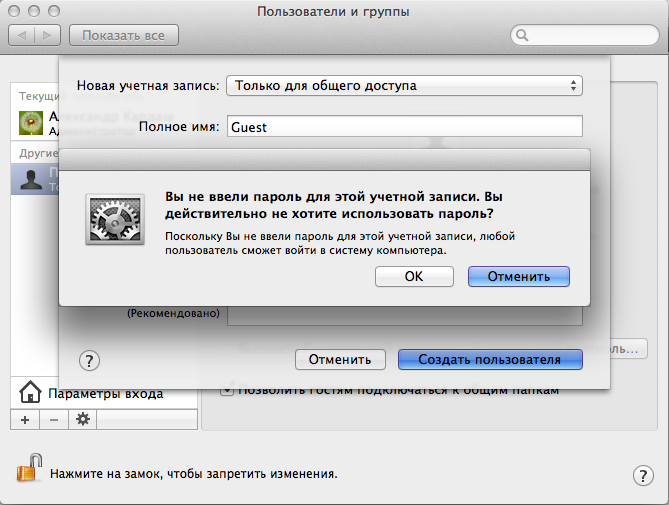
Сначала откроем «Пользователи и группы» и создадим нового пользователя: «Guest». Для этого разблокируем меню нажав замочек и введя пароль администратора от компьютера MAC.

Плюсиком создадим нового пользователя для доступа к компьютеру по сети:

Подтвердим что мы хотим создать учётную запись без пароля:
Вернёмся к системным настройкам и щёлкнем пиктограму «Общий доступ»:

Здесь мы можем изменить название компьютера в сети. Главное, что нужно тут сделать добавить плюсиком папки к которым предоставляется общий доступ и пользователей которым этот доступ предоставляется. Мы разрешаем доступ к логическому диску Files 2 пользователю Guest с правами «Только чтение»

В macOS X SMB по умолчанию выключен. Заходим в «Параметры» и в ключаем SMB ставя галочку: «Предоставление общего доступа к файлам и папкам с помощью SMB (Windows)»

Иногда для доступа по сети нужно править права, владельца папок, дисков и файлов. Делается это как и в Windows: Кликаем правой клавишей по папке(диску или файлу) выбираем в контекстном меню свойства:

Разблокировав замочек можем плюсиком добавить пользователю Guest прав на чтение:

Можно расширить права на вложенные файлы щёлкнув шестерёнку и выбрав меню «Применить к вложенным обьектам. «

После всех манипуляций в сетевом окружении появился новый компьютер MACBOOK c общими папками и файлами доступными только на чтение после ввода логина и пароля:

Пользователь Guest пароля нет. Получаем доступ:

Статья писалась для Windows 7 и Mac OS X 10.7.5 (Lion) которая уже считается устаревшей, но подходит и для современной версии macOS 10.12.1 (Sierra). В целом интерфейс macOS с 2012 года не претерпел серьёзных изменений в отличии от той же Windows.
Если в «Общем доступе» macOS (Сеть в Windows) нет нужных вам компьютеров или они находятся в другой подсети, можно попробовать соединится с ними по IP адресу через меню «Переход» по протоколу SMB:
Источник


