- Mac os sierra theme
- About
- Resources
- License
- Releases
- Packages 0
- Contributors 2
- macOS Sierra Theme for OS X Leopard
- MacCubed
- AmazingHenry
- MacCubed
- swamprock
- Gamer9430
- swamprock
- Attachments
- AmazingHenry
- swamprock
- Adamscomputerrepair
- Attachments
- AmazingHenry
- swamprock
- AmazingHenry
- Gamer9430
- tevion5
- Gamer9430
- AmazingHenry
- AmazingHenry
- 0248294
- Gamer9430
- swamprock
- Attachments
- AmazingHenry
- Использование светлого или темного оформления на Mac
Mac os sierra theme
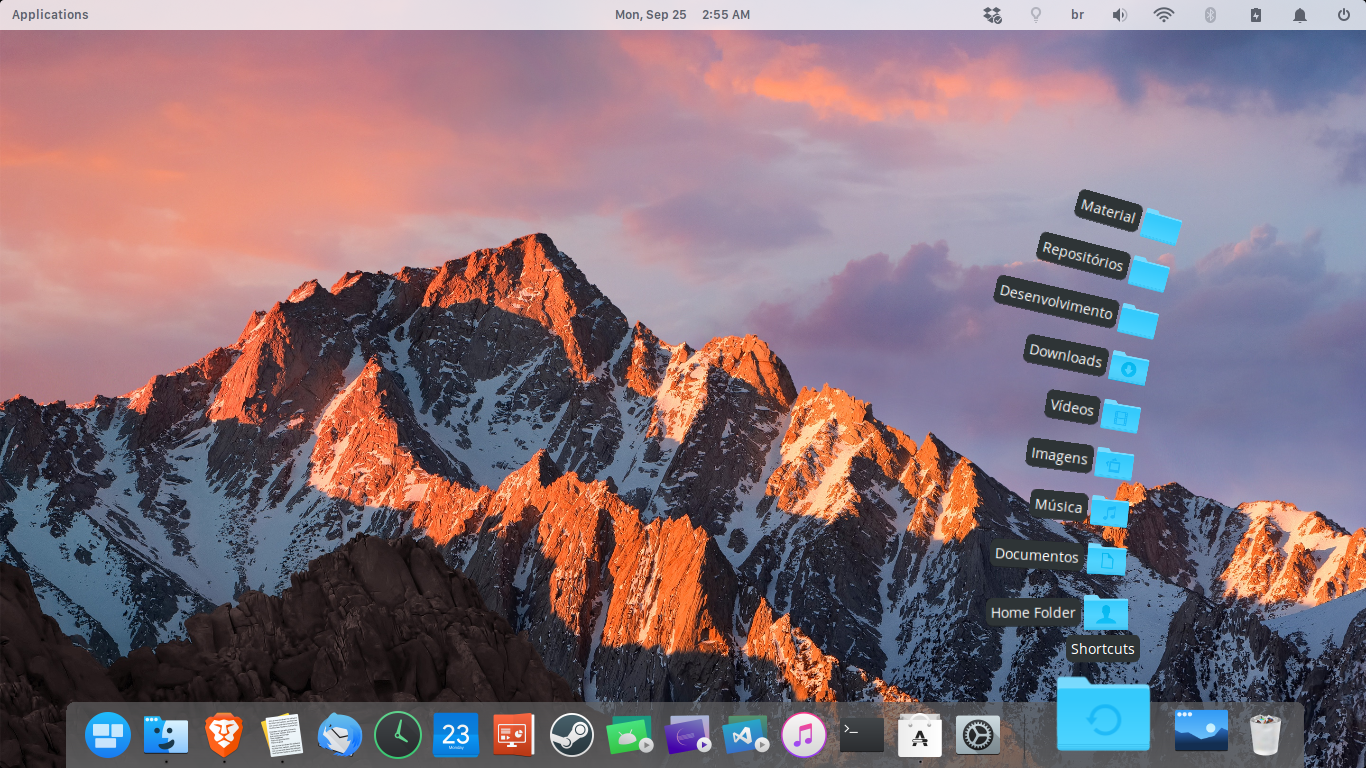
Cairo-Dock macOS Sierra Style
One theme for Cairo-Dock based in the macOS Sierra dock.

- Make sure the Cairo Dock is already installed.
- Recommended install the La Sierra icon pack a La Capitaine’s fork available in https://github.com/btd1337/La-Sierra-Icon-Theme or/and La Capitaine Icon Theme: https://github.com/keeferrourke/la-capitaine-icon-theme.
- Recommended install San Francisco Fonts, available in https://github.com/AppleDesignResources/SanFranciscoFont
Clone the repository for folder
Open cairo-dock via menu or terminal
Set theme: Right click on cairo-dock >> cairo-dock >> configure >> themes >> Locate Cairo-Dock-macOS-Sierra-Style in list >> Apply
- GTK Theme: eOS Sierra Gtk available in https://github.com/btd1337/eOS-Sierra-Gtk
- Wallpaper: macOS Sierra wallpaper macbook available in https://github.com/btd1337/Cairo-Dock-macOS-Sierra-Style/blob/master/images/wallpapers/

Improvements are accepted!
About
A theme for Cairo-Dock based in the macOS Sierra dock.
Resources
License
Releases
Packages 0
Contributors 2
You can’t perform that action at this time.
You signed in with another tab or window. Reload to refresh your session. You signed out in another tab or window. Reload to refresh your session.
Источник
macOS Sierra Theme for OS X Leopard

MacCubed
macrumors 68000
Earlier this year, the @gavinstubbs09 and PowerPC Archive Team planned on releasing an El Capitan icon pack for OS X Leopard, similar to the Yosemite pack that was released a year prior. The pack was supposed to come on January 1st (or there about), but the release was held-up, and the topic switched to a macOS Sierra pack. Since the idea of the Sierra pack emerged, the team, along with others here, have made great strides towards building a fully inclusive macOS Sierra theme for Leopard.
The theme is set to include:
-Icons
-Traffic lights
-Menubar
-Dock
-. And more!
I created this thread for the purpose of discussing solely the macOS Sierra theme, and to make a new place to post the things that we have done to make our old Macs look new again! I will update this post with pictures and other ideas once they are posted or suggested. I look forward to seeing the responses and everyone’s hard work!
Ideas:
-Dark mode?
-Possible release of full «macOS Sierra for PowerPC» Installer DMG
-Easy installer package, no manually using CandyBar or replacing system files
Current Progress:
January 2016
-Icons ready for use with CandyBar, FoxBoxes created for iCloud apps
Summer 2016
-Progress made with Traffic Lights and other UI Elements
October 2016
-Users here start work on UI Elements
Estimated Schedule:
-Pack to be completed by Early 2017 (January/February)
-UI Elements to be finished by December 2016
-Pack installer .zip or .dmg to be done by January 2017
Thanks for taking the time to read this! Post will be updated as new ideas arise, or photos of ongoing work are posted!
Credit: Gavinstubbs09 (MacRumors)
Original progress, icons and iCloud app FoxBoxes
Credit: SourceSunTom (MacRumors)
SourceSunTom’s work on the «About This Mac Screen»
Credit: SourceSunTom (MacRumors)
More of SourceSunTom’s work on the checkboxes and menubar
Credit: Halibabamindingu (MacRumors)

AmazingHenry
macrumors 65816
MacCubed
macrumors 68000
1. If the files are properly modified, then there will be no issues
2. Tiger support is currently up in the air, if enough people support it, I will get in contact with the other creators of the theme and determine if it is worth the time and effort.
I will add a poll to the thread asking if it should be developed for Tiger

swamprock
macrumors 6502a
You can replace the system font systemwide by using a modified Lucida Grande dfont. You lose Lucida Grande in the process, but it all depends on what you would rather have. I can supply the modified dfont if anyone is interested.
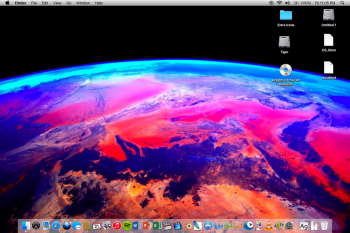
Here it is on my (new to me) 12″ Powerbook-


Gamer9430
macrumors 68020
You can replace the system font systemwide by using a modified Lucida Grande dfont. You lose Lucida Grande in the process, but it all depends on what you would rather have. I can supply the modified dfont if anyone is interested.
Here it is on my (new to me) 12″ Powerbook-
swamprock
macrumors 6502a
The hard part was running FontForge on my Intel Mac, opening up all of the fonts, selecting the San Fran fonts, and copying them over to the Lucida Grande dfont, overwriting the originals. Save and close.
I’ll save you the work and post my modified LucidaGrande.dfont here.
Download the dfont and unpack it to your desktop. Go to /System/Library/Fonts/ and copy the current LucidaGrande.dfont and paste it somewhere as a backup (I put mine in /Documents). Reboot your system and immediately hold cmd-s at the chime to boot into single user mode. Type «/sbin/mount -uw /» (without the quotes) at the prompt and hit return. Type «cd /Users/ /Desktop/» and hit return. Type «cp LucidaGrande.dfont /System/Library/Fonts/» and hit return. Reboot.
Follow the same procedure on a Tiger machine for the same results.
The usual disclaimers apply. I’m not responsible if you hose your system, so make sure to backup the original font as outlined above.
Keep in mind that, due to the way Leopard (and Tiger) render the original fonts, that this will not look exactly like Yosemite/El Capitan/Sierra, but it’s very close.
(This also works with Snow Leopard and Mountain Lion (and probably Lion as well), but you have to use a ttc font instead of a dfont, and go into the ProtectedFonts folder and remove the originals, or else the system will just put it back when you change it. I replaced the protected LucidaGrande.ttc with my modified one to be doubly sure and it worked like a charm. Renaming LucidaGrande.dfont to LucidaGrande.ttc will NOT work; you need a specifically-modified ttc font to make it work, and I created one following the exact same steps as I described in my original post)
Attachments
AmazingHenry
macrumors 65816
swamprock
macrumors 6502a

Adamscomputerrepair
macrumors 6502a
Looks great on my PB.
NOTE: I know I have some icons to change, I’ve been finding Apps as I go and it’s kind of tiresome.
Attachments
- View media item» href=»/attachments/picture-1-png.667147/» target=»_blank»>

AmazingHenry
macrumors 65816
Looks great on my PB.
NOTE: I know I have some icons to change, I’ve been finding Apps as I go and it’s kind of tiresome.
swamprock
macrumors 6502a
That post describes the method and includes the files that you’ll need. Be sure to back up your dock.app, and delete the files that you’re replacing first, rather than just dragging them in and overwriting them.
This method also gives you a white background in your stacks grid.
AmazingHenry
macrumors 65816
That post describes the method and includes the files that you’ll need. Be sure to back up your dock.app, and delete the files that you’re replacing first, rather than just dragging them in and overwriting them.
This method also gives you a white background in your stacks grid.
Gamer9430
macrumors 68020

tevion5
macrumors 68000
Gamer9430
macrumors 68020
AmazingHenry
macrumors 65816
AmazingHenry
macrumors 65816
0248294
Cancelled
Gamer9430
macrumors 68020
swamprock
macrumors 6502a
I did a lot of research on what files Leopard uses for the UI, and it turns out that the Extras.rsrc and Extras2.rsrc files are only used by Tiger and below. The former file is for PowerPC and the latter is for Intel machines. Leopard uses ArtFile.bin and SArtFile.bin for the UI, and there is seemingly nothing out there to decode/encode these files. Themepark didn’t add this functionality until version 4.1, and that’s for Snow Leopard and above. There’s no way to open the Leopard art files in Snow Leopard using Themepark 4.1, and the ArtFileTool that’s out there is for 10.7 and above.
There is a link to a Java program that decodes and reencodes the SArtFile.bin there. I signed up, grabbed the file, and tested it on my Leopard machine. Success!
The post also mentions the original Java ArtFileTool, and links to macthemes2.net, which not only is down, but also not archived due to robots.txt. Damn. So I went on another Google hunt for this elusive file.
So, after hours of searching, in what I thought would be a fruitless gesture, I FINALLY found it. Someone was nice enough to post it to Mediafire and I grabbed it. Tested this one as well, and boom. it works.
So, here they are. Readmes are included that explain how these work. I’ll play around a bit with the traffic lights when I get home later today, but have at it! Simply decode the files, find what you want to change, open it up in Photoshop or whatever you use (they’re mostly png files), edit, replace, reencode, and replace the bins in their directory. Be sure to backup the originals first.
Be sure to reference the forum post I linked above for any issues you may have.
Attachments
AmazingHenry
macrumors 65816
I did a lot of research on what files Leopard uses for the UI, and it turns out that the Extras.rsrc and Extras2.rsrc files are only used by Tiger and below. The former file is for PowerPC and the latter is for Intel machines. Leopard uses ArtFile.bin and SArtFile.bin for the UI, and there is seemingly nothing out there to decode/encode these files. Themepark didn’t add this functionality until version 4.1, and that’s for Snow Leopard and above. There’s no way to open the Leopard art files in Snow Leopard using Themepark 4.1, and the ArtFileTool that’s out there is for 10.7 and above.
There is a link to a Java program that decodes and reencodes the SArtFile.bin there. I signed up, grabbed the file, and tested it on my Leopard machine. Success!
The post also mentions the original Java ArtFileTool, and links to macthemes2.net, which not only is down, but also not archived due to robots.txt. Damn. So I went on another Google hunt for this elusive file.
So, after hours of searching, in what I thought would be a fruitless gesture, I FINALLY found it. Someone was nice enough to post it to Mediafire and I grabbed it. Tested this one as well, and boom. it works.
So, here they are. Readmes are included that explain how these work. I’ll play around a bit with the traffic lights when I get home later today, but have at it! Simply decode the files, find what you want to change, open it up in Photoshop or whatever you use (they’re mostly png files), edit, replace, reencode, and replace the bins in their directory. Be sure to backup the originals first.
Be sure to reference the forum post I linked above for any issues you may have.
Works to decode the file, however I can’t encode it again. I get an error in Terminal saying that the files are invalid or corrupt (all I did was edit one traffic light).
[doublepost=1477255273][/doublepost]Here’s something interesting:
defaults write -g NSUseLeopardWindowValues NO
Makes Leopard windows look like Tiger. Even though Tiger is older, it’s windows look more like the newer macOS. You can also have Tiger-like buttons and traffic lights (although the traffic lights won’t matter) with this command:
defaults write -g AppleUseCoreUI -bool NO
This actually makes the OS look newer. Here’s my iCal window (on Leopard!):
Источник
Использование светлого или темного оформления на Mac
Можно использовать светлое или темное оформление для строки меню, панели Dock, окон и встроенных приложений Mac. Также можно автоматически настраивать уровень яркости в течение суток.
На Mac выберите меню «Apple»

> «Системные настройки», затем нажмите «Основные».
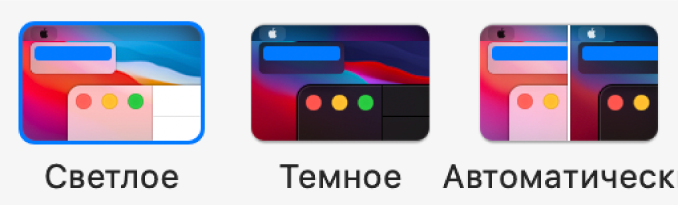
Выберите вариант «Светлый», «Темный» или «Авто».
В светлом режиме используется светлое оформление, которое не меняется.
В темном режиме используется темное оформление, которое не меняется. В темном режиме используется затемненная цветовая схема, при которой объекты, с которыми Вы работаете, выделяются, а окна и элементы управления отходят на задний план. Этот режим хорошо подходит для просмотра документов, презентаций, фотографий, фильмов, веб-страниц и т. п.
Совет. Можно быстро включить или выключить темный режим через Пункт управления. В строке меню нажмите «Пункт управления»  , нажмите в любом месте раздела «Дисплей», затем выберите «Темный режим».
Функция «Авто» автоматически настраивает яркость экрана в течение дня.
Можно также выбрать цветовой акцент для кнопок, всплывающих меню и других элементов интерфейса, а также цвет для обозначения выделенного текста.
Некоторые динамические фоны рабочего стола могут содержать неподвижные изображения, чтобы картинка на рабочем столе не отвлекала от светлого или темного оформления. Например, если при настройке macOS выбрано темное оформление, в качестве картинки рабочего стола устанавливается темное неподвижное изображение. Эту настройку можно изменить в настройках рабочего стола.
Источник


