- Installing Ruby
- Choose Your Installation Method
- Package Management Systems
- apt (Debian or Ubuntu)
- yum (CentOS, Fedora, or RHEL)
- snap (Ubuntu or other Linux distributions)
- portage (Gentoo)
- pacman (Arch Linux)
- Homebrew (macOS)
- FreeBSD
- OpenBSD
- Ruby on OpenIndiana
- Windows Package Manager
- Other Distributions
- Installers
- ruby-build
- ruby-install
- RubyInstaller
- Ruby Stack
- Managers
- asdf-vm
- chruby
- rbenv
- RVM (“Ruby Version Manager”)
- Building from Source
- Установка Ruby и gem через RVM на Mac OS
- Введение
- Установка RVM (система управления пакетами)
- Вариант 1
- Вариант 2
- Установка Ruby с помощью RVM
- Установка gems в Ruby на RVM
- Чистка и удаление RVM
- Настройка в PhpStorm
- Заключение
- Возможные ошибки
- English Query (запросы по теме на английском языке)
- Читайте также
- stonehippo / install_ruby_with_rbenv.md
Installing Ruby
With package managers or third-party tools, you have plenty of options to install and manage Ruby.
You may already have Ruby installed on your computer. You can check inside a terminal emulator by typing:
This should output some information on the installed Ruby version.
Choose Your Installation Method
There are several ways to install Ruby:
- On a UNIX-like operating system, using your system’s package manager is easiest. However, the packaged Ruby version may not be the newest one.
- Installers can be used to install a specific or multiple Ruby versions. There is also an installer for Windows.
- Managers help you to switch between multiple Ruby versions on your system.
- Finally, you can also build Ruby from source.
On Windows 10, you can also use the Windows Subsystem for Linux to install one of the supported Linux distributions and use any of the installation methods available on that system.
Here are available installation methods:
Package Management Systems
If you cannot compile your own Ruby, and you do not want to use a third-party tool, you can use your system’s package manager to install Ruby.
Some members of the Ruby community feel that you should avoid package managers to install Ruby and that you should use dedicated tools instead.
It is possible that major package managers will install older Ruby versions instead of the latest release. To use the latest Ruby release, check that the package name matches its version number. Or use a dedicated installer.
apt (Debian or Ubuntu)
Debian GNU/Linux and Ubuntu use the apt package manager. You can use it like this:
yum (CentOS, Fedora, or RHEL)
CentOS, Fedora, and RHEL use the yum package manager. You can use it like this:
The installed version is typically the latest version of Ruby available at the release time of the specific distribution version.
snap (Ubuntu or other Linux distributions)
Snap is a package manager developed by Canonical. It is available out-of-the-box on Ubuntu, but snap also works on many other Linux distributions. You can use it like this:
We have several channels per Ruby minor series. For instance, the following commands switch to Ruby 2.3:
portage (Gentoo)
Gentoo uses the portage package manager.
To install a specific version, set RUBY_TARGETS in your make.conf . See the Gentoo Ruby Project website for details.
pacman (Arch Linux)
Arch Linux uses a package manager named pacman. To get Ruby, just do this:
This should install the latest stable Ruby version.
Homebrew (macOS)
Ruby versions 2.0 and above are included by default in macOS releases since at least El Capitan (10.11).
Homebrew is a commonly used package manager on macOS. Installing Ruby using Homebrew is easy:
This should install the latest Ruby version.
FreeBSD
FreeBSD offers both pre-packaged and source-based methods to install Ruby. Prebuilt packages can be installed via the pkg tool:
A source-based method can be used to install Ruby using the Ports Collection. This is useful if you want to customize the build configuration options.
More information about Ruby and its surrounding ecosystem on FreeBSD can be found on the FreeBSD Ruby Project website.
OpenBSD
OpenBSD as well as its distribution adJ has packages for the three major versions of Ruby. The following command allows you to see the available versions and to install one:
You can install multiple major versions side by side, because their binaries have different names (e.g. ruby27 , ruby26 ).
The HEAD branch of the OpenBSD ports collection might have the most recent version of Ruby for this platform some days after it is released, see directory lang/ruby in the most recent ports collection.
Ruby on OpenIndiana
To install Ruby on OpenIndiana, please use the Image Packaging System (IPS) client. This will install the Ruby binaries and RubyGems directly from the OpenIndiana repositories. It’s easy:
However, the third-party tools might be a good way to obtain the latest version of Ruby.
Windows Package Manager
On Windows, you can use the Windows Package Manager CLI to install Ruby:
Other Distributions
On other systems, you can search the package repository of your Linux distribution’s manager for Ruby. Alternatively, you can use a third-party installer.
Installers
If the version of Ruby provided by your system or package manager is out of date, a newer one can be installed using a third-party installer.
Some installers allow you to install multiple versions on the same system; associated managers can help to switch between the different Rubies.
If you are planning to use RVM as a version manager you don’t need a separate installer, it comes with its own.
ruby-build
ruby-build is a plugin for rbenv that allows you to compile and install different versions of Ruby. ruby-build can also be used as a standalone program without rbenv. It is available for macOS, Linux, and other UNIX-like operating systems.
ruby-install
ruby-install allows you to compile and install different versions of Ruby into arbitrary directories. chruby is a complimentary tool used to switch between Ruby versions. It is available for macOS, Linux, and other UNIX-like operating systems.
RubyInstaller
On Windows, RubyInstaller gives you everything you need to set up a full Ruby development environment.
Just download it, run it, and you are done!
Ruby Stack
If you are installing Ruby in order to use Ruby on Rails, you can use the following installer:
- Bitnami Ruby Stack provides a complete development environment for Rails. It supports macOS, Linux, Windows, virtual machines, and cloud images.
Managers
Many Rubyists use Ruby managers to manage multiple Rubies. They allow easy or even automatic switching between Ruby versions depending on the project and other advantages but are not officially supported. You can however find support within their respective communities.
asdf-vm
asdf-vm is an extendable version manager that can manage multiple language runtime versions on a per-project basis. You will need the asdf-ruby plugin (which in turn uses ruby-build) to install Ruby.
chruby
chruby allows you to switch between multiple Rubies. It can manage Rubies installed by ruby-install or even built from source.
rbenv
rbenv allows you to manage multiple installations of Ruby. While it can’t install Ruby by default, its ruby-build plugin can. Both tools are available for macOS, Linux, or other UNIX-like operating systems.
RVM (“Ruby Version Manager”)
RVM allows you to install and manage multiple installations of Ruby on your system. It can also manage different gemsets. It is available for macOS, Linux, or other UNIX-like operating systems.
Uru is a lightweight, multi-platform command line tool that helps you to use multiple Rubies on macOS, Linux, or Windows systems.
Building from Source
Of course, you can install Ruby from source. Download and unpack a tarball, then just do this:
By default, this will install Ruby into /usr/local . To change, pass the —prefix=DIR option to the ./configure script.
You can find more information about building from source in the Ruby README file.
Using the third-party tools or package managers might be a better idea, though, because the installed Ruby won’t be managed by any tools.
Источник
Установка Ruby и gem через RVM на Mac OS
Процесс установки Ruby на Mac OS через систему управления пакетами RVM.
Введение
Минус вышеуказанной установки в том, что Ruby и его гемы будут установлены в рут директорию. В этом нет ничего плохого, если всё делать правильно.
А можно пойти другим путём и установить Ruby и gem-ы, не затрагивая основную версию. Для этого на Mac OS есть сторонние инструменты вроде rbenv и RVM (Ruby Version Manager). На последнем и остановимся.
Установка RVM (система управления пакетами)
Вариант 1
При этой команде может возникнуть ошибка:
Ругается на отсутствие GnuPG. По умолчанию в маке он не установлен. Можно его установить через Homebrew:
А затем заново повторить команду.
Вариант 2
Без дополнительных установок, инсталлируем через curl:
Процесс установки: 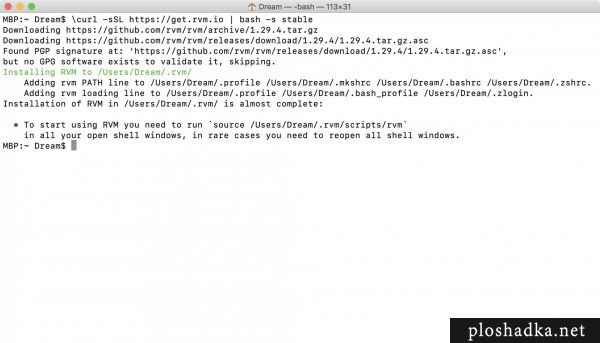
В конце установки появится надпись, которая сообщает, что делать дальше:
Команда установит RVM для текущего пользователя:
На этом установка менеджера для Ruby завершена.
Установка Ruby с помощью RVM
Посмотрим какие версии руби можно установить:
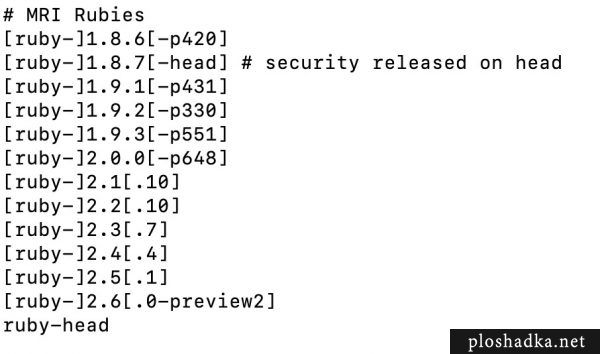
На само деле, указываются не все версии. Самые последние могут не показываться. Можно загуглить последнюю стабильную сборку и указать её версию в установке.
Устанавливаем последнюю версию руби:
Не пугаемся надписи, всё нормально:
Установка занимает несколько минут. Полный процесс установки:
![]()
Для выбора версии Ruby, которая будет использоваться по умолчанию, используется команда:
Можно вернуться к использованию системной версии ruby
Для каждой из версии руби можно установить отдельный набор гемов (gemset).
Создаём gemset который назовём work:
Можно посмотреть все созданные «наборы гемов»:
Применить «набор сетов» по умолчанию:
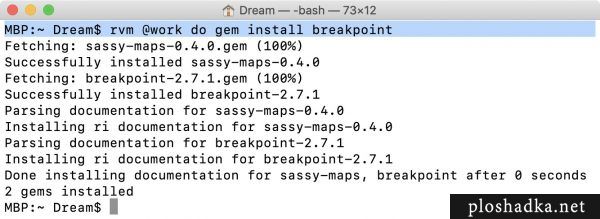
Установка gems в Ruby на RVM
Если после установки гемов ничего не работает, можно попробовать установить через sudo.
Устанавливаем гем компосса:
Устанавливаем дополнительные любые другие гемы, например:
Удаляем гем из набора гемов:
где listen — название гема
Чистка и удаление RVM
Удалить определенную версию Ruby:
Чтобы удалить «набор гемов» (gemset):
Посмотреть все установленные версии ruby:
Полностью удалить RVM:
Настройка в PhpStorm
По умолчанию compass в маке находится по такому пути:
![]()
Однако мы установили в другую директорию, поэтому меняем путь на другой:
Также настраиваем под себя Arguments:
![]()
Заключение
- Установили систему управления пакетами для Ruby
- Установили нужную нам версию руби в директорию текущего юзера
- Добавили туда необходимые гемы
- Настроили compass в PhpStorm
Возможные ошибки
Это может означать, что в шторме, в настройках File Watchers указан неправильный путь.
/Users/Dream/.rvm/gems/ruby-2.5.3@test/wrappers/compass compile /Users/.
LoadError on line [«59»] of /Users/Dream/.rvm/rubies/ruby-2.5.3/lib/ruby/site_ruby/2.5.0/rubygems/core_ext/kernel_require.rb: cannot load such file — autoprefixer-rails
Run with —trace to see the full backtrace
Process finished with exit code 1
Не хватает определенного гема. В данном случае ругается на отсутствие autoprefixer-rails. Как установить недостающие гемы указано выше.
English Query (запросы по теме на английском языке)
How to resolve error during RVM – gpg command not found
Читайте также
Кстати, на сайте нет рекламы. У сайта нет цели самоокупаться, но если вам пригодилась информация можете задонатить мне на чашечку кофе в макдаке. Лайкнуть страницу или просто поблагодарить. Карма вам зачтется.
Источник
stonehippo / install_ruby_with_rbenv.md
Install a new Ruby with rbenv on Mac OS (and make yourself a superhero)
If you’re doing stuff with Ruby on a Mac, e.g. installling Jekyll or something, by default you’ll end up having to use the sudo command to do stuff, since the permission to modify the default config is not available to your user account.
This sucks and should be avoided. Here’s how to fix that.
Installing a new Ruby
To make this better, we are going install a new, custom Ruby. This used to be a big, scary thing, but thanks to the awesome tools Homebrew and rbenv, it’s a snap.*
A word of warning: you will have to use Terminal to install this stuff. If you are uncomfortable with text, words, and doing stuff with your computer beyond pointing and hoping, this may not work well for you. But if that’s the case, I’m not sure why you were trying to use Ruby in the first place.
First, install Homebrew
Homebrew (or just brew, since that’s the name of the command you’ll use), is a package manager for Mac OS. It makes installing all sorts of cool tools easy.
Open terminal and command your Mac to do your bidding with the following command:
This little bit of magic will download the Homebrew install script and walk you through the install process. It’s not too scary, and should only take a couple of minutes. Accept all defaults.
Once that’s done, your system will be all set up to use Homebrew, and its superhappyfuncommand, brew . Let’s try it out by installing a helpful little utility, tree .
Once you do that, run the tree utility like this:
You should get a pretty ASCII picture of your current directory structure.
Once you have Homebrew, your powers are much greater and you can install all sorts of stuff without ever having to invoke sudo or mess with permissions. And you’ll have harnessed the work of thousands of developers who are working in caves and darkend alcoves crafting Homebrew install packages just for you.
Second, install rbenv and a new Ruby
Ok, Homebrew is installed and you now have some new super powers. Let’s use them to get you a new Ruby. We’ll start by installing rbenv and it’s ruby-build plugin. rbenv is a Ruby version manager that lets you change with Ruby you’re currently using, and ruby-build helps you install a custom Ruby. Seriously, when you’re done with this, you’ll be like some sort of new X-Men team member, with the mutant power to install new Rubies with a thought.
Let’s start by installing the tools:
Assuming that all went to plan, you have just upgraded yourself and your Mac. But you can’t quite use your new capabilities yet. You need to hook up rbenv so it can do some stuff. If you want to know what that stuff is, good for you! Go read the documentation. For now, here’s what you need to do:
WARNING: If you use a shell other than bash, like zsh, you’ll need a slightly different command set up the rbenv environment stuff. If you don’t know what I’m talking about, you’re probably fine. If you do, then you can figure this out on your own.
To make this apply to your current Terminal session, do this:
Now it’s time to install a new Ruby. We’ll choose a fairly modern version of the 1.9 family of Rubies. It’s not as shiny as the newer Ruby 2.0 stuff, but it’s more familiar to most folks, like your favorite pair of socks. Or something
That’ll take a few minutes. Once it’s done, you have a shiny new toy. But to play with it, you need to do a couple of other things. First, make the new Ruby the default for your system:
After that, you should install the most useful too for Ruby, Bundler. I am asking you to do this not because it’s required, but because I care deeply and profoundly about you. Really, I do.
I did ask you to install Bundler because of my need to ensure your wellbeing. I also did it to demontrate that, if all went well, you’ve accomplised the task this little guide was supposed to help you do, installing a new Ruby on your Mac that you have control over, a Ruby sans sudo .
Please enjoy your new Ruby responsibly.
Like Spider-Man, you have now been granted great power. And with great power comes the need to read some documentation.
Really, if you want to leverage Homebrew and rbenv–and you really should want to–go read their documentation. You’ll learn how to find new things to install and other interesting facts, like why Unicorns vomit rainbows.
Ok, maybe you won’t learn anything about that last bit. But you’ll be able to do more with the expensive hunk of processed sand on your desk.
Good luck. And ping me on Twitter (@stonehippo) if you need help, or if something here doesn’t work. I wrote this in a few minutes to help out Andy Clarke, and I am may have missed something, so beware and all that.
*Ok, maybe not a snap. But it won’t hurt too bad.
Источник


