- List User Accounts on Mac from Command Line
- How to List All User Accounts on a Mac from Command Line
- View All Users & Accounts on a Mac
- Show User Accounts Only
- Show All User Accounts, User Directories, & User GECOS Info on a Mac
- Related
- Enjoy this tip? Subscribe to our newsletter!
- Thank you!
- Related articles:
- 17 Comments
- Как зайти в папку пользователя на мак?
- Как перейти в папку Users Mac?
- Как зайти в папку программы на Mac?
- Где находятся драйвера на Mac OS?
- Как зайти в папку стим на мак?
- Как указать путь к папке на Mac?
- Как перемещаться по папкам в терминале?
- Как найти программы на Макбуке?
- Куда устанавливаются программы на Mac OS?
- Как правильно указать путь к файлу?
- Как удалить драйвера Ваком в Мак ОС?
- Как удалить принтер в Mac OS?
- Как удалить программу с мака?
- Как зайти в папку Library на Mac?
- Как зайти в Мой компьютер на мак?
- Как найти папку Minecraft на Mac?
- Настройка прав доступа к файлам, папкам и дискам на Mac
- Назначение прав доступа пользователям и группам
- Применение прав доступа ко всем объектам в папке или на диске
- Смена владельца объекта
- Добавление и удаление пользователей и групп в столбце «Имя».
List User Accounts on Mac from Command Line

Mac administrators may find themselves in a situation where they need to display a list of all user accounts on a particular Mac by way of the command line. We’ll review a few methods for advanced individuals to list all accounts, both user and system, on any Mac with any version of Mac OS X system software.
A few preliminary basic approaches to this would be to access the login screen or to list the contents of the /Users directory, though if a user account is hidden then it would not display at the login screen and it’s equally simple to obfuscate a user from the /Users folder. Additionally, the existence of a name in the /Users/ directory is not foolproof, because you can delete a user account but preserve that users home directory. As a result, while those approaches may be appropriate for the casual Mac user looking to show what users they have on a computer, neither of those methods are particularly sufficient for most admin needs. But, by turning to the command line you can reveal all user accounts on a Mac, whether they are general user accounts of active users, admin accounts, as well as any system account.
How to List All User Accounts on a Mac from Command Line
Open the Terminal if you haven’t done so already, either on the local machine you want to list user accounts for, or by connecting to a remote Mac you’d like to see the user accounts on. We’ll then use the ‘dscl’ command, which works in all versions of Mac OS X system software.
View All Users & Accounts on a Mac
dscl . list /Users
The benefit (or trouble) with this approach is that it lists not only all user accounts on a Mac but it also shows every daemon and server process account. This would include usernames like Paul, Bob, Jill, but also daemons, system accounts, and process users like networkd, windowserver, daemon, nobody, root, _spotlight, _ard, _appserver, _iconservices, and many more.
If the complete list of users is thus undesirable, you can easily exclude all the _underscore daemon and process accounts by running the output through grep, as we’ll show next.
Show User Accounts Only
dscl . list /Users | grep -v ‘_’
This command will filter out any of the _ underscore prefixed daemon users, which are not actually user accounts. You’ll get a much shorter list of user names returned as a result, but you’ll still find three user names included that are not typical user accounts, but are normal to be found on Mac OS X installs; daemon, nobody, and root.
Show All User Accounts, User Directories, & User GECOS Info on a Mac
Another approach would be to show and list a detailed account list of user accounts, the associated user account directory, and the user account GECOS info (which is usually a description of the account or a full user name). If you find yourself wondering what on earth some of the system accounts and process user ID accounts in the aforementioned lists are, this approach offers more details, including the gecos description for each account (for example, _qtss user is the QuickTime Streaming Server daemon)
dscacheutil -q user
The output of that command will be rather extensive, so you may want to pipe the result through more or less or redirect it into a text file for easier parsing.
There are likely other means of displaying all user accounts on a Mac, regardless of system version, if you know of an effective of informative method not covered here, do share it in the comments.
Related
Enjoy this tip? Subscribe to our newsletter!
Get more of our great Apple tips, tricks, and important news delivered to your inbox with the OSXDaily newsletter.
Thank you!
You have successfully joined our subscriber list.
Related articles:
17 Comments
I love a good know-it-all. 😭😭
I wonder why nobody answers the non-command-line guys question with the first normal-mac-user answer: use the “Users and Groups” pane of the “System Preferences” to list, control and manage your Mac users and groups, if you’re not prepared for the unix-style mess that is the command-line.
Furthermore, a “Mac” user is NOT a “unix/posix” user. It bases on it – but has much more (data, definitions, home directory, provisioning, profiles etc.) that is beyond the scope of these command-lines. trying to Create or Delete users from the command-line would really mess things up, and leave lots of orphaned junk on your Mac. DO NOT do that from the command-line unless you know very well what you are doing – and even then – that’s a bad idea. the only time I would do that, is if I need to control a remote machine and I only have an ssh login (terminal + shell) to the remote machine. any other way – Apple’s UI (and its automation) provide a better solution.
Next – if you’re talking about those _prefixed_usernames as “process” or “daemon” you should also give at least a sentence about what these are (special users set up for background-processes that exist and run outside the context of any normal “Mac user”, and even when no Mac user is logged in. These ‘users’ have the minimal access and capabilities for the need of the processes running “under” them.
Also, I didn’t really understand the last “GECOS Info” thing – please explain what it is, aside from providing the command-line. It also emits LOTS of information that would be nice if explained.
I’ve tried to add a user from a basic bash line and single user mode and all variations of prompts dscl/ -create/User “etc” on my macbook and every time I get “command not found” any suggestions?
I am confused, when i typed “dscacheutil -q user”. I got deamons and roots, and some of the other users were anonymous. I dont exactly know, what a deamon is, and what a root user is. Can someone please tell me why i do have more than 59 accounts on my mac, is it bad?
Listing all accounts on a Mac will show many that are NOT users, but daemons etc. Those are for system processes, those are not user accounts. Root is super user, every Mac has root.
User accounts are found in the /Users directory of Mac OS at your root Macintosh folder. That’s what someone is logging in as in most cases.
I just wonder why you’re even looking at this if you’re confused by it, what do you aim to achieve? If you don’t know what any of this is, it’s not relevant to you. It’d be like reading about the specifics of rocket science or brain surgery, probably not relevant to you either.
this is how learning works
I just wonder what you aim to acheive by being such a prick?
Great post. Very helpful. I didn’t like the nobody account either. I found it in a dialogue box under privileges, groups, nobody = admin. Previous to I found users, my user name, and then under my selected user name it said admin. This made sense. I am using High Sierra v 10.13 .. Thanks again for the terminal commands, I can add them to my little OS X cheat sheet / notebook. Maybe I will write a book one day!
Excellent suggestions, thank you all. Can someone tell me why Groupmembership would state: root (and my computer name here). I never activated “enable root”.
How delete users account except two users account ? For example :
I have 4 users account/
1-admin
2-usertemplate
3-user1
4-user2
I want to delete all users except : admin & usertemplate?
What’s the good syntax?
dscl . delete /Users/ !(admin | usertemplate) don’t work?
What is a good syntax ?
If you want to delete a user you need to do the following be in a root prompt or do sudo
sudo dscl . -delete /Users/$username
This will delete the user from the directory. Then if you want to delete the user folder you can do
sudo rm -rf /Users/$username
I have listed the users on my mac suspecting that someone had hacked my Mac as it had turned out to be very slow.
I got many users with “_” before them, I got root, nobody daemon.
That is in addition to my created users. Does this mean that everything is ok, or should I start worrying!
Not sure, but I think it’s an idea to run this and maybe share the results with me or someone who can ger a picture of the results: http://etrecheck.com
Maybe post at the Apple Discussions forum?
https://discussions.apple.com
If the computer is unusually slow it’s probably some process that’s running or the drive is reading and/or writing. Or a bad file system.
Just checking something as I am not a command line user.
When I use dscl . list /Users | grep -v ‘_’
I get an account called “nobody”. Who is this and should I get rid of it?
NOBODY owns no files, is NOT in a privileged group, and has ONLY the permissions that any user would have (less the user directory, and control of those files) IOW, it’s a process account. It’s common on UN*X type systems.
LEAVE NODOBY ALONE.
If you have Fast User Account Switching enabled in Mac OS (X) you can see the list of possible user names on the Mac by clicking on the name or icon in the upper right corner.
I use a different trick for this to list admin account / admin users
dscl . -read /Groups/admin GroupMembership
WIll list all administrator accounts on the Mac
Источник
Как зайти в папку пользователя на мак?
Как перейти в папку Users Mac?
В Finder на Mac нажмите меню «Переход» в строке меню. Выберите один из следующих вариантов. На уровень выше: Выберите этот вариант, чтобы открыть вышестоящую папку для текущего окна. Например, если Вы находитесь в папке «Загрузки», этот вариант позволит открыть Вашу папку пользователя.
Как зайти в папку программы на Mac?
Для того, чтобы найти эту папку, Вам необходимо: Открыть Finder и нажать вкладку «Переход», расположенную вверху, рядом с разделами «Окно» и «Справка». Нажмите на клавиатуре кнопку Alt (или Option) и в меню «Переход» появится опция «Библиотеки».
Где находятся драйвера на Mac OS?
Драйвера устройств находятся в директории /System/Library/Extensions/ и имеют расширение . kext. Они также, как и приложения, представляют из себя пакетный файл. Утилиты операционной системы MAC OS X • Утилита (англ.
Как зайти в папку стим на мак?
По умолчанию папка игр имеет адрес (для Mac OSX Mountain Lion/Lion):
/Library/Application Support/Steam/SteamApps. Никаких данных игрока (в том числе и сохранений) данная папка не содержит, поэтому и может быть «легко» перемещена.
Как указать путь к папке на Mac?
Перейдите в меню «Вид» и выберите пункт «Показать строку пути» или нажмите сочетание клавиш Option + Command + P (⌥ + ⌘ + P). В нижней части окна Finder тут же отобразится соответствующая строка, отображающая путь вне зависимости от того, в каком виде вы просматриваете файлы (значки, список, колонки или Cover Flow).
Как перемещаться по папкам в терминале?
Чтобы сменить каталог, выполните команду cd. Команда в таком виде перенесёт вас в ваш домашний каталог; чтобы перейти в другой каталог необходимо указать путь к нему. Вы можете использовать абсолютные или относительные пути.
Как найти программы на Макбуке?
Зажмите кнопку Option (Alt) и нажмите в системном меню на изображение яблочка. Там выберите «Информация о системе». В левой части окна в списке найдите пункт «ПО» и в нём кликните на «Программы». Система отобразит полный список установленных приложений.
Куда устанавливаются программы на Mac OS?
Большинство программ, распространяются в dmg-архивах (образах) и устанавливаются всего в пару кликов:
- открываем скачанный . …
- перетаскиваем каталог с приложением в системную папку «Программы»;
- приложение через пару секунд появится на Launchpad (жест «щипок» для открытия) и сразу будет готово к работе;
Как правильно указать путь к файлу?
В операционных системах UNIX разделительным знаком при записи пути является «/». В Windows — «». Эти знаки служат для разделения названия каталогов, составляющих путь к файлу.
Как удалить драйвера Ваком в Мак ОС?
Как удалить драйверы Wacom на Mac
- Откройте приложение Mac Cleaner на вашем Mac.
- Выберите деинсталлятор.
- Нажмите «Сканировать».
- Нажмите View, чтобы увидеть приложения.
- Выберите приложение Wacom в списке приложений.
- Выберите файлы, которые вы хотите удалить.
- Удалите приложение Wacom.
- Подтвердите последний шаг.
Как удалить принтер в Mac OS?
Удаление принтера на Mac
- На Mac выберите пункт меню «Apple» > «Системные настройки», затем нажмите «Принтеры и сканеры». Открыть настройки принтеров и сканеров
- Выберите принтер в списке, нажмите кнопку удаления , затем нажмите «Удалить принтер».
Как удалить программу с мака?
Удаление программ с помощью Finder
- Найдите нужную программу в программе Finder. …
- Перетащите программу в корзину либо выделите программу и выберите «Файл» > «Переместить в Корзину».
- При запросе имени пользователя и пароля введите имя и пароль учетной записи администратора на компьютере Mac.
Как зайти в папку Library на Mac?
Способ 1. В программе Finder удерживайте нажатой клавишу Option при выборе меню Переход. Под текущим домашним каталогом пользователя появится папка Library.
Как зайти в Мой компьютер на мак?
Где на Mac OS находится «Мой компьютер»?
- Мой компьютер на Mac os: Вместо проводника Windows, на Mac os используется Finder. Он показывает все существующие папки и директории.
- Аналог панели задач Windows: Нижняя строка: Может быть всплывающая или может находится внизу экрана постоянно. …
- Кнопка пуск Mac os: В левом верхнем углу значек Apple аналог кнопке пуск.
Как найти папку Minecraft на Mac?
- Открой Finder.
- Нажми на клавиатуре сочетание клавиш Cmd + Shift + G.
- Введи в открывшемся окне
/Library/Application Support/Minecraft/
Источник
Настройка прав доступа к файлам, папкам и дискам на Mac
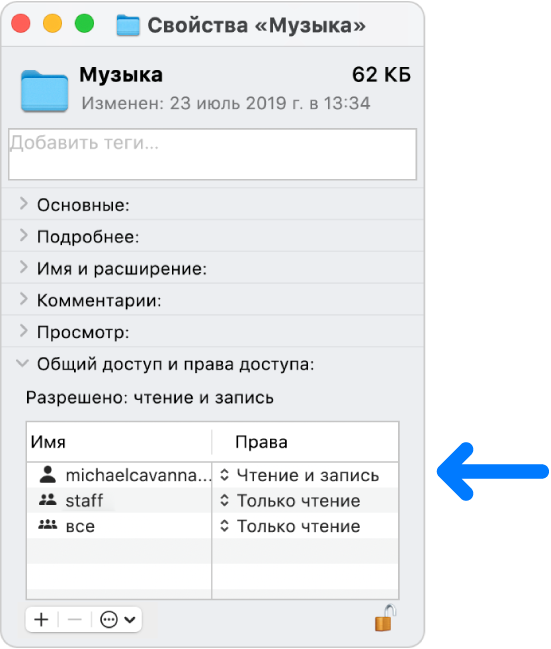
Настройки прав доступа определяют, кто может просматривать и изменять файлы на компьютере. Настройки прав доступа файла, папки или диска можно изменить в нижней части окна «Свойства». Это окно можно открыть в Finder. Например, можно изменить права доступа папки так, чтобы другие пользователи этого Mac или пользователи, подключающиеся к нему для доступа к файлам, могли просматривать файлы в папке, но не могли изменять их.
Назначение прав доступа пользователям и группам
На Mac выберите диск, папку или файл, затем выберите «Файл» > «Свойства».
Если информация в разделе «Общий доступ и права доступа» не отображается, нажмите стрелку  .
.
Если замок в правом нижнем углу закрыт  , нажмите его, чтобы разблокировать панель «Свойства», затем введите имя и пароль администратора.
Нажмите пользователя или группу в столбце «Имя», затем во всплывающем меню выберите настройки прав доступа.
Чтение и запись. Пользователь сможет открывать объект и изменять его.
Только чтение. Пользователь сможет открывать объект, но не сможет изменять его.
Только запись (почтовый ящик). Преобразует папку в папку типа «почтовый ящик». Пользователи смогут копировать объекты в такую папку, но не смогут открывать ее. Открыть «почтовый ящик» может только его владелец.
Нет доступа. Блокируется любой доступ к объекту.
Пока открыто окно «Свойства», можно отменить любые изменения прав доступа пользователя или группы в разделе «Общий доступ и права доступа». Прежде чем закрывать окно «Свойства», нажмите раскрывающееся меню действий  и выберите «Отменить изменения».
Применение прав доступа ко всем объектам в папке или на диске
На Mac выберите папку или диск, затем выберите «Файл» > «Свойства».
Если замок в правом нижнем углу закрыт , нажмите его, чтобы разблокировать панель «Свойства», затем введите имя и пароль администратора.
Нажмите всплывающее меню действий , затем выберите «Применить к вложенным объектам».
Смена владельца объекта
На Mac выберите объект, затем выберите «Файл» > «Свойства».
Если замок в правом нижнем углу закрыт , нажмите его, чтобы разблокировать панель «Свойства», затем введите имя и пароль администратора.
Если имя нового владельца отсутствует в столбце «Имя» (в разделе «Общий доступ и права доступа»), нажмите кнопку «Добавить»  , чтобы добавить нового владельца.
Выберите нового владельца в столбце «Имя», нажмите всплывающее меню действий , затем выберите «Сделать __ владельцем».
Пока открыто окно «Свойства», можно отменить любые изменения владельца объекта в разделе «Общий доступ и права доступа». Прежде чем закрывать окно «Свойства», нажмите раскрывающееся меню действий и выберите «Отменить изменения».
Добавление и удаление пользователей и групп в столбце «Имя».
На Mac выберите объект, затем выберите «Файл» > «Свойства».
Если замок в правом нижнем углу закрыт , нажмите его, чтобы разблокировать панель «Свойства», затем введите имя и пароль администратора.
В разделе «Общий доступ и права доступа» выполните одно из следующих действий:
Добавление пользователя или группы. нажмите кнопку «Добавить» под списком, выберите пользователя или группу, затем нажмите «Выбрать».
Удаление пользователя или группы. выберите пользователя или группу, затем нажмите кнопку «Удалить»  под списком.
Пока открыто окно «Свойства», можно отменить добавление или удаление пользователя или группы в разделе «Общий доступ и права доступа». Прежде чем закрывать окно «Свойства», нажмите раскрывающееся меню действий и выберите «Отменить изменения».
Источник


