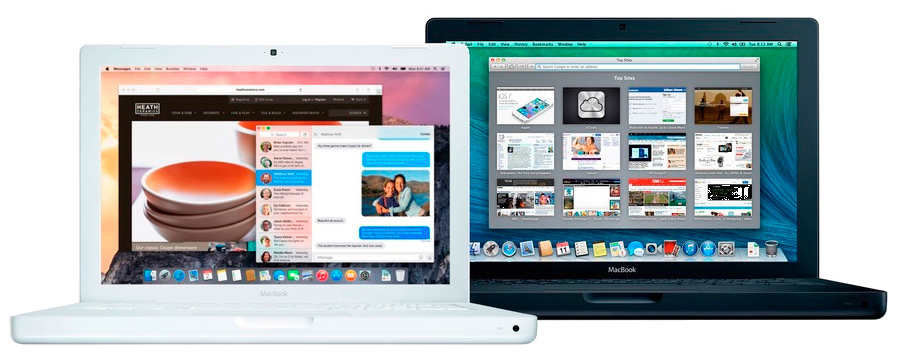
- OS X El Capitan on Unsupported Macs
- CAUTION:
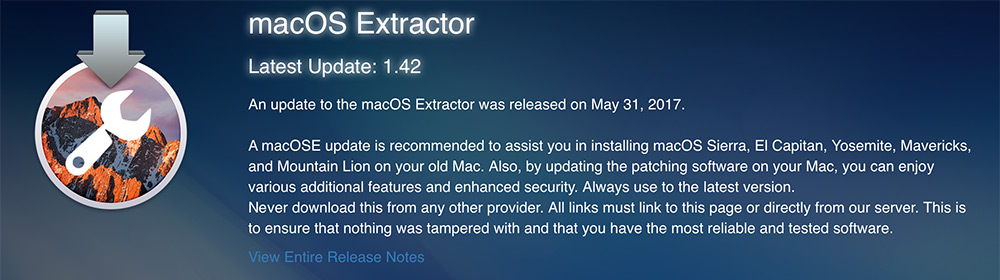
- macOS Extractor
- OS X Patcher
- MacPostFactor
- macOS Extractor Guide
- A: Preparing The Installation Drive
- B: Start Patching
- C: Installation
- D: If Reboot Fails
- E: Install these 64 bit Kexts from the Kexts folder from macOS Extractor
- MacPostFactor Guide
- Requirements for MacPostFactor to work
- macOS Extractor
- Overview
- Powerful, yet Straightforward
- Performance is key
- Release Notes
- Latest Update: 1.45
- Verison History
- System Requirements
- Установка OS X Yosemite на неподдерживаемых компьютерах Mac
- Вариант 1. macOS Extractor
- 1. Подготовка установочного диска
- 2. Установка OS X Yosemite
- 3. Возможные проблемы после перезагрузки
- Вариант 2. MacPostFactor
- Установка ОС OS X Yosemite с диска.
- Установка через USB
- Комментариев: 7
OS X El Capitan on Unsupported Macs
macOS Extractor, OS X Patcher, and MacPostFactor are apps that guide you through patching and installing OS X El Capitan (10.11), Yosemite (10.10), Mavericks(10.9), or Mountain Lion (10.8) on your older Mac. This thread focuses on OS X El Capitan.
CAUTION:
ANY HARM OR DAMAGE CAUSED BY THIS GUIDE HAPPENED UNDER YOUR OWN RESPONSIBILITY! IF YOU HAVE ANY REGRETS ABOUT DOING THIS TO YOUR MAC, YOU PROBABLY SHOULDN’T DO IT. IF YOU ARE QUESTIONING WHETHER IT IS WORTH IT, YOU SHOULD PROBABLY NOT TRY THIS.
PLEASE READ THIS GUIDE BEFORE ASKING QUESTIONS. WE CAN NOT FULLY GUIDE YOU THROUGH THIS ‘ONE STEP’ AT A TIME. IF YOU CAN’T FIGURE YOUR WAY AROUND OS X, WE RECOMMEND NOT DOING THIS.

macOS Extractor
OS X Patcher
MacPostFactor
macOS Extractor Guide
Be sure to have root privileges (administrator password) as OS X will prompt you for this on some stage.
A: Preparing The Installation Drive
1. Make a BACKUP of your system if you can.
2. macOS Extractor has generally everything you need to patch OS X (There are also numerous other sources that can help).
3. Get an OS X El Capitan Installer app (Recommended from the Mac App Store)
4. Make sure your Mac meets the Requirements above
5. A USB or Secondary Partition to put the patched Installer (A Installation Drive for reference)
B: Start Patching
1. Install macOS Extractor.
2. There should be a new drive appearing on your Desktop called ‘Mac OS X Install ESD’. Don’t worry about that. The AutoPatch Tool will unmount that when its done.
3. Go to Applications/OS X Hackers Patch Files and run the AutoPatch package.
4. During the AutoPatch installation. Select the USB or partition (Installation Drive) that you want as the installer. (No, this is not the Mac OS X Install ESD) WARNING: DO NOT SELECT YOUR CURRENT PARTITION (i.e Macintosh HD)
C: Installation
1. reboot your Mac holding option (alt) key.
2. If the installation drive boots you back to the main partition, try blessing the drive from your terminal app:
3. select the Installation drive (and press enter)
4. when booted click install/continue until you reach the disk selection menu, select you main drive (probably Macintosh HD) if you are sure about it, else select another empty drive (at least 15GB for testing/bigger if it should be a secondary system)
D: If Reboot Fails
(If the Mac does not reboot to the El Capitan desktop boot to the installation drive again and perform the following.
open the terminal at the top menu bar or boot into single user mode (Hold Command -S immediately after turning on)
E: Install these 64 bit Kexts from the Kexts folder from macOS Extractor
1. Navigate in your Finder and go to the ‘OS X Hackers Patch Files’ folder in your Applications Folder
2. Open the ‘Kexts’ Folder
3. Choose your Graphics Card Kext Installer and launch it.
4. Select the Partition or Hard Drive that you are currently using the patched OS X. Install it. (Admin privileges required)
5. Restart your Mac
MacPostFactor Guide
IMPORTANT NOTES
Install MacPostFactor at your own risk. We are not liable if your computer explode, fail to wake you up for work, lose important files, pictures, porn or simply ceased to work. Always backup your existing installation before installing MacPostFactor or install in a second partition.
We are not aware of remaining bugs. Although its been thoroughly tested by us and our group of private beta testers, you might still find bugs in it, and if you do find one, feel free to contact us on Twitter @MLforAll & @IsiahJohnson15 or simply email me at [email protected] (@MLforAll’s mail) or go to the Support Page.
El Capitan Install is EXPERIMENTAL. Try this on a secondary partition.
Supplementary Informations for El Capitan
Requirements for MacPostFactor to work
◆ A Mac with Core 2 Duo or Xeon Processor.
◆ OS X 10.7 or later
◆ 2GB RAM at least
◆ At least 15GB of HDD space (8GB for USB)
◆ Install OS X El Capitan.app 10.11 or later in your Application Folder
◆ Read our instructions on MacRumors at least twice
We’re not responsible if you screw up your system. Technically, that won’t happen as you can always go back to Lion
Источник
macOS Extractor
Developed by Isiah Johnson (TMRJIJ)
Verison 1.45
March 31, 2020
macOS Extractor is an amazing Package-based Application that assists you in install macOS 10.8 — 10.14 on your Unsupported Mac. By using this patching software on your Unsupported Mac, you can enjoy the various features and added security that modern Macs have.
Overview
Powerful, yet Straightforward
Lorem ipsum dolor sit amet, consectetuer adipiscing elit. Aenean commodo ligula eget dolor. Aenean massa. Cum sociis natoque penatibus et magnis dis parturient montes, nascetur ridiculus mus. Donec quam felis, ultricies nec, pellentesque eu, pretium quis, sem. Nulla consequat massa quis enim.
Performance is key
With full Graphics Acceleration in OS X Mountain Lion and efficient Graphical Workarounds, you can except exceptional performance from your Mac. macOS Extractor consists of features that automatically reduce intense Graphical Artifact such as Transparency and unneeded Animations.
Release Notes
Latest Update: 1.45
An update to the macOS Extractor was released on March 31, 2020.
A macOSE update is recommended to assist you in installing macOS 10.8 — 10.14 on your old Mac. Also, by updating the patching software on your Mac, you can enjoy various additional features and enhanced security. Always use to the latest version.
Never download this from any other provider. All links must link to this page or directly from our server. This is to ensure that nothing was tampered with and that you have the most reliable and tested software.
Verison History
This update includes:
The Entire AutoPatch has now been rewritten to correct numerous bugs with creating the Installer Drive
OS X Mountain Lion, Mavericks and Yosemite now has 32-bit Applications
Boot.efi patching happens from within the AutoPatch. No more confusion over these Bootloaders
macOS 10.12-10.14 Support for MacBook 4,1 (In Next Release)
Fixed issue where AutoPatch could not rewrite the PlatformSupport.plist
Fixed Issue where the Boot.efi would not Lock resulting in Installer Corruption
Fixed Issue where PostInstall Script did not update according to Mac Model
macOS Extractor now adds Graphical Kexts within the Installer
Fixed Issue where some assets went missing during Compiling
Other Features in Previous Versions:
Small Update to El Capitan and Sierra Specific Kexts
Addressed Issue where AutoPatch would download El Capitan Kexts for Sierra
Added Prelinked Kernels for macOS Sierra Patching
Fixed missing El Capitan Prelinked Kernel that could result in AutoPatch Installation Failure
New SIP Manager Kext added
System Requirements
See if your Mac can handle the Patcher.
Tested Macs listed below. Here are the minimum requirements:
Running 10.7 Lion
At least 4GB of RAM.
A copy of the OS X/macOS installer in the Applications Folder (.app file required / NO DMGs)
15 GB of free space from USB or HDD Partition.
Supported Mac Models
MacMini1,x (C2D upgraded)
We DON’T assist with Hackintosh. All private messages/emails involving installing OS X on non-Apple hardware will be redirected to another support team.
Web Installer Size: 4 MB
Download Size: 70 — 180 MB
The Installer reads and downloads needed patches from our servers. You must have at least 180 MB of space for installation
OS X Hackers are is not affiliated with Apple Inc. Mac OS Ten (X), Mac, iOS, iPhone, iPad, and all other Apple product names are trademarks or registered trademarks of Apple Inc. All other company and product names are trademarks or registered trademarks of their respective companies.
Источник
Установка OS X Yosemite на неподдерживаемых компьютерах Mac
Продолжаем изобретать костыли и велосипеды и сегодня речь пойдёт про установку Mac OS X Yosemite (10.10) вместо максимально возможной OS X Lion (10.7) на неподдерживаемые компьютеры Mac. Спросите как такое возможно? Давайте разбираться.
Для начала немного истории. Итак, OS X 10.6 (Snow Leopard) стала первой версией OS X с опциональной поддержкой 64-битного ядра, позволяющей загружать как 32-битное, так и 64-битное ядро. Однако загрузить 64-разрядное ядро на маках, поставляемых с микропрограммой EFI32, даже если у них стоял 64-разрядный процессор, не представлялось возможным. Поддержка 64-битных ядер точно имеется на iMac и MacBook Pro начиная с начала 2008 г.
С выходом OS X 10.8 (Mountain Lion), Apple полностью отказалась от 32-битных ядер и компьютерам с EFI32 обновления до новых версий OS X стали недоступны. Однако, энтузиасты нашли обходной путь и сегодня рассмотрим два варианта установки OS X Yosemite на неподдерживаемых Mac.
Ниже перечислены рекомендуемые минимальные требования:
- Установлена OS X 10.7 Lion
- Минимум 2 ГБ оперативной памяти
- Установщик OS X Yosemite в папке приложения (можно взять на трекере inmac.org)
- 15 ГБ свободного пространства на USB или внешнем HDD, который будет использоваться в качестве установочного диска.
Собственно, сам мак должен соответсвовать одной из моделей ниже (взято с форума forums.macrumors.com):
- MacBook2,x
- MacBook3,x
- MacBook4,x
- MacBookPro2,x
- MacBookAir1,1
- MacMini1,x
- MacMini2,x
- iMac4,x
- iMac5,x
Предупреждение! Все действия, изложенные в данном руководстве вы делаете на свой страх и риск. Любой вред или ущерб, будет результатом именно ваших действий, потому если у вас имеются сомнения, относительно собственных знаний и навыков, то вам определённо не стоит заниматься этим самостоятельно.
У меня нет возможности протестировать все возможные варианты установки OS X и уж тем более всех перечисленных выше компьютеров Apple. Относитесь к материалам статьи, как ознакомительным.
Вариант 1. macOS Extractor
1. Подготовка установочного диска
(Предполагается что OS X Yosemite Installer у вас уже скачан и находится в каталоге с программами.)
- Устанавливаем macOS Extractor(актуальная версия на данный момент 1.42 от 31 мая 2017). На рабочем столе должен появиться значок «OS X Install ESD».
- Перейдя в раздел «Программы -> OS X Hackers Patch Files» запускаем AutoPatch и выбираем флешку или диск, на который планируем разместить установщик.
- (для не 64-битных Mac) Нужно заменить boot.efi файлы, расположенные в каталогах /System/Library/CoreServices и /usr/standalone/i386 копией из каталога /Applications/OS X Hackers Patch Files/Boot EFI/. Для замены файлов, с них предварительно следует снять блокировку, выполнив в терминале: sudo chflags nouchg /Volumes/OS\ X\ Base\ System/System/Library/CoreServices/boot.efi
(Если что-то не так с путём и вы получили сообщение об ошибке, найдите файл boot.efi самостоятельно, затем в терминале введите «sudo chflags nouchg» и перетащите его в окно терминала)
После того, как вы заменили boot.efi новой версией, следует вернуть ему атрибуты (блокировка) в первоначальное состояние:
sudo chflags uchg /Volumes/OS\ X\ Base\ System/System/Library/CoreServices/boot.efi
2. Установка OS X Yosemite
Перезагружаем Mac удерживая клавишу Alt (Option) и выбираем наш установочный диск «OS X Base System».
Если установка выкидывает обратно в главный раздел, пробуем внести некоторые изменения в терминале:
sudo bless —folder /Volumes/OS\ X\ Base\ System —file /Volumes/OS\ X\ Base\ System/System/Library/CoreServices/boot.efi —setBoot
После чего установка должна пойти в штатном режиме.
3. Возможные проблемы после перезагрузки
Если после установки, компьютер не показал долгожданного рабочего стола Yosemite, снова загружаемся с установочной флешки и открыв терминал из верхней строки меню (не запуская заново установку) или загружаемся в однопользовательском режиме (удерживая Command-S сразу после включения) и выполняем команду:
sudo rm /Volumes/[имя_диска]/System/Library/CoreServices/PlatformSupport.plist
Установка 64-разрядных драйверов устройств (kexts) из папки Kexts OS X Extractor.
Хотелось бы обратить внимание, что на старых видеокартах (GMA 950, X3100, X1600, X1300, X1900, 7300gt, etc.) ускорение графики в Mac OS X Mavericks и Yosemite не поддерживается.
Существуют бета-версии версии драйверов, хотя они могут лагать, но это всё же лучше, чем совсем ничего. Найти их можно в каталоге ‘OS X Hackers Patch Files’. Открыв папку ‘Kexts’ запускаем Graphics Card Kext Installer и выбираем раздел со свежеустановленной Mac OS X. После чего остается только перезагрузить компьютер.
Из-за отсутствия нормальных драйверов для видюхи, возникает проблема с переходом в спящий режим, что лечится дополнительным «костылём» в виде расширения NoSleep и измененного управления яркостью.
Вариант 2. MacPostFactor
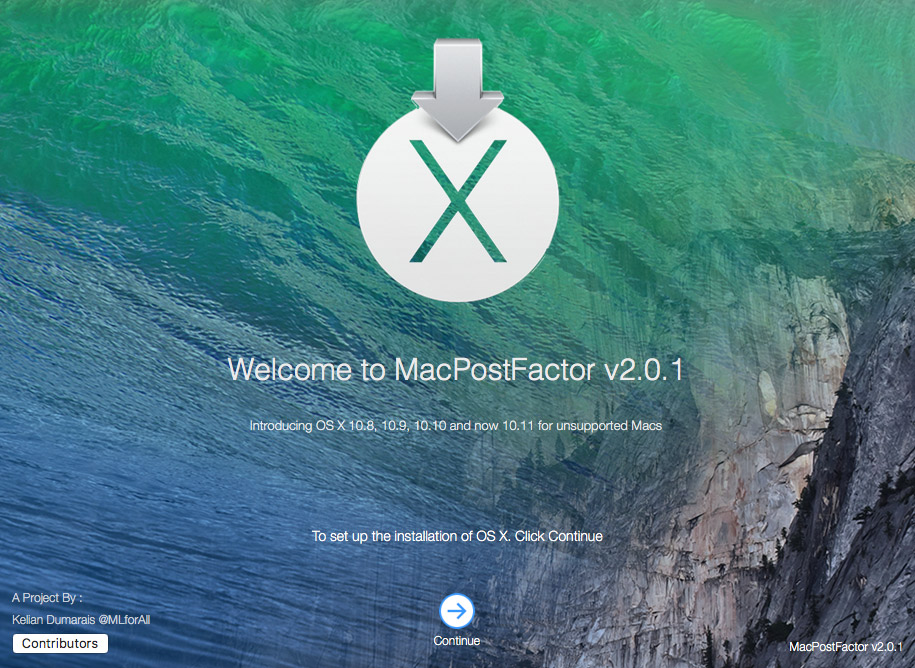
MacPostFactor (версия 2.0.1 от 8 июля 2016 г.) Тут всё упростили по полной программе, никаких действий в терминале проводить не потребуется.
Установка ОС OS X Yosemite с диска.
Убеждаемся что пакет Установка OS X Yosemite.app (Install OS X Yosemite.app) присутствует в папке с программами. Далее, запустив MacPostFactor (MCPF), выбираем тип установки «On this computer», а затем раздел диска, на который будет производится установка Yosemite.
Нажимаем кнопку установить и вводим пароль. Компьютер должен перезагрузиться с логотипом OSXHackers. После завершения процесса установки получаем наш старый Мак с ОС OS X Yosemite на борту.
Установка через USB
Установочная флешка делается не сложнее, единственное отличие состоит в том, что главном окне MCPF следует выбрать тип установки «On an external drive» (на внешнем диске) и указать вашу флешку или диск.
Далее, по уже знакомой с первого варианта схеме, перезагружаем Мак, удерживая клавишу ‘Alt’ (Option), и выбираем USB-накопитель для загрузки.
Возможные проблемы:
- не отображаются Карты в соответствующем приложении
- может подтормаживать Launchpad
- может не воспроизводиться видео в iTunes, Safari, VLC и DVD-плеере
- не корректное отображение в Центре уведомлений
- доступно только одно разрешение экрана
- могут не работать iMessage и FaceTime
Если считаете статью полезной,
не ленитесь ставить лайки и делиться с друзьями.
Комментариев: 7
Попробовал установить по варианту #2 MCPF после того как программа начала свою работу, перезапустился MacBook, но я увидел логотип не OSXHackers, а моргающую папку со знаком вопроса «?». Что делать? MacBook White
Папка со знаком вопроса означает что не найден ни один загрузчик. Есть как минимум два пути: загрузиться с флешки или начать установку OS X через Интернет. Можете почитать о всех возможных вариантах переустановки macOS https://mdex-nn.ru/page/chetyre-varianta-pereustanovki-macos.html
После установки через MCPF выбило install failed! и мак отказывается запускается в режиме восстановления, что делать?
Способи 2 всрал ссд и анешний хард! Систему восстановить невозможно!
Не запускается МакПостФактор из-за прилипшей рекламки adf.ly и сколько не нажимай СКИП рекламка не пропадает
Не могу запустить MacPostFactor 1.0.1 из-за прилипшей рекламки adf.ly и сколько не нажимай Скип Адд рекламка не пропадает
Все норм установилось на чистую 10.7.5 ,накатываете по второму примеру 10.10.5.
Источник


