- File system formats available in Disk Utility on Mac
- Apple File System (APFS)
- Mac OS Extended
- Windows-compatible formats
- Partition a physical disk in Disk Utility on Mac
- Add a partition
- Delete a partition
- Erase a partition
- Enlarge a partition on a storage device
- 3 of the Best Disk Space Analyzers for Mac OS X
- DaisyDisk
- OmniDiskSweeper
- Disk Inventory X
- Bonus: The Finder!
File system formats available in Disk Utility on Mac
Disk Utility on Mac supports several file system formats:
Apple File System (APFS): The file system used by macOS 10.13 or later.
Mac OS Extended: The file system used by macOS 10.12 or earlier.
MS-DOS (FAT) and ExFAT: File systems that are compatible with Windows.
Apple File System (APFS)
Apple File System (APFS), the default file system for Mac computers using macOS 10.13 or later, features strong encryption, space sharing, snapshots, fast directory sizing and improved file system fundamentals. While APFS is optimised for the Flash/SSD storage used in recent Mac computers, it can also be used with older systems with traditional hard disk drives (HDD) and external, direct-attached storage. macOS 10.13 or later supports APFS for both bootable and data volumes.
APFS allocates disk space within a container (partition) on demand. When a single APFS container has multiple volumes, the container’s free space is shared and automatically allocated to any of the individual volumes as needed. If desired, you can specify reserve and quota sizes for each volume. Each volume uses only part of the overall container, so the available space is the total size of the container, minus the size of all the volumes in the container.
Choose one of the following APFS formats for Mac computers using macOS 10.13 or later.
APFS: Uses the APFS format. Choose this option if you don’t need an encrypted or case-sensitive format.
APFS (Encrypted): Uses the APFS format and encrypts the volume.
APFS (Case-sensitive): Uses the APFS format and is case-sensitive to file and folder names. For example, folders named “Homework” and “HOMEWORK” are two different folders.
APFS (Case-sensitive, Encrypted): Uses the APFS format, is case-sensitive to file and folder names and encrypts the volume. For example, folders named “Homework” and “HOMEWORK” are two different folders.
You can easily add or delete volumes in APFS containers. Each volume within an APFS container can have its own APFS format — APFS, APFS (Encrypted), APFS (Case-sensitive) or APFS (Case-sensitive, Encrypted).
Mac OS Extended
Choose one of the following Mac OS Extended file system formats for compatibility with Mac computers using macOS 10.12 or earlier.
Mac OS Extended (Journaled): Uses the Mac format (Journaled HFS Plus) to protect the integrity of the hierarchical file system. Choose this option if you don’t need an encrypted or case-sensitive format.
Mac OS Extended (Journaled, Encrypted): Uses the Mac format, requires a password, and encrypts the partition.
Mac OS Extended (Case-sensitive, Journaled): Uses the Mac format and is case-sensitive to folder names. For example, folders named “Homework” and “HOMEWORK” are two different folders.
Mac OS Extended (Case-sensitive, Journaled, Encrypted): Uses the Mac format, is case-sensitive to folder names, requires a password, and encrypts the partition.
Windows-compatible formats
Choose one of the following Windows-compatible file system formats if you are formatting a disk to use with Windows.
MS-DOS (FAT): Use for Windows volumes that are 32GB or less.
ExFAT: Use for Windows volumes that are over 32GB.
Источник
Partition a physical disk in Disk Utility on Mac
Partitioning a disk divides it into individual sections known as containers.
However, with APFS, you shouldn’t partition your disk in most cases. Instead, create multiple APFS volumes within a single partition. With the flexible space management provided by APFS, you can even install another version of macOS on an APFS volume.
Important: If you’re partitioning your internal physical disk because you want to install Windows, use Boot Camp Assistant instead. Do not use Disk Utility to remove a partition that was created using Boot Camp Assistant. Instead, use Boot Camp Assistant to remove the partition from your Mac.
Add a partition
Important: As a precaution, it’s best to back up your data before creating new partitions on your device.
In the Disk Utility app  on your Mac, select a volume in the sidebar, then click the Partition button
  in the toolbar.
If Disk Utility isn’t open, click the Launchpad icon  in the Dock, type Disk Utility in the Search field, then click the Disk Utility icon .
If you have multiple storage devices connected to your Mac, make sure you select a volume that’s on the device you want to partition.
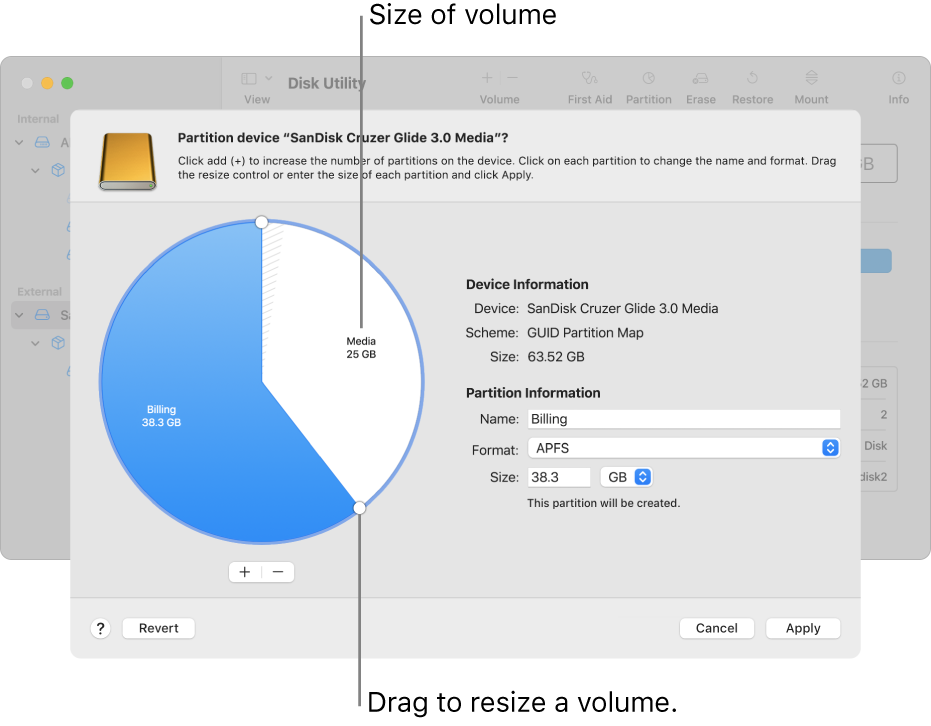
When you select a volume that already has data on it, the pie chart shows a shaded area representing the amount of data on the volume and an unshaded area representing the amount of free space available for another volume. Disk Utility also shows whether the volume can be removed or resized.
Note: If you see a small volume with an asterisk, the partition is smaller than can be represented at the correct scale in the chart.
Click the Add button  below the pie chart.
Read the information in the dialogue that appears, then click Add Partition.
Note: If you click Add Volume instead, you can click the Add button to create an additional APFS volume in the container, or click Cancel to return to the Disk Utility window without making any changes to the storage device.
Type a name for the volume in the Name field.
For MS-DOS (FAT) and ExFAT volumes, the maximum length for the volume name is 11 characters.
Click the Format pop-up menu, then choose a file system format.
Enter the size or drag the resize control to increase or decrease the size of the volume.
Read the information in the Partition Device dialogue, then click Partition.
After the operation finishes, click Done.
After you partition a storage device, an icon for each volume appears in both the Disk Utility sidebar and the Finder sidebar.
Delete a partition
WARNING: When you delete a partition, all the data on it is erased. Be sure to back up your data before you begin.
In the Disk Utility app on your Mac, select a volume in the sidebar, then click the Partition button in the toolbar.
If Disk Utility isn’t open, click the Launchpad icon in the Dock, type Disk Utility in the Search field, then click the Disk Utility icon .
In the Apple File System Space Sharing dialogue, click Partition.
In the pie chart, click the partition you want to delete, then click the Delete button  .
.
If the Delete button is dimmed, you can’t delete the selected partition.
Read the information in the Partition Device dialogue, then click Partition.
After the operation finishes, click Done.
Erase a partition
In the Disk Utility app on your Mac, choose View > Show All Devices, then select the container you want to erase in the sidebar.
If Disk Utility isn’t open, click the Launchpad icon in the Dock, type Disk Utility in the Search field, then click the Disk Utility icon .
Click the Erase button  in the toolbar.
If the Erase button is dimmed, you can’t erase the selected container.
Type a name for the volume in the Name field.
Click the Format pop-up menu, then choose a file system format.
After the operation finishes, click Done.
Enlarge a partition on a storage device
If you have multiple partitions on a device and one of them is running out of space, you may be able to enlarge it without losing any of the files on it.
To enlarge a volume, you must delete the volume that comes after it on the device, then move the end point of the volume you want to enlarge into the freed space. You can’t enlarge the last volume on a device.
WARNING: When you delete a volume or partition, all the data on it is erased. Be sure to back up your data before you begin.
In the Disk Utility app on your Mac, select a volume in the sidebar, then click the Partition button .
If Disk Utility isn’t open, click the Launchpad icon in the Dock, type Disk Utility in the Search field, then click the Disk Utility icon .
In the Apple File System Space Sharing dialogue, click Partition.
In the pie chart, select the partition you want to delete, then click the Delete button .
If the Delete button is dimmed, you can’t delete the selected partition.
Read the information in the Partition Device dialogue, then click Partition.
Источник
3 of the Best Disk Space Analyzers for Mac OS X

It’s often only a matter of time before Mac users wind up seeing the dreaded “startup disk almost full” warning message in Mac OS X, which often leads to a frantic dash around the Downloads folder as users trash unnecessary files to attempt to free up disk space. While there’s nothing wrong with going on a manual mission of tracking down where your disk storage vanished to, there are an entire category of disk space analyzer apps available which make the job easier, offering a visual experience that is quickly scannable and actionable.
We’ll cover three of the best and most popular disk space analysis tools available for the Mac, each of which is either free or offers a free trial version to give a good test run with.
A big thing to remember with using these disk analyzer apps is that if you shouldn’t delete anything without discretion, as they sweep the entire drive and inevitably display system files, system folders, and other necessary components of Mac OS X and apps, along with personal documents and accumulated cruft. It’s a good idea to back up the Mac with Time Machine before using these apps if you’re planning on performing some mass file removal, it’s always better to be safe than sorry and lose files or have to reinstall Mac OS X if you deleted critical system files willy-nilly.
DaisyDisk
DaisyDisk is by far the most attractive storage analysis utility, with a beautiful and intuitive interface that makes finding disk clutter a matter of navigating an interactive colorful wheel. In terms of visualization of your file data, DaisyDisk is superior to anything else available, and it’s also very fast.
The free version of DaisyDisk is highly functional and will sweep your drive and allow simple quick access to any files or folders found (right-click on anything and choose ‘Show in Finder’), and you could get away with just using the free version if you wanted to, but if you enjoy DaisyDisk enough and find it to be a helpful companion to your Mac experience, the full version is money well spent.
OmniDiskSweeper
OmniDiskSweeper is great and the interface is quite similar to using the Finder in Column view, making it very easy to navigate to large files and folders throughout the file system hierarchy. The files are shown in descending order by size, so it’s very easy to figure out what’s eating up storage space.
OmniDiskSweeper has long been one of my favorite free utilities available for the Mac, and I use it often for my own computer and when trying to figure out what’s eating the disk space of other Macs I may encounter. We have discussed using OmniDiskSweeper before here on multiple occasions, it’s a great tool.
Disk Inventory X
Disk Inventory X has been around on the Mac for quite some time, it is an oldie but goodie. Though the interface could use some updating, the functionality remains high and the app works great for discovering large blocks of data (for example, a gazillion photos or zip archives). Perhaps the only issue is that in modern versions of Mac OS X, files can be assigned to the app they open with rather than their file type, which may lead to some confusion. Nonetheless, Disk Inventory X is free too, so if you decide it’s not your cup of tea you’re out nothing but a few mb of bandwidth.
A significant perk of DiskInventoryX having been around for ages is that it’s widely supported on much earlier versions of Mac OS X, so if you’re working on an older Mac with earlier system software, this may be the solution you’re looking for.
Bonus: The Finder!
If you don’t want to download any third party utilities, or perhaps you can’t for whatever reason, the Mac search function within the Finder is able to find large files in Mac OS X too. You’ll just need to set a minimum file size to look for, and away it goes.
The Finder search function works reasonably well for this purpose, but for many Mac users they will find one of the above third party utilities to be easier to quickly scan for large groups of files on a drive with.
Know of any other great utilities to analyze disk storage space and files on a Mac? Let us know in the comments!
Источник


