- Луна тема для windows
- Как сделать Windows 7 похожей на Windows XP
- Шаг 1: Загрузите The Luna Theme
- Шаг 2: Загрузите универсальный шаблонный патчер
- Шаг 3: Установите универсальный шаблонный патчер
- Шаг 4: Установите файлы тем
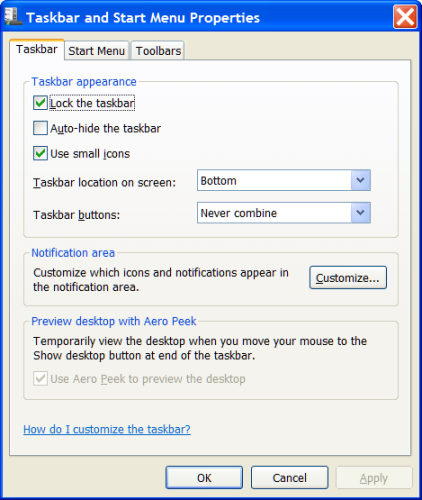
- Шаг 5: Настройте панель задач
- Шаг 6: Загрузите и установите Classic Shell
- Шаг 7: Измените стиль меню Пуск на Luna
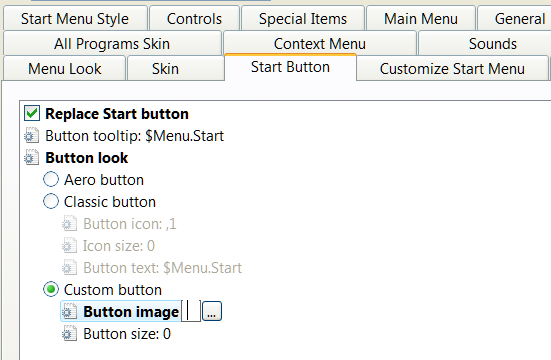
- Шаг 8: измени кнопку запуска
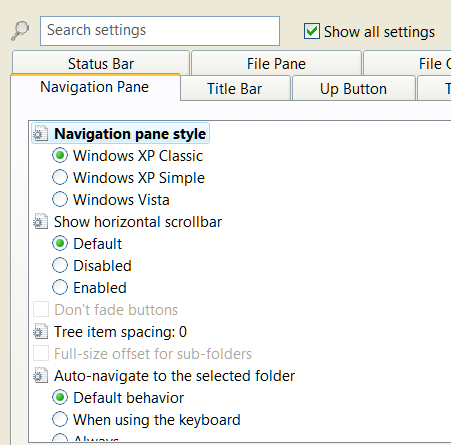
- Шаг 9: измени внешний вид проводника Windows
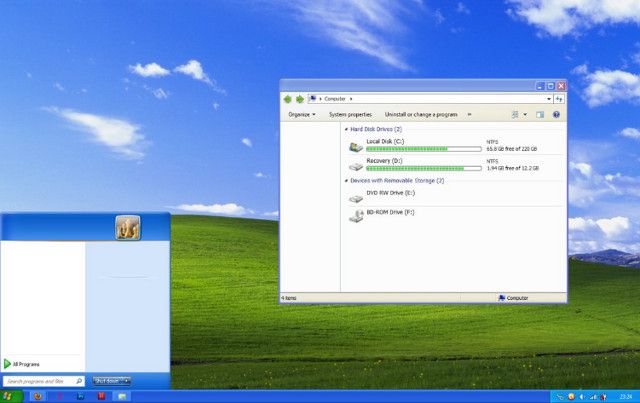
- Шаг 10: Наслаждайся сладкой победой!
Луна тема для windows
Making Windows 7, Windows 8, Windows 10, and Linux Look Like XP
It is possible to make Windows 7, 8, 8.1, Windows 10 (limited support), and Linux look like XP.
Select Your Operating System to Transform
For Windows users, the first step is to install Open Shell.
Download and install the latest version of Open Shell (mirror download link #1). Open Shell (formerly known as Classic Shell) extends custom themes (including our own XP themes) by allowing you to configure and style components NOT affected or styleable by 3rd party themes (such as the start menu layout, the start button icon, the Windows Explorer look and feel, and more). Open Shell is a great supplement to any third party theme. It will enhance the look of our XP themes that make any version of Windows look like Windows XP.
(Windows 7 Only): Download and Install UxStyle [New Recommended Way]
The first step to getting Windows 7 to look like XP is to download and install the latest version of UxStyle. This utility allows you to run third party themes for Windows. Without it, you will not be able to install the XP theme created by Microsoft named Luna.
Extract the UxStyle installation files using an archive utility such as WinRar or 7-Zip. Browse to the folder you just extracted. You will see two executable files named UxStyle_Core_Jul13_x64.msi and UxStyle_Core_Jul13_x86.msi. If you’re running a 64-bit installation of Windows 7, run UxStyle_Core_Jul13_x64.msi by double clicking on it. If you’re not running a 64-bit installation of Windows 7, run UxStyle_Core_Jul13_x86.msi by double clicking on it. If you don’t know, you can find out by going to Start → Settings → Control Panel → System. On this page, it will notify you if you’re running a 64-bit OS. Run the installer and follow the prompts. Once installation is complete, restart your computer, and you can now use 3rd party themes!
If UxStyle does NOT work for you , please click here to show the instructions below for installing and using Universal Theme Patcher . We do NOT recommend using Universal Theme Patcher due to conflicts with VirtualBox.
(Windows 7 Only): Download Universal Theme Patcher
The first step to getting Windows 7 or Windows 8 to look like XP is to download the Universal Theme Patcher. This utility allows you to run third party themes for Windows. Without it, you will not be able to install the XP theme created by Microsoft named Luna.
Using Universal Theme Patcher
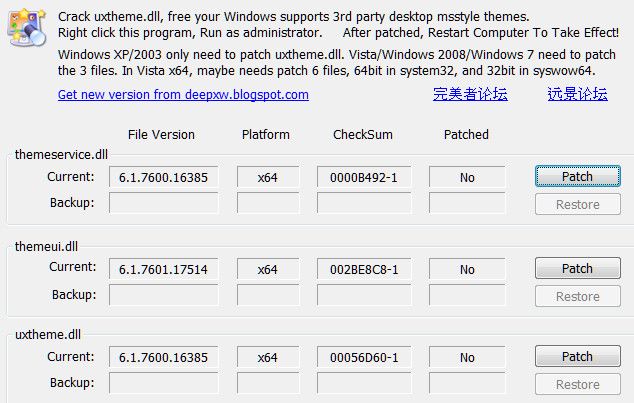
Extract the Universal Theme Patcher using an archive utility such as WinRar or 7-Zip. Browse to the folder you just extracted, and inside the UniversalThemePatcher_20090409 folder, you’ll see two executable files named UniversalThemePatcher-x64.exe and UniversalThemePatcher-x86.exe. If you’re running a 64-bit installation of Windows 7, run UniversalThemePatcher-x64.exe. If you’re not running a 64-bit installation of Windows 7, run UniversalThemePatcher-x86.exe. If you don’t know, you can find out by going to Start → Settings → Control Panel → System. On this page, it will notify you if you’re running a 64-bit OS. Run the program and choose your language. You’ll see a screen similar to the one shown below:

Patch the 3 files by clicking on «Patch». The program will let you know if you’re successful. After all of the files have been patched, restart Windows 7. You can now use custom themes and don’t need to run the Universal Theme Patcher again.
Downloading the Windows 7 Luna and Royale Themes
Downloaded 3857 times!

Downloaded 10161 times!
(Windows 8 and 8.1 Only): Download UltraUXThemePatcher
Before you can download and install custom third party themes for Windows 8 or 8.1, you’ll need to download and install UltraUXThemePatcher. This program patches Windows 8 and Windows 8.1 allowing you the ability to use any theme you want!
Downloading the Windows 8 Luna and Royale Themes
The Luna and Royale themes have finally been ported over to Windows 8.1. They should work in Windows 8, but they have been tested in 8.1. If you want to make the themes look even truer to their Windows 7 counterparts, please take a look at installing Aero Glass for Win8
Version 2.0 is almost as XP as you can get in Windows 8 without having to go ham in the style builder utility!
Downloaded 4193 times!
Theme Last Updated: 6/11/2014

Downloaded 7110 times!
Theme Last Updated: 1/9/2014
Downloaded 4988 times!

Downloaded 4682 times!
Downloaded 4511 times!

Downloaded 4395 times!
Downloaded 3620 times!

Downloaded 3362 times!
Downloaded 4024 times!

Downloaded 7660 times!
Theme Last Updated: 12/22/2013
Downloaded 4601 times!
Theme Last Updated: 10/25/2014
Windows 10 Limited Theme Support
It is possible to run 3rd party themes on Windows 10, but it involves quite a bit of work. Please read this guide for detailed instructions and information. Microsoft changed the way themes work in Windows 10, and as a result, several components are no longer themeable (the taskbar is one of many components that cannot be styled). After trying to convert the XP themes over to Windows 10, we decided it was NOT worth doing . Updated versions of the themes I’ve created for Windows 8 will NOT be updated for Windows 10.
Theme Installation Help Videos
Check out this video for step by step instructions!
Windows 8 and Windows 8.1:
Installing Custom Themes (Windows 7, Windows 8, Windows 8.1, and Windows 10)
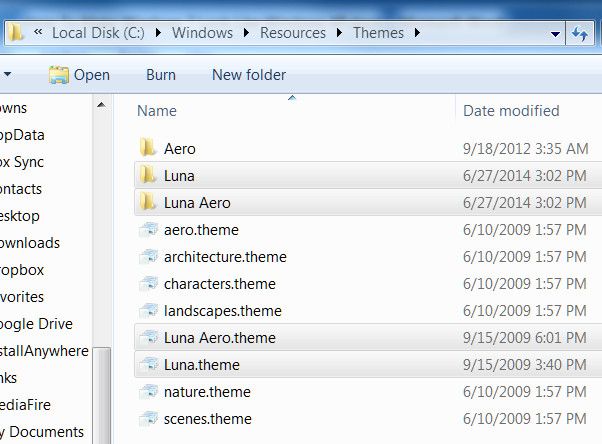
Extract the theme files into your Windows\Resources\Themes directory, usually C:\Windows\Resources\Themes using WinRar or 7-Zip. To use a theme, go back to your desktop, right click on your desktop, and choose «Personalize». Under installed themes, you should now see the Luna and Royale Blue themes. Simply click on either to change your theme.
The XP Custom Start Buttons
 |  |  |
 |  |  |
 | ||