You may encounter situations, when a block of code needs to be executed several number of times. In general, statements are executed sequentially: The first statement in a function is executed first, followed by the second, and so on.
Programming languages provide various control structures that allow for more complicated execution paths.
A loop statement allows us to execute a statement or group of statements multiple times. Given below is the general form of a loop statement in most of the programming languages −
C programming language provides the following types of loops to handle looping requirements.
Sr.No.
Loop Type & Description
1
while loop
Repeats a statement or group of statements while a given condition is true. It tests the condition before executing the loop body.
Executes a sequence of statements multiple times and abbreviates the code that manages the loop variable.
It is more like a while statement, except that it tests the condition at the end of the loop body.
You can use one or more loops inside any other while, for, or do..while loop.
Loop Control Statements
Loop control statements change execution from its normal sequence. When execution leaves a scope, all automatic objects that were created in that scope are destroyed.
C supports the following control statements.
Sr.No.
Control Statement & Description
1
break statement
Terminates the loop or switch statement and transfers execution to the statement immediately following the loop or switch.
Causes the loop to skip the remainder of its body and immediately retest its condition prior to reiterating.
Transfers control to the labeled statement.
The Infinite Loop
A loop becomes an infinite loop if a condition never becomes false. The for loop is traditionally used for this purpose. Since none of the three expressions that form the ‘for’ loop are required, you can make an endless loop by leaving the conditional expression empty.
When the conditional expression is absent, it is assumed to be true. You may have an initialization and increment expression, but C programmers more commonly use the for(;;) construct to signify an infinite loop.
NOTE − You can terminate an infinite loop by pressing Ctrl + C keys.
Windows Programming/Message Loop Architecture
Contents
WinMain [ edit | edit source ]
Programming Windows in C can be a little bit different from what most people are used to. First off, there isn’t a main() function, but instead there is a _tWinMain() function to start your program off. _tWinMain() is defined as a macro in tchar.h as such:
This means that Windows functions can be written easily in Unicode or ASCII. Besides the difference in function name, _tWinMain also has different parameters than the standard main function:
HINSTANCE objects are references to a program instance. hThisInstance is a reference to the current program, and hPrevInstance is a reference to any previously running versions of this same program. However, in Windows NT, the hPrevInstance data object is always NULL. This means that we can’t use the hPrevInstance value to determine if there are other copies of the same program running on your system. There are different ways of checking for other copies of a program running, and we will discuss those methods later.
lpszArgument essentially contains all the information that the argc and argv variables used to show, except that the command-line arguments are not broken up into a vector. This means that if you want to sort individual arguments from the command line, you need to either break them up yourself, or call one of the available functions to break it up for you. We will discuss these functions later.
The last argument, «int iCmdShow» is a data item of type int (integer) that determines whether or not a graphical window should be displayed immediately, or if the program should run minimized.
WinMain has a number of different jobs:
Register the window classes to be used by the program
Create any Windows used by the program
Run the message loop
We will explain each of those tasks in more detail.
Register Window Classes [ edit | edit source ]
Every little graphical detail you see on the screen is known as a «window». Each program with a box around it, each button, each text box are all called windows. In fact, all of these various objects all get created in the same manner. This must mean that there are a large number of options and customizations available in order to get things as different as textboxes and scroll bars from the same method. Each window has an associated «Window Class» that needs to be registered with the system, to specify the different properties of the window. This is done by following 2 steps:
Fill in the fields of the WNDCLASS data object
Pass the WNDCLASS object to the RegisterClass function.
Also, there is an «extended» version of this procedure, that can be followed with similar results:
Fill in the fields of the WNDCLASSEX object
Pass the WNDCLASSEX object to the RegisterClassEx function.
Either of these methods can be used to register the class, but the -Ex version has a few more options.
Once the class is registered, you can discard the WNDCLASS structure, because you don’t need it anymore.
Create Windows [ edit | edit source ]
Creating Windows can be done with the CreateWindow or the CreateWindowEx functions. Both perform the same general task, but again, the -Ex version has more options. You pass some specifics to the CreateWindow function, such as the window size, the window location (the X and Y coordinates), the window title, etc. CreateWindow will return a HWND data object, that is a handle to the newly created window. Next, most programs will pass this handle to the ShowWindow function, to make the window appear on the screen. The way CreateWindow() creates a window is as follows:
The first parameter WS_EX_CLIENTEDGE is the extended window style. Next we have the class name g_szClassName, this tells the system what kind of window to create. Since we want to create a window from the class we just registered, we use the name of that class. After that we specify our window name or title which is the text that will be displayed in the caption, or title bar on our window. The parameter we have as WS_OVERLAPPEDWINDOW is the Window Style parameter. There are quite a few of these and you should look them up and experiment to find out what they do. The next four parameters (CW_USEDEFAULT,CW_USEDEFAULT,240,120) are the X and Y co-ordinates for the top left corner of your window, and the width and height of the window. The X and Y co-ordinates are set to CW_USEDEFAULT to let the window choose where on the screen to put the window. Next, (NULL,NULL,hInstance,NULL) we have the parent window handle , the menu handle, the application instance handle, and a pointer handle to window creation data. In windows, the window on the screen is arranged in a hierarchy of the parent and child windows. When one sees a button on a window, the button is the Child and it is contained within the window that is it’s Parent. In this example, the parent handle is NULL because we have no parent, this is our main or top level window. The menu is NULL for now since we don’t have one yet. The instance handle is set to the value that is passed in as the first parameter of the WinMain(). The creation data that can be used to send additional data to the window that is being created is NULL.
Message Loop [ edit | edit source ]
Once the window is created, the window will interact with the rest of the system by way of messages. The system sends messages to the window, and the window sends messages back. Most programs in fact don’t do anything but read messages and respond to them!
Messages come in the form of an MSG data type. This data object is passed to the GetMessage() function, which reads a message from the message queue, or waits for a new message from the system. Next, the message is sent to the TranslateMessage function, which takes care of some simple tasks such as translating to Unicode or not. Finally, the message is sent to the window for processing using the DispatchMessage function.
Here is an example:
That last line will be explained later.
The Window Procedure [ edit | edit source ]
A window procedure may be named anything you want, but the general prototype for one is as follows:
An LRESULT data type is a generic 32-bit data object, that can be type-casted to contain any 32-bit value (including a pointer). The hwnd parameter is a handle to the window itself. The msg data value contains the current message from the operating system, and the WPARAM and LPARAM values contain the arguments for that message. For instance, if a button is pressed on the keyboard, the msg field will contain the message WM_KEYDOWN, and the WPARAM field will contain the actual letter pressed (‘A’ for instance), and the LPARAM field will contain information on whether or not the CTRL, ALT, or SHIFT buttons are down, and whether the type-matic repeat function has been triggered. Several macros have been defined that are very useful in separating out the WPARAM and LPARAM into different sized chunks:
LOWORD(x) returns the low 16-bits of the 32-bit argument HIWORD(x) returns the high 16-bits of the 32-bit argument LOBYTE(x) returns the low 8-bits of the 16-bit argument HIBYTE(x) returns the high 8-bits of the 16-bit argument
For instance, to access the 2nd byte in the wParam field, we will use the macros as follows:
Since the window procedure only has two available parameters, these parameters are often packed with data. These macros are very useful in separating that information out into different fields.
Here is an example of a general Window Procedure, that we will explain:
Most window procedures only contain a simple loop that searches for particular messages from the system, and then acts on them. In this example, we are only looking for the WM_DESTROY message, which is the message that the kernel sends to the window when the window needs to close. In response to the WM_DESTROY message, the window calls the PostQuitMessage function, which puts a WM_QUIT message (which is defined as 0) into the message queue. When the message loop (described above) gets the WM_QUIT message, it breaks from the loop, and returns the value from the PostQuitMessage function.
Any message that is not handled by the loop should be (must be) passed to the DefWindowProc function. DefWindowProc will perform some default actions based on the messages received, but it won’t do anything interesting. If you want your program to do something, you will need to handle these messages yourself.
Messages [ edit | edit source ]
There are a few other messages that we will talk about later on:
WM_CREATE Your window receives this message only once, when it is first created. Use this message to perform tasks that need to be handled in the beginning, such as initializing variables, allocating memory, or creating child windows (buttons and textboxes). WM_PAINT This message indicates that it is time for the program to redraw itself. Use the graphical functions to redraw whatever is supposed to be on the window. If you don’t draw anything, then the window will either be a boring white (or grey) background, or if the background was not erased, will keep whatever image is already shown on it (which looks unstable.) WM_COMMAND This is a general message that indicates that the user has done something on your window. Either the user has clicked a button, or the user has selected a menu item, or the user has pressed a special «Accelerator» key sequence. The WPARAM and LPARAM fields will contain some descriptions on what happened, so you can find a way to react to this. If you do not process the WM_COMMAND messages, the user will not be able to click any buttons, or select any menu items, and that will be very frustrating indeed. WM_CLOSE The user has decided to close the window, so the kernel sends the WM_CLOSE message. This is the final chance to preserve the window as necessary — if you don’t want it closed completely, you should handle the WM_CLOSE message and ensure that it does not destroy the window. If the WM_CLOSE message is passed to the DefWindowProc, then the window will next receive the WM_DESTROY message. WM_DESTROY The WM_DESTROY indicates that a given window is removed from the screen and will be unloaded from memory. Normally, your program can post the WM_QUIT message to exit the program by calling PostQuitMessage().
These are some of the most basic messages, and we will discuss other messages as the need arises.
— Hint SendMessage(hwnd,MACRO,NULL,NULL) can be used to send user defined messages.
FreeAps и Loop для «Чайников»
FreeAps и Loop для «Чайников» – именно для самых начинающих эта статья, после прочтения вы сможете ориентироваться и понимать, что же вам нужно будет в дальнейшем, а что может и не понадобится!
FreeAps и Loop для «Чайников» – именно так решил назвать эту статью, ведь начиная знакомиться с этой темой ты себя именно таким прибором и ощущаешь, благо есть кому помочь! Сегодня расскажу про первые недели с FreeAps (искусственная поджелудочная железа на телефонах Айфон). Изначально я избегал этой темы и про «петли» знал очень мало, хотя в мониторингах немного «руку набил».)) Поэтому сейчас я лишь немного отличаюсь от обычного пользователя, который решил себя или своего близкого так «проапгрейдить». После статьи будут ссылки на полезную информацию с которой обязательно рекомендую ознакомиться перед использованием данной системы.
Первое, что можно сказать о FreeAps или Loop – это приложения на Айфон, которые получают данные от мониторинга, углеводы, которые вы вводите, также там указана ваша чувствительность к инсулину и углеводам и с помощью коробочки Райли телефон может «увидеть» помпу и управлять ей.
FreeAps это тот же Loop, который доработал Иван Вальков (в который раз звучит его имя), в нём добавлена возможность использовать «микроболюсы» и работа с Найсткаут, так как Loop прежде всего был «заточен» под Dexcom и теперь его можно использовать практически с любым мониторингом.
Преимущества ИПЖ
(искусственной поджелудочной железы)
FreeAps/Loop:
Выключение подачи базального инсулина при угрозе низкого сахара;
Управление помпой через телефон, где всё на русском языке и удобно, помпу при этом вы уже не достаёте для ввода инсулина – всё через телефон, что позволит засунуть её подальше и не морочиться с доставанием, это касается проводных помп, беспроводная и так управляется с пульта;
Пользователи Омнипод могут сэкономить хорошую сумму не покупая пульт и потратить их на дополнительную расходку, а это примерно на 2 месяца;
Приложение само управляет помпой, когда мы спим/заняты и пытается самостоятельно привести сахар к заданным в настройках значениях и в большинстве случаев, если прыжки сахара не резкие довольно успешно справляется, что позволяет немного расслабиться во время болезни (всякие белки/жиры отлично скалываются и не приходится играть в игру “угадай, когда вылезут белки”);
Нет долгого обучения как в Android APS, интерфейс предельно простой и интуитивно понятный;
Недостатки ИПЖ FreeAps/Loop:
За мониторингом нужно следить очень тщательно, ведь это главный источник информации для приложения и подольше шумящие сенсоры носить не получится;
ИПЖ не освобождает вас от пауз, подсчёта углеводов и планирования своего питания, но значительно облегчает эту работу;
Быстро сколоть высокий сахар, как мы привыкли-не получится, система пытается сделать это более плавно, но и высокий СК в течении долгого времени тоже не радует, благо это можно немного изменить в настройках;
Нужно много изучить и переварить информации, ведь вы должны понимать и разбираться во всех основных моментах ИПЖ и понимать всю ответственность;
Вы не сможете удалённо управлять помпой, также в FreeAps/Loop не может изменять чувствительность к инсулину “на ходу” как Android APS, но это можно сделать вручную;
FreeAps – это самая простая система ИПЖ, которая нам сейчас доступна. Настроек не катастрофически много и если вы знаете свои коэффициенты, то проблем не будет, а если не знаете, то придётся узнать!)) Но из-за простоты и функционал ниже. Я считаю, что «стартовать» с неё самый простой вариант, особенно если в вашей семье есть Айфон.
От 6S и выше, сейчас работают и более ранние модели, но только с Loop.в дальнейшем они не будут получать обновления ОС и это не позволит загружать новые версии нужных нам приложений, но оптимальный вариант это Айфон 8 или SE 2020).
Следующий шаг, после того как вы решили, что эта ИПЖ ваша – выбор помпы и мониторинга (если их у вас ещё нет).
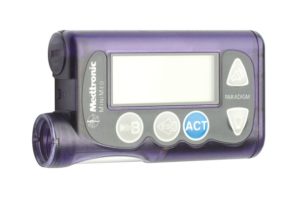
Помпы:
Medtronic 515/715 (все прошивки);
Medtronic 522/722 (все прошивки);
Medtronic 523/723 (с прошивкой 2.4A или ниже);
Medtronic 554/754 очень старые , новые не подойдут(европейские Veo, с прошивкой 2.6A или ниже; ИЛИ канадские Veo с прошивкой 2.7A или ниже)
Omnipod (Eros). Требуется RileyLink 433MHz для работы
Для помп Medtronic требуется RileyLink 916MHz для работы
Как видите тут в большинстве случаев используются только старые помпы и вам придётся их брать с рук б/у. Новые помпы Medtronic 722 ещё выдавали недавно в России и тогда вам подойдёт любая прошивка. Б.у. помпы можно ецё купить за вполне небольшие деньги у людей кто этим занимается (в среднем цена таких помп колеблется от 200$ до 600$ в зависимости от состояния).
Что такое RileyLink или Райли – маленькая коробочка (как спичечный коробок), которая носится в кармане, рюкзаке, сумке и позволяет вашему телефону «увидеть» радио-сигнал от вашей помпы и управлять ей.
Для помп Medtronic и Omnipod (Eros) нужна разная частота, связи и покупаются Райли с разными антенами, в Orange их две.
Цена Райли 150-300$.
Информация по покупке RileyLink и аналогов – RileyLink
Внимание будущие или нынешние пользователи Omnipod (Eros), которые имеют Айфон или Андроид (а это 100% пользователей) – гораздо лучше и дешевле купить Райли и использовать свой телефон в качестве пульта, чем покупать сам пульт и подключать ИПЖ для этого не обязательно, вы можете использовать FreeAps на телефоне+Райли в качестве пульта. Если учесть, что новый пульт стоит примерно 600 евро, а Райли 200$ – можно почувствовать разницу!
Также стоит упомянуть Orange от Семёна Кейзера – простыми словами это Райли с двумя антеннами, которой может работать и с Medtronic и с Omnipod (Eros). Для чего же это нужно – спросите вы?! И будете не правы – многие носят эти помпы в зависимости от обстоятельств, например на пляже или вообще летом более удобен Omnipod, так как не нужно постоянно отстёгивать проводную помпу, а в большинстве случаев лучше Medtronic из-за гораздо меньшей цены на расходные материалы. Сам Orange по размеру – точная копия наушников Apple AirPods первого поколения и на них можно подобрать любые чехлы, которых имеется великое множество. Также они работают от простых “мизинчиковых” батарей ААА, что позволяет быструю замену в случае внепланового окончания заряда, а так бросил в сумку пару запасных и не паришься о заряде.
Мониторинг
Теперь нужно определиться с мониторингом, а так как на Айфонах нет самой лучшей программы Xdrip+ – с этим вопросом придётся поморочиться.
Dexcom G5 можно подключить к FreeAps или Loop с помощью:
Родного приложения Dexcom G5 – каждых 7 дней нужно будет перезапускать сенсор и ждать прогрев 2 часа, для скачивания приложения нужно сменить регион Apple ID, при этом слетают все подписки или установить новую учётную запись с регионом Германия или Великобритания и потом вернуться обратно.
Spike – приложение нужно подписывать за деньги или собирать самому и это задача далеко не простая для рядового пользователя. Также приложение уже не обновляется и скоро потеряет актуальность, хотя интерфейс очень дружественный.
xDrip4ios – немного непривычный интерфейс и отсутствие русского языка может отпугнуть многих пользователей, но свои функции он выполняет испарвно.
Dexcom G6 можно подключить к FreeAps или Loop с помощью:
Родного приложения Dexcom G6 – каждых 10 дней нужно будет перезапускать сенсор и ждать прогрев 2 часа, для скачивания приложения нужно сменить регион Apple ID, при этом слетают все подписки или установить новую учётную запись с регионом Германия или Великобритания и потом вернуться обратно.
Spike и xDrip4ios работают только со старыми трансмиттерами и только в режиме G5.
Freestyle Libre 1
С Bubble используем приложение DiaBox, но в настройках FreeAps выбираем не DiaBox, а Nightscout и прописываем локальный сервер, который указан DiaBox, иначе при калибровках в DiaBox – FreeAps будет отображать данные без калибровок и делать вычисления по ним это вам не нужно абсолютно.
С Miao-Miao используем xDrip4ios или Spike (для Miao-Miao 2 нужно делать понижение прошивки и лучше это делать на телефоне Андроид). Можно использовать Tomato и загружать данные через Nightscout.
Freestyle Libre 2
Используем приложения DiaBox или xDrip4ios – они умеют «читать» сенсор без трансмиттера и передавать данные в Nightscout, откуда их можно загрузить в FreeAps.
Обязательно посмотреть это видео с описанием всех нюансов работы от разработчика FreeAps Ивана Валькова:
Посмотреть интерфейс и как выглядит программа можно в видео Семёна Кейзера об этом:
Мои впечатления
Мои впечатления от использования системы только положительные, но пришлось немного напрячься – практически все продукты не ленится и взвешивать на весах, а также откинуть жабу, которая давила при шумящем сенсоре и шептала на ушко “можно ещё пару дней походить!” Ну и конечно мой Айфон стал больше просить заряд-расход батареи возрос примерно на 15-20% и это нужно учитывать при планировании и иметь под рукой устройства для зарядки или чехол с батареей.
Безопасность
По поводу безопасности – у меня был момент с Либрой 1 + Бабл, когда загнулся усик и система начала показывать ровную линию, я был очень занят и удивился, когда FreeAps перестал принимать данные гликемии с DiaBox, а я ничего не мог с этим поделать. И только через время я обратил внимание на идеально ровную прямую мониторинга-сработала система безопасности ИПЖ, которая при получении 4 абсолютно одинаковых показаний прекращает свою работу и это очень хорошо.
Ваша безопасность состоит в том, чтобы внимательно следить за мониторингом и он показывал адекватные показания, а для этого нужно просто почаще проверять показания глюкометром во избежание проблем.
Выводы
Что мы получаем в итоге всех этих телодвижений – систему, которая может “подстраховать” и значительно облегчить жизнь вам или вашему близкому – взять на себя заботы о непонятных подъёмах сахара и сглаживания ваших просчётов с одной стороны, но за этой системой нужен уход и навыки обслуживания (знание своей чувствительности к инсулину и углеводам, знание и понимание работы системы мониторинга, решение основных проблем с их работой), хотя эти навыки и знания должны быть у любого человека с диабетом и тут принцип “поставлю, а потом разберусь” не очень работает, так как вам придётся очень много разгребать за маленький период времени и мозги просто “вспухнут”, поэтому рекомендую изучить закреплённое сообщение из группы Loop/FreeAps внизу, а потом задать вопросы в группе или комментариях.
Где скачать Loop/FreeAPS?
И тут нам поможет группа Telegram по этой ИПЖ в которую можно зайти по этой ссылке.
Скачать Loop невозможно! Можно или собрать самостоятельно, или попросить чтоб его собрали за вас (у знакомых, либо по инструкции ниже).
Информация по установке Loop:
– Ветка Loop Master – Master – Ветка Loop Dev – Dev – Ветка Loop Automatic Bolus – Automatic Bolus
Информация по установке Loop с поддержкой Spike:
– Ветка Loop Master – Master – Ветка Loop Dev – Dev – Ветка Loop Automatic Bolus – Automatic Bolus – Документация по сборке с поддержкой Spike – Документация
Информация по установке FreeAPS:
– Исходный материал для самостоятельной сборки – FreeAPS – Инструкция по самостоятельной сборки – Инструкция – Новости и информация по доработкам FreeAPS – Новости FreeAPS – Как получить FreeAPS, не имея возможности собрать самостоятельно – Инструкция – Поддержать проект – Поддержка проекта
Дополнительная информация:
– Информация по покупке RileyLink и аналогов – RileyLink – Что такое система ИПЖ, какие бывают и с какими помпами работают – Обзор инсулиновых помп и спецификации ИПЖ
Статья будет дополнятся по мере наполнения моих знаний и новой информации.

 Помпы:
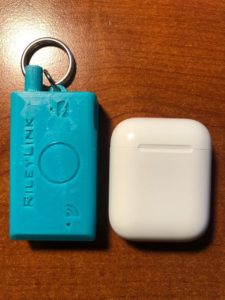 Что такое RileyLink или Райли – маленькая коробочка (как спичечный коробок), которая носится в кармане, рюкзаке, сумке и позволяет вашему телефону «увидеть» радио-сигнал от вашей помпы и управлять ей.
 Также стоит упомянуть Orange от Семёна Кейзера – простыми словами это Райли с двумя антеннами, которой может работать и с Medtronic и с Omnipod (Eros). Для чего же это нужно – спросите вы?! И будете не правы – многие носят эти помпы в зависимости от обстоятельств, например на пляже или вообще летом более удобен Omnipod, так как не нужно постоянно отстёгивать проводную помпу, а в большинстве случаев лучше Medtronic из-за гораздо меньшей цены на расходные материалы. Сам Orange по размеру – точная копия наушников Apple AirPods первого поколения и на них можно подобрать любые чехлы, которых имеется великое множество. Также они работают от простых “мизинчиковых” батарей ААА, что позволяет быструю замену в случае внепланового окончания заряда, а так бросил в сумку пару запасных и не паришься о заряде.
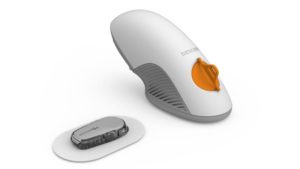 Dexcom G6 можно подключить к FreeAps или Loop с помощью:
 Freestyle Libre 1


