- Как изменить фон экрана входа в систему в Windows 10
- Как изменить фон экрана входа в систему в Windows 10
- Как изменить фон экрана входа в систему в Windows 10 используя приложение Windows 10 Login Screen Background Changer (для старых версий Windows 10)
- Новая версия программы
- Can’t change lock screen image in windows 10
- Replies (92)
- How to change default lock screen image in Windows 10
- About Sergey Tkachenko
- 43 thoughts on “ How to change default lock screen image in Windows 10 ”
Как изменить фон экрана входа в систему в Windows 10

В данной статье показаны действия, с помощью которых можно изменить фон экрана входа в систему в операционной системе Windows 10.
В операционной системе Windows 10 начиная с версии 1607, разработчики компании Microsoft добавили возможность изменения фонового рисунка экрана входа в систему. Данный функционал доступен в приложении «Параметры Windows» и теперь можно легко изменить фон экрана входа в систему.
По умолчанию данная опция включена и фон экрана в систему отображает то же изображение что и на экране блокировки в зависимости от выбранной опции в настройках экрана блокировки.
Также стоит отметить, что установить разные фоновые рисунки для экрана входа и для экрана блокировки не получится
Как изменить фон экрана входа в систему в Windows 10
Чтобы проверить или включить/отключить фон экрана входа в систему, откройте приложение «Параметры Windows», для этого нажмите на панели задач кнопку Пуск и далее выберите Параметры  , или нажмите сочетание клавиш
  + I.
+ I.

В открывшемся окне приложения «Параметры Windows» выберите Персонализация.

Затем выберите вкладку Экран блокировки , и в правой части окна установите переключатель Показывать на экране входа фоновый рисунок экрана блокировки в положение Вкл.

Также здесь в настройках экрана блокировки, можно установить в качестве фонового рисунка экрана входа в систему изображение Windows: интересное , Фото или Слайд-шоу , выбрав соответствующий пункт выпадающего списка Фон.

Выбранное вами изображение станет фоном экрана входа в систему и фоном экрана блокировки.

Если вы отключите данную опцию, то экран входа в систему будет отображать сплошной цвет, который выбран в настройках главного цвета фона, например как на скриншоте ниже.

Как изменить фон экрана входа в систему в Windows 10 используя приложение Windows 10 Login Screen Background Changer (для старых версий Windows 10)
Данный способ использует приложение «Windows 10 Login Screen Background Changer».
Если Вы используете Windows 10 Anniversary Update (версия 1607 ) или более поздние версии, то данный способ более не актуален и использование программ представленных ниже нарушают работу системного файла Windows.UI.Logon.pri, вследствии чего вход в систему становится невозможным.
Приложение «Windows 10 Login Screen Background Changer» позволяет установить в качестве фона экрана входа в систему изображение из вашей коллекции или нужный однотонный цвет.
Запустите приложение от имени администратора , для того чтобы изменить фон, нажмите кнопку Browse for an image, выберите нужное вам изображение и нажмите кнопку Change background.

Подождите пока приложение выдаст вам уведомление (Done, Lock your computer to see your new background — Готово, заблокируйте ваш компьютер чтобы посмотреть ваш новый фон) в диалоговом окне, нажмите кнопку OK .

Если же Вы хотите выбрать какой-либо цвет, нажмите кнопку Choose a color и выберите нужный цвет, нажмите кнопку Change background, также дождитесь пока приложение выдаст вам уведомление (Done, Lock your computer to see your new background — Готово, заблокируйте ваш компьютер чтобы посмотреть ваш новый фон) в диалоговом окне, нажмите кнопку OK .

Перед использованием приложения «Windows 10 Login Screen Background Changer» вам сначала нужно получить полный доступ к папке C:\\Windows\\SystemResources\\Windows.UI.Logon, в которой хранятся файлы интерфейса экрана входа в систему, программа автоматически создаст backup файл Windows.UI.Logon.pri.bak в этой же папке.
Все остальные файлы требующиеся для работы приложения хранятся в папке:
Также перед использованием приложения рекомендуется создать точку восстановления системы
Приложение «Windows 10 Login Screen Background Changer» абсолютно бесплатное, и имеет английский язык интерфейса.
Windows 10 Login Background Changer.zip.
Новая версия программы
Новая версия программы называется «W10 BG Logon Changer-1.0.2.0» и выполнена в стиле универсального Metro/ModernUI интерфейса.
Теперь не нужно получать права доступа к папке C:\\Windows\\SystemResources\\Windows.UI.Logon, программа делает это автоматически. После распаковки архива, в папке с программой также присутствуют dll-файлы (динамически подключаемые библиотеки) которые нужны для работы программы, без них программа не запустится.
«W10 BG Logon Changer» также как и предыдущая версия на английском языке.
В «W10 BG Logon Changer» появилась возможность выбора разрешения экрана.
Скриншот новой версии программы «W10 BG Logon Changer».

Скриншоты изменённого экрана входа в систему.
Can’t change lock screen image in windows 10
Since upgrading to windows 10 from 8.1 I haven’t been able to change my lock screen backround image to anything other than the default one. When I go to my personalization settings and try to select an image, I don’t even get any choises (see screenshot).
Setting an image as lock screen through the pictures app doesn’t help either, I just get an error message saying that it can’t be set as lock screen. I’ve seen similar posts around but haven’t managed to find a working solution.
Sorry, the screenshots are in Finnish.
Replies (92)
* Please try a lower page number.
* Please enter only numbers.
* Please try a lower page number.
* Please enter only numbers.
![]()
Thank you for posting the query on Microsoft Community.
As per the description I understand that you are unable to change the Lock screen image. We sincerely regret for the inconvenience caused.
Let us follow the below methods and check if it helps:
Method 1: You may follow the steps provided below and check if it helps to resolve the issue.
- Right-tap the lower-left corner on the desktop to open the Quick Access Menu , and open Run CMD .
- Type “ gpedit msc” in the Command Prompt window and hit Enter .
- Find and open the setting named » Prevent changing lock screen image «.
- For your information, it is located in ComputerConfiguration >Administrative Templates >Control Panel >Personalization.
- As the setting’s window opens, choose Not Configured and tap OK .
- The other alternative method is to disable this setting. In other words, select Disabled and click OK in the window above.
- After that try to change the screen image.
For more information please refer the link below.
If the issue persists follow Method 2
Method 2: A clean boot is performed to start Windows by using a minimal set of drivers and startup programs. This helps eliminate software conflicts that occur when you install a program or an update or when you run a program in Windows.
Please refer to the below article on how to perform a clean boot to know “How to reset the computer to start normally after clean boot troubleshooting”
NOTE: A clean boot is performed to start Windows by using a minimal set of drivers and startup programs.
Please let us know if you need further assistance.
How to change default lock screen image in Windows 10
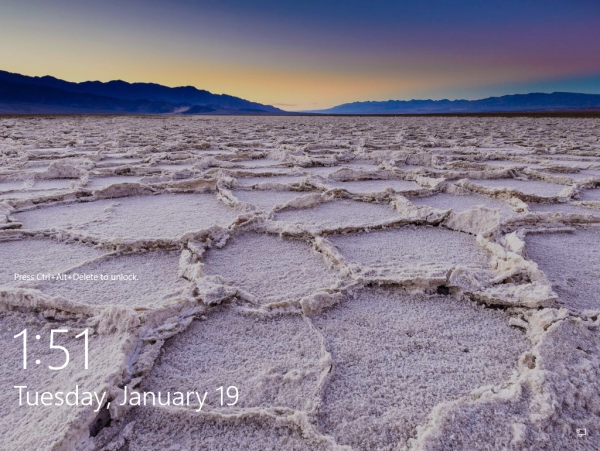
In Windows 10, the lock screen image is shown in a number of cases. For instance, if you locked your user session using Win+L or by clicking the user image in the Start Menu, the lock screen image will appear and show the image which is set in your Settings -> Personalization -> Lock screen. But if you sign out or the screen is locked at the user list screen, then Windows 10 shows another image. This is the default lock screen. So, there are two completely separate lock screens in Windows 10. Here is how you can set the default lock screen image in Windows 10.
And this is the default lock screen image set in my Windows 10: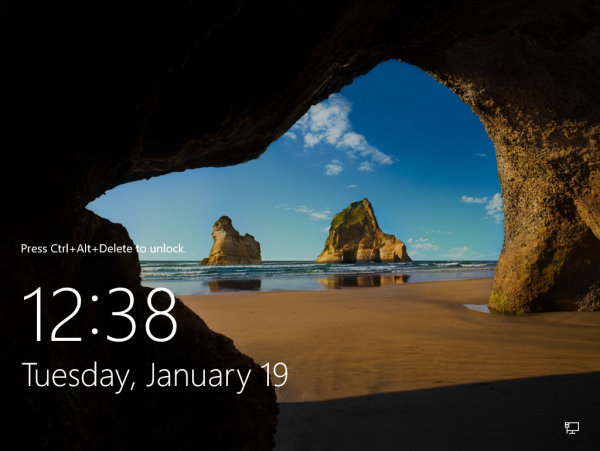
As you can see from the screenshots above, they are two different images.
Unlike the per-user lock screen image, the default one cannot be changed using the Settings app. Here is how to change default lock screen image in Windows 10.
It can be done with a simple Registry tweak. Just do the following.
Tip: How to jump to the desired registry key with one click.
If you have no such key, then just create it.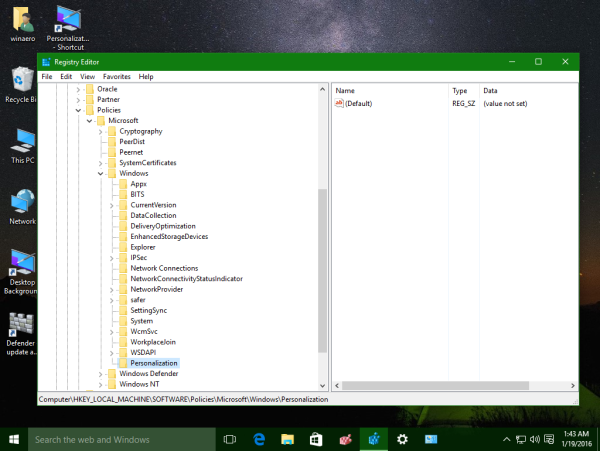
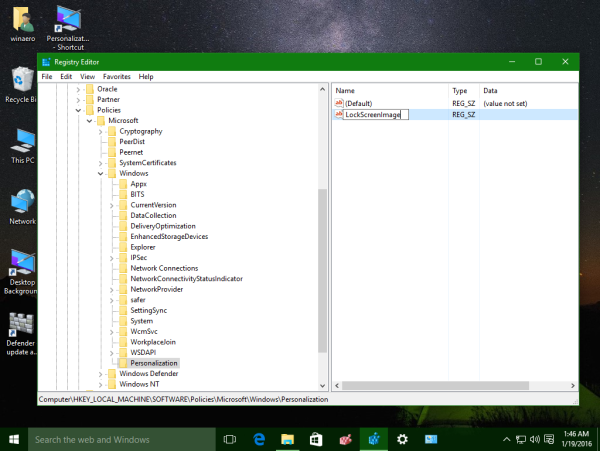 Set its value data to the full path of the desired image which will be used as the lock screen image:
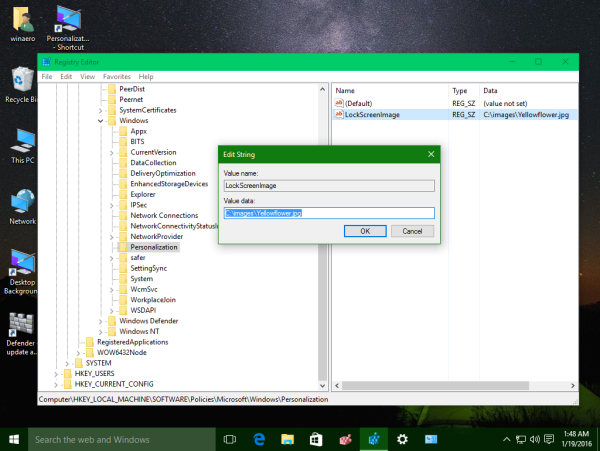
Now the default lock screen background will be set to the specified image: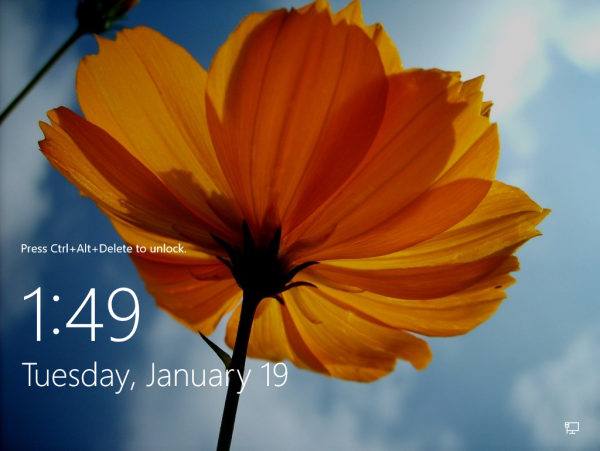
The user lock screen image will remain unchanged:
The only limitation of this trick is Windows Spotlight. It is not possible to enable it for the default Lock screen.
The same can be done using Winaero Tweaker. Go to Appearance -> Default Lock Screen Background: 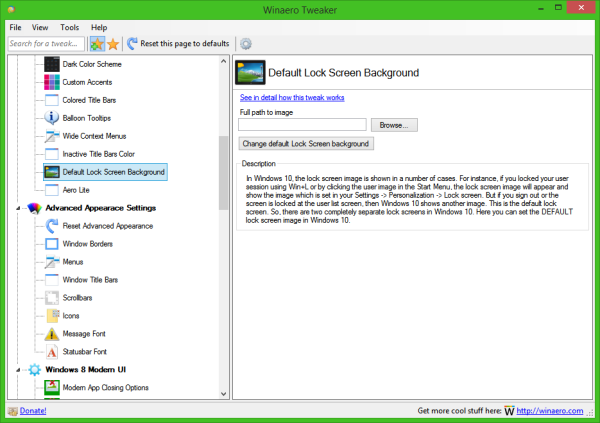
Use this option to avoid Registry editing.
You also might be interested in disabling the Lock screen completely. See this article: How to disable the Lock Screen in Windows 10.
If you have any questions or suggestions related to this tweak, you are welcome to comment.
Winaero greatly relies on your support. You can help the site keep bringing you interesting and useful content and software by using these options:
Share this post
About Sergey Tkachenko
Sergey Tkachenko is a software developer from Russia who started Winaero back in 2011. On this blog, Sergey is writing about everything connected to Microsoft, Windows and popular software. Follow him on Telegram, Twitter, and YouTube.
43 thoughts on “ How to change default lock screen image in Windows 10 ”
Any tips on changing the log in screen?
A registries key above, or nothing.
for some reason, within the tweaker I am unable to see any of my .jpg photos to add as a new default lock screen. is there a reason for this?
I am an idiot…..nevermind….just found the selector for which types of files it searches for. starts out on .png hence the confusion
On your right-bottom there is a hint.
Were is the default lock screen image for Windows 10 located. Somehow I have managed to get mine set to my most recent Spotlight image. I know this is not supposed to be possible but it has happened. I would like the beach cave image back. Thanks.
Look in C:\Windows\Web\Screen. It and the other default images live there.
I know this changes the *default* lock screen image, but is there a way to change the *user* lock screen image through the registry? Yes, specifically through the registry, and not through the personalization menu.
This feature does not work on Windows 10 anniversary edition. In fact it also messes up the ability to change lock screen settings. Once you set this the option to change the lock screen just has a message at the top saying this is controlled by your company. It also changes the ability to change the diagnostic and usage settings from full to basic or enhanced. it again just says this option is controlled by your company.
I am running Windows 10 anniversary HOME edition.
Doesnt WORK in version 1607:; Build ; 14393.105
and i can’t put the normal background , even if i Delete the registryt values .
!
Doesn’t work in Anniversary Update (1607). Well, it does work but it makes it where the user cannot change their lock screen. That’s a problem. I just want to change the DEFAULT lock screen.
Why is it doing this?
It forces the image for ALL lockscreens.
The most suitable option to use the same image for all lockscreen at once.
Not so convenient, but this is all that Microsoft allows us.
What do you mean by “use the same image for all lockscreen at once?” Just not sure what that means.
In short, I meant the following.
1. Revert the tweak.
2. Change the user lock screen image.
3. Apply the tweak again.
Same result. It locks so that the user can’t change it.
After you reverted the tweak, try to do the following.
Open the command prompt and type
gpupdate /force
The result should be as follows:
C:\Users\Winaero>gpupdate /force
Updating policy…
Computer Policy update has completed successfully.
User Policy update has completed successfully.
Then restart your PC.
This should restore the ability to change the user lock screen.
Definitely this tweak now does not work as before in the Anniversary Update, if you have auto logon enabled.
If you have to put in your password on logon, it does seem to still work.
With auto logon enabled you can have the cave picture or a plain colour, no alternative image seems to be possible.
🙁
Why do people use autologon?
This did not work for me, and i have tried everything. There is no way to change the Lock screen that is displayed when you first boot your PC. if Anything, the best i was able to do was to turn off the lock screen. everyone has a salutation for this, none of them work.
This did not work. I tried manually updating the registry and using the software. Same result. Still shows the beach cave image. Anyone have any ideas?
try to run gpupdate /force in the elevated command prompt after you changed the Registry.
This doesn’t seem to work with the April 2018 version of Windows 10. I tried it numerous times with JPEG and PNG images without luck. Possibly the structure of the settings has been changed by Microsoft.
Same problem, and i had several bluescreens while trying
2019.01.22
I had trouble with Lock and Logon background images refusing to change regardless of what I tried until I deleted (renamed) the two files: roaming.lock and settings.dat found at:
\AppData\Local\Packages\Microsoft.Windows.ContentDeliveryManager_\Settings
I hope this helps others having similar difficulties. Perhaps this seemingly safe and easy action could be added under-the-hood of the WinAero action of changing the lock screen.
Definitely doesn’t work in Win10 1903.
I’ve found a solution that works on the latest Windows 10 Pro Build 1903.
1. Go to C:\Windows\Web\Screen and take the ownership of img100.jpg
2. Rename it.
3. Copy an image you like to this folder as img100.jpg
4. Use the Winaero Tweaker or the above “How to change default lock screen image in Windows 10” with the same picture that you will put in other folder.
5. To be on the sure side Open CMD prompt as Administrator and write: gpupdate /force
6. Restart your PC.
The picture in default lock screen image will change.
(It will take few days until the Lock screen picture will change. In my case it took 3 days).
This worked for me with the latest Windows 10 Pro Build 1903:
1. Create the following folder if it does not exist: C:\Windows\System32\oobe\info\backgrounds
2. Copy a JPG image you like to this folder and name it backgroundDefault.jpg
3. In the Registry Editor, browse to HKLM\SOFTWARE\Policies\Microsoft\Windows\Personalization and ensure that the following properties exist with the specified values:
[REG_SZ] “LockScreenImage”: “C:\Windows\System32\oobe\info\backgrounds\backgroundDefault.jpg”
[REG_DWORD] “NoLockScreen”: “0x00000001 (1)”
Alternatively, here are the contents of a .REG file:
[HKEY_LOCAL_MACHINE\SOFTWARE\Policies\Microsoft\Windows\Personalization]
“LockScreenImage”=”C:\\Windows\\System32\\oobe\\info\\backgrounds\\backgroundDefault.jpg”
“NoLockScreen”=dword:00000001
4) The change should take effect immediately. If not, open a CMD prompt as Administrator and execute the following command: gpupdate /force
A few of these techniques work for me, Win10 v1803, 1809, 1903
WORKS – ToneDeF method using OOBE
WORKS – WinAero (original posting) registry ‘Personalization’
However – All of these (and other) methods only seem to work if the image is the same resolution as the current monitor setting. More specifically, the image displays at 1:1 resolution, so if you have a company logo or image that starts on the left, or right, it may be cropped. The lockscreen does not scale.
Worse is when there are multple users that each use a different monitor resolution. These methods do not work proper.
My solution, which is clumsy and high maintenance – until I find a better method is to replace the actual displayed lockscreens with the actual screen sizes that Windows detects and displays. These are located in a system locked folder at: C:\ProgramData\Microsoft\Windows\SystemData\ and within this folder are folders for each user, and each screen resolution you have. The system folder is .\S-1-5-18\ReadOnly\
To manage this, you need to take ownership such as:
takeown /F C:\ProgramData\Microsoft\Windows\SystemData /R /D N
Then allow access:
icacls C:\ProgramData\Microsoft\Windows\SystemData /grant
Baffling why Microsoft chooses to make such a superficial cosmetic task a key system component and rewrite the settings every major update.
We use a script to cleanup all the Microsoft junk, unwanted and forces changes and other things constantly.
01.2020 Win10 Gome 1909
Is there a way to do it on Windows 10 HOME edition? I’ve tried everything from above and nothing works.
Bummer, leave it to Micro$oft for such a terrible design. Will they ever learn? I seriously doubt it. So many repeated mistakes version after version leads me to believe such things are by design to support 3rd party insiders to give them business.
I tried the winareo tweaker on 1909 I just installed but it fails and says “Setup was unable to create the directory C:\Users\myuser
1\AppData\Local\Temp\js-SQ9SU.tmp Error 2: The system cannot find the file specified.”
That looks like a programming error to me. I’m using version 0.16.1.0 of winareo.
The installer has no access to your temp directory for some reason. It is a permission issue.
Thanks for that info, but it is a temp directory setup either by microsoft or your app. I manually created a folder in that directory without issue, so if a permissions issue it’s due to how microsoft views your app, at least that’s my best guess.
The temp folder is buried a few layers deep under AppData, a hidden folder.
Might consider *DATING* these articles!
Tech moves along rather quickly, you know.
They are DATED.
Below the text!
I tried. The articles refused to go out with me on a date.
First, thank you for your great WinAero Tweaker and it’s nice descriptions on here!
Second, you missed the key “DisableLockScreenAppNotification” to proove the lock screen will work.
So this are the commands i always use:
(Assuming your picture in %windir%\System32\oobe\info\backgrounds\backgroundDefault.jpg)
reg.exe ADD HKLM\SOFTWARE\Policies\Microsoft\Windows\Personalization /v LockScreenImage /t REG_SZ /d C:\Windows\System32\oobe\info\backgrounds\backgroundDefault.jpg /f 1
reg.exe ADD HKLM\SOFTWARE\Policies\Microsoft\Windows\System /v DisableLogonBackgroundImage /t REG_DWORD /d 0 /f
reg.exe ADD HKLM\SOFTWARE\Policies\Microsoft\Windows\System /v DisableLockScreenAppNotification /t REG_DWORD /d 1 /f 1
This article is not for your user account’s lockscreen but for the DEFAULT lockscreen. The default is the one which appears when no account is signed in. Got it?
You should mention, that this way of doing is only working on Windows 10 Enterprise or Education Editions.
For all WIndows 10 editions, including Home, you have two different solutions:
SOLUTION 1 – Changing Default LockScreen Image:
================================================
Attention: Be aware, that icacls using Administator name depending on your language!
Same thing with “echo F” for saying “file” at the xcopy file or folder question!
Do it better if you’re smarter out there 🙂
:: set some good to know keys
reg.exe ADD HKCU\SOFTWARE\Microsoft\Windows\CurrentVersion\ContentDeliveryManager /v RotatingLockScreenEnabled /t REG_DWORD /d 0 /f
reg.exe ADD HKCU\SOFTWARE\Microsoft\Windows\CurrentVersion\ContentDeliveryManager /v RotatingLockScreenOverlayEnabled /t REG_DWORD /d 0 /f
reg.exe ADD HKLM\SOFTWARE\Policies\Microsoft\Windows\Personalization /v NoLockScreen /t REG_DWORD /d 0 /f
reg.exe ADD HKLM\SOFTWARE\Policies\Microsoft\Windows\System /v DisableLockScreenAppNotification /t REG_DWORD /d 1 /f
reg.exe ADD HKLM\SOFTWARE\Policies\Microsoft\Windows\System /v DisableLogonBackgroundImage /t REG_DWORD /d 0 /f
:: take ownership of folder, backup old image, copy new image
:: replace MyNewImage.png with your full image path
TAKEOWN /F %WINDIR%\Web\Screen\ /R /A /D J
ICACLS %WINDIR%\Web\Screen\ /grant Administrators:F /T
REN C:\Windows\Web\Screen\img100.png img100.png.backup.%date%
echo F | xcopy /C /H /R /Y “MyNewLockScreenImage.png” “C:\Windows\Web\Screen\img100.png”
cd %ProgramData%\Microsoft\Windows
takeown /F SystemData\ /R /A /D J
ICACLS SystemData\S-1-5-18\ReadOnly\LockScreen_Z\ /grant Administrators:F /T
del /Q /F SystemData\S-1-5-18\ReadOnly\LockScreen_Z\*.*
SOLUTION 2 – Use the “CSP” Registry Keys
================================================
This takes effect immediatly without reboot or logoff. The images are changed, but the lockscreen option at the pc settings is now locked. The user cant change the image anymore if this keys are set.
reg.exe ADD HKLM\SOFTWARE\Microsoft\Windows\CurrentVersion\PersonalizationCSP /v LockScreenImagePath /t REG_SZ /d “MyNewLockScreenImagePath.png” /f
reg.exe ADD HKLM\SOFTWARE\Microsoft\Windows\CurrentVersion\PersonalizationCSP /v LockScreenImageUrl /t REG_SZ /d “MyNewLockScreenImagePath.png” /f
reg.exe ADD HKLM\SOFTWARE\Microsoft\Windows\CurrentVersion\PersonalizationCSP /v LockScreenImageStatus REG_DWORD /d 1 /f
Thanks for Solution 2 “PersonalizationCSP” !
In Windows 10 1909 and 2004 (and possibly others going back) the GPO method does not work outside of Enterprise and Education SKUs. WinAero should be updated to not make this option available if running on a machine that doesn’t support the GPO method. Maybe WinAero should present another option to implement the prior poster’s (Stephan) method #2 (using the CSP registry keys), as this has worked for me on all machines I’ve tried it on.
PS…Thank you Stephan
Its not working for me anyway 🙁
I’m using a last build of Win 10 Pro – 20H2


