- Как исправить read only file system в Linux
- Ошибка read only file system в Linux
- Команда read в Bash
- Встроенное read Bash
- Изменение разделителя
- Строка подсказки
- Назначьте слова в массив
- Выводы
- 5 Commands to View the Content of a File in Linux Command Line
- 5 commands to view files in Linux
- 1. Cat
- 3. Less
- 4. Head
- 5. Tail
- Bonus: Strings command
- Read file from a specific position in x86
- 2 Answers 2
- Reading files the hard way — Part 2 (x86 asm, linux kernel)
- Making a syscall
- Making a Linux syscall on x86_64
- Memory-mapped files
- Using mmap from assembly
Как исправить read only file system в Linux
Ошибка read only file system может возникнуть при загрузке с LiveCD диска или в режиме восстановления вашего дистрибутива. Она означает, что файловая система в которую вы пытаетесь вести запись примонтирована только для чтения. Этому может быть несколько причин. Есть файловые системы, которые доступны только для чтения это файловая система оптических дисков — ISO, а также файловая система образов SquashFS.
С такими файловыми системами вы сделать ничего не сможете. Для изменения данных в них, надо распаковать образ, изменить данные и запаковать его обратно. Но что касается обычных файловых систем, таких как EXT4, BTRFS, XFS, то их можно монтировать и для чтения и для записи.
Ошибка read only file system в Linux
В этой небольшой статье мы рассмотрим как исправить read only file system Linux перемонтировав файловую систему для записи. Первым делом надо определиться с точкой монтирования, для которой надо разрешить запись. Попытаемся создать файл в корневом каталоге:
Ошибка, файловая система корневого каталога доступна только для чтения. Чтобы посмотреть все точки монтирования доступные в системе выполните в терминале:
mount | grep /dev/sd

В данном случае, корневая файловая система и есть точкой монтирования. Но у вас, например, возникнут проблемы с созданием файла в домашней папке, то надо будет уже перемонтировать /home. Смотрите внимательно. Когда точка монтирования выбрана, осталось её примонтировать с правами на запись:
sudo mount -o remount,rw /
sudo mount -o remount,rw /home
После этого вы сможете создать файл без каких-либо проблем. После завершения работы, во избежание повреждения данных при перезагрузке, желательно перемонтировать файловую систему обратно в режим только для чтения:
sudo mount -o remount,ro /
Теперь вы знаете что означает эта ошибка и как с ею справится. Если у вас остались вопросы, спрашивайте в комментариях!
Источник
Команда read в Bash
Bash поставляется с рядом встроенных команд, которые можно использовать в командной строке или в сценариях оболочки.
В этой статье мы рассмотрим встроенную команду read .
Встроенное read Bash
read — это встроенная команда bash, которая считывает строку из стандартного ввода (или из файлового дескриптора) и разбивает строку на слова. Первое слово присваивается первому имени, второе — второму имени и так далее.
Общий синтаксис встроенной функции read имеет следующий вид:
Чтобы проиллюстрировать, как работает команда, откройте терминал, введите read var1 var2 и нажмите «Enter». Команда будет ждать, пока пользователь введет данные. Введите два слова и нажмите «Enter».
Слова присваиваются именам, которые передаются команде read качестве аргументов. Используйте echo или printf чтобы проверить это:
Вместо того, чтобы вводить текст на терминале, вы можете передать стандартный ввод для read с помощью других методов, таких как piping, here-string или heredoc :
Вот пример использования строки здесь и printf :
Если команде read не задан аргумент, вся строка присваивается переменной REPLY :
Если количество аргументов, предоставленных для read , больше, чем количество слов, прочитанных из ввода, оставшиеся слова присваиваются фамилии:
В противном случае, если количество аргументов меньше количества имен, оставшимся именам присваивается пустое значение:
По умолчанию read интерпретирует обратную косую черту как escape-символ, что иногда может вызывать неожиданное поведение. Чтобы отключить экранирование обратной косой черты, вызовите команду с параметром -r .
Ниже приведен пример, показывающий, как работает read при вызове с параметром -r и без него:
Как правило, вы всегда должны использовать read с параметром -r .
Изменение разделителя
По умолчанию при read строка разбивается на слова с использованием одного или нескольких пробелов, табуляции и новой строки в качестве разделителей. Чтобы использовать другой символ в качестве разделителя, присвойте его переменной IFS (внутренний разделитель полей).
Когда IFS установлен на символ, отличный от пробела или табуляции, слова разделяются ровно одним символом:
Строка разделена четырьмя словами. Второе слово — это пустое значение, представляющее отрезок между разделителями. Он создан, потому что мы использовали два символа-разделителя рядом друг с другом ( :: .
Для разделения строки можно использовать несколько разделителей. При указании нескольких разделителей присваивайте символы переменной IFS без пробела между ними.
Вот пример использования _ и — качестве разделителей:
Строка подсказки
При написании интерактивных сценариев bash вы можете использовать команду read для получения пользовательского ввода.
Чтобы указать строку приглашения, используйте параметр -p . Подсказка печатается перед выполнением read и не включает новую строку.
Вот простой пример:
Как правило, вы будете использовать для read команды внутри в while цикл , чтобы заставить пользователя дать один из ожидаемых ответов.
Приведенный ниже код предложит пользователю перезагрузить систему :
Если сценарий оболочки просит пользователей ввести конфиденциальную информацию, например пароль, используйте параметр -s который сообщает read не печатать ввод на терминале:
Назначьте слова в массив
Чтобы присвоить слова массиву вместо имен переменных, вызовите команду read с параметром -a :
Когда даны и массив, и имя переменной, все слова присваиваются массиву.
Выводы
Команда read используется для разделения строки ввода на слова.
Если у вас есть какие-либо вопросы или отзывы, не стесняйтесь оставлять комментарии.
Источник
5 Commands to View the Content of a File in Linux Command Line
If you are new to Linux and you are confined to a terminal, you might wonder how to view a file in the command line.
Reading a file in Linux terminal is not the same as opening file in Notepad. Since you are in the command line mode, you should use commands to read file in Linux.
Don’t worry. It’s not at all complicated to display a file in Linux. It’s easy as well essential that you learn how to read files in the line.
Here are five commands that let you view the content of a file in Linux terminal.
5 commands to view files in Linux
Before you how to view a file in Unix like systems, let me clarify that when I am referring to text files here. There are different tools and commands if you want to read binary files.
1. Cat
This is the simplest and perhaps the most popular command to view a file in Linux.
Cat simply prints the content of the file to standard display i.e. your screen. It cannot be simpler than this, can it?
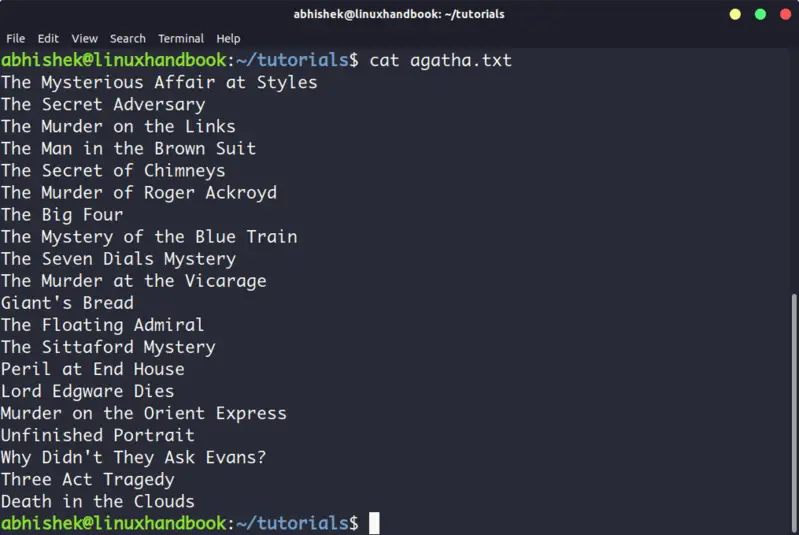 cat displays the content of the file on the screen
Cat becomes a powerful command when used with its options. I recommend reading this detailed tutorial on using cat command.
The problem with cat command is that it displays the text on the screen. Imagine if you use cat command with a file that has 2000 lines. Your entire screen will be flooded with the 200 lines and that’s not the ideal situation.
So, what do you do in such a case? Use less command in Linux (explained later).
The nl command is almost like the cat command. The only difference is that it prepends line numbers while displaying the text in the terminal.
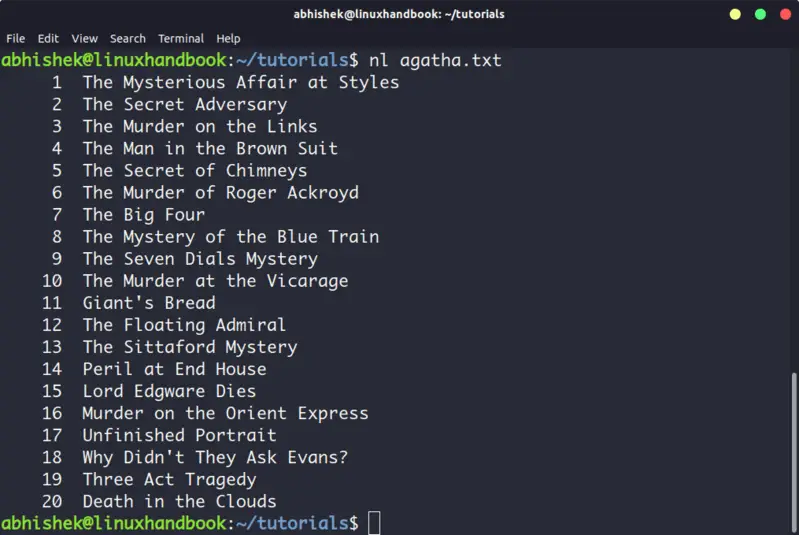 nl command displays text with line numbers
There are a few options with nl command that allows you to control the numbering. You can check its man page for more details.
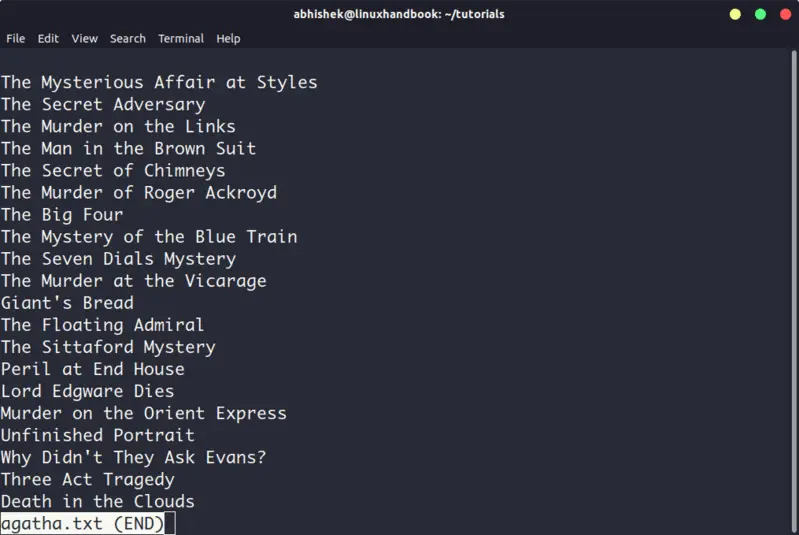
3. Less
Less command views the file one page at a time. The best thing is that you exit less (by pressing q), there are no lines displayed on the screen. Your terminal remains clean and pristine.
I strongly recommend learning a few options of the Less command so that you can use it more effectively.
There is also more command which was used in olden days but less command has more friendly features. This is why you might come across the humorous term ‘less is more’.
4. Head
Head command is another way of viewing text file but with a slight difference. The head command displays the first 10 lines of a text file by default.
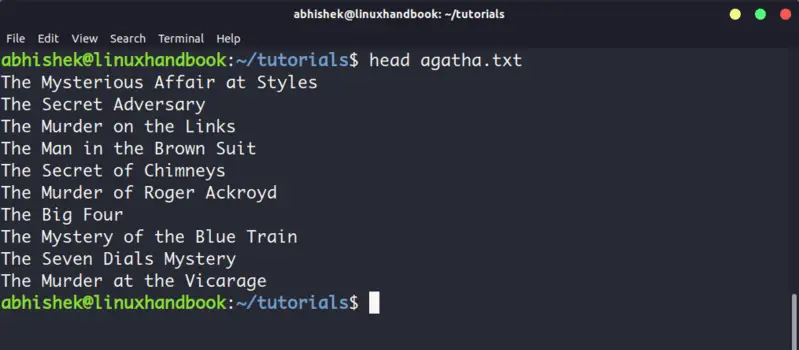
You can change this behavior by using options with head command but the fundamental principle remains the same: head command starts operating from the head (beginning) of the file.
5. Tail
Tail command in Linux is similar and yet opposite to the head command. While head command displays file from the beginning, the tail command displays file from the end.
By default, tail command displays the last 10 lines of a file.

Head and Tail commands can be combined to display selected lines from a file. You can also use tail command to see the changes made to a file in real time.
Bonus: Strings command
Okay! I promised to show only the commands for viewing text file. And this one deals with both text and binary files.
Strings command displays the readable text from a binary file.
No, it doesn’t convert binary files into text files. If the binary file consists of actual readable text, strings command displays those text on your screen. You can use the file command to find the type of a file in Linux.
Conclusion
Some Linux users use Vim to view the text file but I think that’s overkill. My favorite command to open a file in Linux is the less command. It leaves the screen clear and has several options that makes viewing text file a lot easier.
Since you now know ways to view files, maybe you would be interested in knowing how to edit text files in Linux. Cut and Paste are two such commands that you can use for editing text in Linux terminal. You may also read about creating files in Linux command line.
Источник
Read file from a specific position in x86
Is it possible to start reading a file from a specific line or byte. Currently I use this code to read 4 bytes of a file:
This code always reads the first 4 bytes, but I want to start reading from other parts of the file, like the middle for example. What do I need to add or change?

2 Answers 2
A freshly-opened file descriptor starts at position = 0. If you keep reading from the same fd in a loop, you’ll get successive chunks. (Use a larger buffer like 8kiB and loop over dwords in user-space, though, using the value that read returned as an upper limit! A system call is very expensive in CPU time.)
Is it possible to start reading a file from a specific line or byte.
- Byte: yes
- Line: no. In Unix/Linux, the kernel doesn’t have an index of line-start byte offsets or any other line-oriented API. The line handling in stdio fgets for example is purely done in user-space. There have been some historical OSes with record-based files, but Unix files are flat arrays of bytes. (They can have holes, unwritten extents, and extended attributes. But the kernel APIs for the main file contents only operate with by byte offsets).
If you want to do lines, read a big block and loop forward until you’ve seen some number of newlines. If you’re not there yet, read another block; repeat until you find the start and end of the line number you want, or you hit EOF. x86-64 can efficiently search 16 bytes at a time with pcmpeqb / pmovmskb / popcnt (popcnt requires SSE4.2 or the specific popcnt feature bit).
Or with just SSE2, or when optimizing for large blocks, with pcmpeqb / psadbw (against all-zero) to hsum bytes to qwords / paddd . Then check how many lines you went every so often with some scalar code. Or keep it simple and branch on finding the first newline in a SIMD vector.
Obviously the slow and simple option is a byte-at-a-time loop that counts ‘\n’ characters — if you know how to do strchr with SSE2 it should be straightforward to vectorize that search using the above suggestions.
But if you only want some specific byte positions, you have two main options:
seek with lseek(2) before read(2) (see @Nicolae Natea’s answer)
Use POSIX/Linux pread(2) to read from a specified offset, without moving the fd’s file offset for future read calls. The Linux system call name is pread64 ( __NR_pread64 equ 17 from asm/unistd_64.h )
ssize_t pread(int fd, void *buf, size_t count, off_t offset); The only difference from read is the offset arg, the 4th arg thus passed in R10 (not RCX like the user-space function calling convention). off_t is a 64-bit type simply passed in a single register in 64-bit code.
Other than the pread64 name in the .h , there’s nothing special about the asm interface compared to the C interface, it follows the standard system-calling convention. (It exists since Linux 2.1.60 ; before that glibc’s wrapper emulated it with lseek.)
There are other things you can do like mmap , or a preadv system call, but pread is most exactly what you’re looking for if you have a known position you want to read from.
Источник
Reading files the hard way — Part 2 (x86 asm, linux kernel)
This article is part of the Reading files the hard way series.
Looking at that latest mental model, it’s.. a bit suspicious that every program ends up calling the same set of functions. It’s almost like something different happens when calling those.
Are those even regular functions? Can we step through them with a debugger?
If we run our stdio-powered C program in gdb, and break on read , we can confirm that we indeed end up calling a read function:

Cool bear’s hot tip
GDB is an open-source debugger that runs on Linux, macOS (sometimes), and Windows (with some limitations).
It allows, among many other things, setting breakpoints and stepping through code.
We’ll be using it a bunch.
Same goes for the Rust program:

However, when we try to step through it. nothing. For the sake of the investigation, I cloned the glibc repository (since that’s where the read function seems to live), and found this:

Cool bear’s hot tip
The source code for glibc (shown above) can be found in this git repository.
A libc is a very complicated piece of software, for many historical and practical reasons. There are other popular ones, like musl.
The reason we can’t find the source of read is because. it lives in another land entirely:

Cool bear’s hot tip
«syscall» is what the «s» in strace stands for.
It’s not just two different sets of software. They run with different privileges. The Linux kernel (and its device drivers) run in ring 0, where everything is allowed. Userland applications, however run in ring 3.

This is a classic diagram, so I had to show it here, but I don’t think it’s super intuitive. I prefer to think of it this way:

Because what you can do from ring 0 is a strict superset of what you can do from ring 3. Ring 3 is like a prison. Anybody from ring 0 can visit, but ring 3 can only send letters (ie. make syscalls).

So the kernel handles things like reading and writing. But it also handles things like processes. When we start our application, it runs in a process — and the kernel decides which process gets to run and when. It interrupts processes and resumes them, prioritizing the important stuff — but also, giving the illusion that a single CPU core can do multiple things at once (when it really can only do one at a time).
Cool bear’s hot tip
Reality is a lot more complicated. CPU cores do do multiple things at once, just not in a way that’s easy to observe.
There’s a lot the kernel is responsible for, but let’s focus on files. Processes have resources associated to it — like file descriptors! When we open a file (with the open syscall), the kernel:
- Decides whether or not this is allowed
- Asks the VFS who’s responsible for this particular path
- Reserves a file descriptor, which is:
- just a number, really
- unique per-process
- Makes a note that this number correspond to that resource
- Tells us what the number is
And in our further communication with the kernel, whenever we want to refer to that resource, we’ll just use that number.
And this answers one of the questions you might have had while following this article: in the strace output for most programs, we saw a call to close (which, well, closes a file descriptor) — but in our sample C program, we never bothered calling it!
This is because the kernel, in its infinite wisdom, keeps tracks of opened file descriptors, and cleans them all up once the process exits.
«This is all getting a bit theoretical» whispers someone in the back. «I’m glad he’s not showing us kernel code, but.. are we just supposed to trust that the kernel cleans up file descriptors?»
Good question! There is a command to list open file descriptors for a specific path, so we can verify that real quick with a simple C program:

What did we learn?
The kernel is all-powerful. It decides how processes are run, manages access to all devices (including disks), and is in charge of enforcing security.
Regular function calls are just «jumps» to another part of the code. Syscalls are not regular function calls. They are a secure interface between ring 3 (userland, our applications) and ring 0 (the kernel).
Making a syscall involves writing parameters somewhere accessible from userland, and politely asking the kernel to consider our request. The kernel is free to deny it, for various reasons: the file may not exist, we might not have permission to read it, etc.
Making a syscall
We need to clear up a potential source of confusion. We saw a read() function in the source code for glibc (the C library that ships with most Linux distributions), but it is distinct from the actual read syscall.
It seems like most of Unix is written in C, but can we make a syscall without using libc? Something like this:

Hey, Go is not C — does Go use libc to make syscalls? Let’s find out.
This is the source code for a simple Go program that prints the contents of /etc/hosts :
It sure works, but it doesn’t seem to link against libc:

Cool bear’s hot tip
ldd is a tool that «prints shared object dependencies».
The ldd man page has more info.
In our case, it’s useful to make sure our program doesn’t use glibc. Go programs are usually statically linked, unless they use obscure packages like net or os/user .
Welp, I guess Go programs are usually dynamic after all, but you can fix that.
Trying to break on read in gdb also gives nothing. Well, can we make sure it still uses the openat and read syscalls at least? Let’s strace it:

It does! So one doesn’t need libc to make a syscall. What a relief.
What did we learn?
Even though, in some respects, Go is a higher-level language than C (it has a garbage collector, it comes with concurrency primitives, etc.), it doesn’t rely on libc to make syscalls.
This contrasts with the Node.js runtime, and the Rust standard library, which both use libc to make syscalls.
Making a Linux syscall on x86_64
So we’ve seen that pretty much all languages, no matter how many levels of abstractions they’re on, have to eventually make syscalls one way or the other.
But how does one make a syscall? So far we’ve been using languages that either:
- Use libc to make syscalls, via wrapper functions (Node.js, Rust, C)
- Make syscalls for us (Go)
Let’s try to make a syscall ourselves, in assembly.
Cool bear’s hot tip
Assembly is one of the intermediate forms in which most compiled programs go through before they become full executables.
In very simple terms: a C compiler translate C to assembly, the assembler translate assembly to machine code, and a linker glues together several pieces of machine code into an executable.
We’ll use nasm, because everything else gives me high blood pressure. Our code is going to be in readfile.asm , and we’re going to build it with this makefile:
The nasm invocation assembles our assembly into an object file, and the ld invocation links it into a full executable.
We’re going to start with a very simple program, let’s put this in readfile.asm :
Cool bear’s hot tip
rdi is a register.
Registers are memory locations in the CPU that are used for many things: temporary storage, passing arguments to functions, returning values from functions, etc. You can think of them as global variables.
Each architecture has a its own set of registers. We’re on x86_64, so we’ll be using a few of the 64-bit general-purpose registers, like rax , rdi , rsi . We’ll also be using the stack pointer, rsp .
This compiles and links just fine, but it segfaults when we run it:

To get our program to exit cleanly, we need to.. make a syscall.
The first thing we need to make a syscall is its number, which we can find on our Manjaro/ArchLinux system in /usr/include/asm/unistd_64.h . Searching for exit reveals that its number is 60:

The second thing we need to do is.. count our lucky stars, because on x86_64, there is a dedicated instruction to make a syscall. (It’s called syscall ).
So now we just need to put the syscall number 60 in the rax register, and use the syscall instruction, and we should be good:

And just like that, we made a syscall without using libc! That wasn’t so hard.
Cool bear’s hot tip
If it’s not that hard to make a syscall without libc, why do so many languages use libc to make syscalls?
Well, it’s easy to make Linux syscalls, on x86_64. 32-bit architectures have a different ways to make syscalls. Other operating systems have completely different sets of syscalls.
You can learn about some of those differences in the man page for syscall(2) . You can pull it up from a Linux system with the man 2 syscall command, or read it online
Can we re-implement our whole readfile application in assembly? Let’s see.
Logging isn’t going to be as easy as with Node.js, or Rust, or C, or Go. So we’re going to have to lean on the debugger a little bit. Thanks to the -F dwarf -g flags we passed to nasm, we have great debug information:

So, let’s try the open syscall. It needs the same parameters as in C: first a path, then a set of flags. We’ll store the path in the data section.
Cool bear’s hot tip
You don’t need to be fluent in assembly to read this article — it’s good to be exposed even to languages we don’t fully understand. Most people never get «formal training» in assembly, but pick up bits and pieces over the years.
If you want to learn a little more assembly before continuing, you might want to check out this NASM tutorial first.
Stepping through this with gdb, we can make sure open succeeded, by using lsof in another terminal:

We can also use strace on our resulting binary. It shows whether syscalls succeed or fail, so that works out great:

Woops, it looks like we’re not exiting with status code 0, let’s fix that:
That’s better. Now let’s try reading some bytes from this file descriptor. The return value of open is stored in rax , like all other syscalls.
We’re going to be using rax to make our next syscall, so we need to save it to the stack with push . Also, we need to allocate memory for our buffer — let’s allocate 16 bytes on the stack.
Cool bear’s hot tip
The stack is an area we can use to store data. It’s limited in size, but simpler to use than the heap.
To reserve memory, we simply subtract from rsp , a register that contains the address of the «top of the stack».
Here’s a handy diagram that shows what happens to the stack just before we call read:

Running our program still prints nothing so far, but strace lets us know that everything went fine:

Now let’s print that buffer to stdout by using the write call.
And we’re finally seeing some output:

Finally, we just need to repeat reading and writing until read returns 0 bytes read. (We won’t be doing any error checking).
Here’s our final program:
What did we learn?
Making syscalls on Linux x86_64 involves putting values in some registers, and then using the syscall instruction.
We can use the stack (which grows downward) as temporary storage space.
Cool bear’s hot tip
The information about syscalls in this article is extremely Linux-specific.
For example, Windows syscall numbers changes across OS versions — sometimes even service packs. If you’re curious, check out this table.
While it’s possible to make syscalls without using OS libraries, it’s not always practical.
Memory-mapped files
Let’s back up a little and take a look at the strace for mousepad, the program we used to read a file in the GUI.
Note: to obtain this trace, I had to use the -f flag for strace, because the I/O happens in a child process.

We recognize the openat syscall, and also fstat — but.. it doesn’t use read or write . What’s happening over here?
Well, remember when we said the kernel is an all-powerful overseer that controls everything the userland interacts with? That goes for memory too!
In an operating system like Linux, each process has its own virtual address space. Some of it is mapped to physical memory, via the Memory management unit (MMU for short).

Cool bear’s hot tip
Physical memory is divided in «pages», to make them easier to address. Pages are often 4KiB, but not always!
When a process is started, a few pages are reserved for its stack. (Which we used above). When allocating memory on the heap, say, with malloc, glibc’s allocator asks the kernel for more pages, and keeps track of all the allocations, so that free() works properly.
First, let’s check that every process does indeed have a separate address space.
We can make a first program, write.c :
There’s a good chance this program will print a different address every time, but when I ran it, it printed this:
We can use that to write a second program, read.c :
What happened? 0x56459a9c7260 was a valid address in write ‘s virtual address space, but not in read ‘s. Attempting to read from it is an access violation, which results in the kernel sending a signal to our process, and the default handler for that signal terminates the process.
Cool bear’s hot tip
We used this in Part 1 to get our stdio-powered C program to segfault!
An access violation is just one type of page fault. A page fault occurs when we try to read from or write to a (virtual) address that isn’t currently mapped to physical memory.
And this is precisely the trick behind mmap. When we first mmap a file, the kernel might eagerly read the first 4K of the file into a buffer of its own, and sets up the page tables so that the (userland) process can read directly from that buffer:

But once the process reads past the first 4K, then that’s a page fault!

Remember, the kernel can do anything in response to a page fault: it may decide that it’s an access violation, and send a signal to the process. In this case, it chooses simply to fulfill its promise that «this virtual address range contains the contents of the file», just.. not until it’s needed.

The requested part of the file is actually read, a new page mapping is set:

The kernel is of course free to «page out» parts of the file, when they haven’t been accessed in a while (or as soon as it wants, really!).
Cool bear’s hot tip
When executing a program, its image is memory-mapped.
This allows a program to start executing before it’s entirely read from disks, which matters a lot if the executable is large, or the I/O device is slow.
Using mmap from assembly
Can we use that from our assembly program? Sure we can!
Since we’re not sure what parameters mmap needs (and which registers to put them into), we’ll use this Searchable Linux Syscall table for x86 and x86_64 by @FiloSottile.
First, as usual, we’ll need to open the file:
Next, we want to find the size of the file in bytes, so we can pass it to mmap. We’ll use the fstat syscall for that:

To help me write the next part, I wrote a simple C program that dumps the struct’s size, along with the offset of the st_size field, and two constants:
So, it looks like we’ll need to allocate 144 bytes on the stack:
And then we can feed our file descriptor, file size, and flags to mmap . Note that we can specify an address (but NULL is fine) and an offset (but 0 is fine, since we want the whole file).

Finally, we can write out the whole file in a single write syscall:

And there we have it:

What did we learn?
A process’s address space refers to virtual memory, which is then mapped to physical memory via page tables. When an unmapped range is accessed, it results in a page fault.
Instead of reading parts of files with read , we can map them into the virtual address space with mmap . Reading from that range will result in the kernel reading the relevant parts of the file.
Executables are memory-mapped when ran (even on Windows).
In the next part, we’re going to take a look within the kernel, to see how files are organized and read — and how we can find and read them by using this knowledge, bypassing as much abstraction as we can.
This article was made possible thanks to my patrons: Christian Oudard, Ronen Cohen, Matt Welke, Ivan Towlson, Nathan Lincoln, Daniel Wagner-Hall, Felix Weis, Henrik Sylvester Pedersen, Thor Kamphefner, VALENTIN MARIETTE, Kamran Khan, Cole Kurkowski, Arjen Laarhoven, Jeremy Kaplan, Jon Reynolds, Vicente Bosch, Chirag Jain, Ville Mattila, Marie Janssen, Vladyslav Batyrenko, Cameron Clausen, Pierre Guillaume Herveou, Agam Brahma, spike grobstein, Daniel Franklin, Jon Gjengset, Tex, Nick Thomas, Blaž Tomažič, Johan, Paul Marques Mota, Jakub Fijałkowski, Mitchell Hamilton, Ruben Duque, Brad Luyster, Max von Forell, Jake S, Justin, Dimitri Merejkowsky, Chris Biscardi, mrcowsy, René Ribaud, Alex Doroshenko, Julian, Vincent, Steven McGuire, Jack DeNeut, Chad Birch, Martin-Louis Bright, Chris Emery, Bob Ippolito, Jomer, John Van Enk, metabaron, Isak Sunde Singh, DaVince, Philipp Gniewosz, Richard Hill, Simon Rüegg, Roman Levin, V, Max Fermor, Mads Johansen, lukvol, Ives van Hoorne, Greg Stoll, Jan De Landtsheer, Scott Munro, Михаил Захаркин, Daniel Strittmatter, Evgeniy Dubovskoy, Sandro, Alex Rudy, Jake Rodkin, Shane Lillie, Romet Tagobert, Geekingfrog, Douglas Creager, Corey Alexander, Molly Howell, Jeff Crocker, knutwalker, Zachary Dremann, Olivier Peyrusse, Sebastian Ziebell, Julien Roncaglia, eigentourist, Amber Kowalski, Charlton Eivind Rodda, Jan Schiefer, Edil Kratskih, Chris Emerson, Matthew Campbell, Krasimir Slavkov, Juniper Wilde, Paul Kline, Pascal Hartig, Samir Talwar, TD, Kristoffer Ström, Henning Schmick, Ryan Levick, Antoine Boegli, Astrid Bek, Ryan, Yoh Deadfall, Justin Ossevoort, Jeremy, Tomáš Duda, playest, Meghana Gupta, Sebastian Dröge, Adam, Nick Gerace, Jeremy Banks, Rasmus Larsen, exelotl, Ramnivas Laddad, Yury Mikhaylov, Torben Clasen, Sam Rose, Nickolas Fotopoulos, C J Silverio, Walther, Pete Bevin, Shane Sveller, Marcel Jackwerth, Brian Dawn, Clara Schultz, Robert Cobb, jer, Wonwoo Choi, Hawken Rives, João Veiga, Dave Gauer, David Cornu, Richard Pringle, Adam Perry, Yann Schwartz, Jaseem Abid, Zinahe Asnake, Ryan Blecher, Benjamin Röjder Delnavaz, Grégoire Hubert, Matt Jadczak, Nazar Mokrynskyi, Julian Hofer, Mara Bos, Brandon, Jonathan Knapp, Maximilian, Seth Stadick, brianloveswords, Sean Bryant, Ember, Sebastian Zimmer, Makoto Nakashima, Geert Depuydt, Geoff Cant, Geoffroy Couprie, Michael Alyn Miller, Vengarioth, o0Ignition0o, Zaki, Raphael Gaschignard, Romain Ruetschi, Ignacio Vergara, Pascal, Cassie Jones, Pat Monaghan, Jane Lusby, Nicolas Goy, Suhib Sam Kiswani, Henry Goffin, Ted Mielczarek, Random832, Ryszard Sommefeldt, Jesús Higueras, Aurora.
This article is part 2 of the Reading files the hard way series.
If you liked this article, please support my work on Patreon!
Источник


