- Linux traceroute с интерфейса
- Трассировка в Linux
- Для CentOS и RedHat
- Для Debian и Ubuntu
- Как запустить Traceroute в Linux
- О трассировке
- Установка traceroute
- Использование traceroute
- Основное использование
- IPv4 или IPv6
- Тестирование портов
- Скрытие имен устройств
- Предел тайм-аута Traceroute
- Методы исследования
- Установка максимального количества прыжков
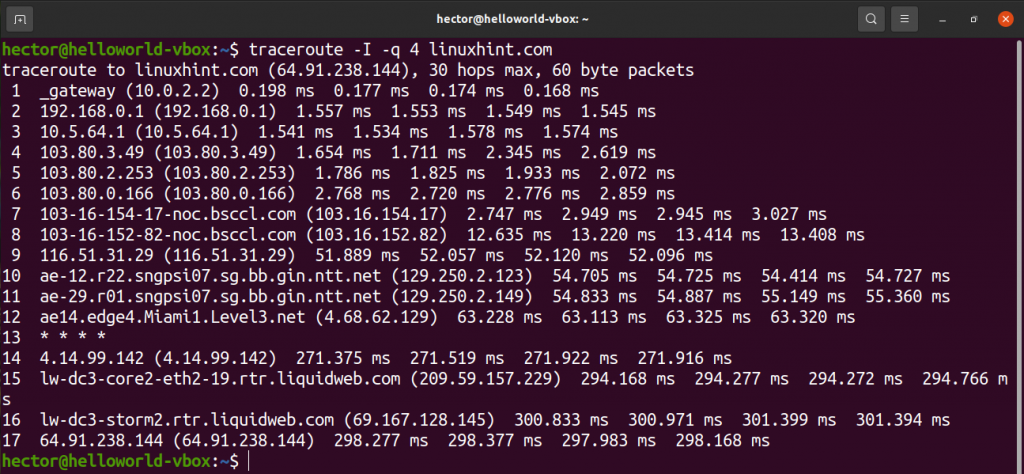
- Указание интерфейса
- Маршрутизация пакетов через шлюз
- Страница справки Traceroute
- Заключение
- Linux traceroute command
- Description
- Syntax
- Options
- List of available methods
- Notes
- Examples
- Related commands
Linux traceroute с интерфейса
 Командой tracert мы инициируем отправку пакетов данных тому получателю, который указали – это может быть адрес сайта, имя компьютера в сети или IP-адрес. При этом пакеты проходят через все промежуточные системы (обычно это специальные сетевые устройства – машрутизаторы) между нашим компьютером и получателем. Таким образом, мы устанавливаем маршрут до пункта назначения и, что гораздо более важно – определяем время отклика (значение в миллисекундах) каждого промежуточного узла.
Таким образом можно установить, в каком месте цепочки находится проблема. Если пакеты не доходят до самого пункта назначения – значит, проблема в нем. Если цепочка обрывается на середине – проблема в каком-то из промежуточных маршрутизаторов. При этом с другого компьютера или по другому маршруту (если такой существует) наш отвалившийся сайт может быть доступен. Если пакеты не выходят за пределы сети нашего провайдера – стало быть, там и проблема.
Трассировка в Linux
В linux за трассировку отвечает пакет traceroute. Первое что сделаем это поставим пакет.
Для CentOS и RedHat
yum install -y traceroute
Для Debian и Ubuntu
apt-get install traceroute -y

Как сделать трассировку в Ubuntu-Debian-CentOS с помощью traceroute-01
Сделаем трассировку до Яндекса. traceroute ya.ru. Видим пошло построение маршрута.

Как сделать трассировку в Ubuntu-Debian-CentOS с помощью traceroute-02
Как видите команда очень похожа на команду из операционной системы Windows. Данная команда очень сильно вам поможет в решении сетевых проблем, так что трассировка вам в помощь.
Источник
Как запустить Traceroute в Linux
Traceroute — это инструмент в Linux, позволяющий исследовать маршруты сетевых пакетов. Это может помочь вам определить ограничивающий фактор перемещения сетевых пакетов. Traceroute также полезен для устранения проблем с медленными сетевыми подключениями. В этом руководстве показано, как запустить traceroute в Linux.
О трассировке
Traceroute отправляет пакеты данных на целевой компьютер, сервер или веб-сайт и записывает любые промежуточные шаги, через которые проходят пакеты. Результатом команды traceroute будут IP-адреса и доменные имена, через которые проходят пакеты. Эти записи также показывают, сколько времени требуется, чтобы пакеты достигли каждого пункта назначения. Это может объяснить, почему некоторые веб-сайты загружаются дольше, чем другие, поскольку количество переходов трафика может варьироваться.
Traceroute также полезен для отображения локальных сетей. Понимание топологии и подключений локальной сети можно найти при запуске инструмента.
Обратите внимание, что при использовании traceroute некоторые устройства могут плохо взаимодействовать. Это может быть связано с ошибками маршрутизаторов, ограничивающими скорость сообщениями ICMP интернет-провайдерами, устройствами, не настроенными для отправки пакетов ICMP (для предотвращения распределенных DoS-атак) и т.д. Некоторые сети также настроены на блокировку запросов трассировки.
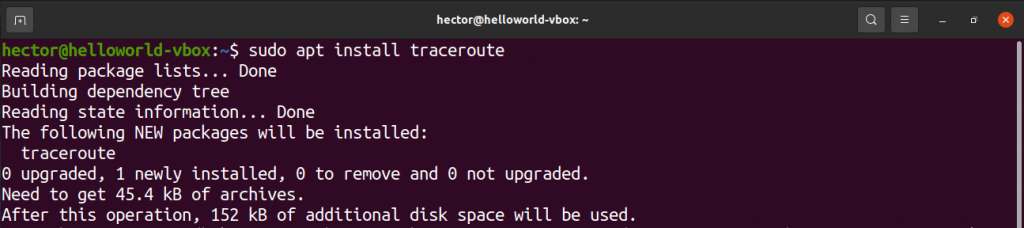
Установка traceroute
Traceroute — мощный инструмент, доступный для всех дистрибутивов Linux. Ниже приводится краткий список команд для установки traceroute в различных дистрибутивах.
Для Debian/Ubuntu и производных:
Для Fedora и производных:
Для openSUSE, SUSE Linux и производных:
Для Arch Linux и производных:
Использование traceroute
В следующих разделах показано, как использовать traceroute в вашей системе Linux.
Основное использование
Основной метод использования traceroute довольно прост. Все, что требуется traceroute, — это пункт назначения для выполнения зондирования. Назначением может быть домен или IP-адрес.


Если сеть настроена на блокировку сигнала traceroute, то этот зонд будет отмечен звездочками.
IPv4 или IPv6
По умолчанию traceroute будет использовать Интернет-протокол по умолчанию, на который настроена ваша система. Чтобы вручную установить версию IP, выполните описанную ниже процедуру.
Чтобы указать traceroute на использование IPv4, используйте флаг -4 :

Чтобы указать traceroute использовать IPv6, используйте флаг -6 :
Тестирование портов
Если есть необходимость протестировать конкретный порт, его можно указать с помощью флага -p . Для отслеживания UDP traceroute будет начинаться с заданного значения и увеличиваться с каждым зондом. Для трассировки ICMP значение будет определять начальное значение последовательности ICMP. Для TCP и других это будет постоянный порт назначения для подключения.

Скрытие имен устройств
В некоторых ситуациях имена устройств в выводе могут сделать вывод беспорядочным. Для большей наглядности вы можете скрыть имена устройств из вывода. Для этого используйте флаг -n :

Предел тайм-аута Traceroute
По умолчанию traceroute ждет 5 секунд, чтобы получить ответ. В определенных ситуациях вы можете изменить время ожидания на больше или меньше 5 секунд. Для этого используйте флаг -w . Обратите внимание, что значение времени — это число с плавающей запятой.

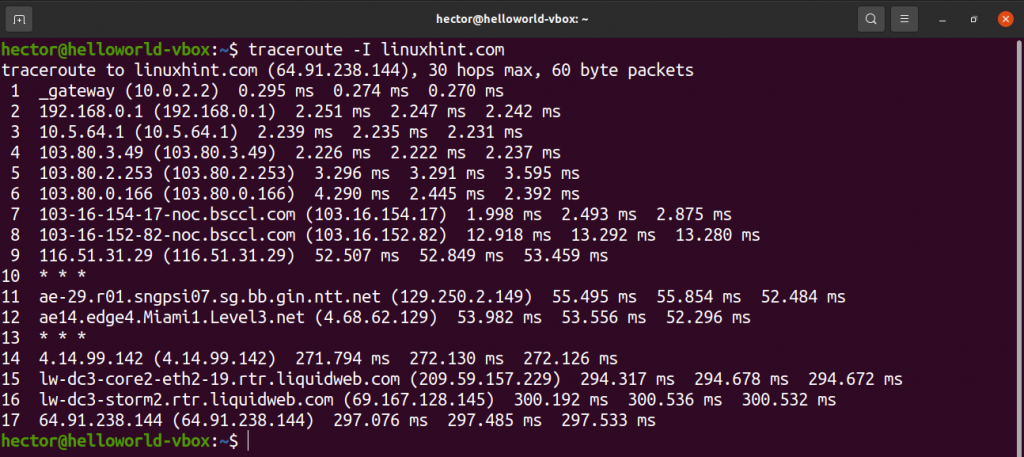
Методы исследования
Есть несколько методов, которые вы можете использовать для проверки удаленного адреса. Чтобы указать traceroute на использование эха ICMP, используйте флаг -I :
Чтобы использовать TCP SYN для зондирования, используйте флаг -T :

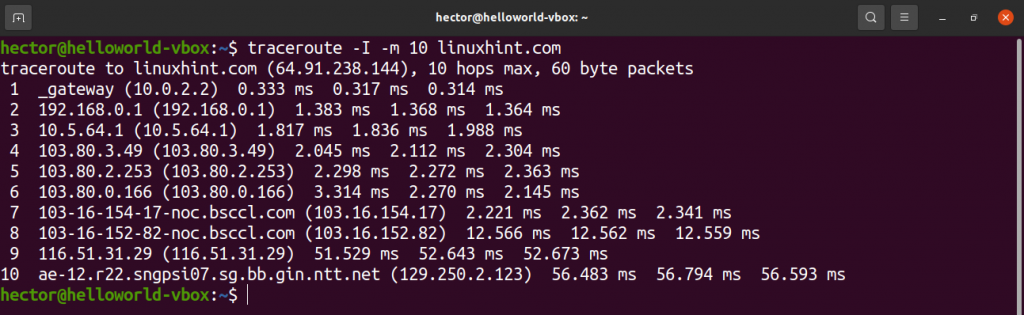
Установка максимального количества прыжков
По умолчанию traceroute отслеживает 30 переходов. Traceroute предлагает возможность вручную установить количество отслеживаемых переходов.
Используйте флаг -m для количества переходов:
Указание интерфейса
Если к компьютеру подключено несколько сетевых интерфейсов, может оказаться полезным указать сетевой интерфейс, который будет использоваться для отправки пакетов. Чтобы указать сетевой интерфейс, используйте флаг -i :

Определение количества запросов для прыжка
Чтобы определить количество запросов для перехода, укажите это число с помощью флага -q :
Маршрутизация пакетов через шлюз
Чтобы маршрутизировать пакеты через определенный шлюз, используйте опцию -g , за которой следует шлюз:

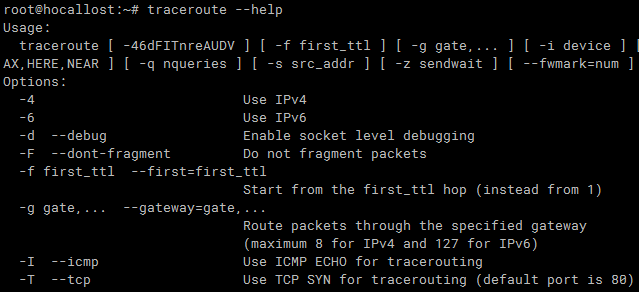
Страница справки Traceroute
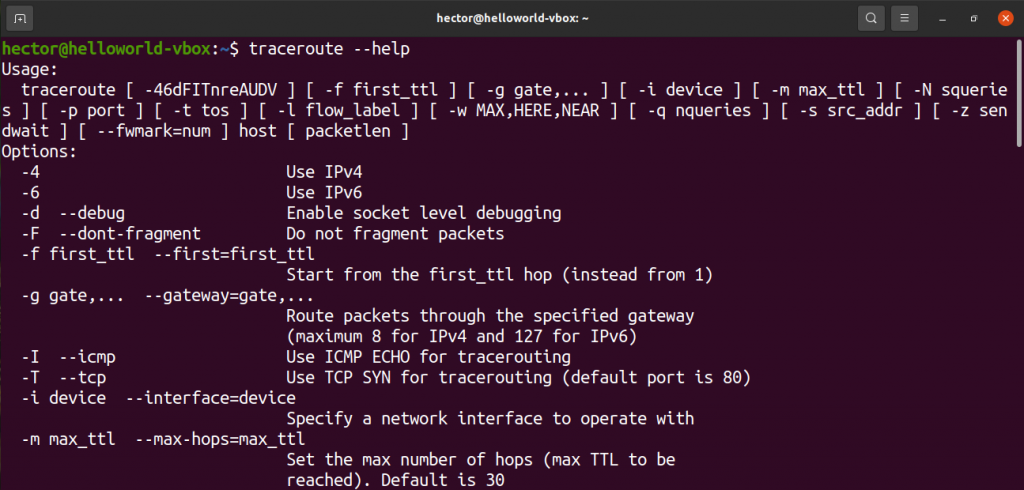
Вышеупомянутые демонстрации — это лишь некоторые из распространенных способов использования traceroute, и вы можете использовать еще больше функций. Чтобы получить быструю помощь, откройте страницу справки traceroute с помощью следующей команды:
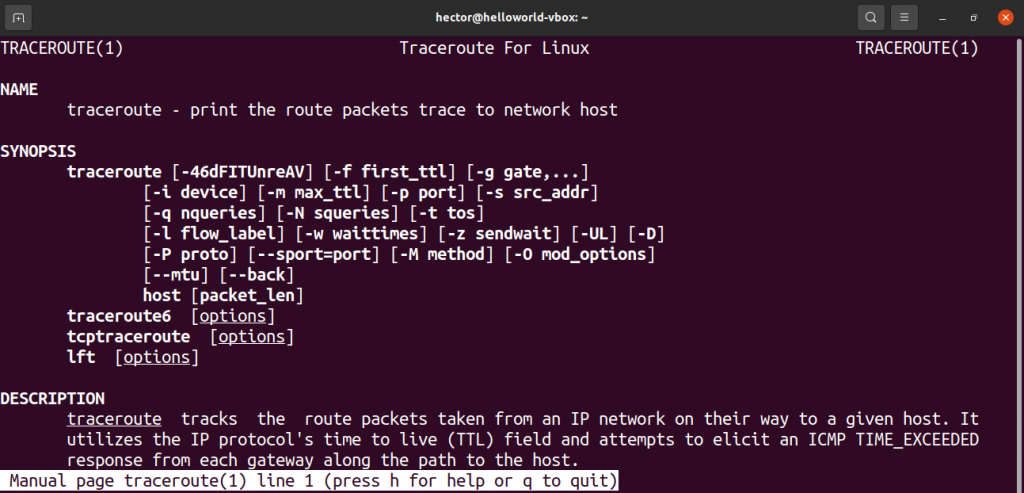
Чтобы получить более полное и подробное руководство по всем доступным параметрам traceroute, посетите страницу руководства с помощью следующей команды:
Заключение
Traceroute — это мощный инструмент, используемый для диагностики сети, и он поддерживает множество опций. Освоение traceroute может потребовать времени и практики. При использовании этого инструмента вы часто будете использовать методы, описанные в этой статье.
А ранее мы писали об использовании аналогичной команды tracert в Windows.
Источник
Linux traceroute command
On Unix-like operating systems, the traceroute command prints the route that packets take to a network host.
This page covers the Linux version of traceroute.
Description
The Internet is a large and complex aggregation of network hardware, connected together by gateways. Tracking the route your packets follow (or finding a gateway that’s discarding your packets) can be difficult. The traceroute command utilizes the IP protocol «time to live» field and attempts to elicit an ICMP TIME_EXCEEDED response from each gateway along the path to some host.
The only mandatory parameter is the destination hostname or IP number. The default probe datagram length is 40 bytes, but this may be increased by specifying a packet size (in bytes) after the destination hostname.
traceroute attempts to trace the route an IP packet would follow to some Internet host by launching probe packets with a small ttl (time to live) then listening for an ICMP «time exceeded» reply from a gateway. It start its probes with a ttl of one and increases this by one until it gets an ICMP «port unreachable» (or TCP reset), which means we got to the «host», or hit a max (which defaults to 30 hops). Three probes (by default) are sent at each ttl setting and a line is printed showing the ttl, address of the gateway and round trip time of each probe. The address can be followed by additional information when requested. If the probe answers come from different gateways, the address of each responding system will be printed. If there is no response within a 5.0 seconds (default), an «*» (asterisk) is printed for that probe.
After the trip time, some additional annotation can be printed: !H, !N, or !P (host, network or protocol unreachable), !S (source route failed), !F (fragmentation needed), !X (communication administratively prohibited), !V (host precedence violation), !C (precedence cutoff in effect), or ! (ICMP unreachable code ). If almost all the probes result in some kind of unreachable, traceroute gives up and exit.
You don’t want the destination host to process the UDP probe packets, so the destination port is set to an unlikely value (you can change it with the -p flag). There is no such a problem for ICMP or TCP tracerouting (for TCP we use half-open technique, which prevents our probes to be seen by applications on the destination host).
In the modern network environment the traditional traceroute methods cannot be always applicable, because of widespread use of firewalls. Such firewalls filter the «unlikely» UDP ports, or even ICMP echoes. To solve this, some additional tracerouting methods are implemented (including tcp); see list of available methods below. Such methods try to use particular protocol and source/destination port, to bypass firewalls (to be seen by firewalls as a start of allowed type of a network session).
Syntax
Options
| —help | Display a help message, and exit. |
| -4, -6 | Explicitly force IPv4 or IPv6 tracerouting. By default, the program will try to resolve the name given, and choose the appropriate protocol automatically. If resolving a hostname returns both IPv4 and IPv6 addresses, traceroute uses IPv4. |
| -I | Use ICMP ECHO for probes. |
| -T | Use TCP SYN for probes. |
| -d | Enable socket level debugging (if the kernel supports it). |
| -F | Do not fragment probe packets. (For IPv4 it also sets DF bit, which tells intermediate routers not to fragment remotely as well). |
Varying the size of the probing packet by the packet_len command-line parameter, you can manually obtain information about the MTU of individual network hops. The —mtu option (see below) tries to do this automatically.
Note, that non-fragmented features (like -F or —mtu) work properly since the Linux kernel 2.6.22 only. Before that version, IPv6 was always fragmented, IPv4 could use the once the discovered final mtu only (from the route cache), which can be less than the actual mtu of a device.
The following options are intended for an advanced usage (another trace methods etc.):
| —sport=port | Chooses the source port to use. Implies -N 1. Normally source ports (if applicable) are chosen by the system. |
| —fwmark=mark | Set the firewall mark for outgoing packets (since Linux kernel 2.6.25). |
| -M method | Use specified method for traceroute operations. Default traditional udp method is called default, and icmp (-I) and tcp (-T) have the names icmp and tcp, respectively. Method-specific options can be passed by -O. Most methods have their simple shortcuts (-I means -M icmp, etc). |
| -O option | Specifies some method-specific option. Several options are separated by comma (or use several -O specifications on the command-line). Each method may have its own specific options, or many not have them at all. To print information about available options, use -O help. |
| -U | Use UDP to particular destination port for tracerouting (instead of increasing the port per each probe). Default port is 53 (dns). |
| -UL | Use UDPLITE for tracerouting (default port is 53). |
| -D | Use DCCP requests for probes. |
| -P protocol | Use raw packet of specified protocol for tracerouting. Default protocol is 253, as per rfc3692. |
| —mtu | Discover MTU along the path being traced. Implies -F -N 1. New mtu is printed once in a form of F=NUM at the first probe of a hop which requires such mtu to be reached. (Actually, the correspond «frag needed» icmp message normally is sent by the previous hop). Note, that some routers might cache once the seen information on a fragmentation. Thus you can receive the final mtu from a closer hop. Try to specify an unusual tos by -t, this helps for one attempt (then it can be cached there as well). See -F option for more info. |
| —back | Print the number of backward hops when it seems different with the forward direction. This number is guessed in assumption that remote hops send reply packets with initial ttl set to either 64, 128 or 255 (which is a common practice). It is printed as a negative value in a form of ‘—NUM‘ . |
List of available methods
In general, a particular traceroute method may have to be chosen by «-M name«, but most of the methods have their simple command-line switches (you can see them after the method name, if present).
| default | The traditional, ancient method of tracerouting. Used by default. Probe packets are udp datagrams with so-called «unlikely» destination ports. The «unlikely» port of the first probe is 33434, then for each next probe it is incremented by one. Since the ports are expected to be unused, the destination host normally returns «icmp unreach port» as a final response. (Nobody knows what happens when some application listens for such ports, though). This method is allowed for unprivileged users. | ||||||||||||||
| icmp, -I | The most commonly-used method, which uses icmp echo packets for probes. If you can ping the destination host, icmp tracerouting is applicable as well. This method may be allowed for unprivileged users since the kernel 3.0 (IPv4 only), which supports new dgram icmp (or «ping») sockets. To allow such sockets, sysadmin should provide net/ipv4/ping_group_range sysctl range to match any group of the user. Options:
| ||||||||||||||
| tcp, -T | Well-known modern method, intended to bypass firewalls. Uses the constant destination port (default is 80, http). If some filters are present in the network path, then most probably any «unlikely» udp ports (as for default method) or even icmp echoes (as for icmp) are filtered, and whole tracerouting will stop at such a firewall. To bypass a network filter, we have to use only allowed protocol/port combinations. If we trace for some, say, mailserver, then more likely -T -p 25 can reach it, even when -I cannot. This method uses well-known «half-open technique», which prevents applications on the destination host from seeing our probes at all. Normally, a tcp syn is sent. For non-listened ports we receive tcp reset, and all is done. For active listening ports we receive tcp syn+ack, but answer by tcp reset (instead of expected tcp ack), this way the remote tcp session is dropped even without the application ever taking notice. The tcp method may be one of the following:
The default tcp method is syn,sysctl. | ||||||||||||||
| tcpconn | An implementation of the tcp method using a simple connect() call, which performs full tcp session opening. Not recommended for normal use, because a destination application is always affected (and can be confused). | ||||||||||||||
| udp, -U | Use udp datagram with constant destination port (default 53, dns). Intended to bypass firewall as well. Note, that unlike in tcp method, the corresponding application on the destination host always receive your probes (with random data), and most can easily be confused by them. In most cases it will not respond to your packets, so you never see the final hop in the trace. (DNS servers usually reply with something angry, however). This method is allowed for unprivileged users. | ||||||||||||||
| udplite, -UL | Use udplite datagram for probes (with constant destination port, default 53). This method is allowed for unprivileged users. Options:
| ||||||||||||||
| dccp, -D | Use DCCP Request packets for probes (rfc4340). This method uses the same «half-open technique» as used for TCP. The default destination port is 33434. Options:
| ||||||||||||||
| raw, -P proto | Send raw packet of protocol proto. No protocol-specific headers are used, IP header only. Implies -N 1. Options:
|
Notes
To speed up work, normally several probes are sent simultaneously. The downside is that this creates a «storm of packages», especially in the reply direction. Routers can throttle the rate of icmp responses, and some of replies can be lost. To avoid this, decrease the number of simultaneous probes, or even set it to 1 (like in initial traceroute implementation), i.e., -N 1
The final (target) host can drop some of the simultaneous probes, and might even answer only the latest ones. It can lead to extra «looks like expired» hops near the final hop. traceroute uses a smart algorithm to auto-detect such a situation, but if it cannot help in your case, use -N 1.
For even greater stability, you can slow down the program’s work with the -z option. For example, use -z 0.5 for a half-second pause between probes.
If some hops report nothing for every method, the last chance to obtain something is to use the ping command with the -R option (IPv4, and for nearest 8 hops only).
Examples
Trace the route that packets take between your system and the host named computerhope.com, using the default method (udp datagram, 16 simultaneous probes). The results looks similar to the following output:
Related commands
netstat — Print information about network connections, routing tables, interface statistics, masquerade connections, and multicast memberships.
ping — Send ICMP ECHO_REQUEST packets to network hosts.
Источник


