- Linux Mint Forums
- Add screen resolution 1920×1080 permanently
- Add screen resolution 1920×1080 permanently
- Re: Add screen resolution 1920×1080 permanently
- Re: Add screen resolution 1920×1080 permanently
- Linux Mint Forums
- How do I add display resolution options in Mint 19.1 ? [SOLVED]
- How do I add display resolution options in Mint 19.1 ? [SOLVED]
- Разрешение экрана в Linux
- Настройка разрешения экрана в GUI
- Как изменить разрешение экрана через терминал
- Выводы
- Linux mint display resolution
Linux Mint Forums
Welcome to the Linux Mint forums!
Add screen resolution 1920×1080 permanently
Add screen resolution 1920×1080 permanently
Post by Lee_on » Mon Jul 30, 2018 5:41 am
I am on Linux Mint 19 Tara cinnamon and I need help please, I need to add screen resolution of 1920×1080 as a permanent option, I know how to go into terminal and do the following steps,
1. Cvt 1920 1080,
2. xrandr –newmode,
3.xrandr —addmode VGA-1,
After these steps the resolution is there and I am able to select it from the options and it works but then when I restart the PC the option is gone, so I need help to basically add this option permanently to the machine so that when you switch the machine off and on the resolution option remain, I have tried from other forums the following but it didn’t work,
1.Alt+Ctrl+F1 (switch to console mode)
2.Login by typing user name and password
3.sudo service lightdm stop (For Mint 12 Lisa users) or sudo service mdm stop (For Mint 13 Maya users)
4.sudo X -configure (generates new xorg.conf file)
I do not get the xorg.conf file or if its there I cant find it.
Please help me with step by step guide as my knowledge is limited,,lol
Re: Add screen resolution 1920×1080 permanently
Post by Lord Boltar » Mon Jul 30, 2018 9:37 am
First you want to run the CVT Tool
In terminal type in cvt 1920 1080 or whatever resolution you desire
You should see an output similar to this
1920×1080 59.96 Hz (CVT 2.07M9) hsync: 67.16 kHz; pclk: 173.00 MHz
Modeline «1920x1080_60.00» 173.00 1920 2048 2248 2576 1080 1083 1088 1120 -hsync +vsync
Next type in xrandr –newmode then copy and paste everything from Modeline above so it looks like below
xrandr —newmode «1920x1080_60.00» 173.00 1920 2048 2248 2576 1080 1083 1088 1120 -hsync +vsync
Next you have to add the desired mode
xrandr —addmode «1920x1080_60.00»
xrandr —output —mode «1920x1080_60.00»
First command creates a new mode with resolution 1920×1080
Second command makes it available for use, with display (VGA-0 may be needed depends on your xrandr output)
Third command selects the newly added mode as the display resolution for the specified display
Thats it. Enjoy
IF your problem has been solved, please edit your original post and add [SOLVED] to the beginning of the Subject Line. It helps other members
The only way for evil to prosper is for good men to do nothing
Re: Add screen resolution 1920×1080 permanently
Post by ralplpcr » Mon Jul 30, 2018 10:03 am
Hi Lee_on, and welcome to the forums!
There’s a couple of ways you can go with this. it all depends on how much (if any) work you wish to do after booting to set the resolution?
The easiest method I can think of would be to create a bash file containing the commands needed to set your resolution.
(I’m going to give the full output lines from my system setting 1280×1024 as an example. Adjust for your own system with the results of your chosen resolution as needed!)
Open a terminal, and execute the following commands in sequence:
1. Type cvt 1280 1024 and press ENTER.
2. You should get an output similar to the following:
5. The connected screen name is what you need — on my system, it’s VGA-0. It should also show the new resolution as stored. not yet active, however.
6. Type xrandr —addmode VGA-0 1280x1024_60.00 . This will add the mode to the dropdown when you go into the display settings.
7. Type xrandr —output VGA-0 —mode «1280x1024_60.00» . This should change your resolution within a split second to your desired setting.
If you followed the above instructions and have successfully gotten the screen to change to your desired resolution, you can now create a bash file to automate this.
Open a text editor. XED is the one that comes with Cinnamon. You’ll need to take some of the outputs that you manually entered and duplicate them exactly here. fortunately, copy/paste works pretty well for that!
Again, using my example above, I’d put the following into my bash file:
/Desktop, and call it something like «SetResolution.sh».
— Once it’s saved, close your text editor.
— Right-click on the icon for SetResolution.sh, and choose «Properties».
— Select the «Permissions» tab.
— Click on the checkbox to allow executing file as program, and then click «Close».
You should now be able to double-click this file and instantly change your resolution whenever you boot into your system.
If you want it to be automated, simply add a link to this file into your Startup Applications (which you can find in your menu)
Источник
Linux Mint Forums
Welcome to the Linux Mint forums!
How do I add display resolution options in Mint 19.1 ? [SOLVED]
How do I add display resolution options in Mint 19.1 ? [SOLVED]
Post by gemk65 » Thu Mar 28, 2019 7:18 am
Hello —
I have just installed Linux Mint 19.1 Cinnamon.
How do I add the display resolution options 1440×900 and 1280×800? Currently I see only two options in the list (from the Display Setting option in System Settings).
Two years ago, for my Linux Mint 18.1 Cinnamon, I received a complete solution to this issue from Robim of this forum; the solution involved adding the relevant resolution lines to the xorg.conf file using the command gksudo xed /etc/X11/xorg.conf. But I found that this solution no longer works, as some aspects of the system and its commands have changed.
My system has the following characteristics:
Monitor:
— LG Flatron W1934S
— directly connected to my computer (no adapter)
— connection socket: VGA connector «DE-15» (15 pins in 3 rows of 5 pins each)
Driver Manager Setting screen (from System Settings):
— After Internet connection is established, “Updating Cache” window is displayed for a few seconds, it finishes, then window is empty, with message: “no proprietary drivers are in use”.
Display Setting screen (from System Settings):
— Title: Unknown DP-2
— Resolution field lists only these two options: 1024×768 and 800×600
Result of Terminal command inxi -Fxzd:
Источник
Разрешение экрана в Linux
С развитием технологий экраны для компьютеров смогли значительно увеличить разрешение. Если старые экраны показывали 640х800 пикселей, то более новые отображают уже 1920х1080. У последних моделей разрешение ещё выше.
В операционной системе Linux существует несколько способов настройки разрешения экрана. В обычных системах, как правило, это не нужно. Но если вы хотите использовать несколько мониторов или решили запустить Linux на виртуальной машине, то разрешение может определиться неправильно и тогда придётся его настроить. В этой статье мы рассмотрим, как изменить разрешение экрана в Linux через графический интерфейс и терминал.
Настройка разрешения экрана в GUI
Разберём настройку разрешения на примере дистрибутива Ubuntu и окружения рабочего стола Gnome. Откройте утилиту Настройки из главного меню:
Перейдите на вкладку Устройства, а затем выберите пункт Настройка экранов:
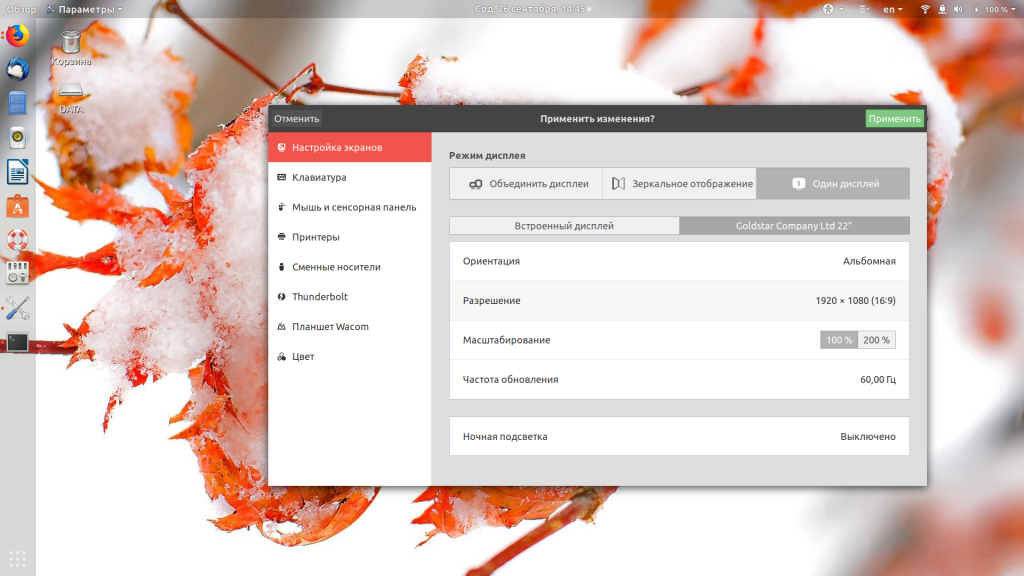
Если к компьютеру подключено два монитора Linux или больше, то у вас будет три варианта работы экранов:
- Объединение — все экраны объединяются в одно рабочее пространство;
- Зеркальное отображение — одинаковая картинка на всех экранах;
- Один экран — картинка только на одном экране, другие отключены.
Независимо от того, какой режим вы выбираете, будут доступны настройки Разрешение и Частота обновления, где вы сможете настроить нужные вам параметры:

Так выполняется настройка монитора Linux через графический интерфейс. Если вы хотите объединить экраны, то можно указать разрешение мониторов Linux для каждого из них отдельно:
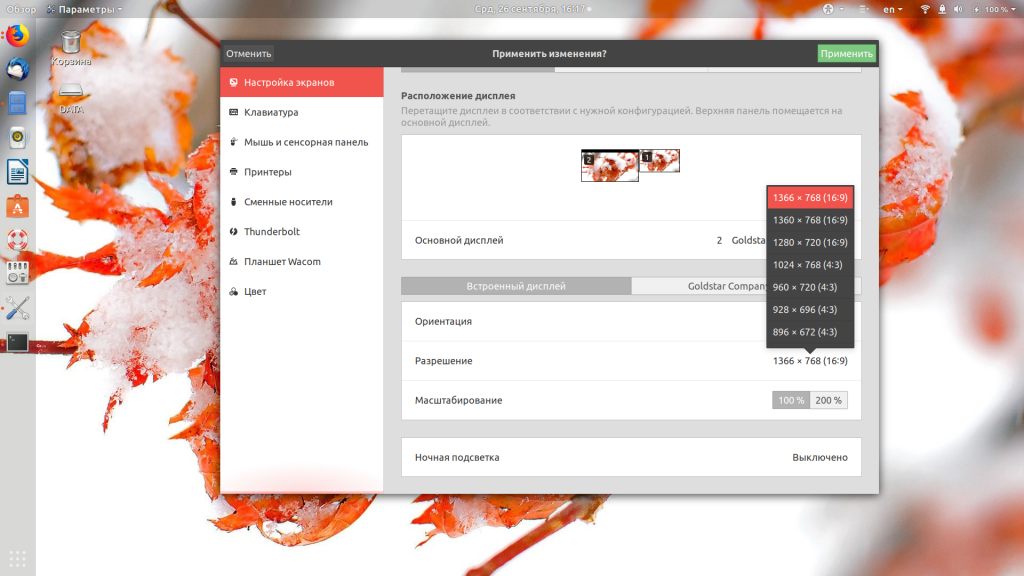
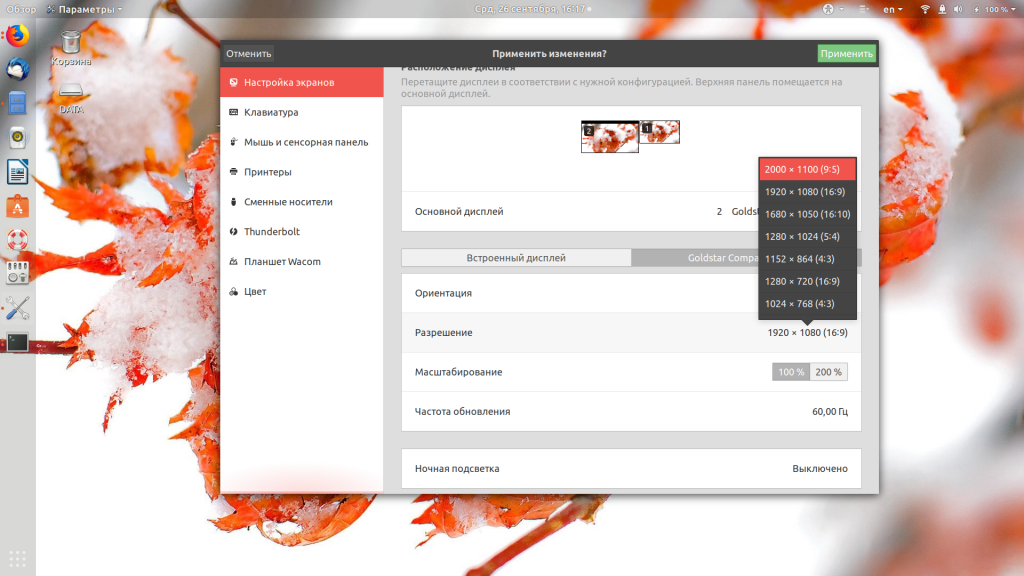
Но здесь есть один недостаток, вы можете выбрать только то разрешение экрана, которое предлагает система. Если вы захотите установить разрешение выше или ниже тех, что есть, то у вас ничего не выйдет. Для этого надо воспользоваться терминалом.
Как изменить разрешение экрана через терминал
Для управления настройками экрана из терминала можно использовать утилиту xrandr. Синтаксис утилиты очень прост:
xrandr опции параметры
Разберём основные опции утилиты, которые будем использовать:
- —verbose — включить более подробный вывод;
- —version — версия программы;
- —query — когда установлена эта опция или не указанно никаких опций, выводится текущая конфигурация;
- -d, —display — позволяет указать какой X экран использовать по имени;
- -s, —screen — устанавливает дисплей для настройки по ID;
- —output — устанавливает дисплей для настройки по имени или ID;
- —primary — выбрать основной экран;
- —size — позволяет указать размер экрана;
- —rate — устанавливает частоту обновления;
- —dpi — устанавливает DPI, количество точек на дюйм, которое позволяет вычислить правильный размер для окон;
- —newmode — создаёт новый режим отображения по размеру и частоте;
- —rmmode — удаляет режим отображения;
- —addmode — добавляет созданный режим к списку доступных для использования;
- —delmode — удалить режим из списка доступных;
- —mode — активирует указанный режим;
- —off — отключает экран;
- —gamma — позволяет установить коррекцию гаммы, в формате красный:зеленый:синий;
Чтобы посмотреть текущие параметры системы, запустите утилиту без параметров:
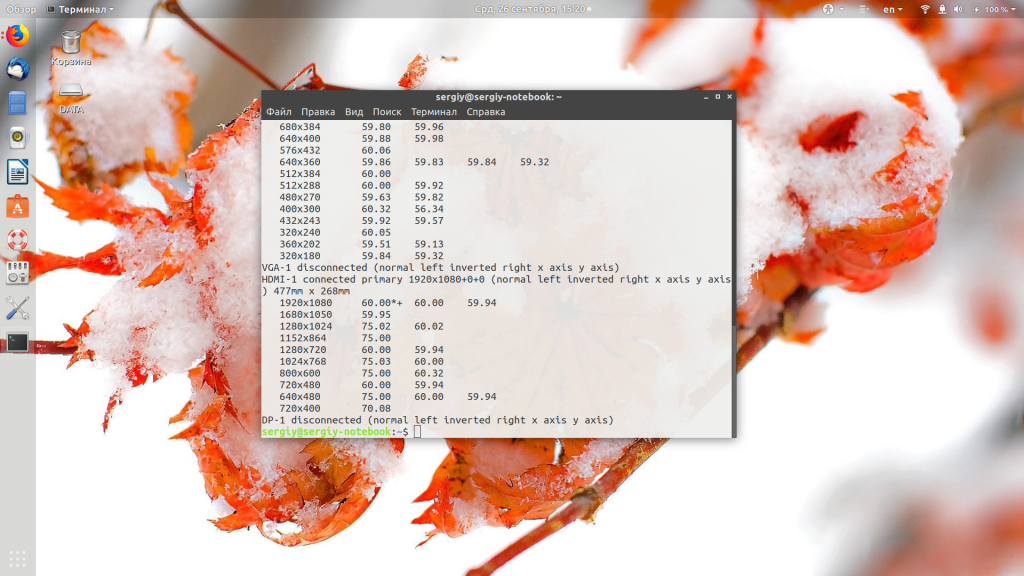
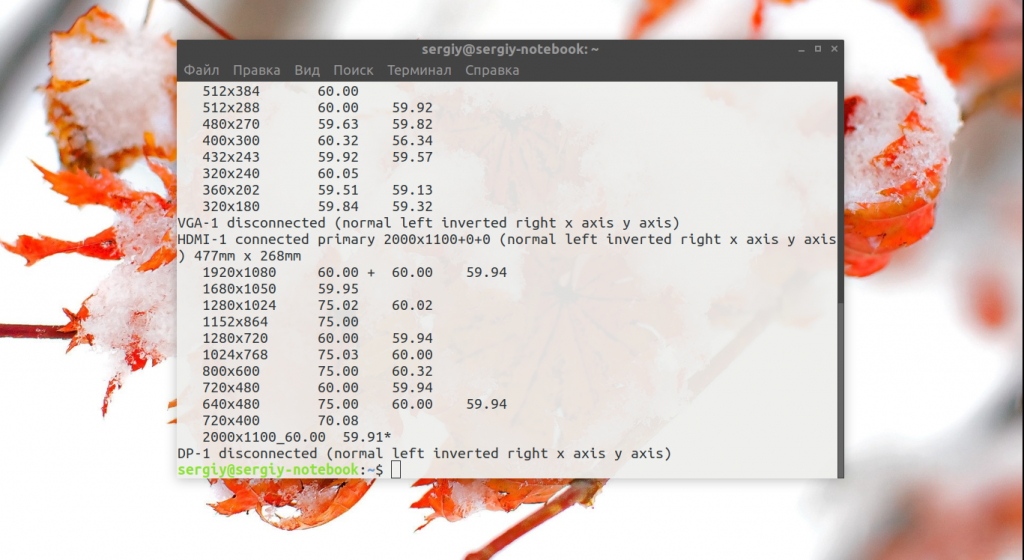
Как видите, к моей системе подключено два экрана:
- LVDS-1 — встроенный экран ноутбука;
- HDMI-1 — внешний экран;
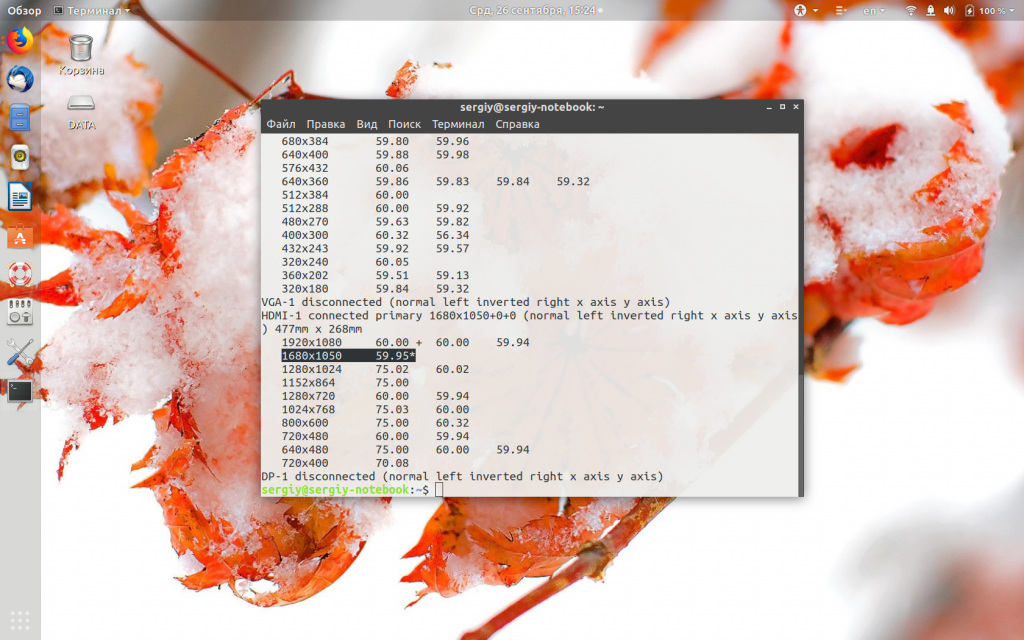
Для каждого экрана доступно несколько разрешений, текущее разрешение отмечено звёздочкой. Чтобы изменить разрешение экрана Linux на одно из доступных, используйте опцию —mode вместе с —output:
xrandr —output HDMI-1 —mode 1680×1050
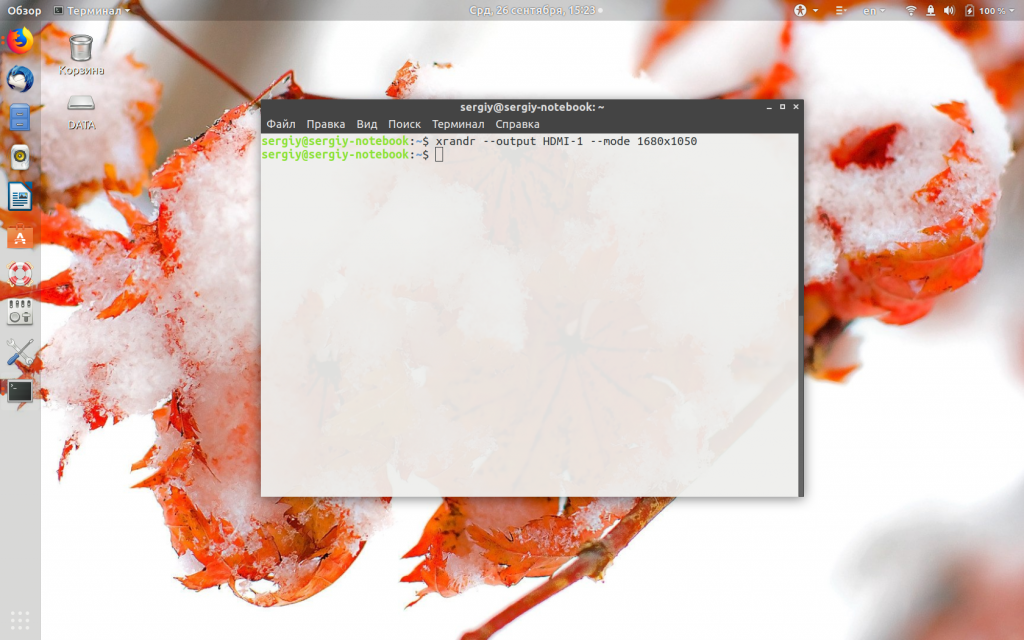
Теперь звёздочка выводится около разрешения 1680х1050.
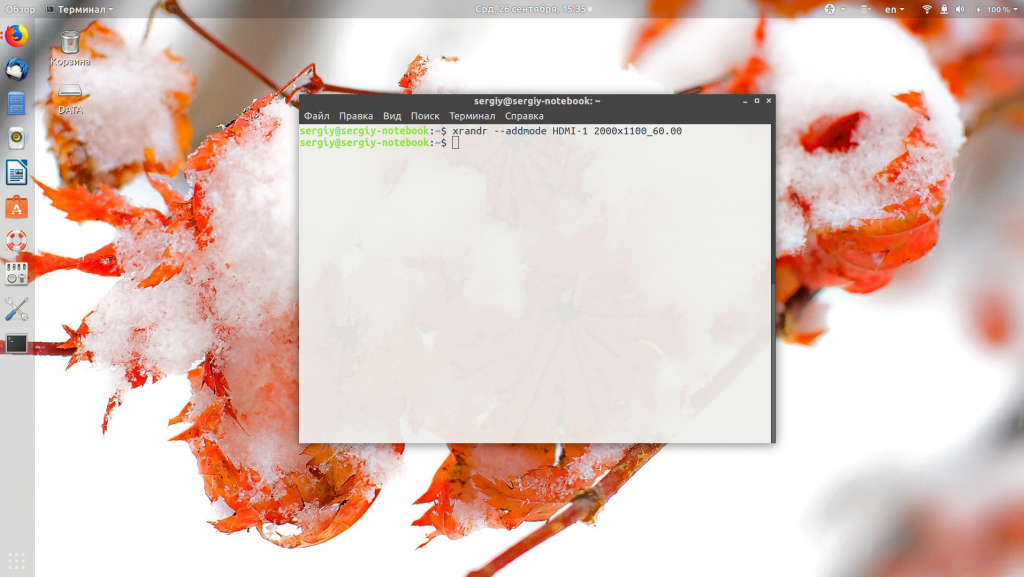
Хорошо, мы разобрались с тем, как добавить одно из существующих разрешений. По сути, то же самое, что и в графическом интерфейсе. Но если нужного разрешения в списке нет, то его можно добавить. Для этого сначала нужно конвертировать обычную запись в формат VESA. Для этого используйте утилиту cvt. Например, создадим режим с разрешением 2000х1100 и частотой обновления 60:
cvt 2000 1100 60

Дальше надо скопировать из вывода утилиты всё, что написано после «Modeline». Осталось использовать скопированный текст в xrandr:
xrandr —newmode «2000x1100_60.00» 183.75 2000 2136 2344 2688 1100 1103 1113 1141 -hsync +vsync
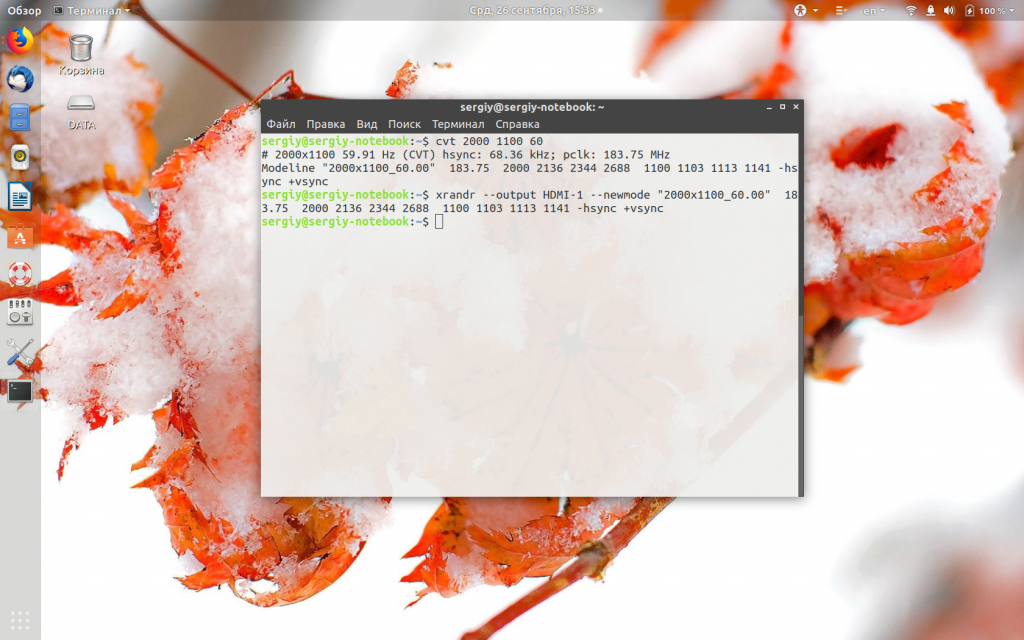
Добавляем только что созданное разрешение к списку доступных для нужного нам экрана:
xrandr —addmode HDMI-1 2000x1100_60.00
А затем активируем, как описывалось выше:
xrandr —output HDMI-1 —mode 2000x1100_60.00
Но будьте аккуратны с новыми разрешениями. Если вы устанавливаете разрешение выше, чем поддерживает ваш монитор, то он просто не будет показывать. Но такая штука может быть полезна с VirtualBox, или если компьютер не определяет, что ваш монитор поддерживает более высокое разрешение.
Чтобы сохранить настройки после перезагрузки, добавьте команду активации разрешения в конфигурационный файл
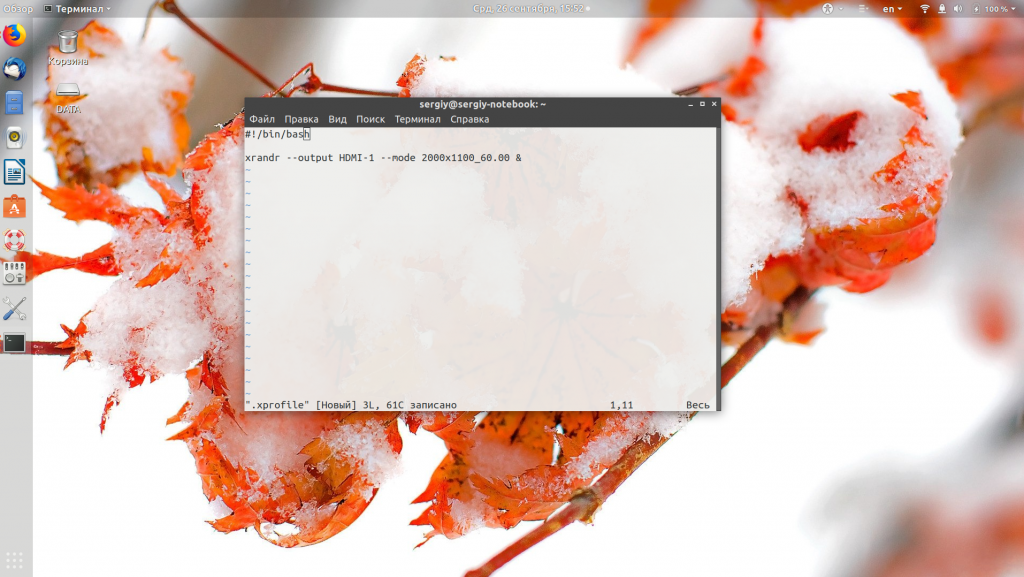
Синтаксис файла очень похож на
/.xinitrc. Все команды из него автоматически выполняются при старте сессии. Или же вы можете использовать любой другой метод автозагрузки, который работает после запуска X.
Выводы
В этой статье мы рассмотрели несколько способов настроить разрешение экрана Linux с помощью графического интерфейса или через терминал. Как видите, это не так сложно, как может показаться на первый взгляд.
Источник
Linux mint display resolution
Linux does not have as much options for display resolutions as in windows. A 22″ Monitor in linux will have 1920×1080, 1440×900, 1280×960, 1024×768 resolutions. Some users may need resolution like 1600×900, 1366×768 for some purposes. These resolutions can be added manually in Linux. Basic steps for adding 1600×900 resolution are explained as under which can be modified for any other screen resolution by changing values 1600×900 with your required one.
1. First step is to create modeline. This is done to get appropriate values of hsync, vsync and other parameters which are required to display a resolution properly in the backend. To add resolution of 1600×900, open terminal and type:
This will create modeline for resolution of 1600×900 which will look something like this:
1600×900 59.95 Hz (CVT 1.44M9) hsync: 55.99 kHz; pclk: 118.25 MHz
Modeline «1600x900_60.00» 118.25 1600 1696 1856 2112 900 903 908 934 -hsync +vsync
These numbers may vary according to your monitor.
2. To add this resolution to monitor settings, type the following highlighted commands one by one:
xrandr —newmode «1600x900_60.00» 118.25 1600 1696 1856 2112 900 903 908 934 -hsync +vsync
(values after xrandr —newmode to be pasted from second line of generated values with cvt command from your own computer, don’t copy from here. In other words, after writing xrandr —newmode in terminal, copy the output of cvt command from its second line excluding word Modeline upto its end and paste it after xrandr —addmode. )
xrandr —addmode VGA1 «1600x900_60.00»
After these steps, resolution of 1600×900 will appear under the list of various resolutions available in display settings. This will remain listed for one session only. When computer is restarted, this will disappear. To make it appear permanently, we need to configure xorg.conf file and make this entry manually.
3. In Mint, xorg.conf is not present by default and has to be created. This can be created only when x server is not working ie. in console mode otherwise system will give error. Type these highlighted commands one by one in console mode:
Alt+Ctrl+F1 (switch to console mode)
Login by typing user name and password
sudo service lightdm stop (For Mint 12 Lisa users) or sudo service mdm stop (For Mint 13 Maya users)
sudo X -configure (generates new xorg.conf file )
File with name xorg.conf.new will be created in Home folder. Although some error message will appear but file will be created. Just ignore that message.
Note: 1.Use only one of the commands (from sudo service lightdm stop or sudo service mdm stop) according to your distro edition. These are used to kill x server.
2. In Mint 13 maya, after sudo service mdm stop, Alt + Ctrl + F1 has to be pressed again.
4. To switch back to graphical mode, type:
sudo start lightdm (Mint 12 Lisa users)
sudo service mdm start (Mint 13 Maya users)
If above commands fail to bring back graphical mode, just restart your computer.
5. Open Home folder. Rename this file from xorg.conf.new to xorg.conf Open xorg.conf with text editor and make the following changes. Underline shows newly added lines
- Add Modeline in Monitor Section under each Identifier option. Example:
Section «Monitor»
Identifier «Monitor0»
Modeline «1600x900_60.00» 118.25 1600 1696 1856 2112 900 903 908 934 -hsync +vsync
VendorName «Monitor Vendor»
ModelName «Monitor Model»
EndSection
Section «Monitor»
Identifier «Monitor1»
Modeline «1600x900_60.00» 118.25 1600 1696 1856 2112 900 903 908 934 -hsync +vsync
VendorName «Monitor Vendor»
ModelName «Monitor Model»
EndSection
- Add modes in screen section in similar way as described above in each subsection (screen1, screen2) under the element Depth (Also for each depth). Example :
Section «Screen»
Identifier «Screen0»
Device «Card0»
Monitor «Monitor0»
SubSection «Display»
Viewport 0 0
Depth 1
Modes «1600×900»
EndSubSection
SubSection «Display»
Viewport 0 0
Depth 4
Modes «1600×900»
EndSubSection
SubSection «Display»
Viewport 0 0
Depth 8
Modes «1600×900»
EndSubSection
Identifier «Screen1»
Device «Card1»
Monitor «Monitor1»
SubSection «Display»
Viewport 0 0
Depth 1
Modes «1600×900»
EndSubSection
SubSection «Display»
Viewport 0 0
Depth 4
Modes «1600×900»
EndSubSection
SubSection «Display»
Viewport 0 0
Depth 8
Modes «1600×900»
EndSubSection
6. Save this file and copy this file to /etc/X11/ by typing following command:
sudo cp xorg.conf /etc/X11
(assuming that xorg.conf is located at Home folder) or do it by graphically if you know.
Note: New resolution must be less than Maximum resolution that monitor can support. And care fully add those lines to each subsection Monitor0, Monitor1, Monitor2, Monitor3, Screen1, Screen2, Screen3, Screen4. For Screen section, add entries for every Depth from 1, 2, 4, 8, 16, 24.
Источник


