- How to install missing dependencies of a custom Debian package?
- 2 Answers 2
- How to Install and Correct Dependencies Issues in Ubuntu
- What is a Dependency?
- Introduction
- Install Dependencies
- Install Software
- Removal Software
- Update Software
- List Software
- Clean Dependencies
- Unmet Dependencies Errors
- Backup Configuration Files
- Options
- List Packages Using Apt-mark
- Option 1: Enable all Ubuntu Repositories.
- Option 2: Update the Software
- Option 3: Upgrade the Software
- Option 4: Clean the Package Dependencies
- Option 5: Clean Cached Packages
- Option 6: Remove «On-hold» or «held» Packages
- Option 7: Use the -f Flag
- Option 8: Use the Build-dep Command
- Option 9: Test Install Package
- Option 10: Reinstall the Software
- Option 11: Remove Old PPA
- Download Packages With Dependencies Locally In Ubuntu
- Download Packages With Dependencies Locally In Ubuntu
- Method 1:
- Method 2:
- Download packages with dependencies locally for a specific architecture
How to install missing dependencies of a custom Debian package?
A custom Debian package has this dependency in the Debian control file:
That must be downloaded from download.docker.com as it isn’t part of the official Debian repositories. The apt sources list looks like this:
Installing that custom Debian package fails:
I thought apt —fix-broken would install the missing docker-ce package from the third-party repository, but instead it wants to remove my foo package. The following works:
What I have tried so far:

2 Answers 2
To install a .deb package while downloading dependencies from the configured repositories, use
Do provide a path even if the file is in the current directory.
If the dependency still isn’t found, show us the output of apt-cache policy docker-ce .
It is well explained in this link.
I know 3 different ways to do it:
a) sudo apt install application.deb
it will install the package it with dependencies in one run automatically:
and if there is any dependencies for the packagename.deb , the command below should be invoke to resolve the dependencies:
c) sudo gdebi my_package_1.0.deb
if gdebi is not installed already, you may install it first. In order to find out if a package, like gdebi in our case, is installed or not, check the status of a package, you may issue the command below:
Источник
How to Install and Correct Dependencies Issues in Ubuntu
What is a Dependency?
A dependency is defined as a file, component, or software package that a program needs to work correctly. Almost every software package we install depends on another piece of code or software to work as expected. Because the overall theme of Linux has always been to have a program do one specific thing, and do it well, many software titles utilize other pieces of software to run correctly.
Introduction
Let’s review what dependencies are and why they are required. We all have, at one point or another, most certainly seen a message from our system when we were installing software regarding “missing dependencies.” This error denotes that a required part of the software package is outdated, unavailable or missing. Let’s review how to address those issues when we come across them on Ubuntu.
Install Dependencies
Ubuntu uses apt (or the Advanced Package Tool) for software package management. Most of the time, you will see the apt-get command used whenever you see the installation of something on Ubuntu. The main task of apt-get is to retrieve the information and packages from a repository with secure, authenticated software sources used to installation, upgrade, and/or removal of packages along with their dependencies.
This is the syntax of apt-get:
Now that we know what apt-get is and how the syntax for it should look like, let’s go through some of the most used apt-get commands, and we will explain how each of them manipulates dependencies.
Install Software
So let’s say that we want to install Python on our server. First, we would need to install a libpython2.7-minimal package/dependency. We can run this command to accomplish this.
We will get an output that the package itself has been found, unpacked and configured. Along with the info about disk space that package will take. If we are missing two dependencies, then we can just run a command like this to install those packages.
Now we can install python with pretty much the same command:
Removal Software
If we want to remove this dependency, we can run the following command.
This will remove libpython2.7-minimal package as well as all the associated dependencies it has.
Update Software
If at any point you want to update all the system packages on the server, we can simply run this command. This command updates all of our software including any dependencies.
The second command will list all software packages it wants to install/update and will prompt us with a yes or no option before proceeding with the installation. Using this command, we ensure all of our dependencies are met.
List Software
If you want to list all available packages, we can use this command.
We mention this command as it leads us into our next section specifically regarding dependencies. This command will show us a huge list of packages available for installation. Now, let’s say that we want to install the libslang2 package, but are unsure which dependencies need to be installed along with this package and which ones are not. We may not even know which ones we need. Luckily, Linux provides for this option by using the showpkg flag. We can run this command to see what dependencies are needed.
So, if we are not sure which dependencies we need, we can simply run the showpkg subcommand to get the information that we need.
Clean Dependencies
If you want to clear up some of the clutter that can sometimes take up our valuable disk space, we can use the following command to free up additional disk space.
These commands will get the job done for us in the same manner that the yum clean and yum cleanall commands do on CentOS.
The clean flag removes all the .deb files from the local repository in /var/cache except the lock files.
The autoclean flag also removes all the .deb files from the local repository, but unlike the clean flag, it removes only the obsolete packages that can no longer be downloaded.
Unmet Dependencies Errors
Almost every Ubuntu user has seen the error «The following packages have unmet dependencies issues«. In this circumstance, the failure almost always is related to the apt package manager as opposed to the software being installed. Luckily, there are multiple options available to rectify this situation. We will look at several ways to address this issue.
Backup Configuration Files
First, as with any system modification, taking a backup of our configurations is a must. We do this to ensure that is any additional issues crop up, we can revert the changes we have made to restore our system files.
Options
When these dependency errors occur, we have multiple options we can try to address the issue.
- Enable all repositories
- Update the software
- Upgrade the software
- Clean the package dependencies
- Clean cached packages
- Remove «on-hold» or «held» packages
- Use the -f flag with the install subcommand
- Use the build-dep command
- Test install package
- Reinstall the software
- Remove the PPA
List Packages Using Apt-mark
As an aside, when the apt-mark showauto command is used, it prints a list of each package that will be automatically added on a new line. If a package name is given, only those packages that will be installed automatically will be shown. We mention this, so we can note the packages that should be installed with the software.
Option 1: Enable all Ubuntu Repositories.
Utilizing this option will allow for a wider base of software and dependencies to pull from. Then, once this is updated, we can try to reinstall the software.
Option 2: Update the Software
Once the above command has finished, we can try to update the package again. Trying to update the software should be our first line of defense.
Option 3: Upgrade the Software
Next, we can show the packages that need to be upgraded and then attempt to upgrade the software.
Option 4: Clean the Package Dependencies
A corrupted package database or packages that were broken or not installed properly can cause this problem. This option uses the autoremove flag to address this.
This command will remove only obsolete or unnecessary packages that no longer exist in the repositories.
Option 5: Clean Cached Packages
This command will clean up the local repository of downloaded packages. Then, try to reinstall the software.
Option 6: Remove «On-hold» or «held» Packages
To locate software that is held or on hold, we can use the apt-mark command. Once we have that info, we can use the remove and dry-run flags to see exactly what will be removed. Then, try to reinstall the software.
Option 7: Use the -f Flag
According to the apt-get man page, using the -f (or —fix-broken) parameter will allow the apt-get command to try to correct the broken dependencies issue. Do not use the package name in the command when using -f.
-f, —fix-broken
Fix; attempt to correct a system with broken dependencies in place. This option, when used with install/remove, can omit any packages to permit APT to deduce a likely solution. If packages are specified, these have to completely correct the problem.
The option is sometimes necessary when running APT for the first time; APT itself does not allow broken package dependencies to exist on a system. It is possible that a system’s dependency structure can be so corrupt as to require manual intervention (which usually means using dselect(1) or dpkg —remove to eliminate some of the offending packages).
Use of this option together with -m may produce an error in some situations. Configuration Item: APT::Get::Fix-Broken.
If you see the 0 upgraded message, this means this command has failed. We are not done yet, though. Let’s try to issue the command again.
Option 8: Use the Build-dep Command
Using this subcommand, we canВ install all the dependencies for ‘softwarename’. Then, we can try to reinstall the software dependencies individually.
Option 9: Test Install Package
The —dry-run flag shows us what apt-get would install without actually installing the package. This is useful with the above command. It can also sometimes show the dependency error prior to the software installation.
Option 10: Reinstall the Software
There are certain dependency issues and conflicts which arise that apt cannot solve. When this occurs, apt will save those packages in an вЂon-hold’ state. This means they will not have been completely installed. Removing those software packages may fix the problem and might assist in solving the original issue. The apt-get purgeВ command will remove the program, all the associated configuration files, and any plugins or settings from our system.
If the output shows any packages in an “on-hold” state, we can go ahead and try to remove them. Once that command completes, run this command to
Now remove the held packages one at a time by executing dist-upgrade each time, until there are no more held packages. Afterwards, try to re-install your package. Make sure to implement the –dry-run option, in order to stay informed of the consequences:
Option 11: Remove Old PPA
The following commands remove the package, the PPA and the associated dependencies.
In the end, we can draw a conclusion that apt-get manages dependencies the same way that yum does. We can install dependency with the install subcommand, we can remove it with remove subcommand, update it with upgrade subcommand, and so on.
If you are using Ubuntu and looking for the best way to manage your dependencies and packages, apt-get is a way to go. It’s superior to dpkg, and it’s more user-friendly.
If you continue to have issues with this, give us a call at 800.580.4985, or open a chat or ticket with us to speak with one of our knowledgeable, experienced Linux administrators today!
Источник
Download Packages With Dependencies Locally In Ubuntu
A while ago, we discussed how to Install Softwares offline in Ubuntu. In that guide, we explained how can you download packages in an Internet-enabled system, and install them in another system that has slow or no Internet connection. In this tutorial, we will see how to download packages with dependencies locally in Ubuntu and its derivatives.
Using this method, we can download a .DEB package along with all required dependencies without actually installing it. This way we can download packages from one system and install them later in the same system itself or any other system that has no Internet connection. We can also download packages for different architecture systems. For example, it is possible to download the 32 bit packages from a 64 bit system and vice versa.
Download Packages With Dependencies Locally In Ubuntu
We can do this in two methods. I tested this guide on Ubuntu 16.04 and 18.04 LTS desktop editions. It worked just fine as described below.
Method 1:
This is the simplest and straight-forward method than other other methods given below.
To download a package with all dependencies, without installing them, just run:
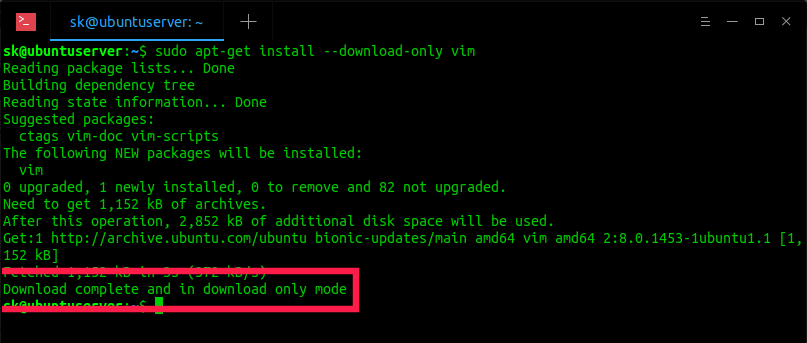
For instance, let us download the Vim package with all required dependencies, without installing them, using command:
Sample output:
As you see in the above output, we have downloaded Vim package will all dependencies, but we didn’t actually install it.
Download Packages With Dependencies Locally In Ubuntu
All downloaded files will be saved in /var/cache/apt/archives directory.
Just copy the entire cache folder on any USB or transfer them via network to a system that you wanted to install the packages in it.
To install the downloaded packages, go to the cache folder and install them as shown below.
See? It’s that simple!
However, t his method only works if the system that you use to download the packages does not have the main package or its dependencies installed locally.
If you try to download a package which is already installed in the same system itself, you will see an output like below.
In such cases, use «apt-rdepends» to download all packages. If apt-rdepends is not installed yet, install it using command:
And then download the main package (i.e. Vim in our case) along with all dependencies using command:
This command will recursively download all required packages.
Just in case if you encountered with an error like below:
Try this command instead:
This command will download Vim with all needed packages and save them in the current working directory.
To install all downloaded packages, run:
Method 2:
First, download the dependencies of the package you wanted to download.
To display list of all dependencies of a package, for example Python, run:
Sample output:
Let us download python package with its dependencies to our local disk.
To do so, first create a directory to save the packages.
Go to the directory:
The above command will download Python package along with all required dependencies and saves them in the current working directory. This command will also save any errors in the errors.txt file.
Let us view the downloaded files using ‘ls’ command:
Sample output:

List downloaded packages
As you see in the above output, python package with all its dependencies has been downloaded.
Just copy them to your USB drive and install the python packages on any offline system as shown below.
Mount the USB drive, go to the location where you have mounted the drive, and run the following command to install Python.
Suggested Read :
Download packages with dependencies locally for a specific architecture
You might notice that the above command has downloaded the 64 bit packages. It is because I am downloading them from the 64-bit Ubuntu system. What if you want to download packages for 32-bit arch systems? It’s also possible!
First, enable the architecture you want in your Ubuntu system using command:
If you don’t add the architecture, you will get the following error message when try to download the packages.
After enabling the Architecture of your choice, run the following command to download specific architecture related packages.
As you see in the above output, I have added the architecture ‘i386’ with ‘apt-cache’ command.
Sample output:

Download packages with dependencies locally for a specific architecture
Let us check the downloaded packages.
Sample output:
See? The above command downloaded the 32 bit packages only.
Recommended read:
You know now how to download packages with dependencies in Ubuntu systems. These methods are same for all DEB-based systems.
Источник


