- How to View File and Folder Permissions in Ubuntu Linux Command Line
- To View Permissions
- Changing Permissions
- Single File or Folder
- All Files
- All Folders
- Changing Owner/Group
- Change Owner/Group of a File
- Change Owner/Group of All Files/Directories
- Permission Groups
- Permission Types
- Numeric Meanings
- Common File Permissions
- Common Directory Permissions
- 4 replies
- Leave a reply
- Linux get permission folder
- ls command
- Permission details
- The first character: file type
- Permissions abbreviations
- The permissions characters
- The first number
- Owner and group
- The rest
- Share this information:
- How to Manage File and Folder Permissions in Linux
- Command line: File permissions
- Command line: File ownership
- GUI: File permissions
- GUI: Change ownership
How to View File and Folder Permissions in Ubuntu Linux Command Line
To View Permissions
To list permission of each file in a directory, in this example /var :
To list file permissions for filename.txt :
To list directory permissions for /var :
To list permissions files in a folder including hidden files.
To list file permissions in a folder with human readable file size:
Changing Permissions
Single File or Folder
To change permissions of file to 644 for example:
To change permissions of directory to 755 for example:
All Files
To change all files recursively to 644 .
All Folders
To change all directories recursively to 755 .
Changing Owner/Group
Change Owner/Group of a File
Change Owner/Group of All Files/Directories
To change the owner and group of all files and directories recursively within a directory.
To change the owner and group of a directory, and all the files and directories within it recursively.
Permission Groups
Each file and directory has three user based permission groups:
- owner – The Owner permissions apply only the owner of the file or directory, they will not impact the actions of other users.
- group – The Group permissions apply only to the group that has been assigned to the file or directory, they will not effect the actions of other users.
- all users – The All Users permissions apply to all other users on the system, this is the permission group that you want to watch the most.
Permission Types
Each file or directory has three basic permission types:
- read – The Read permission refers to a user’s capability to read the contents of the file.
- write – The Write permissions refer to a user’s capability to write or modify a file or directory.
- execute – The Execute permission affects a user’s capability to execute a file or view the contents of a directory.
Numeric Meanings
| Numeric | Readable | Explanation |
| 0 | — | No access. |
| 1 | –x | Execute access. |
| 2 | -w- | Write access. |
| 3 | -wx | Write and execute access. |
| 4 | r– | Read access. |
| 5 | r-x | Read and execute access. |
| 6 | rw- | Read and write access. |
| 7 | rwx | Read, write and execute access. |
Common File Permissions
| Setting | Numerical | Owner | Group | Others |
|---|---|---|---|---|
| -rw——- | 600 | Read/Write | ||
| -rw-r—– | 640 | Read/Write | Read | |
| -rw-r–r– | 644 | Read/Write | Read | Read |
| -rw-rw-r– | 664 | Read/Write | Read/Write | Read |
| -rwx—— | 700 | Read/Write/Execute | ||
| -rwxr-xr-x | 755 | Read/Write/Execute | Read/Execute | Read/Execute |
| -rwx–x–x | 711 | Read/Write/Execute | Execute | Execute |
| -rw-rw-rw- | 666 | Read/Write | Read/Write | Read/Write |
| -rwxrwxrwx | 777 | Read/Write/Execute | Read/Write/Execute | Read/Write/Execute |
Common Directory Permissions
| Setting | Numerical | Owner | Group | Others |
|---|---|---|---|---|
| drwx—— | (700) | Read/Write/Execute | ||
| drwxr—– | (750) | Read/Write/Execute | Read | |
| drwxr-xr-x | (755) | Read/Write/Execute | Read/Execute | Read/Execute |
| drwxrwx— | (770) | Read/Write/Execute | Read/Write/Execute | |
| drwxrwxr-x | (775) | Read/Write/Execute | Read/Write/Execute | Read/Execute |
Let me know if this helped. Follow me on Twitter, Facebook and YouTube, or 🍊 buy me a smoothie.
p.s. I increased my AdSense revenue by 200% using AI 🤖. Read my Ezoic review to find out how.
4 replies
Leave a reply
Cant I just grant root to a user and limit there ability to do anythi9ng administrative?
bassicly I want my second user to be able to access anything and everything but not be able to make system changes on need to remember my password.
Hello,
I am on Ubuntu 20.04, gnome, newcomer from 30 years using Windows.
I setup a backup of my own folders using rsync, Cron scheduler.
I can see the folders and files that were created on the external SD card using terminal command line.
But, gnome file manager shows me an empty folder only. Also tried PCManFM, same thing, can’t see the resulting backup.
Maybe you can tell me what to do…
Cheers
Alex
Hi.
I’m really struggling here.
All my files have 777 permissions. I cannot figure out how to view/open the files.
Everytime I try to open them in windows it will say there is no program to view.
In Ubuntu terminal I can’t seem to view it in any way.
Any ideas?
Thank you
Dave
Who is the owner and group of the files and parent directory? You can find out with:
ls -la /path/to/directory
You may have to change the ownership of the files and directory to your own username and group.
sudo chown -R username:groupname /path/to/directory*
Источник
Linux get permission folder
Last updated on: 2019-03-07
Authored by: Jered Heeschen
This article explains how to use the ls command to check Linux® file permissions. Being able to check the permissions on a file is useful, especially for troubleshooting. You can ensure that a user can read a particular file, for example, or examine a directory structure to ensure that users can follow the hierarchy to the files that they need.
For a more in depth discussion on Linux file permissions, see Linux file permission concepts.
ls command
Use the ls command (the first letter is a lowercase L) to see what files are in a directory. When run by itself, ls returns a list of the current working directory. You can also specify a directory to list. The following example shows a list of the first few files in the /etc directory on a Gentoo system.
The -h option changes the way file sizes are displayed. When you use the -h option, files sizes are displayed in the human-readable format of kilobytes, megabytes, and so on, rather than in raw bytes. Other linux tools such as df also support this flag. The command df -h shows current disk usage in a easier to read format.
To display hidden files (files with names that start with a period), use the -a option. For example, if you use only ls to look at the root home directory on a clean Linux installation, no files are returned:
However, if you add the -a option, the ls command returns a list of files:
Files that start with a period are often system files and application settings files, and you usually don’t want them included in directory lists. But it’s important to know that they’re there and how to see them. The .bashrc file is especially useful to know about because it contains user environment settings that you can change.
If you combine the -a option with the -l option (see the next section) into -la , you get all the details of the hidden files:
Consider the single period and double period in both directory lists:
The single period (.) refers to the directory itself. This is convenient if you want it to run a command and reference your current directory (for example, when you want to copy a file there).
The double period (..) refers to the parent directory. If you type cd .. the directory changes to the one above the one you’re in, in the file system hierarchy. For example, if your current directory is /root , typing cd .. would take you to / , the very top of the hierarchy.
To get more information about the files in a directory, use the -l option with ls, as shown in the following example.
The file names are on the far right side of each line, and the file details precede the names. The necessary details to check file permissions are (1) the series of letters and dashes on the far left of each line, and (2) the two columns that have root in them (in the preceding example). The rest of this article explains how to interpret and use these details.
Permission details
This section explains the series of letters and dashes that define the file permissions.
The first character: file type
In the preceding examples, the first character in each list was either a dash (-) or the letter d .
A dash (-) indicates that the file is a regular file.
The letter d indicates that the file is a directory, which is basically a special kind of file.
A special file type that you might see is a symlink, sometimes called a soft link. It begins with a lowercase L , as shown in the following example:
A symlink is a pointer to another location in the file system.
Permissions abbreviations
Permissions for files are represented by the following letters.
- r refers to the read permission.
- w refers to the write permission.
- x refers to the execute permission.
The permissions characters
Consider the following example:
The first trio of letters after the file type in a file list ( rwx ) shows the permissions for the user , or file owner.
The next trio of characters (also rwx ) shows the permissions for the group category.
The last trio of characters ( r-x ) shows the permissions for the final category, other . In this example, users who are neither the file owner nor in the group have read and execute permissions but not write, as indicated by the dash (-) in the middle position.
Notice the specific order to the permissions in a trio: read, write, execute. A dash in place of a letter for a permission means that category doesn’t have that permission.
The first number
The number listed after the permissions indicates the link count of a file or the number of contained directory entries, for a directory. This number is not relevant for permissions.
Owner and group
After the number of links, two names are listed. In the preceding example, the names are root and mail .
The first name indicates the owner of the file. The user permissions apply to the owner of the file, so in this case, the user ‘root’ has read, write, and execute permissions for this directory.
The second name is the file’s group. The group permissions apply to any user in the same group as the file, so in this case, those permissions apply to anyone in the mail group.
The rest
The remainder of the file details are the size of the file, the date and time that the file was created or last modified, and the file name.
Share this information:
©2020 Rackspace US, Inc.
Except where otherwise noted, content on this site is licensed under a Creative Commons Attribution-NonCommercial-NoDerivs 3.0 Unported License
Источник
How to Manage File and Folder Permissions in Linux
For many users of Linux, getting used to file permissions and ownership can be a bit of a challenge. It is commonly assumed, to get into this level of usage, the command line is a must. Although there is always far more power and flexibility to be had, running seemingly complicated command isn’t alwaysa necessity. With the help of some of the most user-friendly desktop interfaces available, you can get away with little to no command line usage. Even with file permission and ownership.
That’s right, much to the surprise of many a new user, managing files and folders can be done from within the file managers. But before we get to the GUI, it’s always best to have a solid understanding of what it’s doing. So, we’ll start with the command line first.
Command line: File permissions
The commands for modifying file permissions and ownership are:
chmod – change permissions
chown – change ownership.
Neither command is difficult to use. It is important, however, that you understand the only user that can actually modify the permissions or ownership of a file is either the current owner or the root user. So, if you are user Bethany, you cannot make changes to files and folders owned by Jacob without the help of root (or sudo). For example:
A new folder was created on a data partition called /DATA/SHARE. Both users Bethany and Jacob need read and write access to this folder. There are a number of ways this can be done (one of which would be to join the users to a special group – we’ll go over managing groups in another post). If Bethany and Jacob are the only users on the system (and you know your network is safe – very important), you can change the permissions of the folder to give them access. One way to do this would be to issue the command:
The breakdown of the above command looks like:
sudo – this is used to gain admin rights for the command on any system that makes use of sudo (otherwise you’d have to ‘su’ to root and run the above command without ‘sudo’)
chmod – the command to modify permissions
-R – this modifies the permission of the parent folder and the child objects within
ugo+rw – this gives User, Group, and Other read and write access.
As you can probably surmise, this command opens wide the SHARE folder such that anyone on the system can have access to that folder. As I mentioned earlier, a more secure method would be to use groups. But we’re just using this for the purpose of demonstration.
The breakdown of permissions looks like this:
The ‘other’ entry is the dangerous one, as it effectively gives everyone permission for the folder/file. The permissions you can give to a file or folder are:
Using the -R switch is important. If you have a number of sub-folders and files within the SHARE directory, and you want the permissions to apply from the parent object (the containing folder) to the child objects (the sub-folders and files), you must use the -R (recursive) switch so the same permissions are applied all the way to the deepest folder, contained within the parent.
Command line: File ownership
Changing the ownership of a file or folder is equally as simple. Say Jacob moved a folder for Bethany into the SHARE directory – but Jacob still has ownership. This can be changed with a simple command:
Let’s break this down.
sudo – admin rights must be used since we are dealing with a folder that belongs to another user
chown – the command for changing ownership
-R – the recursive switch to make sure all child objects get the same ownership changes
bethany – the new owner of the folder
/DATA/SHARE – the directory to be modified
Should Bethany send the folder back to Jacob, the ownership would need to again be changed (again, this will be simplified with the use of groups).
GUI: File permissions
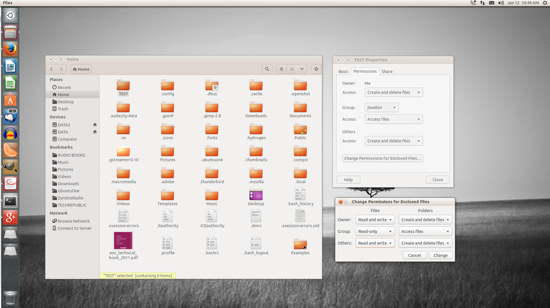
I’m going to demonstrate changing file permissions using the Nautilus file manager on an Ubuntu 13.10 system.
Let’s say you need to allow everyone to gain read/write permissions to the folder TEST. To do this, within the Nautilus file manager, follow these steps:
- Open Nautilus
- Navigate to the target file or folder
- Right click the file or folder
- Select Properties
- Click on the Permissions tab
- Click on the Access files in the Others section
- Select “Create and delete files”
- Click Change Permissions for Enclosed Files
- In the resulting window, Select Read and Write under Files and Create and delete files under Folders (Figure A)
- Click Change
- Click Close.
The trick comes when you need to change the permissions of a folder which does not belong to you. It can be done, but Nautilus must be started with admin access. To do this, follow these steps:
Open up a terminal window
Issue the command sudo -i
Issue the command nautilus
The sudo -i command gives you persistent access to sudo, until you enter the exit command to remove that access. Once Nautilus is open, you can change the permissions of the folder or file as described above – even if you are not the owner of the folder or file.
NOTE: If you’re using a distribution that doesn’t use sudo, alter the above instructions to:
Open up a terminal window
Issue the command su
Type your root password and hit Enter
Issue the command nautilus.
After you’ve completed the task, close the Nautilus window and then the terminal window.
GUI: Change ownership
Changing the ownership of a file or folder will most often require the use of admin rights. So for this, you’ll need to start Nautilus in the method described above.
For changing ownership of a folder or file through Nautilus, do the following:
In the Nautilus window (opened with admin rights), locate the folder or file in question
Right click the folder (or file)
Click on the Permissions tab
Select the new owner from the Owner drop-down (below)
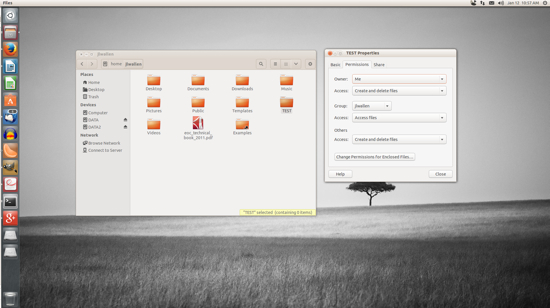
That’s all there is to it. At this point you shouldn’t have any problems changing permissions or ownership for a file or folder with either the command line or the GUI. The use of groups will empower you to alter permission and ownership with more power and security – we’ll cover that soon. Until then, enjoy modifying your files and folders!
Источник


