- Fingerprint GUI
- Contents
- Installation
- Registering fingerprints
- Authentication
- Verification
- Exporting
- Password
- Best way to generate a machine fingerprint?
- 6 Answers 6
- Linux get machine fingerprint
- About
- Fingerprint GUI: приложение для считывателей отпечатков пальцев в Ubuntu
- Как установить графический интерфейс Fingerprint на Ubuntu 18.04 и производные?
- Как удалить графический интерфейс Fingerprint GUi из Ubuntu и производных?
Fingerprint GUI
Fingerprint GUI is a program that provides an interface and drivers for fingerprint readers. The package includes drivers from the open-source project fprint as well as proprietary drivers not included in fprint.
Contents
Installation
The package is available on the AUR :
The package includes an installation guide in HTML at /usr/share/doc/fingerprint-gui/Manual_en.html .
If you are using GNOME or KDE follow the instructions pacman gives and remove the following files:
If you are using a window manager, you may need an authentication agent. The package includes an authentication agent /lib/fingerprint-gui/fingerprint-polkit-agent . If your window manager is fully XDG compliant, this agent will autostart. An agent is only needed when enrolling fingers, not when identifying.
Registering fingerprints
After installation, test if your hardware is recognized and correctly working by launching the configuration utility:
The -d is for debugging, and simply creates a verbose log of events. If you are comfortable without the debug info, you may safely omit the flag.
If your device is not recognized, you might need to reboot in order for udev to set the correct permissions for the device. You may need to add your user to the scanner group.
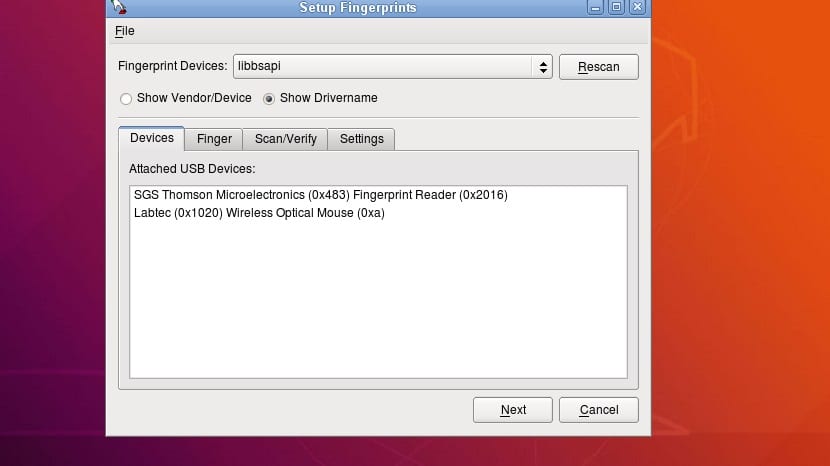
To start registering your fingerprints with the configuration utility, select the tab «Finger», select a finger and choose «next».
Authentication
Once your fingerprints have been registered, you may notice that in the setup procedure that the «test» section does not yet work. This is because the necessary authentication has not been approved in the appropriate pam.d files.
As an example of how to set up fingerprint authetication for a given service, we will first start with sudo. Open /etc/pam.d/sudo in your text editor and insert the following bold text:
Keep in mind that your ‘sudo’ file may contain more entries.
Some users may not have (or want to have) sudo installed on their systems. In this case, it is still possible to use your fingerprint to authenticate su. This can be done just like the sudo example, of course instead adding an entry to /etc/pam.d/su . Again, add the following bold text.
One may also configure such things as GDM, KDM, LightDM and the Gnome-Screensaver. Again, if more information or instruction is needed, please refer to the included manual. The Package Maintainer’s Manual might provide further information that cannot be obtained by the included manual.
Verification
Now that the necessary authentication has been added to pam, you may wish the confirm the functionality of your setup. The easiest way to do this is to, again, launch the fingerprint-gui. Rather than go through the steps (as your fingerprints should already be established), click directly on the Settings tab. From here you may select the function you wish to test (ie. sudo, su, gdm, etc).
There is also an included utility to simply confirm that your registered fingerprints are recognized. This can be done by simply running:
and following the onscreen instructions.
Exporting
If you wish to save your user’s fingerprint data to a file, simply use the Export button in the Settings tab. A file Fingerprints.tar.gz» will be created in the desired directory. The saved file appears to be of little use, however, as an «Import» function has not yet been discovered (as of May 2018).
Password
In some cases, using your fingerprint to log into the system may inhibit certain other functions of the desktop environment. For example, GNOME Keyring is dependent on your password, as it is used to encrypt the data in your keyring. To overcome this, Fingerprint GUI contains a feature that allows you to store your encrypted password on removable media (USB). You may then use the key to decrypt your keychain by authenticating your fingerprint while the removable media is plugged in.
Источник
Best way to generate a machine fingerprint?
I need to generate a unique string that will differ from machine to machine — a «device fingerprint».
- possible approaches for custom implementations? (I’ve got a few ideas, but I figure you guys probably have BETTER ones)
- existing solutions? (both commercial / non commercial are acceptable)
6 Answers 6
Well what I do with my apps is usually create a special ID by taking the hash from the machine name found in Environment , concat it with a hash value of my app’s name, and then apply a salt (probably not even necessary but it helps to be paranoid) to produce a «fingerprint» for an app/machine combo.
This works in my situation because there is only one copy of my app on a machine at a time.

Most machines have a NIC with a MAC Addresses now (if it isn’t attached to the net then what do you need a unique id for the machine for?). Just make sure you are getting the physical NIC’s MAC address and not a virtual mac (created by VMWare or Virtualbox). You may want to store the name of the device the MAC is coming from so that you always get the same MAC address when you are enumerating the MAC addresses. Also don’t use this for security as it is always possible to fake a MAC address, it just provides a relatively unique identifier.
Device fingerprinting is a complex topic if you want to cover the many edge cases (e.g. hardware upgrades, OS upgrades, etc.) and if you are worried about people expending energy to either forge a known-good device fingerprint (good meaning the fingerprint is known to you and receives some benefit such as software usage rights), or create a brand-new fingerprint you have no knowledge of (e.g. the fingerprint was on a blacklist of some sort, and the user wants to create a new Device ID for the device that is not on the blacklist).
Some things are fairly static and a reasonable basis for a simple fingerprint. MAC address best fits that category, but is also very easy to change. Also, some computers have several MAC addresses (including MAC’s from virtual machines), so you need to deal with that complexity. Some network devices are ephemeral, e.g. tethered cell phone.
Other aspects of the computer are harder (but by no means impossible) to forge, such as CPU information, BIOS checksum, hard drive serial numbers, etc. Those things that tend to be harder to forge, however, are also more likely to change (BIOS upgrade, new hard drive, removable hard drives, etc).
You also need to consider carefully protecting the code that actually generates the fingerprint. If that code is easy (enough) to hack, someone attempting to defeat your solution will simply insert whatever fingerprint they want directly in the code that gathers and evaluates components.
Источник
Linux get machine fingerprint
Fingerprint GUI is an application providing fingerprint-based authentication on Linux desktops. Based on the libfprint library, it features a simple GUI for fingerprint management and a PAM module. Additionally, you may install the bundled non-free libbsapi library, in which case Fingerprint GUI will automatically support all fingerprint readers manufactured by UPEK, Inc.
The list of fingerprint readers supported by libfprint is available here.
If you install the libbsapi library, then all hardware by UPEK should be supported as well.
Prepare the build environment
This project is built using the Qt 5 development framework. The required packages can be installed on any recent Debian-based Linux distributions with the command:
In order to compile the software you will need cmake and the development packages for libfprint, libqca-qt5-2, libfakekey, libusb-1.0, libpolkit-qt5-1 and libpam.
If you are running a recent Debian-based distribution, use the following command:
Create the build directory
Generate the Makefile
By default, everything gets installed under /usr/local/ . If you want to change the prefix to /usr/ , you can alter the cmake invocation like this:
Additionally, libraries are installed into $CMAKE_INSTALL_PREFIX/$CMAKE_INSTALL_LIBDIR , helper executables go into $CMAKE_INSTALL_PREFIX/$CMAKE_INSTALL_LIBEXECDIR , and the PAM module is installed into $CMAKE_INSTALL_LIBDIR/security . The default value for both $CMAKE_INSTALL_LIBDIR and $CMAKE_INSTALL_LIBEXECDIR is /lib , which should be suitable for most Linux distributions.
However, should you need to adjust the value of these two variables, you can set them in the same way as $CMAKE_INSTALL_PREFIX above. For instance, on recent 64-bit Fedora systems you would invoke cmake like this:
if you want to install into /usr .
Build the software
Install the compiled software
Add support for UPEK readers (install the bundled proprietary library libbsapi )
Upgrading from older versions
Beginning with version 1.07 of Fingerprint GUI, the ownership and permissions of users’ fingerprint data in /var/lib/fingerprint-gui/ has been changed. To apply the new ownership and permissions needed for version 1.07 and above to fingerprint data from an older version, run:
Please note that every user that wants to use this library must be member of group plugdev . This group is created automatically. The following command will add your current user account to the plugdev group:
See the following guides for instructions on how to modify your PAM stack to enable fingerprint-based authentication:
The lxdm developers should read the PAM documentation, specifically the «Linux PAM Application Developers Guide» located here. Because of the completely improper use of PAM authentication in lxdm it is not possible to use alternative authentication methods.
If you want to use fingerprint login for Lubuntu or other lxdm desktop environments you should install lightdm and lightdm-gtk-greeter and use those instead. That will work.
This software is released under GPL-3+. See LICENSE for the full text of the license.
Copyright © 2008-2016 Wolfgang Ullrich contact@ullrich-online.cc
Bugs can be sent directly to the author or posted in the forums.
About
Use fingerprint readers with a Linux desktop environment
Источник
Fingerprint GUI: приложение для считывателей отпечатков пальцев в Ubuntu

Обычно мы обычно используем имя пользователя с паролем, пароль или код для блокировки нашего оборудования, хотя в настоящее время у нас есть несколько других дополнительных ресурсов безопасности реализованы в наших устройствах, таких как смартфон, планшет, ноутбук, настольный компьютер и другие.
Хотя во многих случаях они обычно недостаточно полезны из-за надежности пароля или кода, поэтому во время Это последнее поколение увеличило использование биометрических устройств для замены этих учетных данных.
На этот раз мы сосредоточимся на одном из самых популярных биометрических устройств и в настоящее время используется в большинстве мобильных устройств последнего поколения.
Сканер отпечатков пальцевХотя он специально не предназначен для использования в качестве метода доступа, он также используется для других задач, таких как вход и выход в рабочей среде, предоставление доступа, подписание и другие.
Хотя В случае Linux производители этих устройств обычно не предлагают своих драйверов.
Для чего для этой проблемы мы поговорим об утилите что нас в этом поддержит Графический интерфейс отпечатков пальцев это приложение с открытым исходным кодом для использования сканера отпечатков пальцев в вашей системе.
Графический интерфейс отпечатков пальцев это программа, которая предоставляет интерфейс и драйверы для считывателей отпечатков пальцев. В пакет входят драйверы из проекта с открытым исходным кодом fprint, а также проприетарные драйверы, не входящие в fprint.
Как установить графический интерфейс Fingerprint на Ubuntu 18.04 и производные?
Si вы хотите установить эту утилиту в вашей системе, чтобы иметь хорошую поддержку для вашего биометрического устройства, мы должны сначала проверить, совместимо ли наше устройство с приложением.
Перед началом рекомендую отключите все дополнительные USB-устройства считывателя отпечатков пальцев, мыши и клавиатуры, чтобы эффективно определить его идентификатор в вашей системе.
Для этого откройте терминал Ctrl + Alt + T и выполните следующую команду:
При этом они должны получить ответ, подобный этому:
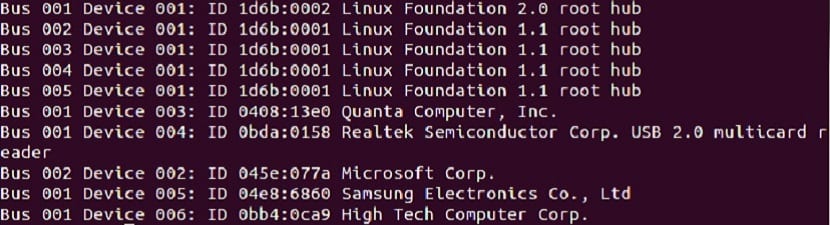
Сейчас Они должны проверить из своего отображаемого списка, совместимо ли их устройство с приложением., среди поддерживаемых в нем устройств:
045e: 00bb 08ff: 1683 08ff: 2660 08ff: 268f 147e: 2020
045e: 00bc 08ff: 1684 08ff: 2680 08ff: 2691 147e: 3001
045e: 00bd 08ff: 1685 08ff: 2681 08ff: 2810 1c7a: 0603
045e: 00ca 08ff: 1686 08ff: 2682 08ff: 5501
0483: 2015 08ff: 1687 08ff:2683 08ff: 5731
0483: 2016 08ff: 1688 08ff: 2684 138a: 0001
04f3: 0907 08ff: 1689 08ff: 2685 138a: 0005
05ba: 0007 08ff: 168a 08ff: 2686 138a: 0008
05ba: 0008 08ff: 168b 08ff: 2687 138a : 0010
05ba: 000a 08ff: 168c 08ff: 2688 138a: 0011
061a: 0110 08ff: 168d 08ff: 2689 138a: 0017
08ff:1600 08ff: 168e 08ff: 268a 138a: 0018
08ff: 1660 08ff: 168f 08ff: 268b 138a: 0050
08ff: 1680 08ff: 2500 08ff: 268c 147e: 1000
08ff: 1681 08ff: 2550 08ff: 268d 147e: 1001
08ff: 1682 08ff : 2580 08ff: 268e 147e: 2016
0483: 2015 147e: 1003 147e: 3000
0483: 2016 147e: 2015 147e:3001
147e: 1000 147e: 2016 147e: 5002
147e: 1001 147e: 2020 147e: 5003
147e: 1002
Если он совместим, вы можете продолжить установку, сначала Мы должны добавить репозиторий в систему с помощью этой команды:
sudo add-apt-repository ppa:fingerprint/fingerprint-gui
Мы обновляем наш список репозиториев:
sudo apt-get update
И сейчас мы должны установить приложение вместе с некоторыми утилитами за безупречную работу в нашей системе:
sudo apt-get install libbsapi policykit-1-fingerprint-gui fingerprint-gui
Нам просто нужно дождаться загрузки и установки. При запуске приложения мы можем начать регистрацию отпечатков пальцев.
Кроме того, в случае обработки более чем одного считывателя отпечатков пальцев приложение показывает нам список, в котором мы можем выбрать, с каким из них мы хотим работать, и мы выбираем его, чтобы начать регистрацию отпечатков пальцев с его помощью.
Как удалить графический интерфейс Fingerprint GUi из Ubuntu и производных?
Если вы хотите удалить это приложение из своей системы Они должны выполнить следующие команды, если они используют Ubuntu или производную от Gnome, они должны выполнить:
sudo apt-get install policykit-1-gnome
В случае с KDE их просто нужно заменить на:
sudo apt-get install policykit-1-kde
И, наконец, удаляем приложение с помощью этой команды:
sudo apt-get remove fingerprint-gui
Таким образом, мы уже удалим приложение из нашей системы.
Содержание статьи соответствует нашим принципам редакционная этика. Чтобы сообщить об ошибке, нажмите здесь.
Полный путь к статье: Из Linux » приложений » Fingerprint GUI: приложение для считывателей отпечатков пальцев в Ubuntu
Источник


