- не могу примоунтить диск.
- Using the GPT Linux Filesystem Data Type Code
- What’s the Problem?
- Using GPT fdisk
- Patching libparted/GNU Parted
- Using libparted
- Conclusion
- Команда fdisk в Linux
- Опции и синтаксис fdisk
- Примеры использования команды fdisk
- 2. Интерактивный режим
- 3. Просмотр таблицы разделов
- 4. Создание таблицы разделов
- 5. Создание разделов
- 6. Тип раздела
- 7. Удаление раздела
- 8. Загрузочный раздел
- 9. Применение изменений
- Выводы
не могу примоунтить диск.

echo p | parted /dev/sdb
$ sudo file -s /dev/sdb4
у меня, при попытке моунта в dmesg валится следующее:
на что гугл говорит следующее:
Right. What is your kernel version (uname -a)? Until kernel 3.2 the blocksize of ext4 >was limited to the page size of the memory, which is 4k on a x86/amd64 system. (But >64k is supported on many other platforms, ppc, mips, and, apparently, arm.) So I >suppose your kernel is older.
а моя федора 3.15.10-200.fc20.x86_64
я так понимаю примоунтить не получиться никак
dumpe2fs -h /dev/sdb4 | grep Block
На крайний случай можно через fuseext2 примонтировать и вытащить данные.
ок. сейчас попробую через fuseext2
это диск от какого-то nas-a для дома.
Да там какой-нибудь ARM с page size 64k. На x86_* не примонтируешь. Попробуй через fuseext2
fuseext2 нет в репах, попытался сам:
./configure прерывается на
Источник
Using the GPT Linux Filesystem Data Type Code
Web page created: 2/19/2012; last update: 10/6/2012
I’m a technical writer and consultant specializing in Linux technologies. This Web page is provided free of charge and with no annoying outside ads; however, I did take time to prepare it, and Web hosting does cost money. If you find this Web page useful, please consider making a small donation to help keep this site up and running. Thanks!
| Donate $1.00 | Donate $2.50 | Donate $5.00 | Donate $10.00 | Donate another amount |
A relatively new (June, 2011) partition type code for Linux-native filesystems on GUID Partition Table (GPT) disks holds the promise to reduce the risk of problems on dual-boot Linux/Windows systems. Unfortunately, this type code has not yet (as of October of 2012) been widely adopted by most partitioning software, although it’s now «in the pipeline» and so should become used by default on most Linux distributions within a few months. In the meantime, many systems, particularly those that dual-boot Windows and Linux on Unified Extensible Firmware Interface (UEFI) computers, are vulnerable to accidental destruction of their Linux installations from Windows. The solution is simple, and this page describes how to implement the solution even if your distribution hasn’t yet adopted it.
What’s the Problem?
Disk partition tables include type codes, which are coded names or numbers associated with specific uses of partitions. OSes can use the type codes as they see fit. For the most part, Linux ignores partition type codes, but Windows doesn’t—it uses partition type codes as a filter to determine which partitions to attempt to use. Specifically, the Microsoft Basic Data type code (EBD0A0A2-B9E5-4433-87C0-68B6B72699C7) identifies a filesystem that Windows can understand, such as FAT or NTFS. Unfortunately, for years Linux has used this same type code to identify its filesystem partitions on GPT disks; however, Windows can’t read Linux filesystems without extra drivers. This means that Windows shows Linux filesystem partitions as unformatted disks in its file manager, and if you attempt to access one, Windows asks you if you want to format it, as shown below. This makes it far too easy to accidentally trash your Linux installation from Windows if you place Linux filesystem partitions on a GPT disk. This problem does not affect the older Master Boot Record (MBR) partitioning system, which is the most common partitioning system on pre-2011 computers. Thus, on older Linux/Windows dual-boot systems, Windows won’t show the Linux partitions in its file manager. Also, this problem does not apply to Linux swap, LVM, or RAID partitions, even on GPT disks; it only affects Linux filesystem partitions that are given the Microsoft Basic Data partition type code on GPT disks.

When I first wrote the GPT fdisk (gdisk, cgdisk, and sgdisk) partitioning software, I felt that having Linux share the same filesystem type code as Windows was awkward at best and risky at worst, but I went along with it because I didn’t want to deviate from accepted practice. As time went on, though, I began to see problem reports in online forums, and with the explosion of computers that use the UEFI firmware (which in turn uses GPT) in 2011, it became clear to me that something would have to be done. Thus, I modified both GPT fdisk and the other major Linux partitioning software with GPT support, libparted, to use a new Linux-specific type code for Linux filesystem partitions. I called the new filesystem type Linux Filesystem Data, and it has a GUID code of 0FC63DAF-8483-4772-8E79-3D69D8477DE4 (although you may never need to know or use that GUID value directly). I posted to the bug-parted mailing list about the problem, and the ensuing discussions resulted in some further improvements to my libparted patch. This took place in late June of 2011.
GPT fdisk has included support for the new type code since version 0.7.2 (released in June of 2011), and a few other tools, such as busybox, also support the new type code. It took over a year, but in late September of 2012, the libparted «powers that be» have finally accepted my patch, and it should be included in libparted 3.2, which is due out in October of 2012. To use the new code, you have three choices: You can use GPT fdisk to change the type code on your partitions, you can patch a pre-3.2 version of libparted to support the new code, or you can use libparted 3.2. If you have a Linux-only installation, there’s no real need to adjust your partition type codes, since the Linux kernel and most other Linux tools ignore partition type codes.
Using GPT fdisk
If you have an existing dual-boot installation and you want the Linux partitions to disappear from the Windows file browser, the easiest way to accomplish this goal is to use GPT fdisk, version 0.7.2 or later. You can use the t command in the gdisk utility to do the job. Change the type code from 0x0700 to 0x8300:
This example shows a GPT disk (as evidenced by the GPT: present line) with a Linux filesystem (Spare /boot) that has a 0x0700 type code—GPT fdisk’s way of identifying a Microsoft Basic Data partition. (Since GPT fdisk doesn’t scan partitions’ contents to identify the filesystem, you’ll have to know enough about your disk to know which partitions are actually Linux filesystem partitions.) This disk also has an EFI System Partition (ESP) and a Linux LVM partition. To change the type code of the Linux partition, use the t command to set a code of 0x8300 (GPT fdisk’s internal code for the Linux Filesystem Data type):
To be sure everything is OK, you can view the partition table again, and then save your changes:
After making this change, the Linux partition(s) whose codes you change will disappear from the Windows file manager. If you need more help in using GPT fdisk (including the cgdisk and sgdisk variants), consult the main GPT fdisk Web page.
Patching libparted/GNU Parted
If you’re using a pre-3.2 version of libparted and don’t want to or can’t upgrade it, you may be able to patch the source code or install a patched binary version of libparted. This will enable you to create partitions with the new type code from the start, rather than fix them after the fact. I’m releasing my patch on this page for individual users or for distributions that want to ship a pre-3.2 version of libparted with support for the new type code. You can download the patch in several ways:
- A parted 3.0 source code patch file—Download this file and apply it to the source code if you want to build libparted (and GNU Parted) locally with the patch. This patch applies cleanly to parted 3.0. I don’t guarantee that it applies cleanly to any other version.
- A patched source code tarball for parted 3.0—Download this file if you want a pre-patched source code tarball to compile locally.
- An RPM .spec file for parted 3.0—This file, in conjunction with the patch file and the original source code file, enables you to build binary and source RPMs for the patched version of parted.
- A patched source RPM file for parted 3.0—You can create a binary RPM for any architecture from this file by using rpmbuild.
- A patched binary RPM of parted 3.0 for x86-64—Download this version if you have an RPM-based x86-64 computer. I compiled this on a Fedora 16 system, and I can’t guarantee it will work on others.
- A patched binary RPM of parted 3.0 for i586—Download this version if you have an RPM-based x86 computer. I compiled this on an openSUSE 12.1 system, and I can’t guarantee it will work on others.
Note that my patch was created against parted 3.0, but parted 3.1 was released in March of 2012 (after I wrote the initial version of this page). I don’t guarantee that the patch will work against other versions of parted, but it might. I haven’t updated the pre-patched versions of the program for parted 3.1; instead, I recommend you wait for parted 3.2 to be released.
Because of the huge number of distributions, I can’t make binaries available for all of them. You might be able to get a binary RPM working on a Debian-based system with the help of alien, but I make no promises. If you can’t get one of the binary RPMs to install on your system, you may need to compile the source code locally. Also, if your distribution uses a version of parted other than 3.0, switching to my patched parted 3.0 may cause problems or be disallowed by your package manager.
If you need help compiling and installing the program from source code, consult the INSTALL file in the main directory of the source code tarball, or do a Web search for generic instructions on compiling and installing source code.
Using libparted
GNU Parted doesn’t give you direct control over partition type codes. Instead, they’re set according to the filesystem type you specify. In parted, when you create a new partition and tell it to use a Linux filesystem type (ext2, ext3, ext4, ReiserFS, etc.), the new Linux Filesystem Data type code will be automatically applied. If you create a FAT or NTFS partition, the Microsoft Basic Data type code will be applied. Type codes for Mac OS’s HFS+, Linux swap, and other partition types are set in similar ways.
If you run the patched GNU Parted on a disk you’ve prepared with an unpatched version of libparted or on a disk that contains true FAT or NTFS filesystems, you’ll see the partitions that use the Microsoft Basic Data type code marked with a new flag, msftdata:
This example shows a disk with a Linux ext2 filesystem incorrectly marked with the Microsoft Basic Data (msftdata) type code. You can remove the flag using the GNU Parted toggle command:
Note, however, that you cannot toggle this flag off on FAT or NTFS partitions; you can only do so on partitions that hold other filesystem types. (If you try to toggle the msftdata flag off on a FAT or NTFS partition, the command will silently fail.) To verify that the change has been made, type print; the msftdata flag should be gone. You can then quit (parted makes its changes as you type commands, unlike gdisk, which holds them until you explicitly write them with w).
If you install a patched libparted on a system that also runs libparted-based programs, such as GParted, they should automatically take advantage of the new functionality. For instance, GParted shows the new flag when the Microsoft Basic Data type code is set:

Note that GParted shows the msftdata flag as being set on /dev/sda3 in the figure, and the «Manage Flags» feature enables you to unset it. Also, note that GParted must use the version of libparted provided by the patched parted package you install; if it uses another version of the library, GParted will continue to apply the Microsoft Basic Data type code to Linux partitions.
Conclusion
If you’re using a version of libparted that lacks support for the Linux Basic Data partition type code, I recommend that you install a patched or upgraded version that includes this support. Without it, the risk of Linux partitions being accidentally trashed in Windows is unacceptably high. In absolute terms, this risk will only increase as more UEFI-booting systems become available. With any luck, now that the support is being added to libparted 3.2, it should begin to migrate down to distributions and be used by default.
Источник
Команда fdisk в Linux
В Linux существует множество способов разметки диска, создания на нём разделов и просмотра уже существующих. Это утилиты parted и cfdisk в терминале и графическая утилита gparted. Однако сегодня мы поговорим про самую простую утилиту для разметки диска в терминале — fdisk.
Именно она используется чаще всего, если надо посмотреть как диски и разделы доступны на компьютере. Далее рассмотрим основные опции утилиты, её синтаксис, а также примеры использования.
Опции и синтаксис fdisk
Синтаксис утилиты ничем не отличается от других команд Linux:
$ fdisk опции устройство
Ей надо передать опции, согласно действия, которое вы хотите выполнить, а также раздел диска или устройство к которому эти действия надо применить. Давайте теперь рассмотрим опции fdisk:
- -B, —protect-boot — не стирать первые 512 байт диска чтобы не повредить загрузочную запись;
- -L, —color — настройка цветного вывода, возможные значения auto, never или always;
- -l, —list — вывести все разделы на выбранных устройствах или если устройств не задано, то на всех устройствах;
- -o, —output — указывает какие поля данных надо показывать в выводе программы, доступные поля рассмотрим ниже;
- -u, —units — настраивает формат вывода размера разделов, доступные значения: cylinders, sectors, по умолчанию используется sectors;
- -w, —wipe — режим стирания файловой системы или RAID с диска, возможные значения auto, never или always по умолчанию используется auto;
- -W, —wipe-partition — режим стирания файловой системы или RAID из только что созданного раздела. Возможные значения аналогичны предыдущей опции;
- -h, —help — показать справку по утилите;
- -v, —version — опция выводит версию утилиты.
Опции используются для настройки работы утилиты, мы рассмотрели только самые главные, которые могут вам пригодится, теперь перейдём к командам:
- a — включение или выключения флага boot для раздела;
- d — удалить раздел;
- F — показать свободное место;
- l — вывести список известных типов разделов;
- n — создать новый раздел;
- p — вывести таблицу разделов;
- t — изменение типа раздела;
- i — вывести информацию о разделе;
- I и O — записать или загрузить разметку в файл сценария sfdisk;
- w — записать новую таблицу разделов на диск;
- q — выйти без сохранения;
- g — создать пустую таблицу разделов GPT;
- o — создать пустую таблицу разделов MBR.
Теперь вы знаете основные опции и команды fdisk, давайте рассмотрим использование программы.
Примеры использования команды fdisk
1. Список дисков и разделов
Чтобы посмотреть список доступных вам дисков и разделов на них используйте опцию -l:
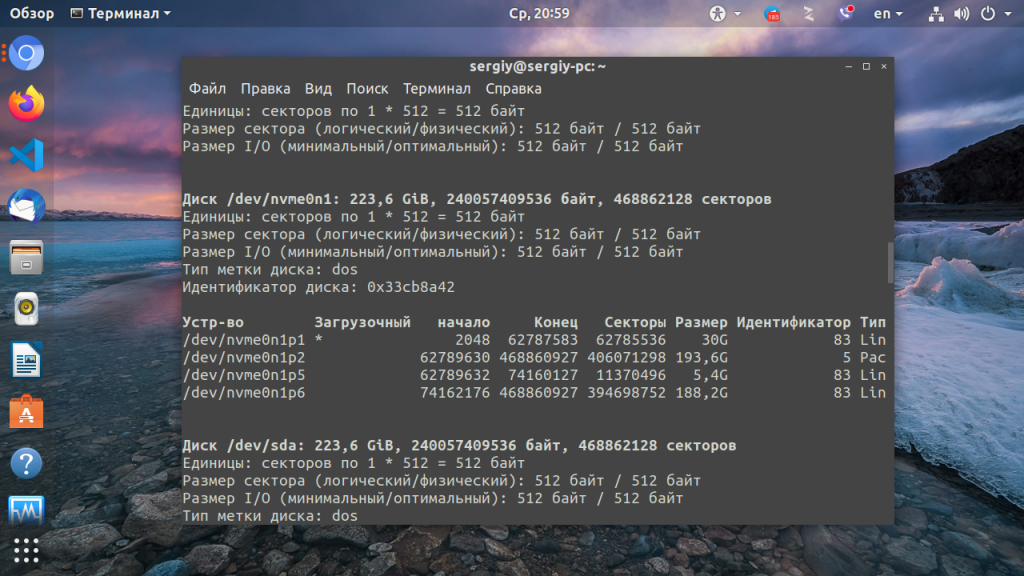
Утилита покажет все блочные устройства. На снимке есть /dev/sda, это обычный жесткий диск и /dev/nvme0n1 — это M.2 накопитель, а также там есть есть несколько /dev/loop* устройств, созданных ядром, которые лучше не трогать.
2. Интерактивный режим
Большинство операций fdisk по разметке дисков выполняются в интерактивном режиме. Чтобы запустить fdisk в интерактивном режиме передайте утилите блочное устройство которое надо разметить. В моём примере, это /dev/nvme0n1:
sudo fdisk /dev/nvme0n1
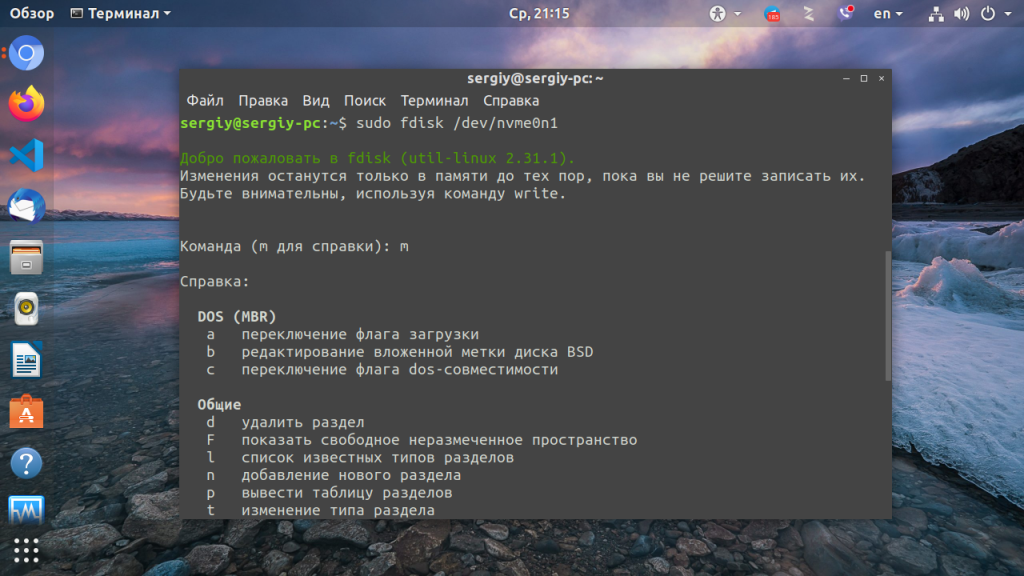
Вам не обязательно возвращаться к этой статье, когда вы захотите снова поработать с программой, посмотреть доступные команды можно выполнив команду m:
3. Просмотр таблицы разделов
Чтобы посмотреть текущий тип таблицы разделов, а также доступные разделы на диске используйте команду p:
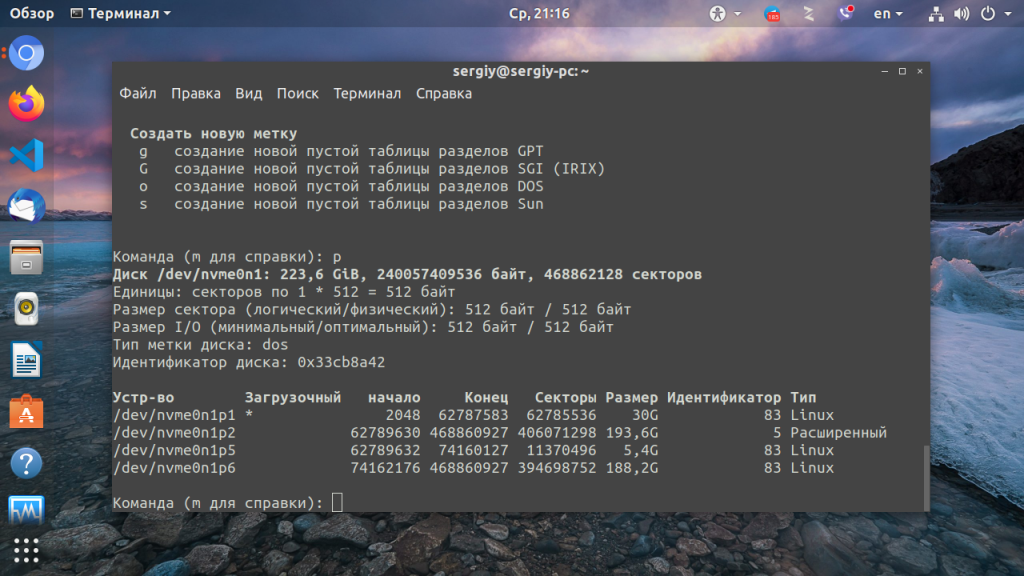
В данном примере на диске уже есть несколько разделов, а таблица разделов используется MBR (dos).
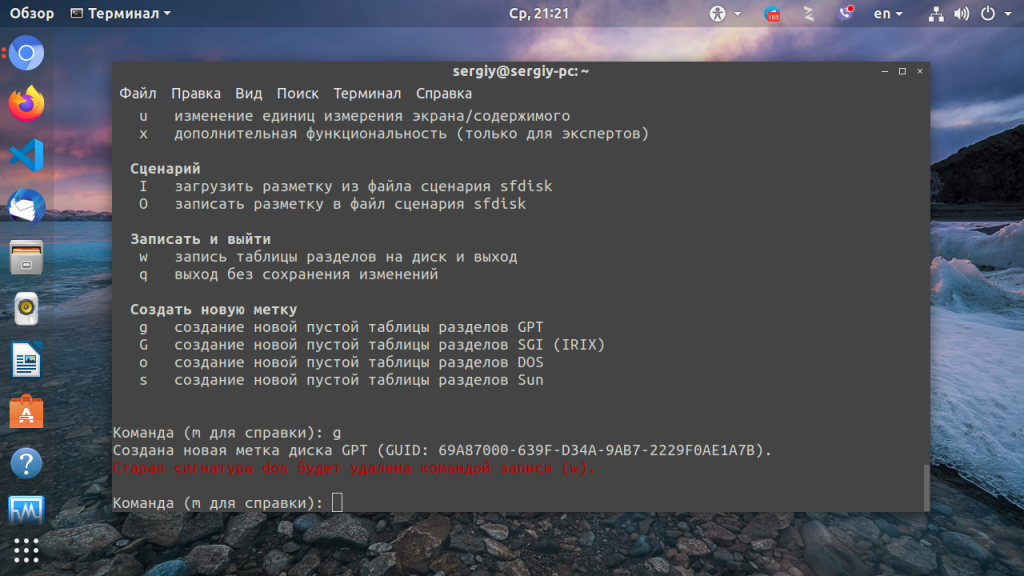
4. Создание таблицы разделов
Давайте создадим новую таблицу разделов GPT. Для этого используйте команду g. Для таблицы разделов MBR нам бы понадобилась команда o.
5. Создание разделов
Чтобы создать раздел используйте команду n. Команда спросит какой номер раздела надо присвоить этому разделу, затем спросит сектор начала раздела, эти значения можно оставить по умолчанию, так как утилита предлагает минимальные доступные. Далее надо указать размер раздела. Это можно сделать тремя способами:
- указать количество секторов раздела;
- указать последний сектор раздела;
- указать размер раздела в килобайтах, мегабайтах или гигабайтах, обозначения стандартные K,M,G.
Давайте создадим три раздела разными способами:
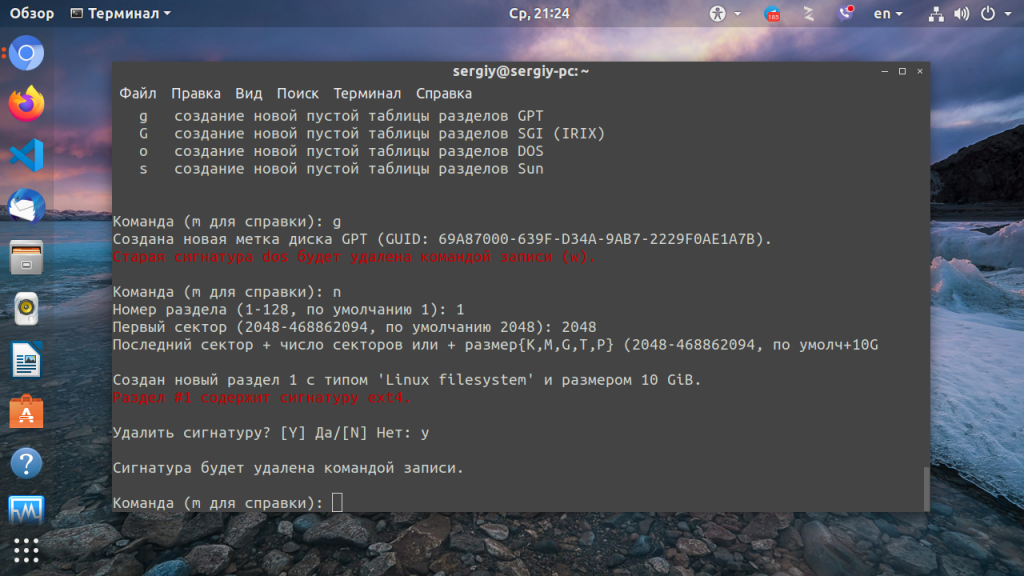
Первый раздел создадим с помощью обычных единиц измерения. Перед ними надо ставить плюс, так как это место, которое добавляется к первому сектору раздела.
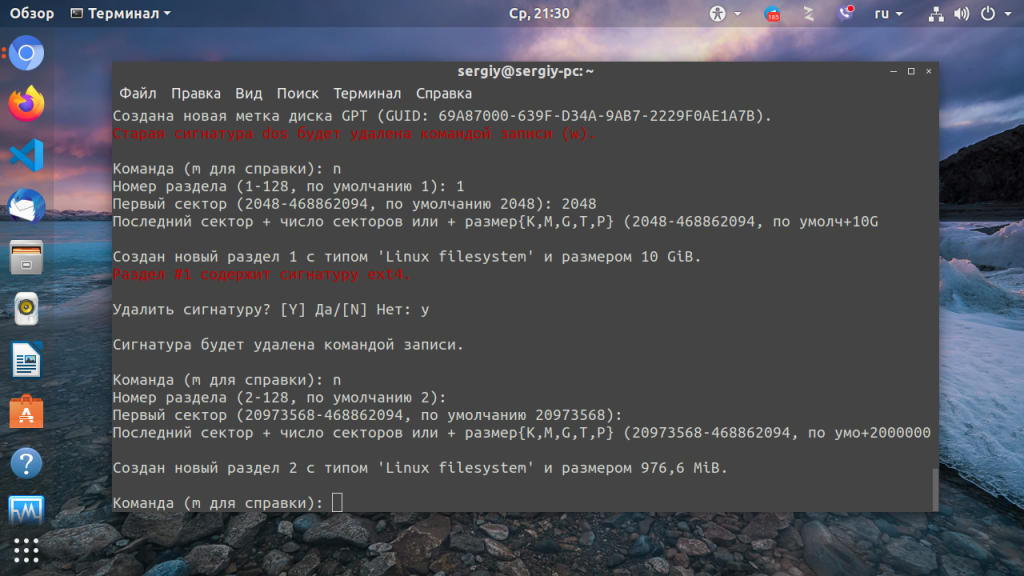
Во втором способе укажем размер раздела в секторах. Для получения раздела размером 1 гигабайт нам понадобится примерно 2 000 000 секторов. По умолчанию размер сектора 512 байт, поэтому 2 000 000 * 512 получится примерно 1024 000 000 байт:
И в третьем способе с помощью калькулятора добавим к первому сектору раздела те же два миллиона:
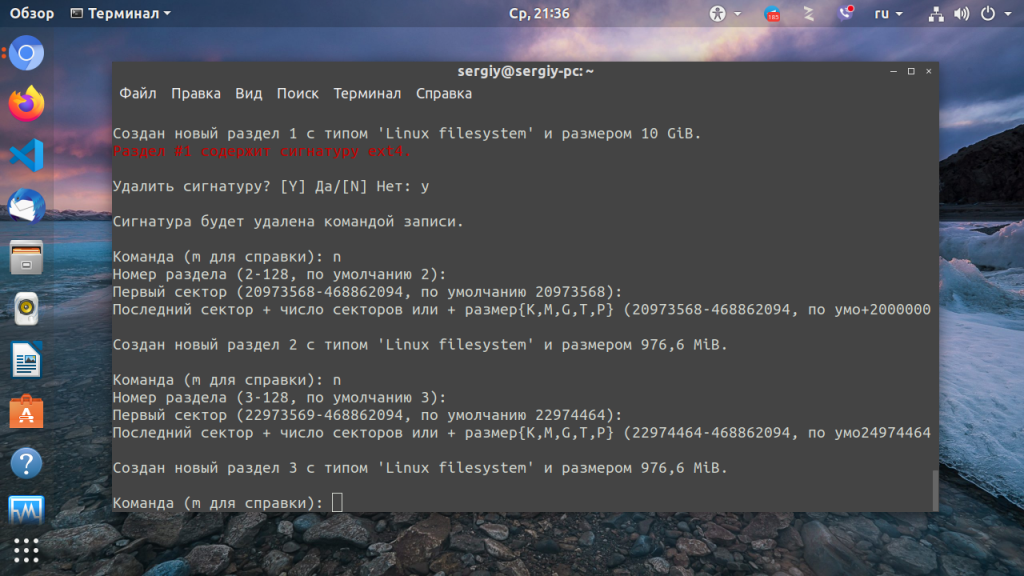
На этом создание разделов fdisk завершено. А вот форматирование разделов в fdisk невозможно, для этого придется воспользоваться утилитой mkfs.
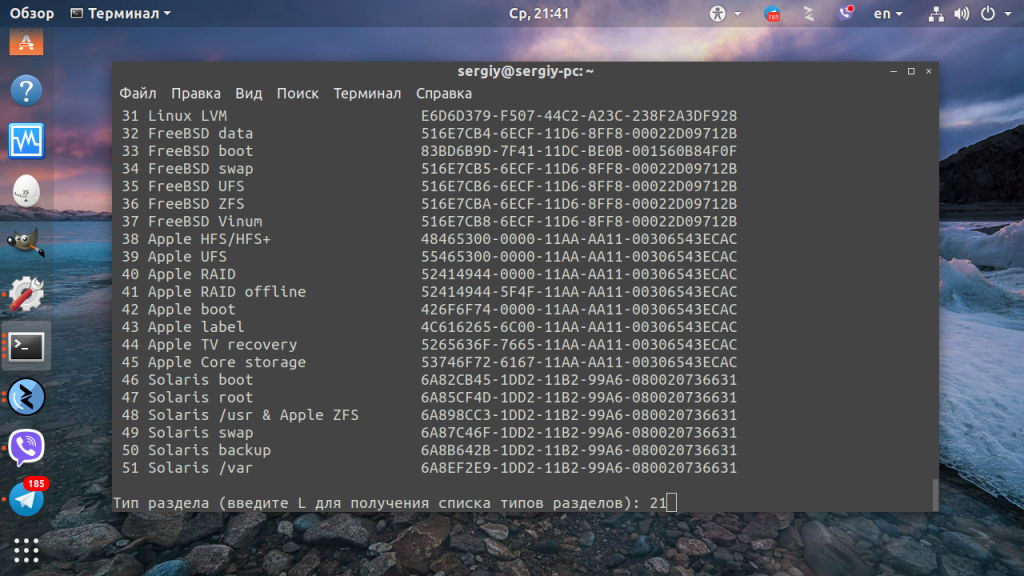
6. Тип раздела
Кроме обычных разделов для пользовательских файлов существуют и другие типы разделов, например раздел EFI, BIOS boot, Windows Recovery, Linux swap, этот тип влияет на назначение раздела, например, раздел EFI не будет использоваться пока для него не будет выбран правильный тип. Чтобы изменить тип раздела используйте команду t:
Для вывода всех доступных типов и их номеров используйте команду L:
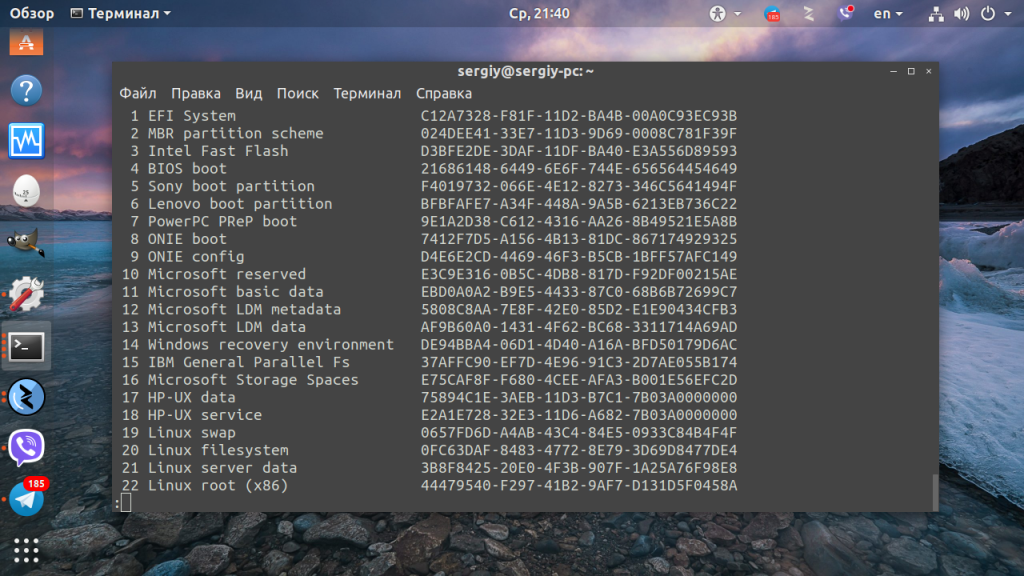
Для выхода из списка разделов нажмите q, а затем просто наберите номер нужного типа:
7. Удаление раздела
Чтобы удалить раздел выполните команду d, а затем введите его номер:
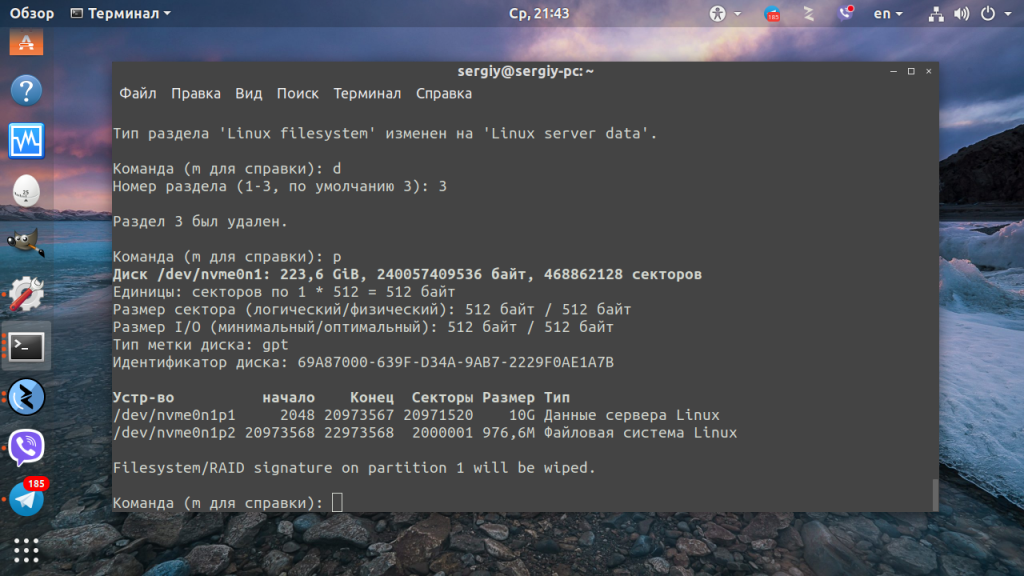
Вот так просто выполняется удаление.
8. Загрузочный раздел
При загрузке компьютера с диска, на котором используется таблица разделов MBR, BIOS ищет раздел, отмеченный как загрузочный и начинает искать загрузчик именно на нём. Чтобы сделать раздел загрузочным если он ещё не загрузочный или наоборот сделать его не загрузочным используйте команду a:
Загрузочность отмечается звездочкой в выводе команды p. В таблице разделов GPT для записи загрузчика используется раздел с типом BIOS boot, а флага загрузочности здесь уже нет.
9. Применение изменений
Все изменения, которые вы сейчас вносили, ещё не записаны на диск. Для их записи надо выполнить команду w:
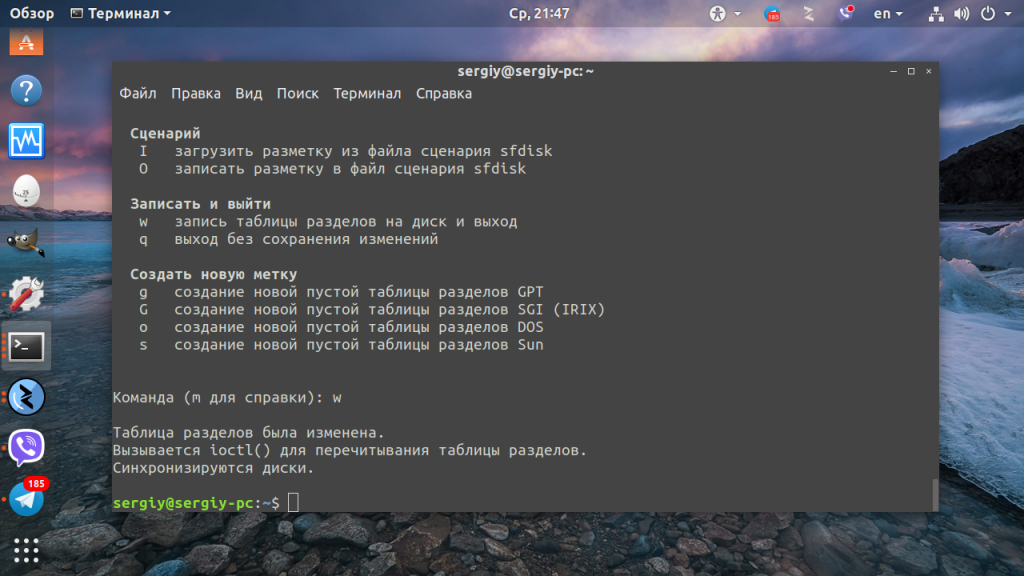
После записи изменений программа завершится.
Выводы
В этой статье мы рассмотрели как пользоваться fdisk в Linux, как создавать разделы с помощью этой утилиты, а также как выбрать тип диска. Несмотря на все возможности утилиты намного удобнее пользоваться gparted или же cfdisk если надо разметить диск в терминале. Последнюю мы разберем в одной из следующих статей.
Источник


