- Команда exit для начинающих
- Команда exit в Linux
- Определение ловушек (trap)
- Заключение
- Bash get exit code of command on a Linux / Unix
- What is an exit code in bash shell?
- How to find out the exit code of a command
- Bash get exit code of command – How to use exit codes in shell scripts
- How do I set an exit code for my own shell scripts?
- A sample shell script to get the exit code of a command
- Recommend exit code for your shell scripts
- How to deal with the exit codes of all piped commands
- Conclusion
- Raymii.org
- Execute a command and get both output and exit status in C++ (Windows & Linux)
- Table of Contents
- The stackoverflow example using fgets
- fread vs fgets
- Command execution including output and exit code
- A note on Windows
- Nullbytes in output example:
Команда exit для начинающих
Оригинал: Linux exit Command Explained for Beginners (with Examples)
Автор: Himanshu Arora
Дата публикации: 4 сентября 2019 года
Перевод: А. Кривошей
Дата перевода: март 2020 г.
Если вы новичок в Linux, и ваша работа связана с работой в командной строке, то само собой разумеется, что вы должны проводить много времени в терминале. Как вы, вероятно, согласитесь, есть некоторые команды, которые мы обычно используем очень часто, например, ls, cp и rm. Однако есть некоторые другие, которые используются намного реже. В этом посте мы обсудим одну такую, менее часто используемую команду: Exit.
Обратите внимание, что все примеры и инструкции, упомянутые в этой статье, были протестированы в оболочке Bash, работающей в Ubuntu 18.04LTS.
Команда exit в Linux
Команда exit позволяет вам выйти из оболочки, где она запущена.
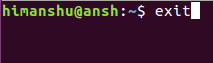
Если в вашем окне оболочки есть несколько вкладок, то эта команда выходит из вкладки, в которой она выполняется. Учитывая, что это встроенная команда, весьма вероятно, что вы не найдете выделенную справочную страницу для exit. Чтобы получить доступ к ее официальной документации, выполните следующую команду:
В моей системе вышеупомянутая команда выдала следующий вывод:
Теперь некоторые из вас могут спросить, почему (или, скорее, когда) требуется N. Это значение, которое является состоянием выхода, используется в основном, когда команда используется внутри скрипта (сценария bash). В некоторых случаях это значение отображается на понятную человеку ошибку, предупреждение или уведомление.
Кроме того, как ясно из вышеприведенного вывода справочной команды, если значение N не указано явно, то этим значением считается состояние завершения последней выполненной команды.
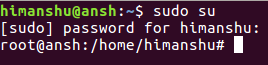
Давайте рассмотрим простой пример: я переключил учетные записи пользователей и вошел в оболочку root:
Затем я вышел из оболочки с помощью команды exit. Кроме того, я использовал 8 в качестве значения состояния выхода.

Теперь в родительской оболочке (куда я вернулся) я использовал следующую команду для проверки состояния выхода:
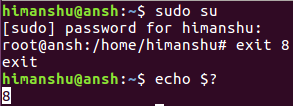
Вы можете видеть, что это то же значение состояния, которое было передано команде выхода в оболочке root. Таким образом, мы можем получить доступ к статусу, а затем делать все, что намечено.
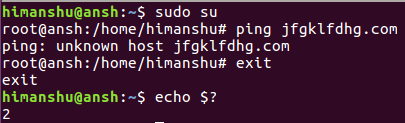
Вот еще один пример, в котором я явно не передавал какой-либо статус выхода из оболочки root, но при запросе в родительской оболочке было возвращено состояние выхода последней команды, которая была выполнена в оболочке root:
Определение ловушек (trap)
Если вы хотите, вы также можете определить некоторые действия, которые вы хотите, чтобы система выполняла при выходе из оболочки. Например, вы можете удалить один или несколько файлов при выходе. Для этого вам нужно установить ловушку (trap), которую вы можете создать следующим образом:
Какое бы действие вы ни предприняли при выходе из системы, вам нужно указать соответствующую команду в двойных кавычках выше. Например, я использовал следующую команду:
Дело в том, что в моей системе такого файла нет, поэтому после выполнения команды exit оболочка должна отобразить ошибку для нее. И вот что на самом деле произошло — см. ниже:

Таким образом, вы можете установить ловушки на выходе. Для получения дополнительной информации о ловушках выполните следующую команду:
Заключение
Когда дело доходит до команды exit, не требуется особой кривой обучения, особенно если вы новичок в командной строке. И вы, вероятно, согласитесь с этим. Так что просто попробуйте все, что мы здесь обсудили, и начните использовать команду exit (если вы этого еще не сделали).
Источник
Bash get exit code of command on a Linux / Unix
I am a new Linux system user. How do I get the exit code of a command? How do I get the exit code or status of Linux or Unix shell command and store it into a shell variable?
Introduction – Each Linux or Unix shell command returns a status when it terminates normally or abnormally. For example, if backup.sh script is unsuccessful, and it returns a code which tells the shell script to send an e-mail to sysadmin.
| Tutorial details | |
|---|---|
| Difficulty level | Easy |
| Root privileges | No |
| Requirements | Bash on Linux, macOS or Unix-like OS |
| Est. reading time | 2 minutes |
What is an exit code in bash shell?
Every Linux or Unix command executed by the shell script or user has an exit status. Exit status is an integer number. 0 exit status means the command was successful without any errors. A non-zero (1-255 values) exit status means command was a failure.
How to find out the exit code of a command
You need to use a particular shell variable called $? to get the exit status of the previously executed command. To print $? variable use the echo command or printf command:
date
echo $?
date-foo-bar
printf ‘%d\n’ $?
How to get the exit code of a command such as date and date-foo-bar
Bash get exit code of command – How to use exit codes in shell scripts
So how do you store exit status of the command in a shell variable? Simply assign $? to a shell variable. The syntax is:
How do I set an exit code for my own shell scripts?
The exit command cause normal shell script termination. It exits the shell with a status of N. The syntax is:
A sample shell script to get the exit code of a command
- No ads and tracking
- In-depth guides for developers and sysadmins at Opensourceflare✨
- Join my Patreon to support independent content creators and start reading latest guides:
- How to set up Redis sentinel cluster on Ubuntu or Debian Linux
- How To Set Up SSH Keys With YubiKey as two-factor authentication (U2F/FIDO2)
- How to set up Mariadb Galera cluster on Ubuntu or Debian Linux
- A podman tutorial for beginners – part I (run Linux containers without Docker and in daemonless mode)
- How to protect Linux against rogue USB devices using USBGuard
Join Patreon ➔
Recommend exit code for your shell scripts
| Exit status | Description |
|---|---|
| 1 | Catchall for general errors |
| 2 | Misuse of shell builtins (according to Bash documentation) |
| 126 | Command invoked cannot execute |
| 127 | Command not found |
| 128 | Invalid argument to exit command |
| 128+n | Fatal error signal “n” |
| 130 | Bash script terminated by Control-C |
| 255* | Exit status out of range |
How to deal with the exit codes of all piped commands
Conclusion
This page showed how to use exit codes on Linux or Unix based system and how to get the exit status/code of command. See man pages by typing the man command or help command:
man bash
help exit
For more info see:
🐧 Get the latest tutorials on Linux, Open Source & DevOps via
| Category | List of Unix and Linux commands |
|---|---|
| Documentation | help • mandb • man • pinfo |
| Disk space analyzers | df • duf • ncdu • pydf |
| File Management | cat • cp • less • mkdir • more • tree |
| Firewall | Alpine Awall • CentOS 8 • OpenSUSE • RHEL 8 • Ubuntu 16.04 • Ubuntu 18.04 • Ubuntu 20.04 |
| Linux Desktop Apps | Skype • Spotify • VLC 3 |
| Modern utilities | bat • exa |
| Network Utilities | NetHogs • dig • host • ip • nmap |
| OpenVPN | CentOS 7 • CentOS 8 • Debian 10 • Debian 8/9 • Ubuntu 18.04 • Ubuntu 20.04 |
| Package Manager | apk • apt |
| Processes Management | bg • chroot • cron • disown • fg • glances • gtop • jobs • killall • kill • pidof • pstree • pwdx • time • vtop |
| Searching | ag • grep • whereis • which |
| Shell builtins | compgen • echo • printf |
| Text processing | cut • rev |
| User Information | groups • id • lastcomm • last • lid/libuser-lid • logname • members • users • whoami • who • w |
| WireGuard VPN | Alpine • CentOS 8 • Debian 10 • Firewall • Ubuntu 20.04 |
Comments on this entry are closed.
One of the best Unix exit code tutorial with examples. Thank you. I used it on my macOS macMini desktop.
Hi, I just completed 9 captchas- 18 3×3 grids. I come here for a quick tutorial to remind myself of something I already know, in most cases, for one minute so as not to lose my train of thought. Thank-you! But I don’t have the time for the captchas. Please find another solution to whatever problem you are trying to solve.
Captchas are only needed when posting comments to avoid spam. However, Cloudflare might trigger Captchas when it detects IP address with bad reputation.
Hi Vivek,
Love your site, and I’ve learned a lot from it. It’s a great resource.
I normally use a self-administered proxy/VPN when using a browser for privacy reasons. Unfortunately I can’t control which IP address I get without becoming an ISP or a cloud provider myself. Cloudflare probably sees my IP address and knows that it is in the range for cloud provider X, and not from a company or residential IP address, which triggers the captcha.
So in this case it is unfortunately targetting a normal/not-spamming user. I understand that you are doing this so as to not have to deal with spam or other issues; and my behaviour is probably that of only a tiny percentage of users.
Trade-offs and unintended consequences, right? Anyway, I thought it might be useful to hear from someone for whom this was causing issues. In order to check on this and reply today, I ‘only’ had to do 4 captchas.
Thank you kindly for your excellent website.
Источник
Raymii.org
Execute a command and get both output and exit status in C++ (Windows & Linux)
Table of Contents
Recently I had to parse some command line output inside a C++ program. Executing a command and getting just the exit status is easy using std::system , but also getting output is a bit harder and OS specific. By using popen , a POSIX C function we can get both the exit status as well as the output of a given command. On Windows I’m using _popen , so the code should be cross platform, except for the exit status on Windows is alway 0, that concept does not exist there. This article starts off with a stack overflow example to get just the output of a command and builds on that to a safer version (null-byte handling) that returns both the exit status as well as the command output. It also involves a lot of detail on fread vs fgets and how to handle binary data.
The complete code example with usage examples can be found on github here or at the bottom of this page. A working example is compiled on github actions for different platforms (windows & linux).
Normally I would advise against parsing command line output. It is error-prone, you’re dependent on the language selected by the user, different versions might have different flags ( OS X vs Linux ) and much more. If you have the option to use a native library, you should use that. An example could be parsing curl output to get some data from an API. There are probably a metric ton of http libraries available for your favorite programming language to use instead of parsing the curl or wget or fetch output.
In my case I have to use an old program to parse a closed-source file to get some binary output. This is a temporary situation, a native parsing library is also under development. The binary is under my control as well as the system settings, language, other tools and such, so for this specific use case the solution to parse command line output was acceptable for the time being.
Do note that in this post I’ll interchange the term nullbyte, null character, null termination and null-terminated. They all mean the same, the null-byte character used to end a C string ( \0 , or ^@ , U+0000 or 0x00 , you get the gist).
If you need more features, more cross-platform or async execution, boost.Process is a great alternative. I however can’t use boost on the environment this code is going to run due to compiler and size constraints.
The stackoverflow example using fgets
On stackoverflow the example given is a good base to build on, however, to get the exit code and the output, it must be modified. Because we want to also grab the exit code, we cannot use the example which uses the std::unique_ptr . Which in itself is a great example of using a unique_ptr with a custom deleter ( cmd is a const char* with the command to execute:
The code is copied below:
This example does what it states, but with a few gotchas. It uses a FILE* (pointer), char buffer allocation and manually closing the FILE* when something goes wrong ( catch ). The unique_ptr example is more modern, due to not having to handle the exception and using a std::array instead of a C-style char* buffer. Exception throwing is a whole other issue, but let’s not get into that today. What we are going to get into today is C style code to read from FILE* and how binary data is handled.
The stackoverflow example is probably just fine if you only need textual output into a std::string . My usecase however was a bit more complex, as you’ll find out while reading the rest of this artice.
fread vs fgets
Code style aside, my biggest issue was that using fgets in this way combined with adding a const char* to a std::string stops when it encounters a nullyte ( \0 ). For regular string output that often is not an issue, most commands just output a few strings and call it a day. My output returns a binary blob, which might include nullbytes. fread reads an amount of bytes and returns how much it has read successfully, which we can use when adding the output to our std::string including the nullbytes.
The example above does result += buffer , adding a const char* to a std::string , in this case according to cppreference on operator+= on std::string: Appends the null-terminated character string pointed to by s.
The problem therein lies that the characters after the nullbyte should be added as well in my case. fgets does not give back the amount of data it read. Using fgets and a buffer of 128, if I have a nullbyte at 10 and a newline at 40, then the first 10 bytes plus what is after 40 bytes will be returned. Effectively we’re loosing everything in between the nullbyte and the newline, or until the end of the buffer (128) if there is no newline in between.
fread does return the amount of bytes it has read. Combining that with a constructor of std::string that takes a const char* and a size_t we can force the entire contents inside the string. This is safe, since a std::string knows its size, it does not rely on a null-termination character. However, other code that uses const char* will not be able to work with these nullbytes, keep that in mind.
This stackoverflow post was very helpful for me to understand fread , as well as help from a co-worker that dreams in C , he explained a lot of the inner workings.
And if, after all of this, you’re wondering why I’m shoehorning binary data inside a std::string , great question. I’ll probably go into that another time since that would require a longer post than this entire article.
Command execution including output and exit code
My code checks the exit status of the executed binary (for error handling) and uses the data returned for further processing. To keep this all in one handy dandy place, lets start with defining a struct to hold that data. It will hold the result of a command , so the name CommandResult sounds descriptive enough.
Below you’ll find the struct code, including an equality operator as well as a stream output operator.
The meat and potatoes of the struct are of course the output and exitstatus . I’m using an int for the exit status because of reasons.
The next part is the Command class itself, here is that code:
The fread command will run until there are no more bytes returned from the command output. I know the kind of output I’m working with so my buffer is 1 MiB, which is probably too large for your data. In my case I benchmarked it and between 10KiB and 1 MiB was the fastest on the target architecture. 128 or 8192 is just fine as well probably, but you should benchmark that for yourself. A rather simple test is to output some enormous file with cat and take the execution time plus cpu and memory usage. Don’t print the result, just look at those three things and choose what ratio is acceptable for you.
Why not also initialize the std::string with 1 MiB of characters? std::strings cannot be allocated for a given size at construction, other than by filling them or afterwards calling .reserve() , my benchmarks did not show any meaningful speed or performance boost by doing either.
Using the above code is easy. Since it’s a static function, you don’t need a class instance to use it. Here is an example:
Which results in:
Since we’re going through a shell, redirection works as well. Redirecting stdout to stderr results in no output, just an exit status:
The output is on stderr in my shell however, which is expected:
If you do need to capture stderr then you redirect output the other way around, like so:
Pipes work as well as in your shell, but do note that this is all using sh and you have no control over environment variables or the default shell. Read more on the POSIX page on popen to find out why that is.
A note on Windows
Here is an example for Windows, where we must use _popen and _pclose :
The exit code will always be zero since that concept does not translate to windows. There is %ErrorLevel% , but that is only an environment variable for console applications, not the actual exit status.
The microsoft page also notes that _popen will not work with GUI applications, just console programs. If you need that, use Boost.process or system .
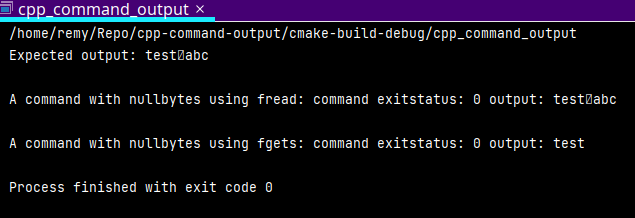
Nullbytes in output example:
In the example code on github you’ll also see a execFgets function, I’ve left that in there to show the difference in nullbyte handling. For reference I’ll show an example here as well. The relevant part of command using fgets :
The part using fread :
The test command, including a clang-tidy warning exclusion ( // NOLINT ):
The nullbyte character is substituted with \0 in the above output. Here is a screenshot showing how it looks in my terminal:
Once again do note that this is safe to use with std::strings , methods that take a string_view or a const char* probably will not react very well to nullbytes. For my use case this is safe, your milage may vary.
Try playing with the buffer size and then looking at the output. If you set it to 4, the output with fgets is testbc . Funny right? I like such things.
Источник


