- How to make disk image with dd on Linux or Unix
- What is a dd image?
- How to clone an entire hard disk
- How to clone a partition
- dd make disk image
- How to restore system (dd image)
- Tip #1: Not enough disk space locally? Use remote box
- Tip #2: See progress while making an image with dd
- Tip #3: Save extra information
- Команда dd и все, что с ней связано
- How to Make Disk Images in Linux with DD Command
- Install LSSCSI Utility
- Check Disk Information
- Create a Clone Disk Image
- Restore the Drive from Clone Image
- Conclusion
- About the author
- Aqsa Yasin
How to make disk image with dd on Linux or Unix
What is a dd image?
Disk cloning is nothing but a mere process of creating an image of an entire disk. This can be useful for copying disks, backups, recovery and more. The dd command is easy to use tool for making such clones.
Warning: You should be very careful when using dd command; it can destroy data. Remember the order of input file (if=) and output file (of=).
How to clone an entire hard disk
The syntax is:
dd if=/dev/input/DEVICE-HERE of=/dev/OUTPUT/DEVICE-HERE bs=64K conv=noerror,sync
To clone /dev/sdc (250G) to /dev/sdd (250G) in Linux, enter:
# dd if=/dev/sdc of=/dev/sdd bs=64K conv=noerror,sync
To clone /dev/ada0 (250G) to /dev/adb0 (250G) in FreeBSD, enter:
# dd if=/dev/ada0 of=/dev/adb0 bs=64K conv=noerror,sync
Where,
- if=/dev/file : Input device/file.
- of=/dev/file : Output device/file.
- bs=64k : Sets the block size to 64k. You can use 128k or any other value.
- conv=noerror : Tell dd to continue operation, ignoring all read errors.
- sync : Add input blocks with zeroes if there were any read errors, so data offsets stay in sync.
How to clone a partition
To clone /dev/sdc1 to /dev/sdd1, enter:
# dd if=/dev/sdc1 of=/dev/sdd1 bs=128K conv=noerror,sync
Sample outputs:
dd make disk image
You can boot from a live cd. Once booted, make sure no partitions are mounted from the source hard drive disk. You can store disk image on an external USB disk. The syntax is as follows
dd if=/dev/INPUT/DEVICE-NAME-HERE conv=sync,noerror bs=64K | gzip -c > /path/to/my-disk.image.gz
In this example, create disk image for /dev/da0 i.e. cloning /dev/da0 and save in the current directory:
# dd if=/dev/da0 conv=sync,noerror bs=128K | gzip -c > centos-core-7.gz
Sample outputs:
Fig.01: dd command in action
How to restore system (dd image)
The syntax is:
# gunzip -c IMAGE.HERE-GZ | dd of=/dev/OUTPUT/DEVICE-HERE
For example:
# gunzip -c centos-core-7.gz | dd of=/dev/da0
- No ads and tracking
- In-depth guides for developers and sysadmins at Opensourceflare✨
- Join my Patreon to support independent content creators and start reading latest guides:
- How to set up Redis sentinel cluster on Ubuntu or Debian Linux
- How To Set Up SSH Keys With YubiKey as two-factor authentication (U2F/FIDO2)
- How to set up Mariadb Galera cluster on Ubuntu or Debian Linux
- A podman tutorial for beginners – part I (run Linux containers without Docker and in daemonless mode)
- How to protect Linux against rogue USB devices using USBGuard
Join Patreon ➔
Tip #1: Not enough disk space locally? Use remote box
You can send the image through ssh and save it on the remove box called server1.cyberciti.biz:
# dd if=/dev/da0 conv=sync,noerror bs=128K | gzip -c | ssh vivek@server1.cyberciti.biz dd of=centos-core-7.gz
Tip #2: See progress while making an image with dd
gdd (GNU DD) in action with progress bar running on MacOS X
Tip #3: Save extra information
- See how to save and restore MBR only.
- Not a fan of dd? See top 6 open source disk cloning and imaging softwares.
- Want to deal with corrupted disk? Try ddrescue command.
🐧 Get the latest tutorials on Linux, Open Source & DevOps via
Источник
Команда dd и все, что с ней связано

В UNIX системах есть одна очень древняя команда, которая называется dd. Она предназначена для того, чтобы что-то куда-то копировать побайтово. На первый взгляд — ничего выдающегося, но если рассмотреть все возможности этого универсального инструмента, то можно выполнять довольно сложные операции без привлечения дополнительного ПО, например: выполнять резервную копию MBR, создавать дампы данных с различных накопителей, зеркалировать носители информации, восстанавливать из резервной копии данные на носители и многое другое, а, при совмещении возможностей dd и поддержке криптографических алгоритмов ядра Linux, можно даже создавать зашифрованные файлы, содержащие в себе целую файловую систему.
Опять же, в заметке я опишу самые часто используемые примеры использования команды, которые очень облегчают работу в UNIX системах.
Начну с небольшого примера, наглядно иллюстрирующего основные параметры команды:
# dd if=/dev/urandom of=/dev/null bs=100M count=5
Параметры:
- if: указывает на источник, т.е. на то, откуда копируем. Указывается файл, который может быть как обычным файлом, так и файлом устройства.
- of: указывает на файл назначения. То же самое, писать можем как в обычный файл, так и напрямую в устройство.
- bs: количество байт, которые будут записаны за раз. Можно представлять этот аргумент как размер куска данные, которые будут записаны или прочитаны, а количество кусков регулируется уже следующим параметром.
- count: как раз то число, которое указывает: сколько кусочков будет скопировано.
Таким образом, описанная команда читает 5*100 мегабайт из устройства /dev/urandom в устройство /dev/null. Придавая этой команде смысловую нагрузку получается, что система сгенерирует 500 мегабайт случайных значений и запишет их в null устройство. Конечно, единственное, что сделает эта команда: нагрузит процессор на несколько секунд. Рассмотрим примеры из практики:
Создание образа диска:
# dd if=/dev/cdrom of=image.iso
Команда будет считывать из устройства данные и записывать в файл до тех пор, пока не достигнет окончания устройства. Если диск битый, можно попробовать его прочитать, игнорируя ошибки чтения:
# dd if=/dev/cdrom of=image.iso conv=noerror
Параметр «conv» позволяет подключать несколько фильтров, применимых к потоку данных. Фильтр «noerror» как раз отключает остановку работы программы, когда наткнется на ошибку чтения. Таким образом, некоторые данные с диска все же можно будет прочитать. Точно таким образом я спас данные со своей флешки Corsair, которую погнули: подобрал подходящее положение, когда контакт есть, и сделал дамп файловой системы.
Подключить, кстати, такие образы можно при помощи команды mount с ключем «-o loop»:
# mount -o loop image.iso /mnt/image
Если что-то не получается, процесс разбивается на 2 уровня:
# losetup -e /dev/loop0 image.iso
# mount /dev/loop0 /mnt/image
Если и так не работает, значит файловая система образа полетела.
Работа с носителями информации
Очень простое, хоть и не оптимальное решение клонирования жесткого диска:
# dd if=/dev/sda of=/dev/sdb bs=4096
Все то же побайтовой копирование с размером буфера 4 Кб. Минус способа в том, что при любой заполненности разделов копироваться будут все биты, что не выгодно при копировании разделов с маленькой заполненностью. Чтобы уменьшить время копирования при манипуляции с большими объемами данных, можно просто перенести MBR на новый носитель (я ниже опишу как), перечитать таблицу разделов ядра (при помощи того же fdisk), создать файловые системы и просто скопировать файлы (не забыв сохранить права доступа к файлам).
Как вариант, можно даже по расписанию делать бекап раздела по сети. Разрулив ключи ssh будет работать такая схема:
# dd if=/dev/DEVICE | ssh user@host «dd of=/home/user/DEVICE.img».
Когда-то читал исследование, согласно которому очень большая доля жестких дисков на барахолке подвергается восстановлению данных без привлечения чего-то специализированного, и содержит конфиденциальную информацию. Чтобы на носителе ничего нельзя было восстановить — можно забить его нулями:
# dd if=/dev/zero of=/dev/DEVICE
Думаю, понятно на что нужно заменить DEVICE. После проведения лекций по Linux, я очень тщательно стал следить за тем, что пишу.
Проверить можно тем же dd, но преобразовав данные в hex:
# dd if=/dev/sda | hexdump -C
Должны посыпаться нули.
MBR расположена в первых 512 байтах жесткого диска, и состоит из таблицы разделов, загрузчика и пары доп. байт. Иногда, ее приходится бекапить, восстанавливать и т.д. Бекап выполняется так:
# dd if=/dev/sda of=mbr.img bs=512 count=1
Восстановить можно проще:
# dd if=mbr.img of=/dev/sda
Причины этих махинаций с MBR могут быть разные, однако хочу рассказать одну особенность, взятую из опыта: после восстановления давней копии MBR, где один из разделов был ext3, а позже стал FAT и использовался Windows, раздел перестал видиться виндой. Причина — ID раздела, который хранится в MBR. Если UNIX монтирует файловые системы согласно суперблоку, то винды ориентируются на ID разделов из MBR. Поэтому всегда нужно проверять ID разделов при помощи fdisk, особенно если на компьютере есть винды.
При помощи dd можно генерировать файлы, а затем использовать их как контейнеры других файловых систем даже в зашифрованном виде. Технология следующая:
При помощи dd создается файл, забитый нулями (случайными числами забивать не рационально: долго и бессмысленно):
# dd if=/dev/zero of=image.crypted bs=1M count=1000
Создался файл размером почти в гигабайт. Теперь нужно сделать этот файл блочным устройством и, при этом, пропустить его через механизм шифрования ядра linux. Я выберу алгоритм blowfish. Подгрузка модулей:
# modprobe cryptoloop
# modprobe blowfish
Ассоциация образа с блочным устройством со включенным шифрованием:
# losetup -e blowfish /dev/loop0 image.crypted
Команда запросит ввести пароль, который и будет ключем к образу. Если ключ введен не правильно, система не смонтируется. Можно будет заново создать данные в образе, используя новый ключ, но к старым данным доступа не будет.
Создаем файловую систему и монтируем:
# mkfs.ext2 /dev/loop0
# mount /dev/loop0 /mnt/image
Образ готов к записи данных. После завершения работы с ним, нужно не забыть его отмонтировать и отключить от блочного loop устройства:
# umount /dev/loop0
# losetup -d /dev/loop0
Теперь шифрованный образ готов.
Основные идеи я расписал, однако множество задач, которые можно решить при помощи маленькой программки, имя которой состоит из двух букв, намного шире. Программа «dd» — яркий пример того, что IT’шники называют «UNIX way»: одна программа — часть механизма, выполняет исключительно свою задачу, и выполняет ее хорошо. В руках человека, который знает свое дело, которому свойственен не стандартный подход к решению задачи, такие маленькие программки помогут быстро и эффективно решать комплексные задачи, которые, на первый взгляд, должны решать крупные специализированные пакеты.
Источник
How to Make Disk Images in Linux with DD Command
Whenever it comes to wiping, backing up, or restoring Linux files, you have few tools. Although there is one alternative that still works, regardless of the Linux distribution you’re using, and that is the DD command. Creating an image of a partition or cloning a complete hard disk drive are simply the acts of making a copy of the whole disk or partition, and it is very simple with the dd command. The DD command is good for cloning disks, backups, and restoration, among other things. In this guide, we will see how to make a disk image using the DD command. Make sure you have the Ubuntu Linux system installed.
DD circumvents this by making an identical replica of the whole hard drive or partitions. So if you recover this backup, your machine will be restored to its original state. You’ll regain access to your folders, games, browser history, and sometimes even device settings. We’ll want another drive with more capacity than the one we’re cloning to replicate your drive. There would most probably be a big hard drive for this purpose.
Install LSSCSI Utility
Open the command-line terminal of the Ubuntu 20.04 Linux system. Make sure to have the “lsscsi” utility installed on your system. If it is not installed, try to install it using the below “apt” command followed by the keyword “install” and “lsscsi”. It will take not more than 5 minutes to get installed, and you are good to go.
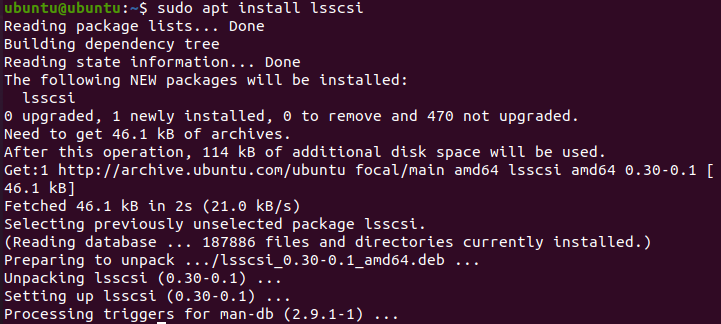
After installing the “lsscsi” utility, now it’s time to use it for listing all the storage devices of our Linux system. To list the storage drives and DVD’s execute the below command. You can see we have one disk drive and one cd/DVD device in our system.

Check Disk Information
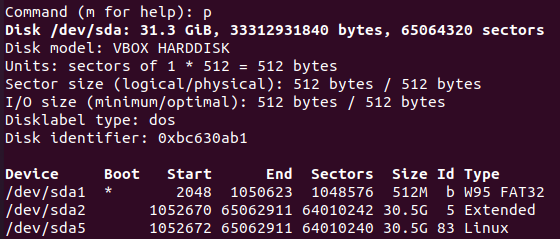
Firstly, we have to find out some information regarding the disk drive “/dev/sda”. And for this reason, we have to use the “fdisk” instruction in our command-shell with sudo privileges as below.

It will navigate to its command theme. Type “p” to check the information of disks as below. You can see it shows the total memory of the “/dev/sda” drive, its sectors, and bytes. It is showing the disk type as DOS. On the other hand, the last three lines of the snapshot show the partitions of the /dev/sda drive and their further information.
Create a Clone Disk Image
Now you have almost every piece of information regarding the “/dev/sda” drive. Press “q” to exit the commanding theme. Now, you are ready to make a disk image using the DD command. So, make yourself clear that the DD command always needs “sudo” privileges to execute. As we already know from the above image, the “/dev/sda” has three partitions, and we will make an image of one of them. So, we choose “sda1” for making its clone. You have to execute the below “DD” command followed by the “if” path and “of” path. The “if” path is of the input disk drive, which is meant to be cloned and the “of” path is for the output device disk, where it would be copied as an image. So, from this, you can understand that “sda1.img” is the cloned file for disk and sda1 is the actual drive. We have specified the bytes per second to be copied from one location to another. We assigned it a value of 1000. The command is as follows:
The output shows the number of records inputted and outputted from two locations, e.g., source and destination. It also shows the number of bytes with time seconds, copied into a destination in MB’s. This means that the clone has been effectively done.

Let’s check the destination image file to see if all the data from the source drive has been cloned into it properly or not. Use the below list command along with the path of an image file of the drive as:
The output shows the rights assigned to this image file, its size, and location. You can say that it has similar rights and size as the original disk drive have.

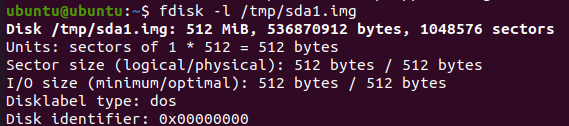
To see some more information regarding the disk image file, you have to try the below “fdisk” command followed by the flag “-l” as below.
The output shows the exact same information regarding this image file as we have seen for the original disk drive before creating this image file. It shows the size of the image drive, its total number of bytes, and total sectors.
Restore the Drive from Clone Image
Now, if you want to restore your original disk drive along with all the data it has, you have to use the DD command again to do so. While using the DD command, there is a little change in it. You have to swipe the input and output paths this time. This means you have to place the image disk file path into the “if” path, and in the “of” output path, you have to mention the location where you want to restore the image file data. Here is the command to restore the drive data from the image file:
The output shows the transfer of backup files into their actual destination. You can see the input and output number of total records and some further information regarding the numbers of bytes transferred, the total size of the disk image, and the time taken to transfer it.

Conclusion
Indeed, The method discussed before is the easiest and simplest way to clone a disk into an image file and restore the backup to get all the files and folders back.
About the author

Aqsa Yasin
I am a self-motivated information technology professional with a passion for writing. I am a technical writer and love to write for all Linux flavors and Windows.
Источник


