- How to Increase Swap Size on Ubuntu Linux
- Increase swap size on Ubuntu
- Change swap size in Ubuntu 18.04 or newer
- Share this:
- 49 Comments
- Change Swap Size in Ubuntu
- Finding out available swap file(s)
- Deleting the swap file
- About the author
- Sidratul Muntaha
- Ubuntu Documentation
- Introduction
- What is swap?
- Why do I need swap?
- How much swap do I need?
- Example Scenarios
- How do I add more swap?
- How do I add or modify a swap partition?
- Process to Increase Size of Swap Partition and use it for Hibernation
- Creating the swap partition
- Activating the swap partition
- Making the swap partition work for hibernate (optional)
- How do I add a swap file?
- Create the Swap File:
- Enable use of Swap File
- Enable Swap File at Bootup
- Example of making a swap file
- Disable and Remove a Swap File
- What is swappiness and how do I change it?
- What is the priority of swap containers?
- Should I reinstall with more swap?
- Why is my swap not being used?
- Swap may not be needed
- Is there a swap partition at all?
- Enabling a swap partition
- Empty Swap
How to Increase Swap Size on Ubuntu Linux
The recent releases of Ubuntu use swap file instead of the traditional swap partition. The swap file is simply a file under the root which is used as swap to share the burden on the RAM.
The biggest advantage of using a swap file is that you can easily resize it. That’s not always the case when you use a dedicated swap partition.
Let’s see how to resize the swap space on Ubuntu.
Increase swap size on Ubuntu
If you are using swap partition and want to increase the swap size, you can create swap file. Your Linux system can use multiple swap spaces as needed. This way, you won’t have to touch the partition.
This tutorial assumes that you are using swap file on your system, not a swap partition.
Now, let’s see how to increase the swap file. First thing first, make sure that you have a swap file in your system.
It will show the current swap available. If you see the type file, it indicates that you are using a swap file.
Now before you resize the swap file, you should turn the swap off. You should also make sure that you have enough free RAM available to take the data from swap file. Otherwise, create a temporary swap file.
You can disable a given swap file using this command. The command doesn’t produce any output and it may take a few minutes to complete:
Now use the fallocate command in Linux to change the size of the swap file.
Make sure that you mark this file as swap file:
You should see an output like this where it warns you that old swap signature is being wiped out.
Once you do that, enable the swap file:
That’s it. You just increased the swap size in Ubuntu from 2 GB to 4 GB. You can check swap size using the free command or the swapon —show command.
You see how easy it is to resize swap size thanks to the swap files. You didn’t touch the partition, you didn’t reboot the system. Everything was done on the fly. How cool is that!
I hope you found this quick tutorial helpful in resizing the swap space on Ubuntu as well as other Linux distributions. If you have questions or suggestions, please leave a comment below.
Источник
Change swap size in Ubuntu 18.04 or newer
[Updated July 26, 2020]: Change swapfile permission; Set swapfile in /etc/fstab.
Swap is a special area on your computer, which the operating system can use as additional RAM.
Starting with Ubuntu 17.04, the swap partition was replaced by a swap file. The main advantage of the swap file is easy resizing.
Note: before running the following commands, please make sure you have a backup of your data!
In the following example, we’ll extend the swap space available in the /swapfile from 4 GB to 8 GB.
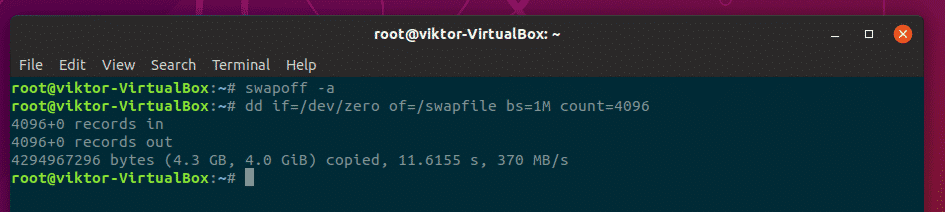
- Turn off all swap processes
2. Resize the swap
if = input file
of = output file
bs = block size
count = multiplier of blocks
3. Change permission
4. Make the file usable as swap
5. Activate the swap file
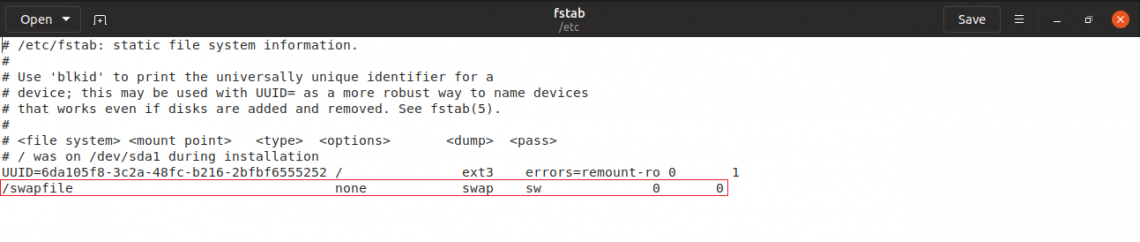
6. Edit /etc/fstab and add the new swapfile if it isn’t already there
7. Check the amount of swap available
Share this:
49 Comments
Thanks alot, You full of taste! 🙂
My system work faster 🙂
Hi Dev,
I’m glad to hear that 🙂
Thank you ..Bogdan…..
besides the GREAT step by step!
That is exactly what I wanted to know to dual boot with Ubuntu and that other “thingy” that came with my laptop, (for warranty purposes only! LOL!)
I have 12GB Ram, and so I’d use 24GB swap partition, so I can RUN “hibernation?
As I LOVE not using ANY battery as “sleep” might do!
So the “swap file” only POINTS to the “swap partition” and is NOT actual “allocated space. ” I am a nooby, as you can TELL! LOL!
Yes! :), Exxcccatly according to this table! 🙂
RAM(GB) No hibernation With Hibernation Maximum
1 1 2 2
2 1 3 4
3 2 5 6
4 2 6 8
5 2 7 10
6 2 8 12
8 3 11 16
12 3 15 24
16 4 20 32
24 5 29 48
32 6 38 64
64 8 72 128
128 11 139 256
Great tutorial, worked perfectly on Ubuntu 20LTS.
I have 8 GB of physical RAM, how much swap size is recommended?
For 8GB of physical RAM it’s recommended to have 8GB of swap space. If you’re also using hibernation, you should double the swap space to 16GB.
For more information, please see https://access.redhat.com/documentation/en-us/red_hat_enterprise_linux/7/html/storage_administration_guide/ch-swapspace#tb-recommended-system-swap-space
Thank you for the detailed instructions with explanation. This article solved my problem very quickly.
Thank you very much! Easy and simple!
Bogdan, that’s an excellent article and thanks.
A minor feedback: the default swap file name in Ubuntu 18.04 (Server) is /swap.img . Maybe it is helpful for readers if you describe how to see that by using cat /etc/fstab (or grep ”swap” /etc/fstab). In this case readers can skip Step 3 (to change the swap file permission) & 6 (to update the fstab file).
Hi Culip,
Thank you for your kind words and your feedback.
I don’t have an Ubuntu Server 18.04 installation available to check the default swap file name and I couldn’t find any reference in the official Ubuntu Server 18.04 docs
Skipping steps #3 and #6 if the file already exists is a great idea and I’ll update the article.
Hi Bogdan
This is working perfect on Mint 20.1
Thx (mange tak) 😉
As simple as 1+1 problem is.
2 comments?
1.-if we stop swap and ,we do the file with dd, the server has lag
do you recomend make the swapfile first?
2.-after reboot the server the swap is 0% used, and all is setings is correct an my server show the correct new /swapfile as the new swap area. but is not used, fstab is correcto an the proc show te correct swapfile
Well, I answered my own question. I left entries for both the swap file and the swap partition in the fstab. When I restarted, both showed up as active, when I ran swapon -s. I’m not sure if having them both running concurrently could cause problems, so I commented out the entry for the swap partition and restarted. The box came back up with only the swap file running. That little 90mb swap partition can just sit there and gather dust. It doesn’t appear to be hurting anyone.
Hello. I recently moved onto an Ubuntu server v18.04 box, at a large webhost. The box was provisioned with a 90mb swap partition, which is really small and caused problems with a backup app. I walked through all of your commands and my server is now running a swap file, apparently bypassing the swap partition. The following lines are in the fstab:
# swap was on /dev/sda6 during installation
UUID=25678faa-bdb3-4a22-b3ae-e6ef02d200f2 none swap sw 0 0
I added the swapfile line under it, but what should I do with the swap partition entry? Should I delete it or just let it initialize and sit dormant? Will running a swapfile in this situation cause problems?
I really appreciate your information on resizing the swap space, BTW. It was well written and easy to follow.
Thank you for this. I’d been wanting to increase the swapfile size for a while, but every instruction set I found seemed to technical. Your instructions were clear, concise and did exactly what I needed. So thank you. 🙂
You’re welcome!
I’m glad to hear that my blog post helped you.
My fstab on ubuntu 20.04 has these entries – did not change any, do I still need to change ?
I did follow all steps except any fstab change and this shows proper 8gb
grep SwapTotal /proc/meminfo
SwapTotal: 8388604 kB
# /etc/fstab: static file system information.
#
# Use ‘blkid’ to print the universally unique identifier for a
# device; this may be used with UUID= as a more robust way to name devices
# that works even if disks are added and removed. See fstab(5).
#
#
# / was on /dev/sdb3 during installation
UUID=0f2d2288-e7f1-4742-b53a-e466a50e91e7 / ext4 errors=remount-ro 0 1
# /home was on /dev/sdb4 during installation
UUID=b0651f1d-4dfd-46ff-9afd-964277a02e04 /home ext4 defaults 0 2
# swap was on /dev/sdb2 during installation
UUID=2f49d3f7-8691-40d8-b7a0-eaf71de5abf4 none swap sw 0 0
Hi Ionut,
I don’t think you need to change anything.
But you can check what type of swap is active (file or partition) with the “swapon -s” command. “-s” meaning summary.
This is what I get when I run this command on a machine with 4 GB of swap:
$ swapon -s
Filename Type Size Used Priority
/swap/file file 4194304 0 -2
$ /swapfile none swap sw 0 0
bash: /swapfile: Permission denied
swap is created but why show is permission denied when type /swapfile non swap sw 0 0 ?
$ sudo vim /etc/fstab
(you can use any editor instead of vim)
and then paste this line
/swapfile none swap sw 0 0
Thanks Bogdan! I like your tutorial the best! Use it as a handbook!
Источник
Change Swap Size in Ubuntu
Note – Running all these commands require root privilege, so I recommend running a “root” terminal.

Finding out available swap file(s)
Before we get to change the swap, let’s find out how much swap size we have.

According to the result, the system has a swap file at “/swapfile”.
For manipulating the swap file, we have to disable it first.
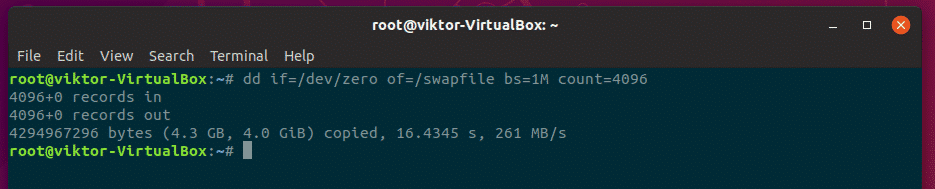
Now, change the size of the swap file –
Here, the total size of the swap file will be bs*count = 1M x 4096 = 4GB
Make the “/swapfile” usable again –

Turn on the swapfile –

After restarting your system, check out the result –

Deleting the swap file
If your RAM space is high enough, then you probably want to get rid of the swap file. If that’s your case, then let’s get rid of the swap file!
Don’t worry! I’ll also show you how to set a completely fresh swap file.
For deleting the swap file, run the following commands –

Remove the swap file entry from “/etc/fstab” file. It should be the last line of the file.

Now, time to remove the actual swap file.

Don’t forget to restart your system!
For getting back the swap file, use the following commands –
# Adding permission where only root user can read the swap file

# Setup the file for swap space


Edit the “/etc/fstab” file and add the following line at the end of the file –

Restart your system.

Voila! Your swap file is back!
What if you had a swap partition? You have to perform actions on the partition itself. That’s more troublesome than just simply managing your swap files directly using the methods above, right?
I recommend deleting the “swap” partition and use the above method to create a new swap file.
About the author

Sidratul Muntaha
Student of CSE. I love Linux and playing with tech and gadgets. I use both Ubuntu and Linux Mint.
Источник
Ubuntu Documentation
Introduction
This FAQ is aimed at Linux novices.
What is swap?
Swap space is the area on a hard disk. It is a part of your machine’s Virtual Memory, which is a combination of accessible physical memory (RAM) and the swap space. Swap holds memory pages that are temporarily inactive. Swap space is used when your operating system decides that it needs physical memory for active processes and the amount of available (unused) physical memory is insufficient. When this happens, inactive pages from the physical memory are then moved into the swap space, freeing up that physical memory for other uses. Note that the access time for swap is slower, depending on the speed of the hard drive. Do not consider it to be a complete replacement for the physical memory. Swap space can be a dedicated swap partition (recommended), a swap file, or a combination of swap partitions and swap file(s).
Why do I need swap?
Memory consuming programs Sometimes, a large program (like LibreOffice, Neverwinter Nights, or a video editor) make the entire system need extra memory. A significant number of the pages used by these large programs during its startup may only be used for initialization and then never used again. The system can swap out those pages and free the memory for other programs or even for the disk cache. In these cases, swap will be used to help the system handle any extra load.
Hibernation (suspend-to-disk) The hibernation feature (suspend-to-disk) writes out the contents of RAM to the swap partition before turning off the machine. Therefore, your swap partition should be at least as big as your RAM size. Although the latest versions of Ubuntu don’t support hibernation OOTB you may configure your system to allow Hibernation. In both alternatives (PM-UTILS or SYSTEMD) you may use a partition or a file.
Unforeseeable Circumstances Unforeseeable events can and will happen (a program going crazy, some action needing much more space than you thought, or any other unpredictable combination of events). In these cases, swap can give you an extra delay to figure out what happened, or to finish what you are working on.
Optimizing memory usage Since mechanical hard drives are considerably slower than RAM (SSD — Solid State Drive — storage is not as slow as physical drives, but still slower than RAM), when you need a file (be it a data file like a video, executables like Firefox, or libraries), the Linux kernel reads the file into RAM and keeps it there, so that the next time you need it, it is already in RAM and data access is much faster. The portions of RAM that accelerate disk read are called «cached memory.» You will notice that they make a huge difference in terms of responsiveness. The Linux kernel automatically moves RAM reserved by programs—but not really used—into swap, so that it can serve the better purpose of extending cached memory.
Optimizing Swap performance Because swap space uses a disk device, this can cause performance issues in any system that uses swap space significantly because the system itself may also be using the same disk device at the same time that it is required for swap operations. One way to reduce this problem is to have swap space on a different physical drive so that the competition for that resource is either reduced or eliminated.
How much swap do I need?
For less then 1GB of physical memory (RAM), it’s highly recommended that the swap space should, as a base minimum, be equal to the amount of RAM. Also, it’s recommended that the swap space is maximum twice the amount of RAM depending upon the amount of hard disk space available for the system because of diminishing returns.
For more modern systems (>1GB), your swap space should be at a minimum be equal to your physical memory (RAM) size «if you use hibernation», otherwise you need a minimum of round(sqrt(RAM)) and a maximum of twice the amount of RAM. The only downside to having more swap space than you will actually use, is the disk space you will be reserving for it.
The «diminishing returns» means that if you need more swap space than twice your RAM size, you’d better add more RAM as Hard Disk Drive (HDD) access is about 10³ slower then RAM access, so something that would take 1 second, suddenly takes more then 15 minutes! And still more then a minute on a fast Solid State Drive (SSD).
Example Scenarios
(last 3 columns denote swap space)
How do I add more swap?
Swap is generally associated with a swap partition, perhaps because the user is prompted to create a swap partition at the time of installation. In fact, any file can be used as a swapping device, be it a partition or a conventional file. Swap can be added by increasing the size of the swap partition or by adding a swap file. Keep in mind that when creating a swap file that it may not necessarily be using contiguous disk blocks (as a swap partition will), and this could have a negative impact on performance as disk access times may be longer, and the more your system uses swap, the worse it will be. The Linux kernel also accesses swap disk block IO directly bypassing all caching, metadata and filesystem code, so a swap file should have no ill effect on the stability of your base filesystem. Since kernel 2.6.29 the swap system has automatically supported TRIM capable devices like SSDs.
The advantages of a swap file are many, but it is problematic for using the default swsusp hibernation method for powerless sleep. The best solution for maintaining hibernate capability after adding RAM is to increase the size of the swap partition.
How do I add or modify a swap partition?
Process to Increase Size of Swap Partition and use it for Hibernation
- Creating the swap partition
- Activating the swap partition
- Making the new swap partition work for hibernate (optional)
Creating the swap partition
- Boot to Ubuntu install CD and choose the option to run Ubuntu now
Go to system -> GParted Partition Editor
Activating the swap partition
(If your swap is on your primary hard drive, you don’t need to do anything here.) Now you need to find what partition your swap is on and what its UUID is. UUID?! you say? Well that’s the Universally Unique IDentifier for the partition so you can reference it even if it’s on a different mount point from boot-to-boot due to adding disks, etc.
Pull up a terminal and run gksu gparted & and enter your root password. The & lets this process run while still giving you access to the command line.
Right-click on your swap partition and choose *Information*. You should see the **Path** and **UUID** listed there. Keep this open for further reference.
Run gksu gedit /etc/fstab & and look for the line that has *swap* in it. It should be the third column, separated by spaces or tabs. You can either use the path or the UUID to tell Linux where to find your swap partition. I recommend UUID because it’ll stay constant even if you move the partition around or the disk somehow becomes sdb instead of sda or something like that. Make the appropriate edits and save the file. Your line should look something like this if you used UUID (with your UUID instead, of course):
UUID=41e86209-3802-424b-9a9d-d7683142dab7 none swap sw 0 0
or this if you used path: /dev/sda2 none swap sw 0 0
Save the file.
Enable the new swap partition with this command.
Confirm that the swap partition exists.
Making the swap partition work for hibernate (optional)
‘INFO: This will not work for 12.04, resume from hibernate work differently in 12.04.‘
Pull up a Terminal again and run cat /proc/swaps and hopefully you see the path to your swap partition listed there. If not chances are something went wrong in the steps above. Here’s my output:
gksu gedit /etc/default/grub & to pull up the boot loader configuration
Look for the line GRUB_CMDLINE_LINUX=»» and make sure it looks like this (using your UUID of course) GRUB_CMDLINE_LINUX=»resume=UUID=41e86209-3802-424b-9a9d-d7683142dab7″ and save the file
sudo update-grub and wait for it to finish
gksu gedit /etc/initramfs-tools/conf.d/resume & and make sure its contents are resume=UUID=41e86209-3802-424b-9a9d-d7683142dab7 (with your UUID of course in place of mine). Save the file!
sudo update-initramfs -u
Now you should be able to hibernate and resume!
How do I add a swap file?
Note: btrfs does not support swap files at the moment. See man swapon. and btrfs Faq
Create the Swap File:
We will create a 1 GiB file ( /mnt/1GiB.swap) to use as swap:
fallocate size suffixes: g = Giga, m = Mega, etc. (See man fallocate).
If fallocate fails or it not available, you can use dd:
We need to set the swap file permissions to 600 to prevent other users from being able to read potentially sensitive information from the swap file.
Format the file as swap:
Enable use of Swap File
The additional swap is now available and verified with: cat /proc/swaps
Enable Swap File at Bootup
Add the swap file details to /etc/fstab so it will be available at bootup:
Example of making a swap file
This is an example of making and using a swap file on a computer with no swap partition.
Disable and Remove a Swap File
Disable the swap file from the running system and the delete it:
Remove the swap file details from fstab:
Removing the swap file line
What is swappiness and how do I change it?
The swappiness parameter controls the tendency of the kernel to move processes out of physical memory and onto the swap disk. Because disks are much slower than RAM, this can lead to slower response times for system and applications if processes are too aggressively moved out of memory.
- swappiness can have a value of between 0 and 100
- swappiness=0 tells the kernel to avoid swapping processes out of physical memory for as long as possible
- swappiness=100 tells the kernel to aggressively swap processes out of physical memory and move them to swap cache
The default setting in Ubuntu is swappiness=60. Reducing the default value of swappiness will probably improve overall performance for a typical Ubuntu desktop installation. A value of swappiness=10 is recommended, but feel free to experiment. Note: Ubuntu server installations have different performance requirements to desktop systems, and the default value of 60 is likely more suitable.
To check the swappiness value
To change the swappiness value A temporary change (lost on reboot) with a swappiness value of 10 can be made with
To make a change permanent, edit the configuration file with your favorite editor:
Search for vm.swappiness and change its value as desired. If vm.swappiness does not exist, add it to the end of the file like so:
Save the file and reboot.
What is the priority of swap containers?
The Linux kernel assigns priorities to all swap containers. To see the priorities that the Linux Kernel assigns to all the swap containers use this command.
Priorities can be changed by using the swapon command or defined in /etc/fstab. Consult the manual page of swapon for more info
Should I reinstall with more swap?
Definitely not. With the 2.6 kernel, «a swap file is just as fast as a swap partition.» (Wikipedia:Paging, LKML).
Why is my swap not being used?
My swap is not being used! When I issue the free command, it shows something like this:
Note: This regards mainly swap on hard disk partitions, but it could help anyway. In these examples /dev/hda8 is considered as swap.
Swap may not be needed
Start many memory consuming applications (e.g. Gimp, web browsers, LibreOffice etc) and then issue the free command again. Is swap being used now?
Ubuntu Desktop uses Swap to Hibernate (PC off, no power needed, program states saved). If Hibernation is important to you, have more swap space than ram + swap overflow.
Is there a swap partition at all?
Use this command to see all partitions
You should be able to see something like this in the output
If not, you either need to create a swapfile or create a swap partition. To create a swap partition you can
- boot from your Ubuntu install CD, create a swap partition out of the free space on your hard disk and then interrupt your installation.
Enabling a swap partition
In case you do have a swap partition, there are several ways of enabling it.
- Use the following command
- Ensure that there is a line link below. This enables swap on boot.
- Then disable all swap, recreate it, then re-enable it with the following commands.
Empty Swap
Even if you have lots of RAM and even if you have a low swappiness value, it is possible that your computer swaps. This can hurt the multitasking performance of your desktop system.
You can use the following script to get the swap manually back into RAM:
- Place the script e.g. /usr/local/sbin:
- Copy-paste the script into the file:
NOTE: The first «#!» is MoinMoin synxtax for comments, so we must double the line http://moinmo.in/HelpOnMoinWikiSyntax#Comments
- Save and close gedit
- Make the script executable:
- Execute:
SwapFaq (последним исправлял пользователь zubzou 2019-12-19 12:51:11)
The material on this wiki is available under a free license, see Copyright / License for details
You can contribute to this wiki, see Wiki Guide for details
Источник


