The latest versions of libxml2 can be found on the xmlsoft.org server ( FTP and rsync are available), there are also mirrors (France and Antonin Sprinzl also provide a mirror in Austria). (NOTE that you need both the libxml(2) and libxml(2)-devel packages installed to compile applications using libxml if using RPMs.)
You can find all the history of libxml(2) and libxslt releases in the old directory. The precompiled Windows binaries made by Igor Zlatovic are available in the win32 directory.
RPMs for x86_64 are available directly on xmlsoft.org, the source RPM will compile on any architecture supported.
Igor Zlatkovic is now the maintainer of the Windows port, he provides binaries.
OpenCSW provides Solaris binaries.
Steve Ball provides Mac Os X binaries.
The HP-UX porting center provides HP-UX binaries
Bull provides precompiled RPMs for AIX as patr of their GNOME packages
If you know other supported binary ports, please contact me.
Code from the GNOME GIT base libxml2 module, updated hourly libxml2-git-snapshot.tar.gz.
Docs, content of the web site, the list archive included libxml-docs.tar.gz.
I do accept external contributions, especially if compiling on another platform, get in touch with the list to upload the package, wrappers for various languages have been provided, and can be found in the bindings section
Libxml2 is also available from GIT:
See libxml2 Git web. To checkout a local tree use:
The libxslt module is also present there.
Библиотека DLL файлов
Новые DLL
LIBXML2.DLL
Описание dll файла: Libxml2 Вероятная ошибка dll: отсутствует LIBXML2.DLL Совместимые операционные системы: Windows XP, Windows 7, Windows 8, Windows 10
Скачать LIBXML2.DLL
Ниже расположены прямые ссылки на файлы библиотеки dll из нашей коллекции.
ВАЖНО! Устанавливая библиотеку, вы принимаете на себя все риски, связанные с вмешательством в работу вашей операционной системы.
Как скачать LIBXML2.DLL и установить ее
Откройте загруженный zip-файл. Извлеките LIBXML2.DLL в папку на вашем компьютере. Мы рекомендуем вам распаковать его в директорию программы, которая запрашивает LIBXML2.DLL. Если это не работает, вам придется извлечь LIBXML2.DLL в вашу системную директорию. По умолчанию это:
C: \ Windows \ System (Windows 95/98/Me) C: \ WINNT \ System32 (Windows NT/2000) C: \ Windows \ System32 (Windows XP, Vista, 7, 8, 8.1, 10)
Если вы используете 64-разрядную версию Windows, вы должны также положить LIBXML2.DLL в C: \ Windows \ SysWOW64 \ . Убедитесь, что вы перезаписали существующие файлы (но не забудьте сделать резервную копию оригинального файла). Перезагрузите ваш компьютер. Если ошибка dll сохраняется, попробуйте следующее: Откройте меню Пуск и выберите пункт «Выполнить». Введите CMD и нажмите Enter (или если вы используете Windows ME, наберите COMMAND ). Введите regsvr32 LIBXML2.DLL и нажмите Enter.
Внимание! Скачать LIBXML2.DLL из сети Интернет очень легко, однако велика вероятность заражения вашего компьютера вредоносным кодом. Пожалуйста, проверяйте ВСЕ скаченные из Интернет файлы антивирусом! Администрация сайта download-dll.ru не несет ответственность за работоспособность вашего компьютера.
Обратите также внимание, что каждый файл имеет версию и разрядность (32 или 64 бита). Установка в систему DLL файлов помогает не в 100% случаев, но в основном проблемы с программами и играми решаются таким незамысловатым методом. Чаще всего с DLL вы сталкиваетесь при ошибках в операционной системе. Некоторые библиотеки поставляются с системой Windows и доступны для любых Windows-программ. Замена DLL-файлов с одной версии на другую позволяет независимо наращивать систему, не затрагивая прикладные программы.
Ошибка DLL? Помогут наши спецы!
Не можете разобраться? Не запускается игра? Постоянно появляются ошибки DLL? Опиши подробно свою проблему и наши специалисты быстро и квалифицированно найдут решение возникшей неисправности. Не надо стеснятся задать вопрос!
Библиотека libxml2 для работы с XML-файлами
Программисту часто бывает нужно работать с XML-документами. Самой популярной библиотекой для этого является libxml2. Научимся ее подключать к своему проекту.
1. Что такое libxml2?
libxml2 — это библиотека для парсинга XML-документов. Это означает,что программист может искать и править отдельные атрибуты и значения в XML-документе.
Библиотека написана на языке Си, и, вследствие этого, переносима практически на все платформы (Unix, Windows, CygWin, Mac OS, RISC OS, OS/2, VMS, QNX, MVS и т.д.).
Кроме того, существуют привязки к языкам C++, Python, PHP5 и т.д.
Библиотека распространяется под MIT-лицензией, что делает эту библиотеку весьма популярной.
2. Загрузка библиотеки
Библиотеку libxml2 в формате готовых файлов можно загрузить на сайте: www.zlatkovic.com/projects/libxml/index.html
Нужно учесть, что файлы имеют зависимости, поэтому для выбора загружаемых файлов нужно их учитывать:
Мы видим, что в минимальном варианте нужно загрузить следующие пакеты:
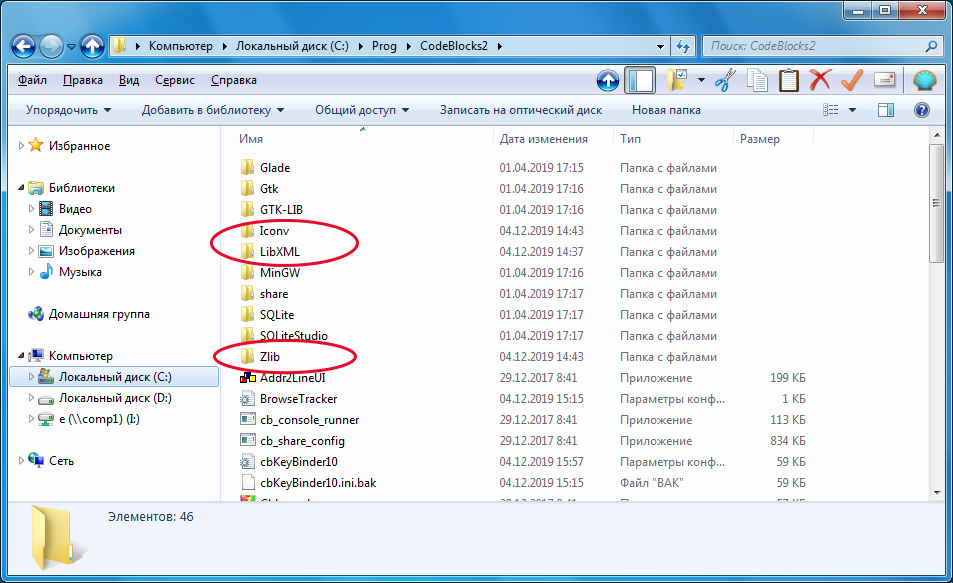
Заходим на www.zlatkovic.com/pub/libxml/ и загружаем три архива:
Распаковываем эти архивы в папку с CodeBlocks. В каждом архиве содержатся папки bin (исполняемые модули), lib (статические библиотеки) и include (заголовочные файлы).
Цифры в названиях можно убрать для удобства:
3. Создание проекта
Сначала создаем обычный консольный проект как здесь. Назовем проект x1. Затем вместо примера вставим следующий код:
Библиотека libxml2 для работы с XML-файлами
Программисту часто бывает нужно работать с XML-документами. Самой популярной библиотекой для этого является libxml2. Научимся ее подключать к своему проекту.
1. Что такое libxml2?
libxml2 — это библиотека для парсинга XML-документов. Это означает,что программист может искать и править отдельные атрибуты и значения в XML-документе.
Библиотека написана на языке Си, и, вследствие этого, переносима практически на все платформы (Unix, Windows, CygWin, Mac OS, RISC OS, OS/2, VMS, QNX, MVS и т.д.).
Кроме того, существуют привязки к языкам C++, Python, PHP5 и т.д.
Библиотека распространяется под MIT-лицензией, что делает эту библиотеку весьма популярной.
2. Загрузка библиотеки
Библиотеку libxml2 в формате готовых файлов можно загрузить на сайте: www.zlatkovic.com/projects/libxml/index.html
Нужно учесть, что файлы имеют зависимости, поэтому для выбора загружаемых файлов нужно их учитывать:
Мы видим, что в минимальном варианте нужно загрузить следующие пакеты:
Заходим на www.zlatkovic.com/pub/libxml/ и загружаем три архива:
Распаковываем эти архивы в папку с CodeBlocks. В каждом архиве содержатся папки bin (исполняемые модули), lib (статические библиотеки) и include (заголовочные файлы).
Цифры в названиях можно убрать для удобства:
3. Создание проекта
Сначала создаем обычный консольный проект как здесь . Назовем проект x1. Затем вместо примера вставим следующий код:
void parseStory(xmlDocPtr doc, xmlNodePtr cur)
while (cur != NULL)
if ((!xmlStrcmp(cur->name, (const xmlChar *)»keyword»)))
fprintf(stderr,»Document not parsed successfully. \n»);
if (xmlStrcmp(cur->name, (const xmlChar *) «story»))
fprintf(stderr,»document of the wrong type, root node != story»);
while (cur != NULL)
if ((!xmlStrcmp(cur->name, (const xmlChar *)»storyinfo»)))
parseStory (doc, cur);
int main(int argc, char **argv)
printf(«Usage: %s docname\n», argv[0]);
В этом примере мы парсим XML-документ и ищем ключ с именем «keyword». Затем выводим значение этого ключа.
4. Настройка компилятора
Чтобы пример заработал нужно сделать следующие три шага:
Указать компилятору, где взять заголовочные файлы.
Подключить библиотеки для компоновки.
Поместить библиотеки в готовый проект.
Начнем с заголовочных файлов. Зайдите в меню «Проект — Параметры сборки — Каталоги» и добавьте пути к заголовочным файлам:
Затем переключитесь на вкладку «Настройки компоновщика» и укажите библиотеку:
И, наконец, скопируйте следующие файлы dll в папку с программой:
c:\Prog\CodeBlocks2\LibXML\bin\libxml2.dll
c:\Prog\CodeBlocks2\Iconv\bin\iconv.dll
c:\Prog\CodeBlocks2\Zlib\bin\zlib1.dll
Эти файлы нужно скопировать в папку:
5. Создание тестового файла
Нам нужен XML-документ для работы. Создайте текстовый файл и скопируйте туда текст:
Libxml2 windows 64 bit
LibXML2 for Windows for Intel and ARM Processors ReadMe
Current Version: 2.9.9.0
Release Date: Thursday, 04 April 2019
The purpose of this repository is to publish a port of the famous ZLib (zlib, for purists — you know who you are) library for creating Zip archives and extracting files from them to Windows 10 running on ARM processors such as the Qualcomm Snapdragon series, such as the one inside the Asus ASUS NovaGo TP370QL, about which you can learn more at https://www.asus.com/us/2-in-1-PCs/ASUS-NovaGo-TP370QL/.
This code incorporates version 1.15, the latest version, of iconv published on the official site, at https://www.gnu.org/software/libiconv/, adding configurations for ARM, ARM64, and x64.
For completeness, this repository includes the Win32 and x64 (32 and 64 bit Windows on Intel/AMD) binaries.
Using These Libraries
Since this project supports simultaneously targeting four platforms from one code base, the output files having extensions .dl l, .exe , .lib , and .pdb , are differentiated by
Configuration Platform ID
Hardware Pletform
Bits
Suffix
Win32
Windows on Intel and AMD
32
Win32
x64
Windows on Intel and AMD
64
x64
ARM
Windows on ARM Processors
32
ARM
ARM64
Windows on ARM Processors
64
ARM64
This is the last of four major open source libraries, all of which had to be converted and tested before this conversion could be put forward. The following table lists the four libraries, along with URLs for the GitHub repositories in which you can find the source code.
Name
Version
Repository URL
zlib
1.2.11
https://github.com/txwizard/zlib_x64_and_ARM
iconv
1.15
https://github.com/txwizard/iconv_x64_and_ARM
LZMA *
5.3.10
https://github.com/txwizard/LZMA_x64_and_ARM
* The LZMA library comes by way of the XZ Utilities project at https://tukaani.org/xz/, since it eventually became evident that the maintainers expected that version to be integrated into it.
In addition to the foregoing three OSS libraries, runsiite.exe and the other unit test programs leverage code in two new libraries of my own devising, both of which are published as open source projects.
Name
Version
Repository URL
CRTTime
1,0,0,3
https://github.com/txwizard/CRTTime
NativeConssoleAppAids
1,0,0,4
https://github.com/txwizard/NativeConsoleAppAids
Since the headers, link library, and dynamic-link library versions of all dependent libraries are incorporated herein, you need not visit any of the foregoing repositories to get started with libxml2. Nevertheless, identifying them herein is intended to spare others the time spent chasing down the original sources from which these four libraries were built, should you want to build them from source.
All repositories incorporate test programs that have been built for all supported platforms. When executed, each program displays its version number, followed by a message that identifis the platform on which it is executing, then the current local and UTC machine time. The NativeConssoleAppAids unit tests are incomplete, because it was developed alongside CRTTime, which uses most of its routines, and the four open source library ports, all of which incorporate other routines defined therein into their respective unit test programs.
Testing of libxml2 is the most difficult to set up, since the current directory must contain directory test from the repository, because it expects to find the inputs for its unit tests therein. The simplest way to do so is to copy the absolute name of the test program, runsuiteXXX.exe , where «XXX» is the platform ID listed in the first table above, into the Windows Clipboard, then open a command prompt in the directory that contains the test directory, paste the program name into that window, and hit Enter. Since all required DLLs are in the program directory, the program can find and load them. In this way, a copy of the ARM build of each program was successfully tested on a working ARM computer by copying the output directory onto a flash drive, from which it was launched directly. Of course, testing libxml required the test directory to be copied along with the program directory.
Building it Yourself
If you have any edition of Visual Studio 2017 installed on a 64-bit copy of Microsoft Windows, and you intend to use only the 64-bit Intel libraries, you may skip the rest of this section, because the required runtime libraries are already installed.
Otherwise, please keep reading, especially if your target is an ARM processor, since the Microsoft C runtime for ARM is tucked away, and finding them took many searches, spread across about a week, to find a proper package. Moreover, extracting them from that package requires some specialized knowledge about the internal format of a NuGet package.
To use these libraries on any supported platform, you must acquire and install the Microsoft« C Runtime Library, version 14.00.24234.1 or later, called vcruntime140.dll on all platforms. Microsoft distributes it as part of the «Microsoft Visual C++ 2015 Redistributable Update 3 RC» package, available from https://www.microsoft.com/en-us/download/details.aspx?id=52685 for Intel and AMD CPUs, and from https://dotnet.myget.org/F/dotnet-core/api/v2/package/vc-runtime/2.0.0/ for ARM processors.
The Intel/AMD packages come as self-extracting EXE files, one each for x86 (32 bits) and x64 (64 bits). Though they are packaged separately, the download page offers the option of fetching both in one pass. If you take that option, you should elect to dwonload both, then view the packages in your Downloads folder. This suggestion applies to Edge and Chrome for certain, and is sound advice for other Web browsers. Though technically self-extracting archives, manually extracting them makes clear that they are intended to be executed, so that the executable code embedded therein can reassemble the numerous bits into a handful of program files before it installs them.
The ARM package comes as a .nupkg that can be renamed to .zip , and treated as an ordinary ZIP archive. Both ARM and ARM64 (32 and 64 bit) runtimes come in one package. To get the goods, extract the archive into a new directory, and use the file explorer to drill down into it. Inside directory content\VC\Redist\MSVC\14.14.26405\onecore are two subdirectories, helpfully named arm and arm64 . Unlike the Intel/AMD packages, the ARM package is a straightforward, if opaque, ZIP archive, and the contents of the two leaf directories need only to be copied into a directory that is in your PATH list, and they are ready for use.
For those who are interested, the directory structure in the NuGet package reflects the location into which the files are installed into Visual Studio when you install the ARM compilers and tools.
To get the tools for Microsoft Visual Studio, start the Visual Studio Installer, which should be on the main list of Programs (not APPs), answer the UAC prompt, and select the Modify button. Once the form draws itself, select the Individual Components tab, and scroll down almost to the bottom, where you will eventually find Visual C++ compilers and libraries for ARM and ARM64, listed as two items. Check either or both, and click Modify. When the installer is done, you are ready to go.