- boy3vil / MITMf Kali linux Install
- Libffi6 kali linux install
- Libffi6 kali linux install
- System Requirements
- Installation Prerequisites
- Preparing for the Installation
- Kali Linux Installation Procedure
- Language
- Network
- User Accounts
- Clock
- Encrypted LVM
- Proxy Information
- Metapackages
- Boot Information
- Reboot
- Post Installation
boy3vil / MITMf Kali linux Install
| mitmf —arp —spoof —gateway 192.168.100.1 —target 192.168.100.100 -i wlan0 |
| apt-get install python-dev python-setuptools libpcap0.8-dev libnetfilter-queue-dev libssl-dev libjpeg-dev libxml2-dev libxslt1-dev libcapstone3 libcapstone-dev libffi-dev file |
| git clone https://github.com/byt3bl33d3r/MITMf |
| cd MITMf && git submodule init && git submodule update —recursive |
| pip install -r requirements.txt |
| (if error pip) |
| sudo apt-get install python-setuptools |
| sudo apt-get install python-dev |
| sudo apt install python-pip |
| (if error bdfactory) |
| git clone https://github.com/secretsquirrel/the-backdoor-factory backdoor |
| mkdir /usr/share/mitmf/bdfactory |
| cd backdoor |
| cp -r ./* /usr/share/mitmf/bdfactory/ |
| cd /usr/share/mitmf/bdfactory |
| (if error «pcap.h not found») |
| sudo apt-get update |
| sudo apt-get install libpcap0.8-dev |
| (if error «‘x86_64-linux-gnu-gcc’ failed with exit status 1») |
| apt-get install libnfnetlink-dev |
| sudo apt install libnetfilter-queue-dev |
You can’t perform that action at this time.
You signed in with another tab or window. Reload to refresh your session. You signed out in another tab or window. Reload to refresh your session.
Источник
Libffi6 kali linux install
libffi-3.4.2 was released on June 28, 2021. Check the libffi web page for updates: URL:http://sourceware.org/libffi/.
Compilers for high level languages generate code that follow certain conventions. These conventions are necessary, in part, for separate compilation to work. One such convention is the «calling convention». The «calling convention» is essentially a set of assumptions made by the compiler about where function arguments will be found on entry to a function. A «calling convention» also specifies where the return value for a function is found.
Some programs may not know at the time of compilation what arguments are to be passed to a function. For instance, an interpreter may be told at run-time about the number and types of arguments used to call a given function. Libffi can be used in such programs to provide a bridge from the interpreter program to compiled code.
The libffi library provides a portable, high level programming interface to various calling conventions. This allows a programmer to call any function specified by a call interface description at run time.
FFI stands for Foreign Function Interface. A foreign function interface is the popular name for the interface that allows code written in one language to call code written in another language. The libffi library really only provides the lowest, machine dependent layer of a fully featured foreign function interface. A layer must exist above libffi that handles type conversions for values passed between the two languages.
Libffi has been ported to many different platforms.
At the time of release, the following basic configurations have been tested:
| Architecture | Operating System | Compiler |
|---|---|---|
| AArch64 (ARM64) | iOS | Clang |
| AArch64 | Linux | GCC |
| AArch64 | Windows | MSVC |
| Alpha | Linux | GCC |
| Alpha | Tru64 | GCC |
| ARC | Linux | GCC |
| ARM | Linux | GCC |
| ARM | iOS | GCC |
| ARM | Windows | MSVC |
| AVR32 | Linux | GCC |
| Blackfin | uClinux | GCC |
| CSKY | Linux | GCC |
| HPPA | HPUX | GCC |
| KVX | Linux | GCC |
| IA-64 | Linux | GCC |
| M68K | FreeMiNT | GCC |
| M68K | Linux | GCC |
| M68K | RTEMS | GCC |
| M88K | OpenBSD/mvme88k | GCC |
| Meta | Linux | GCC |
| MicroBlaze | Linux | GCC |
| MIPS | IRIX | GCC |
| MIPS | Linux | GCC |
| MIPS | RTEMS | GCC |
| MIPS64 | Linux | GCC |
| Moxie | Bare metal | GCC |
| Nios II | Linux | GCC |
| OpenRISC | Linux | GCC |
| PowerPC 32-bit | AIX | IBM XL C |
| PowerPC 64-bit | AIX | IBM XL C |
| PowerPC | AMIGA | GCC |
| PowerPC | Linux | GCC |
| PowerPC | Mac OSX | GCC |
| PowerPC | FreeBSD | GCC |
| PowerPC 64-bit | FreeBSD | GCC |
| PowerPC 64-bit | Linux ELFv1 | GCC |
| PowerPC 64-bit | Linux ELFv2 | GCC |
| RISC-V 32-bit | Linux | GCC |
| RISC-V 64-bit | Linux | GCC |
| S390 | Linux | GCC |
| S390X | Linux | GCC |
| SPARC | Linux | GCC |
| SPARC | Solaris | GCC |
| SPARC | Solaris | Oracle Solaris Studio C |
| SPARC64 | Linux | GCC |
| SPARC64 | FreeBSD | GCC |
| SPARC64 | Solaris | Oracle Solaris Studio C |
| TILE-Gx/TILEPro | Linux | GCC |
| VAX | OpenBSD/vax | GCC |
| X86 | FreeBSD | GCC |
| X86 | GNU HURD | GCC |
| X86 | Interix | GCC |
| X86 | kFreeBSD | GCC |
| X86 | Linux | GCC |
| X86 | OpenBSD | GCC |
| X86 | OS/2 | GCC |
| X86 | Solaris | GCC |
| X86 | Solaris | Oracle Solaris Studio C |
| X86 | Windows/Cygwin | GCC |
| X86 | Windows/MingW | GCC |
| X86-64 | FreeBSD | GCC |
| X86-64 | Linux | GCC |
| X86-64 | Linux/x32 | GCC |
| X86-64 | OpenBSD | GCC |
| X86-64 | Solaris | Oracle Solaris Studio C |
| X86-64 | Windows/Cygwin | GCC |
| X86-64 | Windows/MingW | GCC |
| X86-64 | Mac OSX | GCC |
| Xtensa | Linux | GCC |
Please send additional platform test results to libffi-discuss@sourceware.org.
First you must configure the distribution for your particular system. Go to the directory you wish to build libffi in and run the «configure» program found in the root directory of the libffi source distribution. Note that building libffi requires a C99 compatible compiler.
If you’re building libffi directly from git hosted sources, configure won’t exist yet; run ./autogen.sh first. This will require that you install autoconf, automake and libtool.
You may want to tell configure where to install the libffi library and header files. To do that, use the —prefix configure switch. Libffi will install under /usr/local by default.
If you want to enable extra run-time debugging checks use the the —enable-debug configure switch. This is useful when your program dies mysteriously while using libffi.
Another useful configure switch is —enable-purify-safety . Using this will add some extra code which will suppress certain warnings when you are using Purify with libffi. Only use this switch when using Purify, as it will slow down the library.
If you don’t want to build documentation, use the —disable-docs configure switch.
It’s also possible to build libffi on Windows platforms with Microsoft’s Visual C++ compiler. In this case, use the msvcc.sh wrapper script during configuration like so:
For 64-bit Windows builds, use CC=»path/to/msvcc.sh -m64″ and CXX=»path/to/msvcc.sh -m64″ . You may also need to specify —build appropriately.
It is also possible to build libffi on Windows platforms with the LLVM project’s clang-cl compiler, like below:
When building with MSVC under a MingW environment, you may need to remove the line in configure that sets ‘fix_srcfile_path’ to a ‘cygpath’ command. (‘cygpath’ is not present in MingW, and is not required when using MingW-style paths.)
To build static library for ARM64 with MSVC using visual studio solution, msvc_build folder have aarch64/Ffi_staticLib.sln required header files in aarch64/aarch64_include/
SPARC Solaris builds require the use of the GNU assembler and linker. Point AS and LD environment variables at those tool prior to configuration.
For iOS builds, the libffi.xcodeproj Xcode project is available.
Configure has many other options. Use configure —help to see them all.
Once configure has finished, type «make». Note that you must be using GNU make. You can ftp GNU make from ftp.gnu.org:/pub/gnu/make .
To ensure that libffi is working as advertised, type «make check». This will require that you have DejaGNU installed.
To install the library and header files, type make install .
libffi was originally written by Anthony Green green@moxielogic.com.
The developers of the GNU Compiler Collection project have made innumerable valuable contributions. See the ChangeLog file for details.
Some of the ideas behind libffi were inspired by Gianni Mariani’s free gencall library for Silicon Graphics machines.
The closure mechanism was designed and implemented by Kresten Krab Thorup.
Major processor architecture ports were contributed by the following developers:
Jesper Skov and Andrew Haley both did more than their fair share of stepping through the code and tracking down bugs.
Thanks also to Tom Tromey for bug fixes, documentation and configuration help.
Thanks to Jim Blandy, who provided some useful feedback on the libffi interface.
Andreas Tobler has done a tremendous amount of work on the testsuite.
Alex Oliva solved the executable page problem for SElinux.
The list above is almost certainly incomplete and inaccurate. I’m happy to make corrections or additions upon request.
Источник
Libffi6 kali linux install
Installing Kali Linux (single boot) on your computer is an easy process. This guide will cover the basic install (which can be done on bare metal or guest VM), with the option of encrypting the partition. At times, you may have sensitive data you would prefer to encrypt using Full Disk Encryption (FDE). During the setup process you can initiate an LVM encrypted install on either Hard Disk or USB drives.
First, you’ll need compatible computer hardware. Kali Linux is supported on amd64 (x86_64/64-Bit) and i386 (x86/32-Bit) platforms. Where possible, we would recommend using the amd64 images. The hardware requirements are minimal as listed in the section below, although better hardware will naturally provide better performance. You should be able to use Kali Linux on newer hardware with UEFI and older systems with BIOS.
Our i386 images, by default use a PAE kernel, so you can run them on systems with over 4 GB of RAM.
In our example, we will be installing Kali Linux in a fresh guest VM, without any existing operating systems pre-installed. We will explain other possible scenarios throughout the guide.
System Requirements
The installation requirements for Kali Linux will vary depending on what you would like to install and your setup. For system requirements:
- On the low end, you can set up Kali Linux as a basic Secure Shell (SSH) server with no desktop, using as little as 128 MB of RAM (512 MB recommended) and 2 GB of disk space.
- On the higher end, if you opt to install the default Xfce4 desktop and the kali-linux-default metapackage, you should really aim for at least 2 GB of RAM and 20 GB of disk space.
- When using resource-intensive applications, such as Burp Suite, they recommend at least 8 GB of RAM(and even more if it large web application!) or using simultaneous programs at the same time.
Installation Prerequisites
This guide will make also the following assumptions when installing Kali Linux:
- Using the amd64 installer image.
- CD/DVD drive / USB boot support.
- Single disk to install to.
- Connected to a network (with DHCP & DNS enabled) which has outbound Internet access.
We will be wiping any existing data on the hard disk, so please backup any important information on the device to an external media.
Preparing for the Installation
Download Kali Linux (We recommend the image marked Installer).
Burn The Kali Linux ISO to DVD or image Kali Linux Live to USB drive. (If you cannot, check out the Kali Linux Network Install).
Backup any important information on the device to an external media.
Ensure that your computer is set to boot from CD/DVD/USB in your BIOS/UEFI.
Kali Linux Installation Procedure
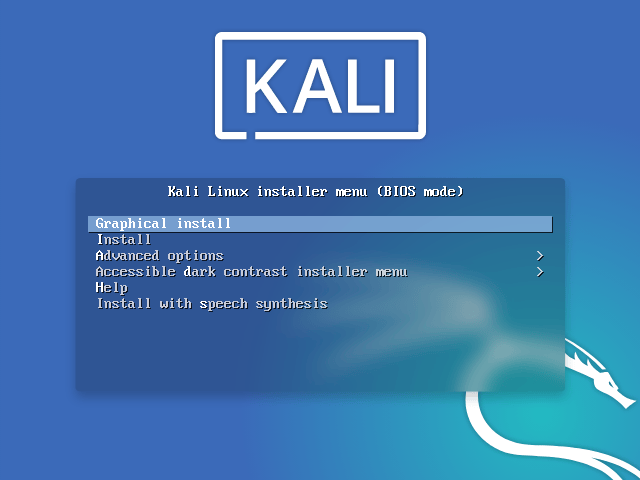
- To start your installation, boot with your chosen installation medium. You should be greeted with the Kali Linux Boot screen. Choose either Graphical install or Install (Text-Mode). In this example, we chose the Graphical install.
If you’re using the live image instead, you will see another mode, Live, which is also the default boot option. 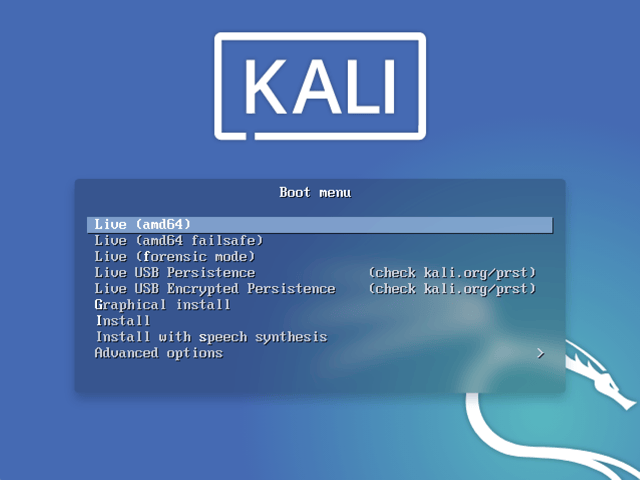
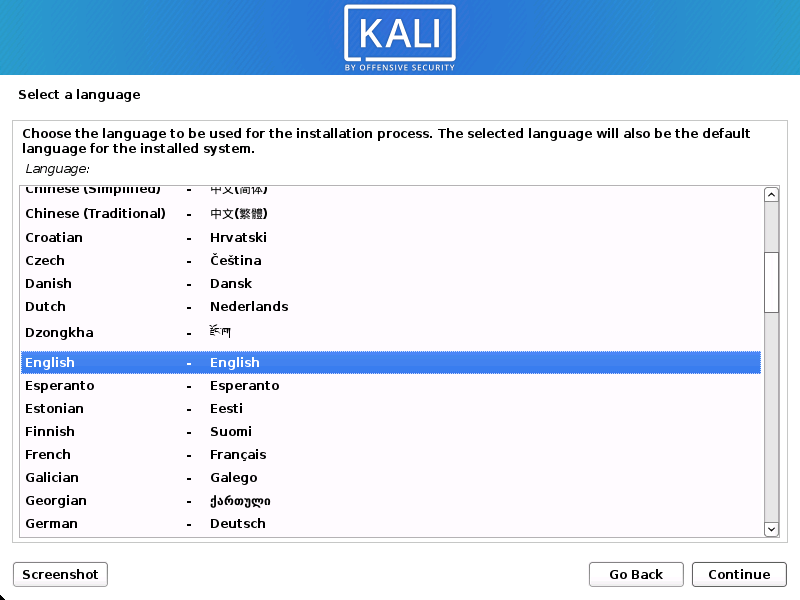
Language
- Select your preferred language. This will be used for both the setup process and once you are using Kali Linux.
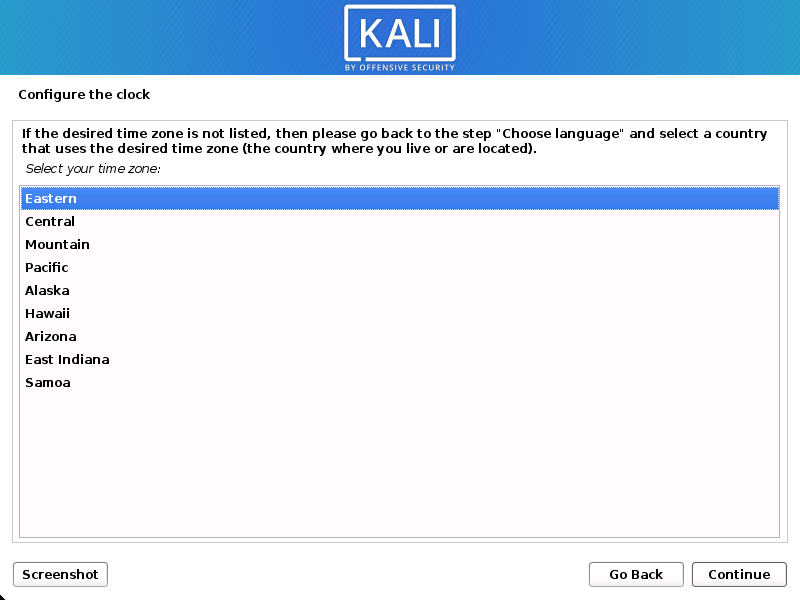
- Specify your geographic location.

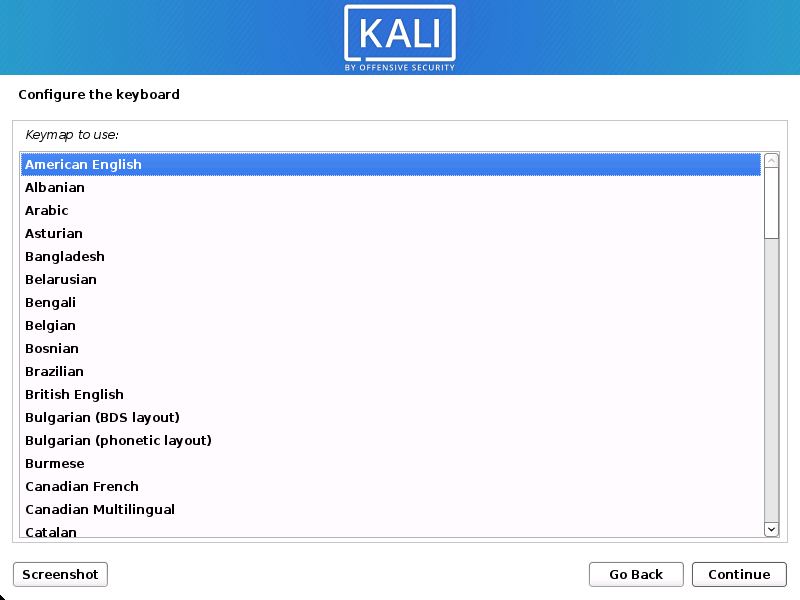
- Select your keyboard layout.
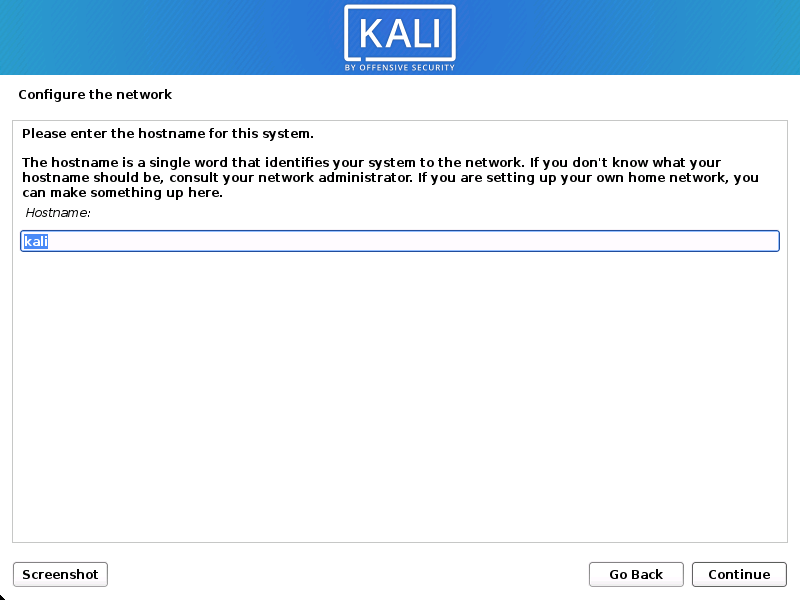
Network
- The setup will now probe your network interfaces, looks for a DHCP service, and then prompt you to enter a hostname for your system. In the example below, we’ve entered kali as our hostname.
If there is no network access with DHCP service detected, you may need to manually configure the network information or do not configure the network at this time.
- If there isn’t a DHCP service running on the network, it will ask you to manually enter the network information after probing for network interfaces, or you can skip.
- If Kali Linux doesn’t detect your NIC, you either need to include the drivers for it when prompted, or generate a custom Kali Linux ISO with them pre-included.
- If the setup detects multiple NICs, it may prompt you which one to use for the install.
- If the chosen NIC is 802.11 based, you will be asked for your wireless network information before being prompted for a hostname.
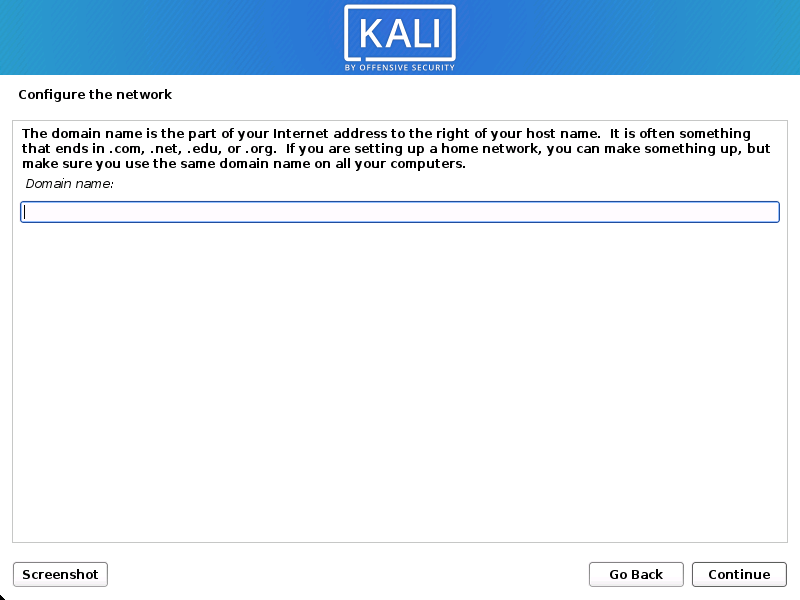
- You may optionally provide a default domain name for this system to use (values may be pulled in from DHCP or if there is an existing operating systems pre-existing).
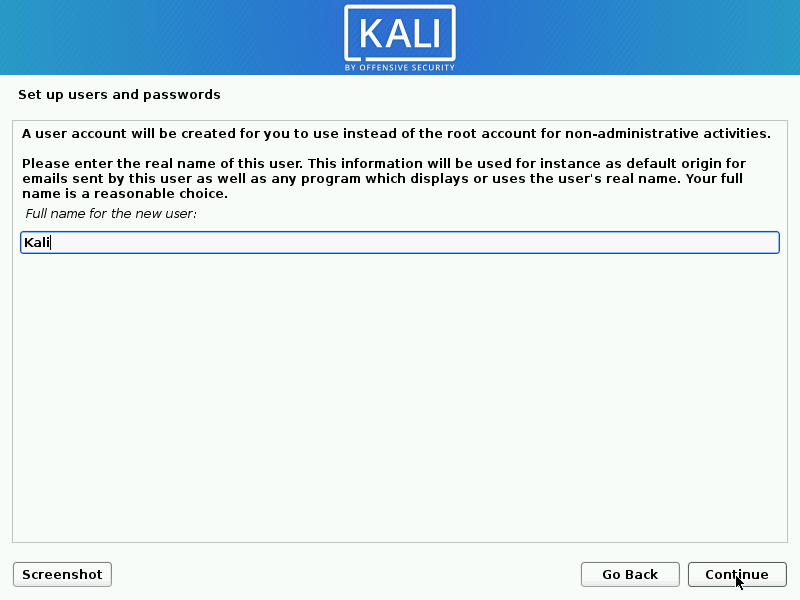
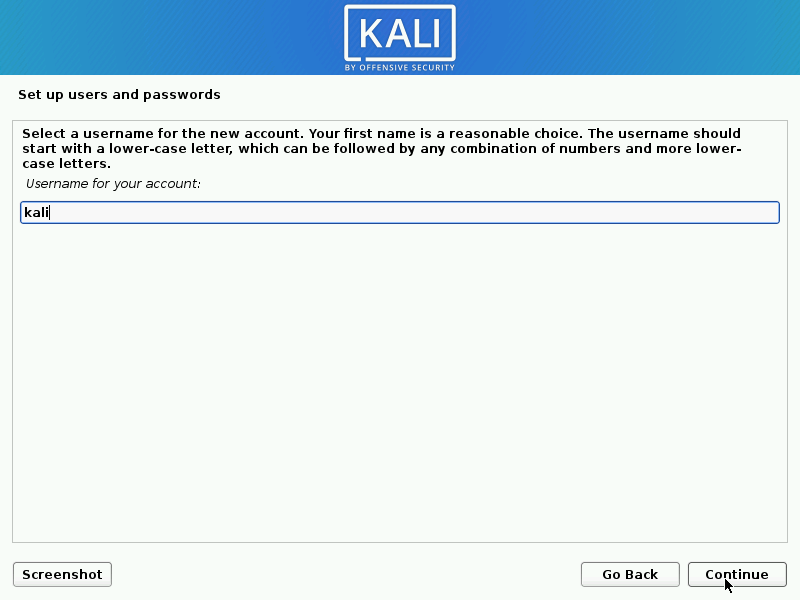
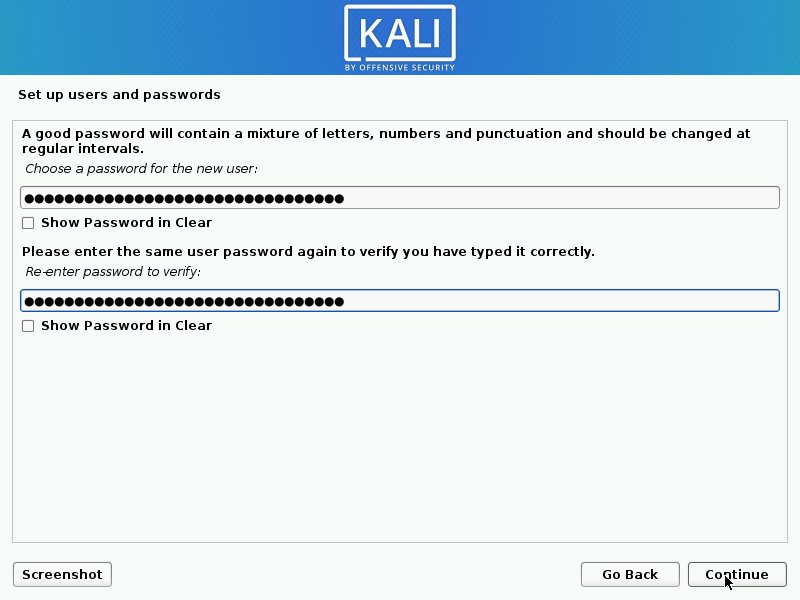
User Accounts
- Next, create the user account for the system (Full name, username and a strong password).
Clock
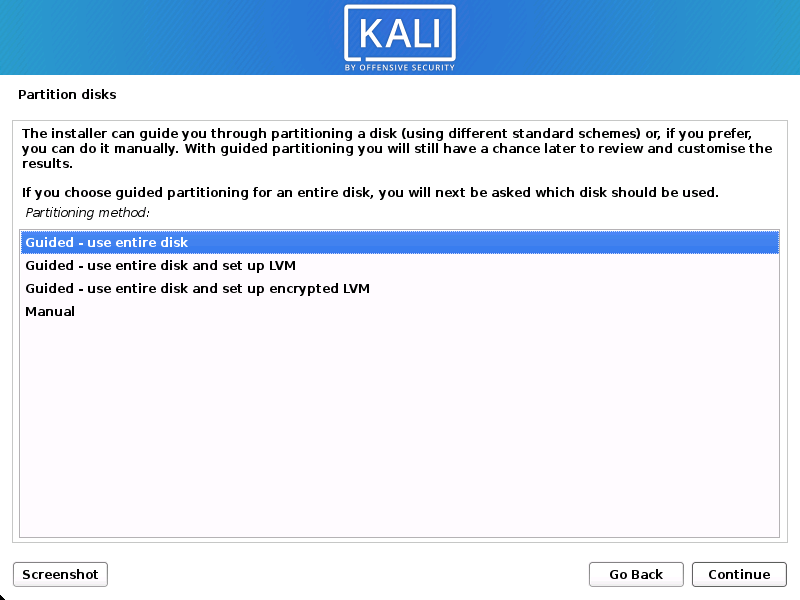
- The installer will now probe your disks and offer you various choices, depending on the setup.
In our guide, we are using a clean disk, so we have four options to pick from. We will select Guided — the entire disk, as this is the single boot installation for Kali Linux, so we do not want any other operating systems installed, so we are happy to wipe the disk.
If there is an pre-existing data on the disk, you will have have an extra option (Guided — use the largest continuous free space) than the example below. This would instruct the setup not to alter any existing data, which is perfect for for dual-booting into another operating system. As this is not the case in this example, it is not visible.
Experienced users can use the “Manual” partitioning method for more granular configuration options, which is covered more in our BTRFS guide.
If you want to encrypt Kali Linux, you can enable Full Disk Encryption (FDE), by selecting Guided — used entire disk and setup encrypted LVM. When selected, later on in the setup (not in this guide) prompt you to enter a password (twice). You will have to enter this password every time you start up Kali Linux.
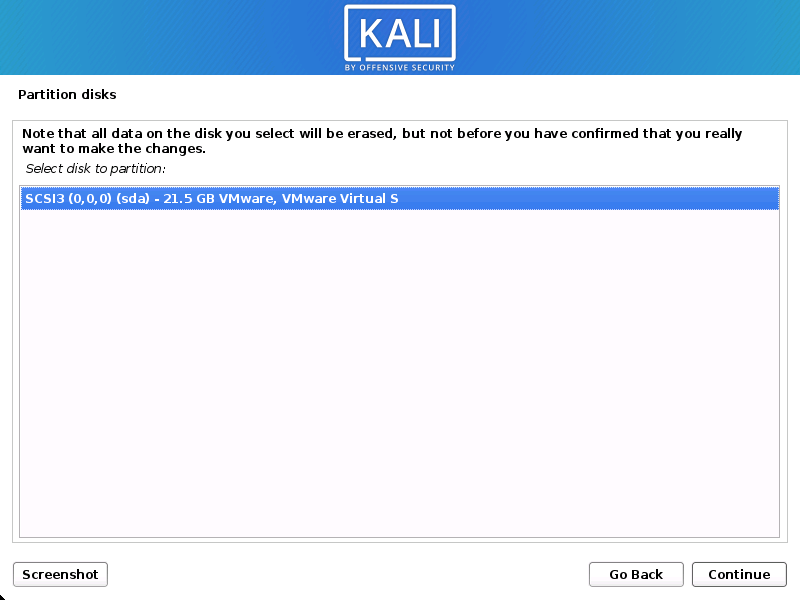
- Select the disk to be partitioned.
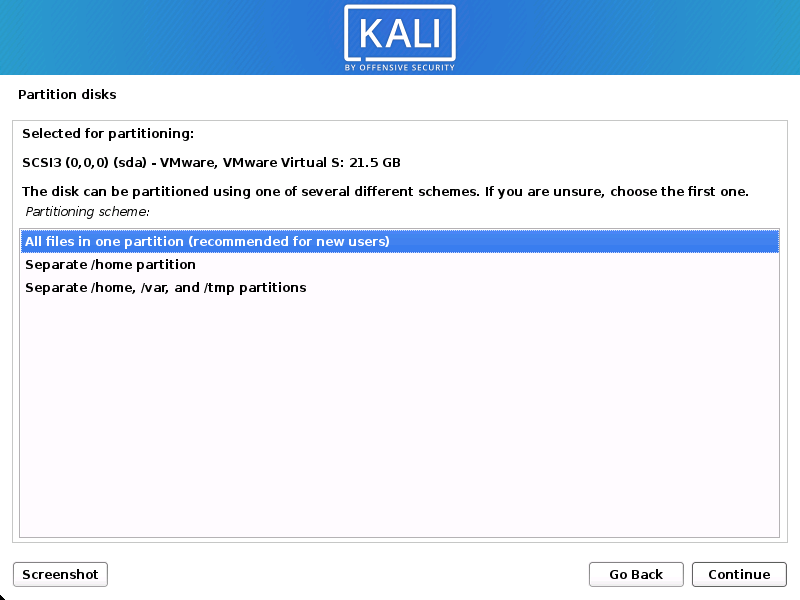
- Depending on your needs, you can choose to keep all your files in a single partition — the default — or to have separate partitions for one or more of the top-level directories.
If you’re not sure which you want, you want “All files in one partition”.
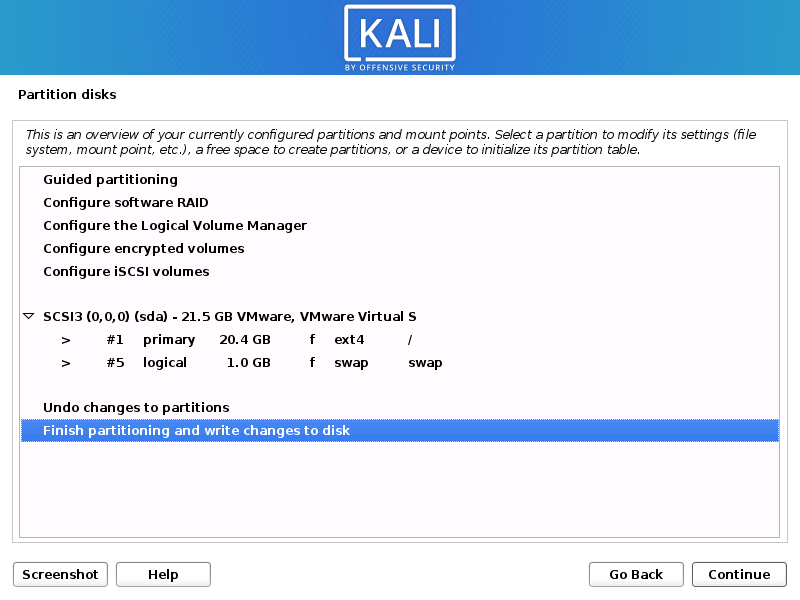
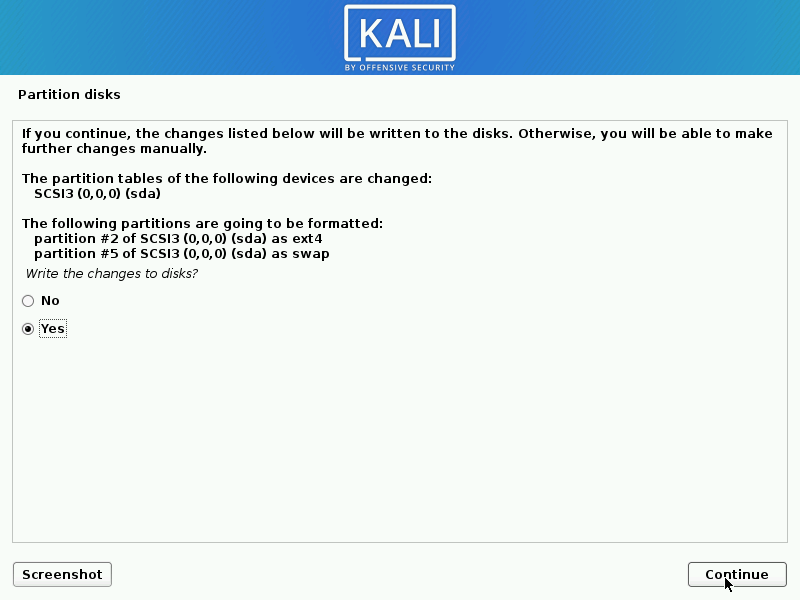
- Next, you’ll have one last chance to review your disk configuration before the installer makes irreversible changes. After you click Continue, the installer will go to work and you’ll have an almost finished installation.
Encrypted LVM
If enabled in the previous step, Kali Linux will now start to perform a secure wipe of the hard disk, before asking you for a LVM password.
Please sure a strong password, else you will have to agree to the warning about a weak passphrase.
This wipe may take “a while” (hours) depending on the size and speed of the drive.
If you wish to risk it, you can skip it.
Proxy Information
- Kali Linux uses a central repository to distribute applications. You’ll need to enter any appropriate proxy information as needed.

Metapackages
If network access was not setup, you will want to continue with setup when prompt.
If you are using the Live image, you will not have the following stage.
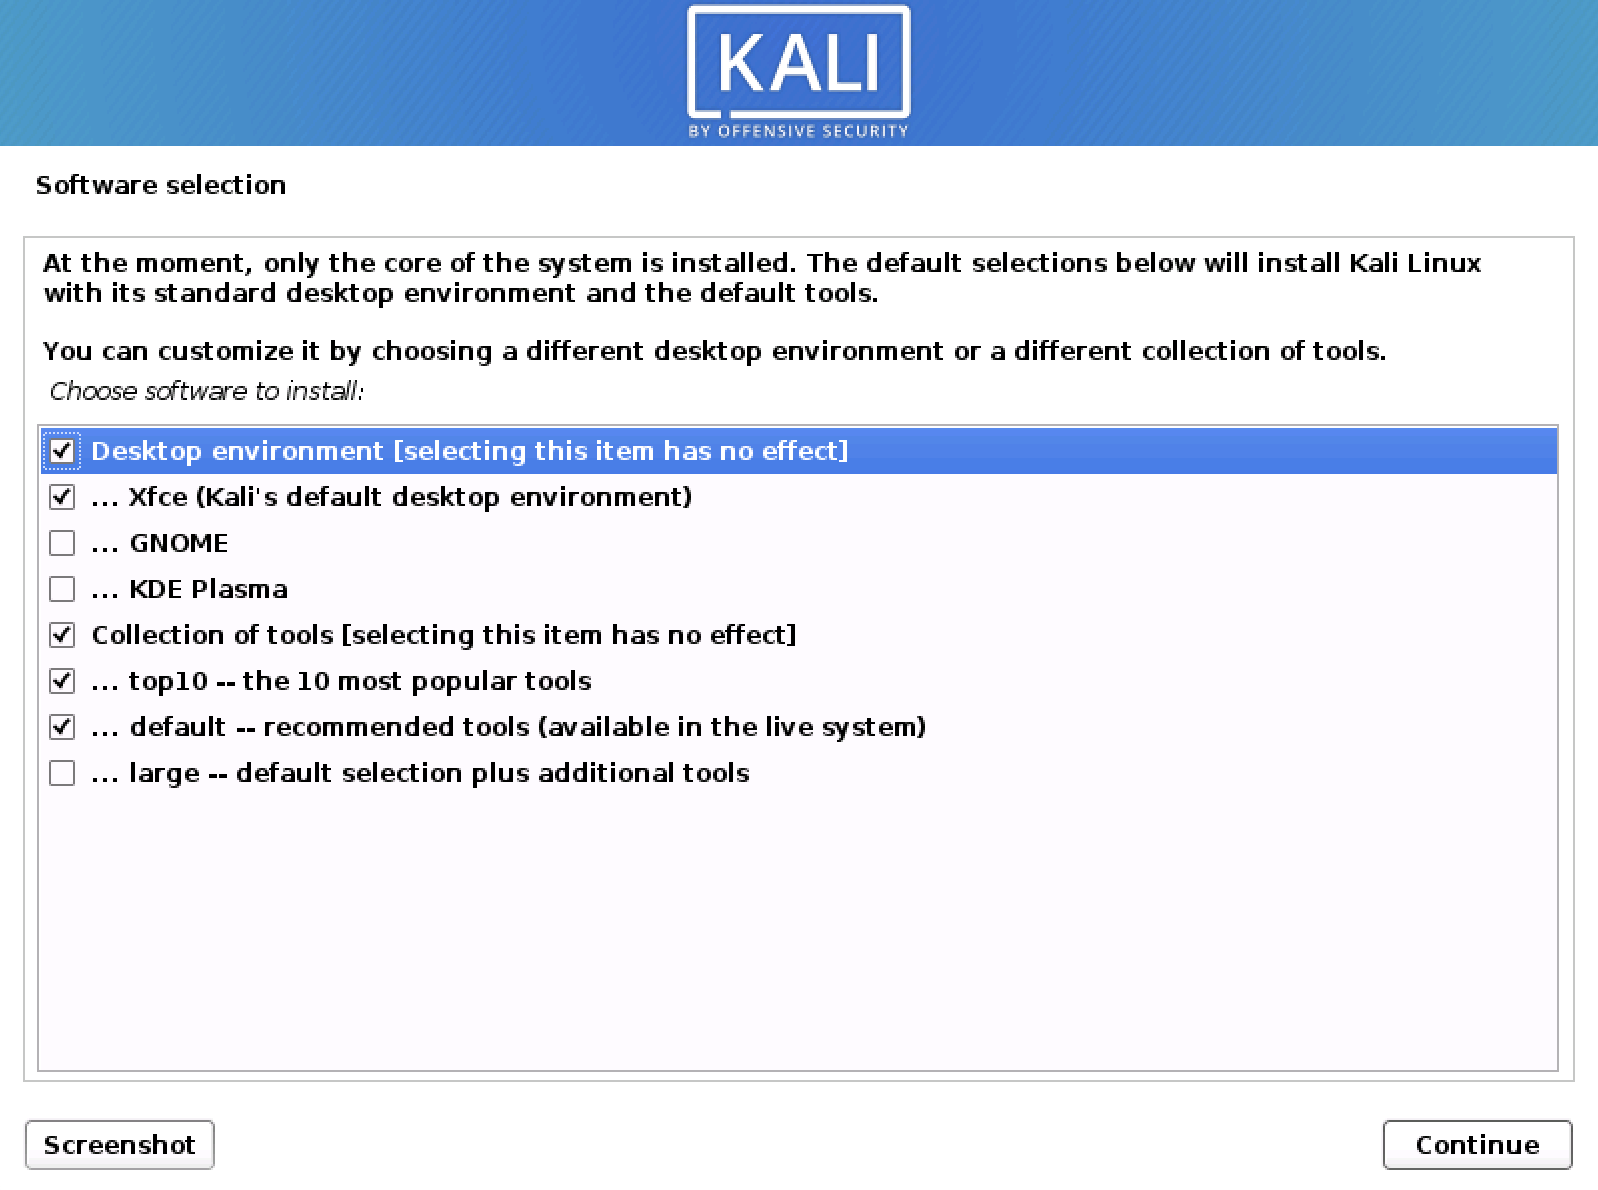
- Next you can select which metapackages you would like to install. The default selections will install a standard Kali Linux system and you don’t really have to change anything here.
Please refer to this guide if you prefer to change the default selections.
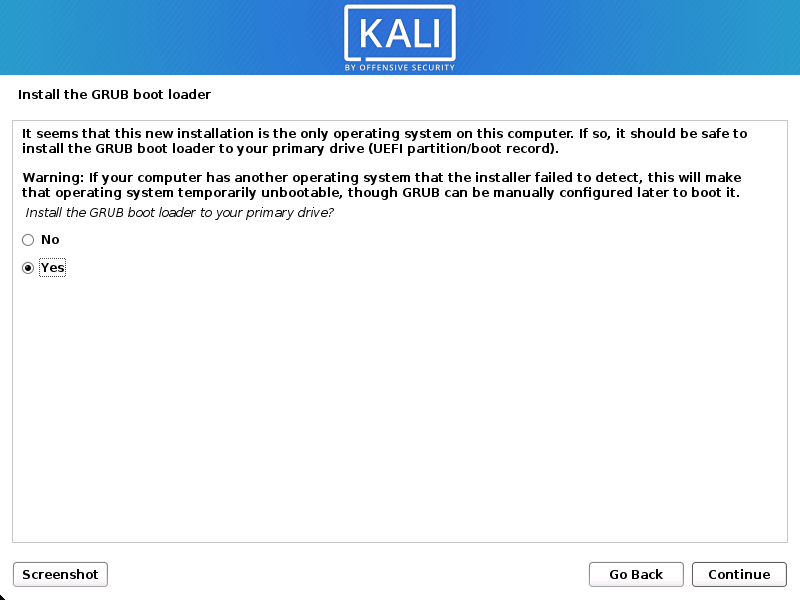
Boot Information
- Next confirm to install the GRUB boot loader.
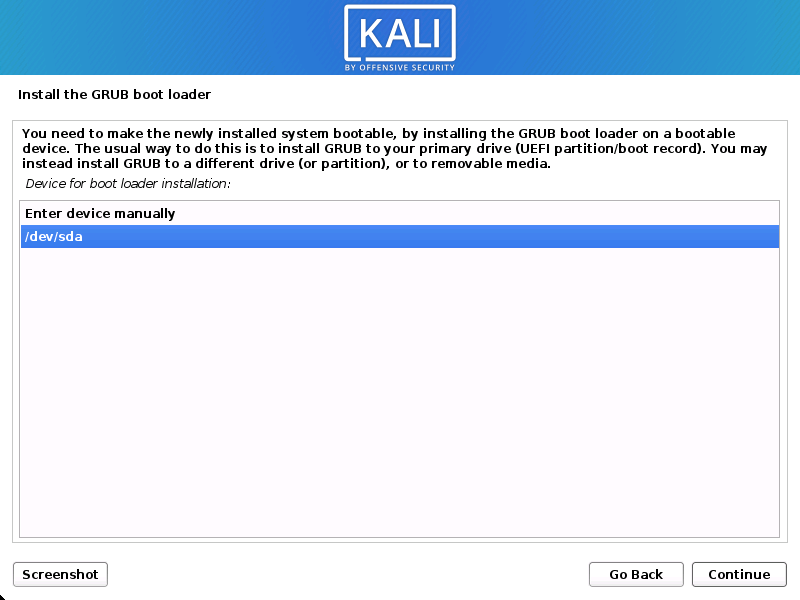
- Select the hard drive to install the GRUB bootloader in (it does not by default select any drive).
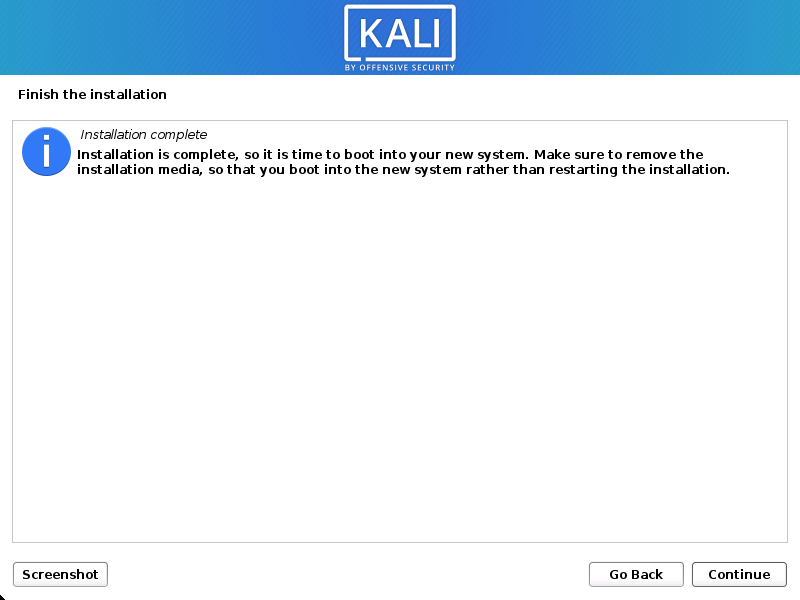
Reboot
- Finally, click Continue to reboot into your new Kali Linux installation.
Post Installation
Now that you’ve completed installing Kali Linux, it’s time to customize your system.
The General Use section has more information and you can also find tips on how to get the most out of Kali Linux in our User Forums.
Updated on: 2021-Sep-27
Author: gamb1t
Источник


