- Zeta Systems Blog
- Installing Virtio Drivers In Windows On KVM
- 3rd July 2018
- Download ISO
- Machine Configuration
- Attach ISO
- Begin Install
- Storage Driver
- Post Install
- Guest Agent
- Device Manager
- Generic Bus
- Virtio Ethernet Adapter
- Virtio Balloon Driver
- Virtio Input Driver
- Virtio Serial Driver
- QXL Video Driver
- Cursor Tweak
- Создание виртуальной машины kvm из консоли
- Создание хранилища.
- Создание виртуальной машины kvm, с помощью virt-install.
- Virt-Manager: графическая консоль управления KVM
- Установка Virt-Manager в Linux
- Управление KVM через virt-manager из Windows
- Использование Virt-Manager для управления виртуальными машинами KVM
- Типовые проблемы с Virt-Manager
Zeta Systems Blog
Insights, comments, tips and random ramblings.


Installing Virtio Drivers In Windows On KVM
3rd July 2018
Virtio drivers are paravirtualized device drivers for KVM virtual machines.
Paravirtualized drivers enhance the performance of machines, decreasing I/O latency and increasing throughput to near bare-metal levels.
It is recommended to use the paravirtualized drivers for fully virtualized machines.
Most Linux distributions include the virtio drivers as standard. This guide explains how to install them in Windows.
This guide was written for Zetastack users but applies to any Windows guest VM running on a KVM host.
This includes Nutanix, Red Hat Virtualization (RHEV), Proxmox VE, oVirt and OpenStack.

If your device manager looks like this, then this guide will help you.
Download ISO
We recommend the stable release, the same as what is shipped with Red Hat Enterprise Linux.
This is the link to download:
Download and add the ISO to your virtualization platform.
In Zetastack this is done in Settings Import.
Machine Configuration
Edit the machine configuration and set these:
- Disk bus: Virtio SCSI pass-through controller
- NIC model: Virtio Ethernet
- Video model: QXL
- Video RAM: 32MB
Attach ISO
This bit depends on whether you are installing a new Windows VM or you already have an existing Windows VM.
If you are installing a new Windows VM, set the ISO to be the 2nd CD-ROM drive leaving the Windows install ISO as the 1st CD-ROM drive.
Begin Install
If you are not installing a new Windows VM, you can skip this section.
Storage Driver
At the disk detection stage, the Windows installer cannot detect any disks for installation.

This is expected behaviour, since the virtio drivers have not been loaded yet and are not included by Microsoft in the installation media.
Click «Load driver» and select «CD Drive (E:) virtio-win-0.1.1»

The driver required is the «VirtIO SCSI pass-through controller» located at:
For other editions of Windows, the driver will be located in the relevant directory on the ISO.
Select the driver and click «Next».

The driver is loaded and the and the disk is now detected.
Select the disk for installation and click «Next».

Post Install
Once the installation is complete and the VM has booted, the next steps are to install the guest agent and resolve any missing drivers.
Guest Agent
It is essential the guest agent is installed.
The guest agent is used by the hypervisor to communicate directly with the VM.
The guest agent is required for clean VM shutdown and to enable live snapshots of the VM images.
On the task bar click «File Explorer».

Select «This PC» then double click «CD Drive (E:) virtio-win-0.1.1».

Open the «guest-agent» folder.
Right click the «qemu-ga-x64» file and select «Install».

The QEMU guest agent will now install.

Once installed the VM must be completely shutdown before the agent can run.
When the VM is started again, the guest agent service will automatically start.
Device Manager
In Device Manager we can see the following unconfigured devices.

This table lists the devices and the drivers required.
| Device | Driver |
|---|---|
| Storage controller | Virtio SCSI pass-through controller (already installed) |
| Ethernet controller | Virtio Ethernet adapter |
| PCI device | Virtio balloon driver |
| PCI input device | Virtio input driver |
| PCI simple communications controller | Virtio serial driver |
| Display adapter | QXL video driver |
| HID button over interrupt driver | Generic bus |
The procedure is simple but repetitive.
Generic Bus
This is a Microsoft bug which is easily resolved.
Right click on «HID Button over Interrupt Driver» and select «Update Driver Software. «

Select «Browse my computer for driver software».

Select «Let me pick from a list of device drivers on my computer».

Select the model «Generic Bus».

This resolves the bug, and removes the driver warning.

Virtio Ethernet Adapter
This is a high speed driver capable of 10GbE and better.
Right click on «Ethernet Controller» and select «Update Driver Software. «.

Select «Browse my computer for driver software».

Select «CD Drive (E:) virtio-win-0.1.1» and click OK.

Device Manager will automatically find the correct driver. The path to the driver does not need to be specified.
At the prompt click «Install».

The driver is installed.

The device description has now changed in Device Manager.

Virtio Balloon Driver
The balloon driver allows the memory in the VM to be changed dynamically.
Right click on «PCI Device» and select «Update Driver Software. «.

Follow the same steps for the Ethernet adapter above to complete the driver installation.
Virtio Input Driver
This provides accurate mouse tracking within the console.
Right click on «PCI Input Device» and select «Update Driver Software. «.
![]()
Follow the same steps for the Ethernet adapter above to complete the driver installation.
Virtio Serial Driver
This is a virtual serial port for communication between the hypervisor and the VM.
Right click on «PCI Simple Communications Controller» and select «Update Driver Software. «.

Follow the same steps for the Ethernet adapter above to complete the driver installation.
QXL Video Driver
This is a video driver that improves performance and allows for higher resolutions.
It also provides a seamless cursor when using the console to manage the VM.
Right click on «Microsoft Basic Display Adapter» and select «Update Driver Software. «.

Follow the same steps for the Ethernet adapter above to complete the driver installation.
Cursor Tweak
When using the QXL driver, the mouse cursor needs to be tweaked.
This will provide a seamless cursor in web based VM consoles.
On the start menu click «Settings».


Click «Mouse & touchpad».

Click «Additional mouse options».

In the Pointers tab, enable «Enable pointer shadow» and click OK to update.

This allows the use of black and extra large cursors.
Создание виртуальной машины kvm из консоли
Опубликовано вс, 09/14/2014 — 13:42 пользователем goodigy
Создание хранилища.
Для начала создадим хранилище виртуальных машин.
Я буду использовать простой тип хранилища, основанный на папках.
storage — название хранилища,
dir — — — — «/home/goodigy/kvm» — путь к папке.
Вывод должен быть таким
Добавляем в автозагрузку
Информация о хранилище
Создание виртуальной машины kvm, с помощью virt-install.
Устанавливать мы будем с помощью утилиты virt-install
Создание виртуальной машины, например, с опреционной системой CentOs на борту.
- -n — название нашей машины, CentOs;
- -r — выделяемая память, 1024Мб;
- —vcpus — процессор;
- -c — путь к iso-образу установочного диска;
- —disk — виртуальный hdd;
- pool — название хранилища, storage;
- size — размер hdd, 20Гб;
Можно указать еще очень много параметров.
Узнать какие существуют
Установка виртуальной машины с существующим диском, на примере виртуальной машины битрикса, описанной в одной из предыдущих статей.
- —os-type — linux или windows;
- —os-variant — одно значение из списка, можно посмотреть командой virt-install —os-variant list;
Virt-Manager: графическая консоль управления KVM
Virt-Manager – графическая консоль для управления виртуальными машинами KVM от компании Red Hat. С помощью Virt-Manager можно, создавать, редактировать, запускать и останавливать виртуальные машины на гипервизоре KVM. Можно выполнять настройку параметров виртуальных машин, что значительно упрощает работу по сравнению с управлением KVM из интерфейса командной строки.
В статье мы рассмотрим установку Virt-Manager на сервер с KVM, типовые задачи управления виртуальными машинами в графической консоли и покажем, как использовать virt-manager из Windows-клиента.
Установка Virt-Manager в Linux
Прежде всего нужно установить необходимые пакеты из базового репозитория на сервере с KVM (в нашем примере сервер KVM установлен на Linux CentOS). Выполните следующую команду yum (или dnf):
# yum install -y virt-manager xorg-x11-xauth liberation-sans-fonts
Чтобы удаленно подключаться к virt-manager с Windows-компьютера, нужно дополнительно настроить SSH. Откройте файл sshd_config:
Включите следующие параметры:
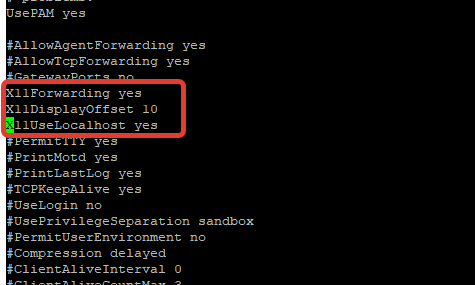
Перезапустите сервис sshd:
# service sshd restart
Управление KVM через virt-manager из Windows
Для удалённого подключения к virt-manager с Windows компьютера, вам понадобится следующее ПО:
- Putty – ssh клиент
- Xming – порт сервера для ОС Windows.
Скачать putty можно с официального сайта https://www.putty.org/, а Xming по ссылке https://sourceforge.net/projects/xming/
Откройте Putty, перейдите в Connection—>SSH—X11. Включите опцию “Enable X11 Forwarding“.
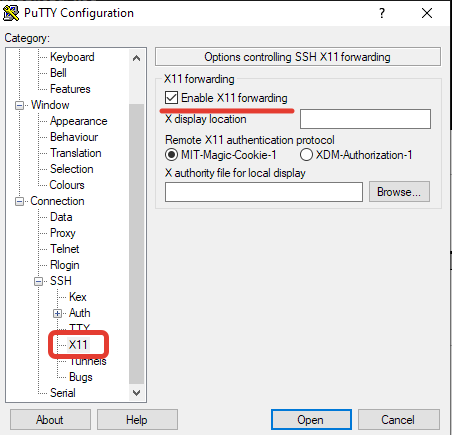
Теперь на вкладке Session, укажите адрес KVM сервера, имя сессии, укажите порт и сохраните подключение.
Чтобы из Windows удаленно подключаться к KVM серверу через virt-manager, используется следующий порядок:
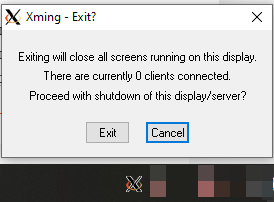
- Сначала запускаете Xming;
- Запускаете сохраненную сессию Putty с опцией X11 Forwarding;
- Подключаетесь к virt-manager.
После включения Xming у вас в трее должен светиться значок X:
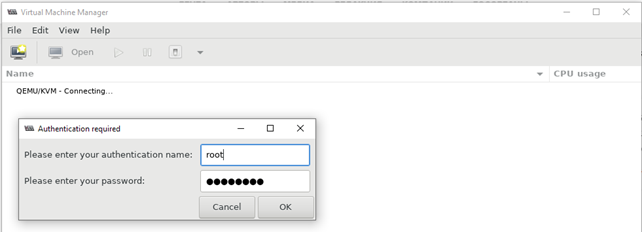
Далее запустите Putty, и после авторизации на сервере, выполните:
Через несколько секунд у вас должно открыться окно управления virt-manager и окно дополнительной авторизации, где нужно ввести данные для подключения к серверу:
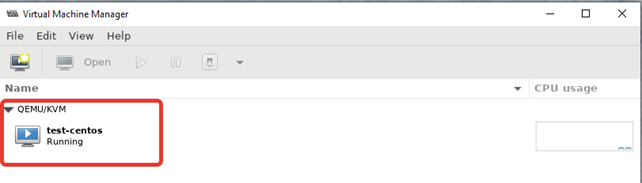
После авторизации вы должны увидеть список виртуальных машин.
Использование Virt-Manager для управления виртуальными машинами KVM
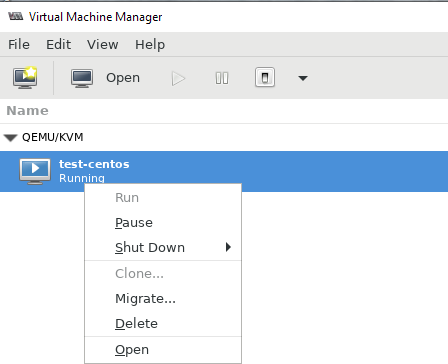
Щелкнув ПКМ по виртуальной машине, вы можете выключить, перезагрузить, включить ВМ.
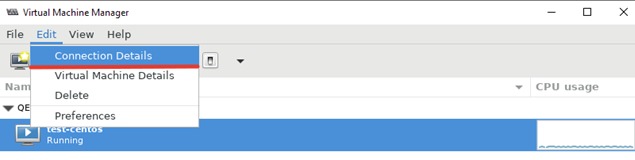
Далее я хочу изменить директорию для хранения файлов виртуальных машин, так как основное место на диске при установке операционной системы на сервере с KVM, я отдал под директорию VZ. Чтобы поменять стандартную директорию, перейдите в меню “Edit -> Connection Details”.
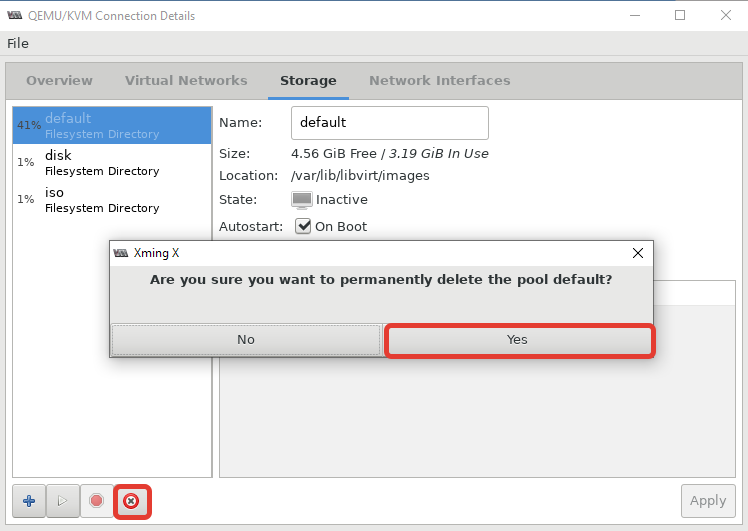
 В открывшемся окне, нужно перейти во вкладку “Storage”. Для создания нового пула, нужно остановить работу текущего и после чего удалить его:
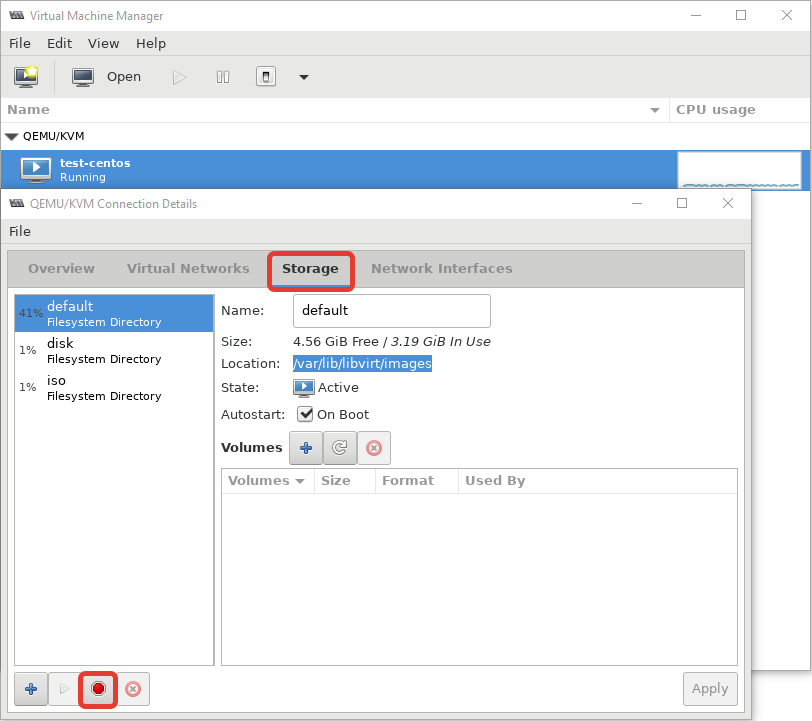
После установки пула, кнопка удаления станет активна:
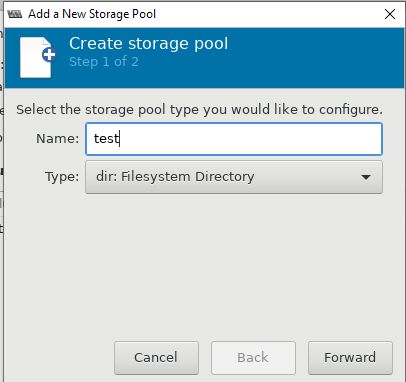
Теперь можно создать пул в нужной вам директории или разделе:
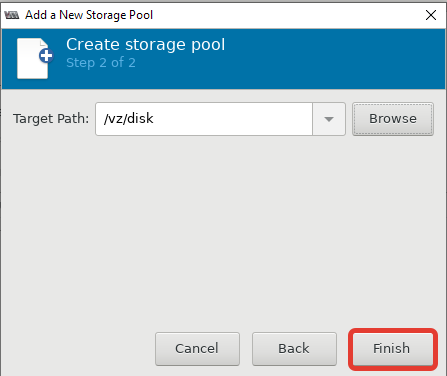
После этого, у меня стал активным мой основной раздел для файлов ВМ:

Либо просто удалить первоначальную директорию и создал симлинк на нужный раздел:
# rm -rf /var/lib/libvirt/images/
# ln -s /vz/disk/ /var/lib/libvirt/images
Теперь можно попробовать создать новую виртуальную машину KVM. Ниже я прикреплю ряд скриншотов, на которых по шагам будет все более-менее понятно. В конце опишу весь процесс создания машины.
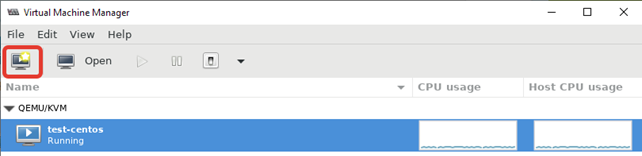
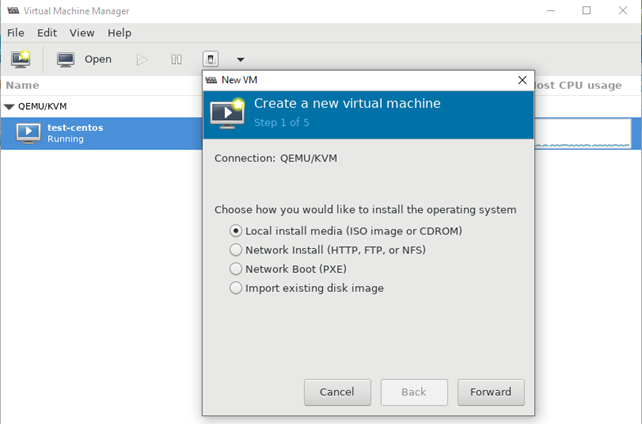
- При нажатии кнопки на первом скриншоте, запускается процесс создания новой виртуальной машины KVM;
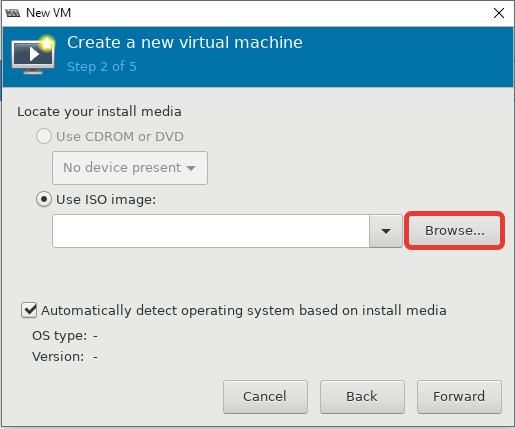
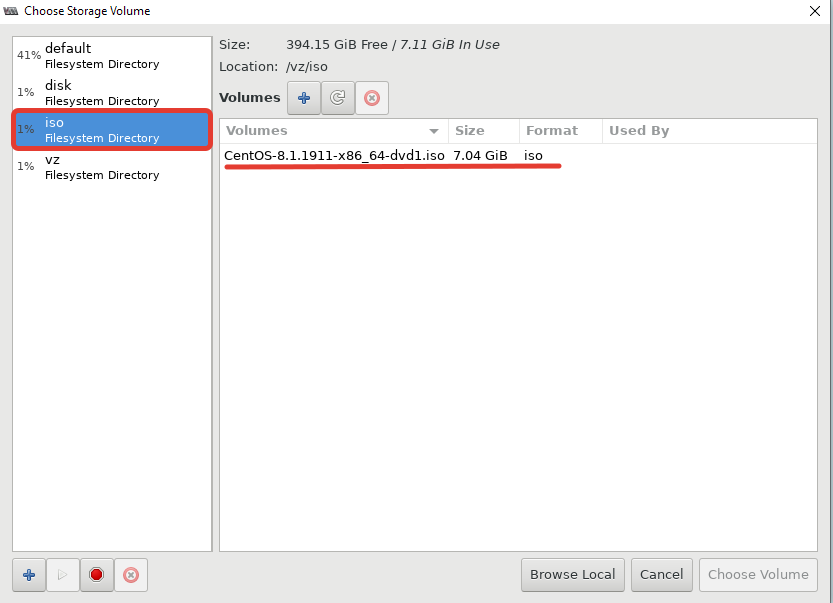
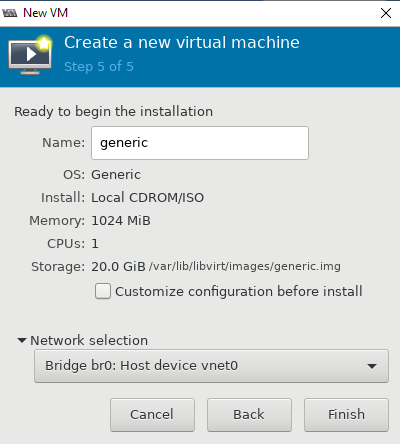
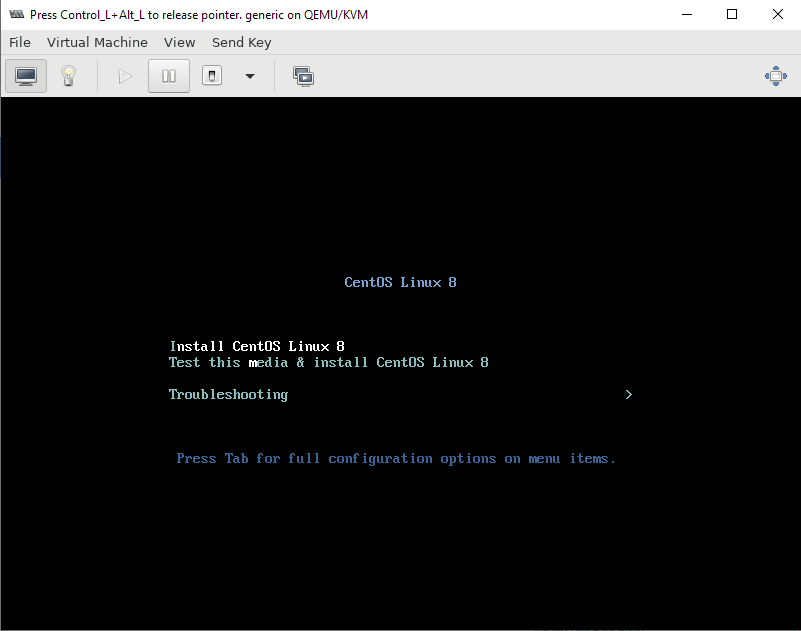
- Затем указываем, откуда запускать установку ОС на виртуальной машине. Я использовал локальный ISO образ с дистрибутивом CentOS 8;
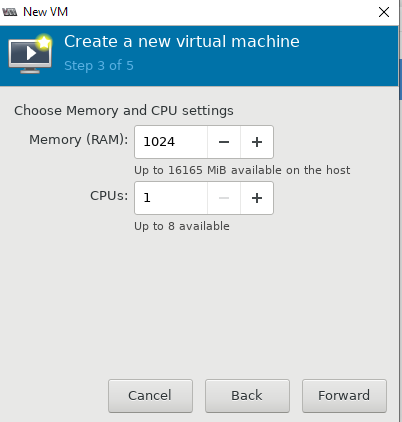
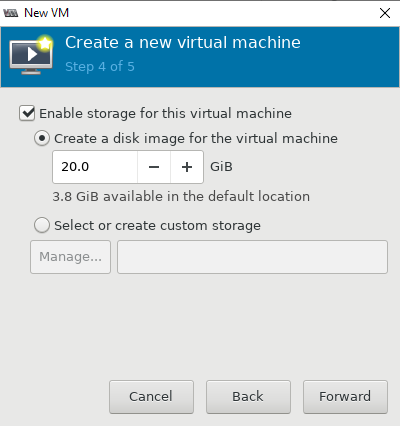
- Далее настраиваются ресурсы виртуальной машины: количество памяти и vCPU, размер виртуального диска (при необходимости его можно будет расширить или уменьшить), имя, и указываем сеть;
- После создания ВМ к ней сразу будет примонтирован установочный образ ОС, который указали при создании.
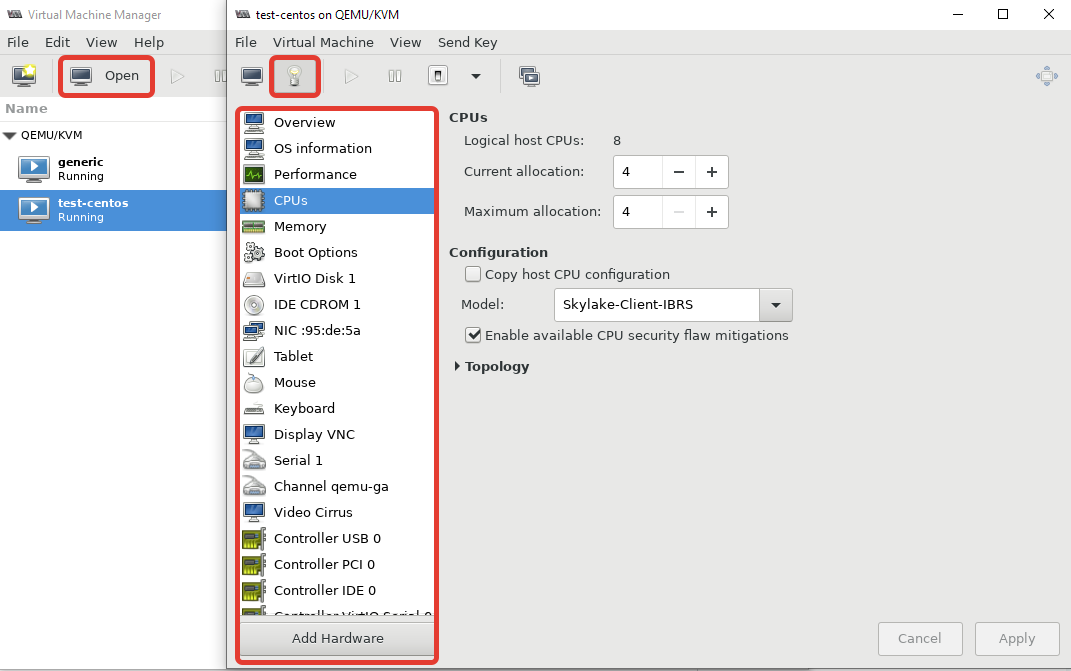
Чтобы изменить ресурсы или какие-то параметры уже созданной машины, вам нужно выделить ее и нажать кнопку “Open”. В открывшемся меню нажмите на лампочку и у вас откроется список параметров виртуальной машины KVM.
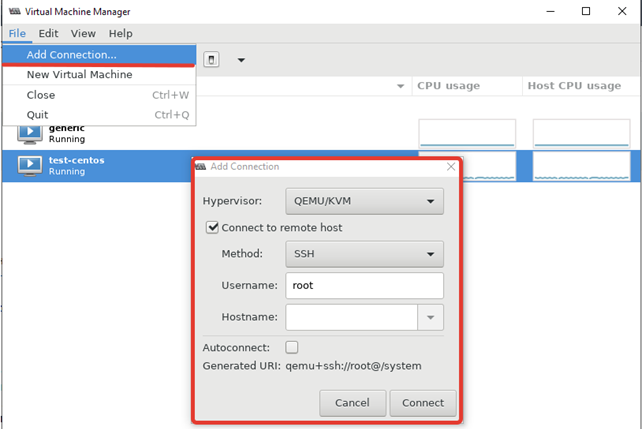
Чтобы добавить новый сервер KVM, выполните следующее “File -> Add Connection” и заполните данные в открывшемся окне:
Типовые проблемы с Virt-Manager
Во время изучения интерфейса virt-manager, я столкнулся с несколькими ошибками и решил описать их в статье. Первая ошибка, с которой я столкнулся, вышла на стадии создания новой виртуальной машины:
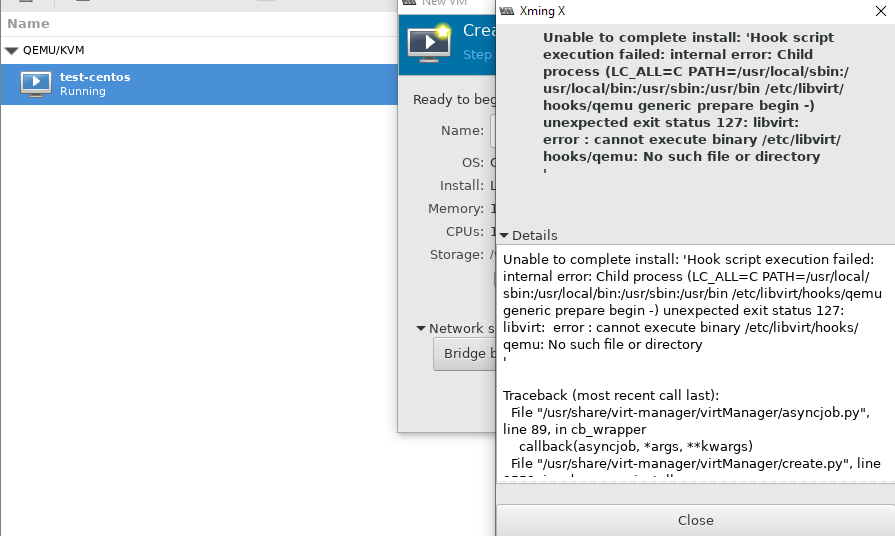
Система ругается на отсутствие файла, который скорее всего должен быть создан при установке KVM на сервер, но в моем случае он отсутствовал. Решился вопрос, созданием файла:
После этого нужно перезапустить сервис libvirtd:
# service libvirtd restart
Следующая ошибка ожидала меня сразу же на следующем шаге установки:
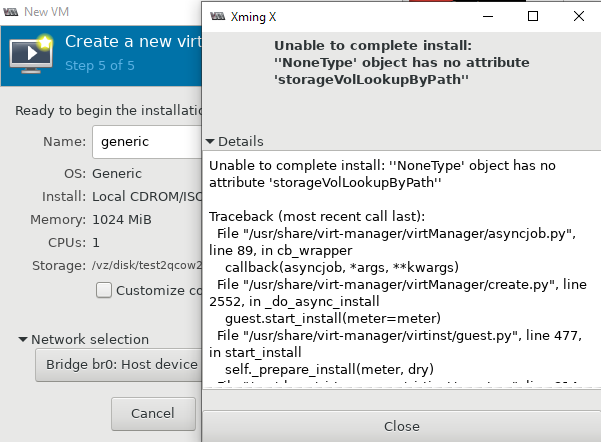
Чтобы решить эту проблему и возможно последующие другие, нужно установить пакет qemu-kvm-tools:
# yum install qemu-kvm-tools -y
После выполненных действий, виртуальная машина создалась без ошибок, и я смог выполнить установку гостевой операционной системы на ней.
Управлять KVM через virt-manager очень удобно. Вы значительно сократите время на выполнение рядовых операций с виртуальными машинами, а также сможете подключиться к ним из Windows.


