- Как использовать команду nmap
- Установка Nmap
- Установка Nmap в Ubuntu и Debian
- Установка Nmap на CentOS и Fedora
- Установка Nmap на macOS
- Установка Nmap в Windows
- Использование Nmap
- Указание целевых хостов
- Указание и сканирование портов
- Ping сканирование
- Отключение разрешения DNS-имен
- Определение ОС, служб и версий
- Вывод Nmap
- Механизм сценариев Nmap
- Заключение
- Как установить nmap windows
- Windows Self-installer
- Command-line Zip Binaries
- Installing the Nmap zip binaries
- Compile from Source Code
- Executing Nmap on Windows
Как использовать команду nmap

Nmap — это мощный инструмент сетевого сканирования для аудита безопасности и тестирования на проникновение. Это один из основных инструментов, используемых администраторами сети для устранения проблем с подключением к сети и сканирования портов .
Nmap также может определять Mac-адрес, тип ОС , версию службы и многое другое.
В этой статье объясняются основы того, как использовать команду nmap для выполнения различных сетевых задач.
Установка Nmap
Nmap — это многоплатформенная программа, которую можно установить во всех основных операционных системах. Первоначально он был выпущен как инструмент только для Linux, а позже был перенесен на другие системы, такие как BSD, Windows и macOS.
Если вы предпочитаете графический интерфейс, а не командную строку, Nmap также имеет графический пользовательский интерфейс под названием Zenmap.
Официальные бинарные пакеты доступны для загрузки со страницы загрузки Nmap.
Процедура установки проста и зависит от вашей операционной системы.
Установка Nmap в Ubuntu и Debian
Nmap доступен из репозиториев Ubuntu и Debian по умолчанию. Чтобы установить его, запустите:
Установка Nmap на CentOS и Fedora
На CentOS и других производных от Red Hat запускаются:
Установка Nmap на macOS
Пользователи macOS могут установить Nmap, загрузив установочный пакет «.dmg» с сайта Nmap или через Homebrew:
Установка Nmap в Windows
Версия Nmap для Windows имеет некоторые ограничения и, как правило, немного медленнее, чем версия для UNIX.
Самый простой вариант установки Nmap в Windows — это загрузить и запустить самоустанавливающийся exe-файл.
Вы можете запустить Nmap в Windows либо из командной строки, либо запустив программу Zenmap. Для получения дополнительной информации о том, как использовать Nmap в Windows, ознакомьтесь с инструкциями по использованию после установки.
Использование Nmap
Nmap обычно используется для аудита сетевой безопасности, отображения сети, определения открытых портов и поиска сетевых устройств.
Упрощенный синтаксис команды nmap выглядит следующим образом:
Самый простой пример использования Nmap — сканирование одной цели от имени обычного пользователя без указания каких-либо параметров:
При вызове от имени пользователя без полномочий root, у которого нет прав на использование сырых пакетов, nmap запускает сканирование TCP-соединения. Параметр -sT по умолчанию включен в непривилегированном режиме.
Вывод будет выглядеть примерно так, включая основную информацию о сканировании и список открытых и отфильтрованных TCP-портов.
Самым популярным вариантом сканирования является TCP SYN scan ( -sS ), который быстрее, чем вариант подключения, и работает со всеми совместимыми стеками TCP.
-sS включается по умолчанию, когда nmap вызывает пользователь с административными привилегиями:
Для более подробного вывода используйте увеличение детализации с помощью -v или -vv :
Чтобы выполнить сканирование UDP, вызовите команду с параметром ( -sU) от имени пользователя root:
Для получения полного списка методов сканирования портов посетите страницу документации Nmap.
Nmap также поддерживает адреса IPv6. Чтобы указать хост IPv6, используйте опцию -6 :
Указание целевых хостов
Nmap рассматривает все аргументы, которые не являются опциями, как целевые хосты.
Аргументы считаются вариантами, если они начинаются с одинарного или двойного тире ( — , — ).
Самый простой вариант — передать один или несколько целевых адресов или доменных имен:
Вы можете использовать нотацию CIDR, чтобы указать диапазон сети:
Чтобы указать диапазон октетов, используйте символ тире. Например, для сканирования 192.168.10.1, 192.168.11.1и 192.168.12.1:
Другой символ, который вы можете использовать для указания целей, — это запятая. Следующая команда нацелена на те же хосты, что и предыдущая:
Вы можете комбинировать все формы:
Чтобы убедиться, что вы указали правильные хосты перед сканированием, используйте параметр сканирования списка ( -sL ), который перечисляет только цели без запуска сканирования:
Если вы хотите исключить цели, которые включены в указанный вами диапазон, используйте опцию —exclude :
Указание и сканирование портов
По умолчанию Nmap выполняет быстрое сканирование 1000 самых популярных портов. Это не первые 1000 последовательных портов, а 1000 наиболее часто используемых портов в диапазоне от 1 до 65389.
Для поиска всех портов с 1 по 65535 используйте опцию -p :
Каждый порт может находиться в одном из следующих состояний:
- open — программа, запущенная на порту, отвечает на запрос.
- closed — на порту не работает ни одна программа, и хост отвечает на запросы.
- filtered — хост не отвечает на запрос.
Порты и диапазоны портов указываются с помощью опции -p .
Например, чтобы просканировать только порт 443, вы должны использовать следующую команду:
Чтобы указать более одного порта, разделите целевые порты запятой:
Диапазоны портов можно указать с помощью символа тире. Например, чтобы просканировать все порты UDP в диапазоне от 1 до 1024, вы должны запустить:
Порты также можно указать с помощью имени порта. Например, для поиска порта 22, ssh, вы можете использовать:
Ping сканирование
Чтобы выполнить ping-сканирование или обнаружение хоста, вызовите команду nmap с опцией -sn :
Эта опция указывает Nmap только на обнаружение сетевых хостов, а не на сканирование портов. Это полезно, когда вы хотите быстро определить, какой из указанных хостов запущен и работает.
Отключение разрешения DNS-имен
По умолчанию Nmap выполняет обратное разрешение DNS для каждого обнаруженного хоста, что увеличивает время сканирования.
При сканировании больших сетей рекомендуется отключить разрешение обратного DNS и ускорить сканирование. Для этого вызовите команду с опцией -n :
Определение ОС, служб и версий
Nmap может обнаружить операционную систему удаленного хоста с помощью снятия отпечатков стека TCP/IP. Чтобы запустить обнаружение ОС, вызовите команду с опцией -O :
Если Nmap может обнаружить ОС хоста, он напечатает что-то вроде следующего:
Обычно системные службы прослушивают стандартные порты, которые хорошо известны и зарезервированы для них. Например, если порт 22, соответствующий службе SSH, открыт, вы предполагаете, что на хосте работает SSH-сервер. Однако вы не можете быть абсолютно уверены, потому что люди могут запускать службы на любых портах, которые им нужны.
Благодаря обнаружению службы и версии Nmap покажет вам, какая программа прослушивает порт и версию программы.
Для поиска службы и версии используйте опцию -sV :
Вы также можете сканировать ОС, версии и запускать traceroute с помощью одной команды, используя параметр -A :
Вывод Nmap
По умолчанию Nmap выводит информацию на стандартный вывод (stdout).
Если вы сканируете большую сеть или нуждаетесь в информации для дальнейшего использования, вы можете сохранить результат в файл.
Nmap предоставляет несколько типов вывода. Чтобы сохранить вывод в нормальном формате, используйте параметр, за которым следует имя файла -oN :
Самый популярный вариант — сохранить вывод в формате XML. Для этого воспользуйтесь опцией -oX :
Еще один полезный формат — вывод grepable, который можно анализировать с помощью стандартных инструментов Unix, таких как grep , awk и cut . Вывод grepable указывается с опцией -oG :
Механизм сценариев Nmap
Одна из самых мощных функций Nmap — это скриптовый движок. Nmap поставляется с сотнями скриптов , и вы также можете писать свои собственные скрипты на языке Lua.
Вы можете использовать скрипты для обнаружения вредоносных программ и бэкдоров, выполнения атак методом перебора и т.д.
Например, чтобы проверить, скомпрометирован ли данный хост, вы можете использовать:
Заключение
Nmap — это инструмент с открытым исходным кодом, который в основном используется администраторами сети для обнаружения узлов и сканирования портов.
Обратите внимание, что в некоторых странах сканирование сетей без разрешения является незаконным.
Если у вас есть вопросы или замечания, пожалуйста, оставьте комментарий ниже.
Как установить nmap windows
While Nmap was once a Unix-only tool, a Windows version was released in 2000 and has since become the second most popular Nmap platform (behind Linux). Because of this popularity and the fact that many Windows users do not have a compiler, binary executables are distributed for each major Nmap release. We support Nmap on Windows 7 and newer, as well as Windows Server 2008 and newer. We also maintain a guide for users who must run Nmap on earlier Windows releases. While it has improved dramatically, the Windows port is not quite as efficient as on Unix. Here are the known limitations:
Nmap only supports ethernet interfaces (including most 802.11 wireless cards and many VPN clients) for raw packet scans. Unless you use the -sT -Pn options, RAS connections (such as PPP dialups) and certain VPN clients are not supported. This support was dropped when Microsoft removed raw TCP/IP socket support in Windows XP SP2. Now Nmap must send lower-level ethernet frames instead.
When using Nmap with WinPcap instead of Npcap, you cannot generally scan your own machine from itself (using a loopback IP such as 127.0.0.1 or any of its registered IP addresses). This is a Windows limitation that we have worked around in Npcap, which is included in the Windows self-installer. Users stuck with WinPcap can use a TCP connect scan without pinging ( -sT -Pn ) as that uses the high level socket API rather than sending raw packets.
Scan speeds on Windows are generally comparable to those on Unix, though the latter often has a slight performance edge. One exception to this is connect scan ( -sT ), which is often much slower on Windows because of deficiencies in the Windows networking API. This is a shame, since that is the one TCP scan that works over all networking types (not just ethernet, like the raw packet scans). Connect scan performance can be improved substantially by applying the Registry changes in the nmap_performance.reg file included with Nmap. By default these changes are applied for you by the Nmap executable installer. This registry file is in the nmap- directory of the Windows binary zip file, and nmap- /mswin32 in the source tarball (where is the version number of the specific release). These changes increase the number of ephemeral ports reserved for user applications (such as Nmap) and reduce the time delay before a closed connection can be reused. Most people simply check the box to apply these changes in the executable Nmap installer, but you can also apply them by double-clicking on nmap_performance.reg , or by running the command regedt32 nmap_performance.reg . To make the changes by hand, add these three Registry DWORD values to HKEY_LOCAL_MACHINE\SYSTEM\CurrentControlSet\Services\Tcpip\Parameters :
Set a large value such as 65534 (0x0000fffe). See MS KB 196271.
Set the minimum value (0x0000001e). See MS KB 149532.
Set to 1 so TCPTimedWaitDelay is checked.
I would like to thank Ryan Permeh of eEye, Andy Lutomirski , and Jens Vogt for their hard work on the Nmap Windows port. For many years, Nmap was a Unix-only tool, and it would likely still be that way if not for their efforts.
Windows users have three choices for installing Nmap, all of which are available from the download page at https://nmap.org/download.html.
Windows Self-installer
Every Nmap release includes a Windows self-installer named nmap- -setup.exe (where is the version number of the specific release). Most Nmap users choose this option since it is so easy. Another advantage of the self-installer is that it provides the option to install the Zenmap GUI and other tools. Simply run the installer file and let it walk you through panels for choosing an install path and installing Npcap. The installer was created with the open-source Nullsoft Scriptable Install System. After it completes, read the section called “Executing Nmap on Windows” for instructions on executing Nmap on the command-line or through Zenmap.
Command-line Zip Binaries
Most users prefer installing Nmap with the self-installer discussed previously.
Every stable Nmap release comes with Windows command-line binaries and associated files in a Zip archive. No graphical interface is included, so you need to run nmap.exe from a DOS/command window. Or you can download and install a superior command shell such as those included with the free Cygwin system available from http://www.cygwin.com. Here are the step-by-step instructions for installing and executing the Nmap .zip binaries.
Installing the Nmap zip binaries
Uncompress the zip file into the directory you want Nmap to reside in. An example would be C:\Program Files . A directory called nmap- should be created, which includes the Nmap executable and data files. Microsoft Windows XP and later includes zip extraction—just right-click on the file in Explorer . If you do not have a Zip decompression program, there is one (called unzip) in Cygwin described above, or you can download the open-source and free 7-Zip utility. Commercial alternatives are WinZip and PKZIP.
For improved performance, apply the Nmap Registry changes discussed previously.
Nmap requires the free Npcap packet capture library. We include a recent Npcap installer which is available in the zip file as npcap- .exe , where is the Npcap version rather than the Nmap version. Alternatively, you can obtain and install the latest version from https://npcap.org.
Due to the way Nmap is compiled, it requires the Microsoft Visual C++ 2013 Redistributable Package of runtime components. Many systems already have this installed from other packages, but you should run vcredist_x86.exe from the zip file just in case you need it. Pass the /q option to run these installers in quiet (non interactive) mode.
Instructions for executing your compiled Nmap are given in the section called “Executing Nmap on Windows”.
Compile from Source Code
Most Windows users prefer to use the Nmap binary self-installer, but compilation from source code is an option, particularly if you plan to help with Nmap development. Compilation requires Microsoft Visual C++ 2013, which is part of their commercial Visual Studio suite. Any of the Visual Studio 2013 editions should work, including the free Visual C++ 2013 Express.
Some of Nmap’s dependencies on Windows are inconvenient to build. For this reason, precompiled binaries of the dependencies are stored in Subversion, in the directory /nmap-mswin32-aux . When building from source, whether from a source code release or from Subversion, check out /nmap-mswin32-aux as described below.
Compiling Nmap on Windows from Source
Download the Windows dependencies from Subversion with the command svn checkout https://svn.nmap.org/nmap-mswin32-aux . The build files are configured to look for dependencies in this checked-out directory. If you want to build the dependencies yourself instead, you will have to reconfigure the Visual Studio project files to point to the alternate directory.
Decide whether to obtain the Nmap source code by downloading the latest release from nmap.org, or using a Subversion client to retrieve even newer (but less tested) code from our repository. These instructions are for the web download approach, but using Subversion instead is straightforward (see the section called “Obtaining Nmap from the Subversion (SVN) Repository”).
Download the latest Nmap source distribution from https://nmap.org/download.html. It has the name nmap- .tar.bz2 or nmap- .tgz . Those are the same tar file compressed using bzip2 or gzip, respectively. The bzip2-compressed version is smaller.
Uncompress the source code file you just downloaded. The source code directory and the nmap-mswin32-aux must be in the same parent directory. Recent releases of the free Cygwin distribution can handle both the .tar.bz2 and .tgz formats. Use the command tar xvjf nmap-version.tar.bz2 or tar xvzf nmap-version.tgz , respectively. Alternatively, the common WinZip application can decompress these files.
Open Visual Studio and the Nmap solution file ( nmap- /mswin32/nmap.sln ).
Right click on Solution ‘nmap’ in the Solution Explorer sidebar and choose “ Configuration Manager ” . Ensure that the active solution configuration is Release and then close the Configuration Manager.
Build Nmap by pressing F7 or choosing “ Build Solution ” from the GUI. Nmap should begin compiling, and end with the line “ — Done — ” saying that all projects built successfully and there were zero failures.
The executable and data files can be found in nmap- /mswin32/Release/ . You can copy them to a preferred directory as long as they are all kept together.
Ensure that you have Npcap installed. You can obtain it by installing our binary self-installer or executing npcap- .exe from our zip package. Alternatively, you can obtain the official installer at https://npcap.org.
Instructions for executing your compiled Nmap are given in the next section.
If you wish to build an Nmap executable Windows installer or Zenmap executable, see docs/win32-installer-zenmap-buildguide.txt in the Nmap SVN repository.
Many people have asked whether Nmap can be compiled with the gcc / g++ included with Cygwin or other compilers. Some users have reported success with this, but we don’t maintain instructions for building Nmap under Cygwin.
Executing Nmap on Windows
Nmap releases now include the Zenmap graphical user interface for Nmap. If you used the Nmap installer and left the Zenmap field checked, there should be a new Zenmap entry on your desktop and Start Menu. Click this to get started. Zenmap is fully documented in Chapter 12, Zenmap GUI Users’ Guide. While many users love Zenmap, others prefer the traditional command-line approach to executing Nmap. Here are detailed instructions for users who are unfamiliar with command-line interfaces:
Make sure the user you are logged in as has administrative privileges on the computer (user should be a member of the administrators group).
Open a command/DOS Window. Though it can be found in the program menu tree, the simplest approach is to choose “ Start ” -> “ Run ” and type cmd . Opening a Cygwin window (if you installed it) by clicking on the Cygwin icon on the desktop works too, although the necessary commands differ slightly from those shown here.
Change to the directory you installed Nmap into. You can skip this step if Nmap is already in your command path (the Zenmap isntaller adds it there by default). Otherwise, type the following commands.
On Windows releases prior to Windows 7, specify \Program Files\Nmap instead. The directory will also be different if you chose to install Nmap in a non-default location.
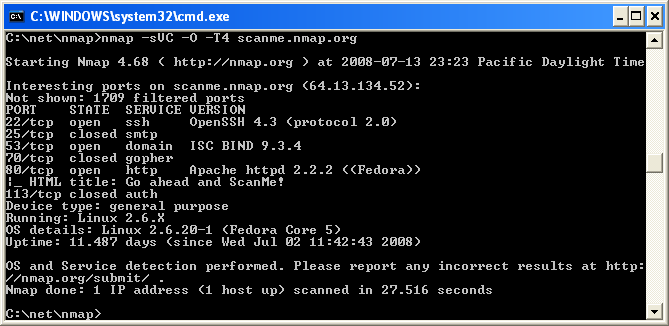
Execute nmap.exe . Figure 2.1 is a screen shot showing a simple example.
Figure 2.1. Executing Nmap from a Windows command shell
If you execute Nmap frequently, you can add the Nmap directory ( c:\Program Files (x86)\Nmap by default on Windows 7) to your command execution path. The exact place to set this varies by Windows platform. On my Windows XP box, which installs Nmap in c:\Program Files\Nmap , I do the following:
From the desktop, right click on My Computer and then click “ properties ” .
In the System Properties window, click the “ Advanced ” tab.
Click the “ Environment Variables ” button.
Choose Path from the System variables section, then hit edit.


