- Java Files Open Options
- Get started with Spring 5 and Spring Boot 2, through the Learn Spring course:
- 1. Overview
- 2. The OpenOption Parameter
- 3. Opening a File for Reading and Writing
- 4. Creating a SPARSE File
- 5. Keeping the File Synchronized
- 6. Deleting the File After Closing the Stream
- 7. Conclusion
- Files, Path
- Paths
- Files
- Path Operations
- Creating a Path
- Retrieving Information about a Path
- Removing Redundancies From a Path
- Converting a Path
- Joining Two Paths
- Creating a Path Between Two Paths
- Comparing Two Paths
Java Files Open Options
Last modified: August 10, 2020
Get started with Spring 5 and Spring Boot 2, through the Learn Spring course:
If you have a few years of experience in the Java ecosystem, and you’re interested in sharing that experience with the community (and getting paid for your work of course), have a look at the «Write for Us» page. Cheers, Eugen
1. Overview
In this tutorial, we’re going to focus on the standard open options available for files in Java.
We’ll explore the StandardOpenOption enum that implements the OpenOption interface and that defines these standard open options.
2. The OpenOption Parameter
In Java, we can work with files using the NIO2 API, which contains several utility methods. Some of these methods use an optional OpenOption parameter that configures how to open or create a file. In addition, this parameter will have a default value if not set, which can be different for each of these methods.
The StandardOpenOption enum type defines the standard options and implements the OpenOption interface.
Here’s the list of supported options we can use with the StandardOpenOptions enum:
- WRITE: opens the file for write access
- APPEND: appends some data to the file
- TRUNCATE_EXISTING: truncates the file
- CREATE_NEW: creates a new file and throws an exception if the file already exists
- CREATE: opens the file if it exists or creates a new file if it does not
- DELETE_ON_CLOSE: deletes the file after closing the stream
- SPARSE: the newly created file will be sparse
- SYNC: preserves the content and the metadata of the file synchronized
- DSYNC: preserves only the content of the file synchronized
In the next sections, we’ll see examples of how to use each of these options.
To avoid any confusion on the file path, let’s get a handle on the home directory of the user, which will be valid across all operating systems:
3. Opening a File for Reading and Writing
First, if we want to create a new file if it does not exist we can use the option CREATE:
We can also use the option CREATE_NEW, which will create a new file if it does not exist. However, it will throw an exception if the file already exists.
Secondly, if we want to open the file for reading we can use the newInputStream(Path, OpenOption...) method. This method opens the file for reading and returns an input stream:
Notice how we didn’t use the option READ because it’s used by default by the method newInputStream.
Third, we can create a file, append to a file, or write to a file by using the newOutputStream(Path, OpenOption...) method. This method opens or creates a file for writing and returns an OutputStream.
The API will create a new file if we don’t specify the open options, and the file does not exist. However, if the file exists, it will be truncated. This option is similar to calling the method with the CREATE and TRUNCATE_EXISTING options.
Let’s open an existing file and append some data:
4. Creating a SPARSE File
We can tell the file system that the newly created file should be sparse (files containing empty spaces that will not be written to disk).
For this, we should use the option SPARSE with the CREATE_NEW option. However, this option will be ignored if the file system does not support sparse files.
Let’s create a sparse file:
5. Keeping the File Synchronized
The StandardOpenOptions enum has SYNC and DSYNC options. These options require that data is written to the file synchronously in the storage. In other words, these will guarantee that the data is not lost in the event of a system crash.
Let’s append some data to our file and use the option SYNC:
The difference between SYNC and DSYNC is that SYNC stores the content and the metadata of the file synchronously in the storage, while DSYNC stores only the contents of the file synchronously in the storage.
6. Deleting the File After Closing the Stream
The StandardOpenOptions enum also offers a useful option that gives us the ability to destroy the file after closing the stream. This useful if we want to create a temporary file.
Let’s append some data to our file, and use the option DELETE_ON_CLOSE:
7. Conclusion
In this tutorial, we covered the available options to open files in Java using the new file system API (NIO2) that was shipped as a part of Java 7.
As usual, the source code with all the examples in the tutorial can be found over on Github.
Files, Path
Paths
getFileName() — возвращает имя файла из пути;
getParent() — возвращает «родительскую» директорию по отношению к текущему пути (то есть ту директорию, которая находится выше по дереву каталогов);
getRoot() — возвращает «корневую» директорию; то есть ту, которая находится на вершине дерева каталогов;
startsWith() , endsWith() — проверяют, начинается/заканчивается ли путь с переданного пути:
Вывод в консоль:
testFile.txt
C:\Users\Username\Desktop
C:\
true
false
Обрати внимание на то, как работает метод endsWith() . Он проверяет, заканчивается ли текущий путь на переданный путь. Именно на путь, а не на набор символов.
Сравни результаты этих двух вызовов:
Вывод в консоль:
false
true
В метод endsWith() нужно передавать именно полноценный путь, а не просто набор символов: в противном случае результатом всегда будет false, даже если текущий путь действительно заканчивается такой последовательностью символов (как в случае с “estFile.txt” в примере выше).
Кроме того, в Path есть группа методов, которая упрощает работу с абсолютными (полными) и относительными путями.
boolean isAbsolute() — возвращает true, если текущий путь является абсолютным:
Вывод в консоль:
Path normalize() — «нормализует» текущий путь, удаляя из него ненужные элементы. Ты, возможно, знаешь, что в популярных операционных системах при обозначении путей часто используются символы “.” (“текущая директория”) и “..” (родительская директория). Например: “./Pictures/dog.jpg” обозначает, что в той директории, в которой мы сейчас находимся, есть папка Pictures, а в ней — файл “dog.jpg”
Так вот. Если в твоей программе появился путь, использующий “.” или “..”, метод normalize() позволит удалить их и получить путь, в котором они не будут содержаться:
Вывод в консоль:
C:\Users\Java\examples
C:\Users\examples
Path relativize() — вычисляет относительный путь между текущим и переданным путем.
Вывод в консоль:
Username\Desktop\testFile.txt
Полный список методов Path довольно велик. Найти их все ты сможешь в документации Oracle. Мы же перейдем к рассмотрению Files .
Files
С помощью метода filter() отбираем только те строки из файла, которые начинаются с «Как».
Проходимся по всем отобранным строкам с помощью метода map() и приводим каждую из них к UPPER CASE.
Объединяем все получившиеся строки в List с помощью метода collect() .
preVisitDirectory() — логика, которую надо выполнять перед входом в папку;
visitFileFailed() — что делать, если вход в файл невозможен (нет доступа, или другие причины);
postVisitDirectory() — логика, которую надо выполнять после захода в папку.
У нас такой логики нет, поэтому нам достаточно SimpleFileVisitor . Логика внутри метода visitFile() довольно проста: прочитать все строки из файла, проверить, есть ли в них нужное нам содержимое, и если есть — вывести абсолютный путь в консоль. Единственная строка, которая может вызвать у тебя затруднение — вот эта: На деле все просто. Здесь мы просто описываем что должна делать программа после того, как выполнен вход в файл, и все необходимые операции совершены. В нашем случае необходимо продолжать обход дерева, поэтому мы выбираем вариант CONTINUE . Но у нас, например, могла быть и другая задача: найти не все файлы, которые содержат «This is the file we need», а только один такой файл. После этого работу программы нужно завершить. В этом случае наш код выглядел бы точно так же, но вместо break; было бы: Что ж, давай запустим наш код и посмотрим, работает ли он. Вывод в консоль: Нужный файл обнаружен! C:\Users\Username\Desktop\testFolder\FileWeNeed1.txt Нужный файл обнаружен! C:\Users\Username\Desktop\testFolder\level1-a\level2-a-a\FileWeNeed2.txt Нужный файл обнаружен! C:\Users\Username\Desktop\testFolder\level1-b\level2-b-b\FileWeNeed3.txt Отлично, у нас все получилось! 🙂 Если тебе хочется узнать больше о walkFileTree() , рекомендую тебе вот эту статью. Также ты можешь выполнить небольшое задание — заменить SimpleFileVisitor на обычный FileVisitor , реализовать все 4 метода и придумать предназначение для этой программы. Например, можно написать программу, которая будет логировать все свои действия: выводить в консоль название файла или папки до/после входа в них. На этом все — до встречи! 🙂
Path Operations
The Path class includes various methods that can be used to obtain information about the path, access elements of the path, convert the path to other forms, or extract portions of a path. There are also methods for matching the path string and methods for removing redundancies in a path. This lesson addresses these Path methods, sometimes called syntactic operations, because they operate on the path itself and don’t access the file system.
This section covers the following:
Creating a Path
A Path instance contains the information used to specify the location of a file or directory. At the time it is defined, a Path is provided with a series of one or more names. A root element or a file name might be included, but neither are required. A Path might consist of just a single directory or file name.
You can easily create a Path object by using one of the following get methods from the Paths (note the plural) helper class:
The Paths.get method is shorthand for the following code:
The following example creates /u/joe/logs/foo.log assuming your home directory is /u/joe , or C:\joe\logs\foo.log if you are on Windows.
Retrieving Information about a Path
You can think of the Path as storing these name elements as a sequence. The highest element in the directory structure would be located at index 0. The lowest element in the directory structure would be located at index [n-1] , where n is the number of name elements in the Path . Methods are available for retrieving individual elements or a subsequence of the Path using these indexes.
The examples in this lesson use the following directory structure.
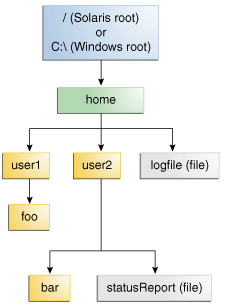
Sample Directory Structure
The following code snippet defines a Path instance and then invokes several methods to obtain information about the path:
Here is the output for both Windows and the Solaris OS:
| Method Invoked | Returns in the Solaris OS | Returns in Microsoft Windows | Comment |
|---|---|---|---|
| toString | /home/joe/foo | C:\home\joe\foo | Returns the string representation of the Path . If the path was created using Filesystems.getDefault().getPath(String) or Paths.get (the latter is a convenience method for getPath ), the method performs minor syntactic cleanup. For example, in a UNIX operating system, it will correct the input string //home/joe/foo to /home/joe/foo . |
| getFileName | foo | foo | Returns the file name or the last element of the sequence of name elements. |
| getName(0) | home | home | Returns the path element corresponding to the specified index. The 0th element is the path element closest to the root. |
| getNameCount | 3 | 3 | Returns the number of elements in the path. |
| subpath(0,2) | home/joe | home\joe | Returns the subsequence of the Path (not including a root element) as specified by the beginning and ending indexes. |
| getParent | /home/joe | \home\joe | Returns the path of the parent directory. |
| getRoot | / | C:\ | Returns the root of the path. |
The previous example shows the output for an absolute path. In the following example, a relative path is specified:
Here is the output for Windows and the Solaris OS:
| Method Invoked | Returns in the Solaris OS | Returns in Microsoft Windows |
|---|---|---|
| toString | sally/bar | sally\bar |
| getFileName | bar | bar |
| getName(0) | sally | sally |
| getNameCount | 2 | 2 |
| subpath(0,1) | sally | sally |
| getParent | sally | sally |
| getRoot | null | null |
Removing Redundancies From a Path
Many file systems use «.» notation to denote the current directory and «..» to denote the parent directory. You might have a situation where a Path contains redundant directory information. Perhaps a server is configured to save its log files in the » /dir/logs/. » directory, and you want to delete the trailing » /. » notation from the path.
The following examples both include redundancies:
The normalize method removes any redundant elements, which includes any » . » or » directory/.. » occurrences. Both of the preceding examples normalize to /home/joe/foo .
It is important to note that normalize doesn’t check at the file system when it cleans up a path. It is a purely syntactic operation. In the second example, if sally were a symbolic link, removing sally/.. might result in a Path that no longer locates the intended file.
To clean up a path while ensuring that the result locates the correct file, you can use the toRealPath method. This method is described in the next section, Converting a Path.
Converting a Path
You can use three methods to convert the Path . If you need to convert the path to a string that can be opened from a browser, you can use toUri . For example:
The toAbsolutePath method converts a path to an absolute path. If the passed-in path is already absolute, it returns the same Path object. The toAbsolutePath method can be very helpful when processing user-entered file names. For example:
The toAbsolutePath method converts the user input and returns a Path that returns useful values when queried. The file does not need to exist for this method to work.
The toRealPath method returns the real path of an existing file. This method performs several operations in one:
- If true is passed to this method and the file system supports symbolic links, this method resolves any symbolic links in the path.
- If the Path is relative, it returns an absolute path.
- If the Path contains any redundant elements, it returns a path with those elements removed.
This method throws an exception if the file does not exist or cannot be accessed. You can catch the exception when you want to handle any of these cases. For example:
Joining Two Paths
You can combine paths by using the resolve method. You pass in a partial path , which is a path that does not include a root element, and that partial path is appended to the original path.
For example, consider the following code snippet:
Passing an absolute path to the resolve method returns the passed-in path:
Creating a Path Between Two Paths
A common requirement when you are writing file I/O code is the capability to construct a path from one location in the file system to another location. You can meet this using the relativize method. This method constructs a path originating from the original path and ending at the location specified by the passed-in path. The new path is relative to the original path.
For example, consider two relative paths defined as joe and sally :
In the absence of any other information, it is assumed that joe and sally are siblings, meaning nodes that reside at the same level in the tree structure. To navigate from joe to sally , you would expect to first navigate one level up to the parent node and then down to sally :
Consider a slightly more complicated example:
In this example, the two paths share the same node, home . To navigate from home to bar , you first navigate one level down to sally and then one more level down to bar . Navigating from bar to home requires moving up two levels.
A relative path cannot be constructed if only one of the paths includes a root element. If both paths include a root element, the capability to construct a relative path is system dependent.
The recursive Copy example uses the relativize and resolve methods.
Comparing Two Paths
The Path class supports equals , enabling you to test two paths for equality. The startsWith and endsWith methods enable you to test whether a path begins or ends with a particular string. These methods are easy to use. For example:
The Path class implements the Iterable interface. The iterator method returns an object that enables you to iterate over the name elements in the path. The first element returned is that closest to the root in the directory tree. The following code snippet iterates over a path, printing each name element:
The Path class also implements the Comparable interface. You can compare Path objects by using compareTo which is useful for sorting.
You can also put Path objects into a Collection . See the Collections trail for more information about this powerful feature.
When you want to verify that two Path objects locate the same file, you can use the isSameFile method, as described in Checking Whether Two Paths Locate the Same File.


