- Как установить Kali Linux на VMware Workstation
- Что такое Kali Linux
- Кому подойдет Kali Linux
- Как установить Kali Linux на VMware Workstation
- Как запустить готовую виртуальную машину Kali Linux на VMware Workstation
- VMware Arena
- Reserved Space for Virtualization
- How to Download and Install Kali Linux on VMware
- How to Download and Install Kali Linux on VMware
- Download Kali Linux ISO & VM Images
- Install Kali Linux on VMware Workstation
- Iso kali linux для vmware
- Where to Get Official Kali Linux Images
- Verifying Your Downloaded Kali Image
- How Do I Verify My Downloaded Image?
Как установить Kali Linux на VMware Workstation
В статье мы подробно расскажем, что такое Kali Linux и покажем, как проходит установка Kali Linux на VMware Workstation Player.
Что такое Kali Linux
Kali Linux — это дистрибутив ОС Linux. Его разработала американская компания Offensive Security, которая занимается тестированием на проникновение, информационной безопасностью и цифровой криминалистикой. Kali создавался для проекта по проведению тестов на безопасность. В основу его разработки легли такие проекты, как Auditor Security Collection и WHAX.
Kali создан на базе двух дистрибутивов: Debian и BackTrack. BackTrack — это ПО, специально созданное для тестирования безопасности и проведения цифровой криминалистической экспертизы. Первая его версия появилась в 2006 году в формате LiveCD. Уже через шесть лет, с появлением Kali Linux, BackTrack потерял свою актуальность.
В дистрибутив Кали входят такие программы, как Metasploit, Nmap, Aircrack-ng, Ettercap и сотни других приложений и инструментов для пентестинга. С помощью встроенных инструментов Кали можно:
- собирать информацию,
- анализировать уязвимости,
- тестировать беспроводные атаки,
- проводить стресс-тестирования,
- устраивать атаки паролем,
- делать обратный инжиниринг,
- проверять аппаратный взлом и другое.
Сейчас Kali Linux очень активно развивается, новые версии дистрибутива выходят раз в несколько месяцев.
Кому подойдет Kali Linux
Kali стал популярен благодаря сериалу «Mr. Robot» — в картине все взломы и тестирования проходят именно с помощью этой операционной системы. Фигурирование Кали в сериале вызвало резкий рост интереса к ОС среди обычных пользователей. Однако ОС не подходит для решения повседневных задач. Дело в том, что в Кали отсутствуют стандартные офисные программы и пользователь по умолчанию в ней root.
Kali Linux активно используют как добросовестные специалисты по информационной безопасности, так и хакеры и хакерские группировки. Кто чаще всего использует Kali Linux:
- сетевые администраторы поддерживают эффективность и безопасность сети, отвечают за конфиденциальность данных;
- сетевые архитекторы разрабатывают надежные и безопасные среды;
- пентестеры анализируют корпоративную среду на уязвимость и проводят аудит;
- разработчики сетевого оборудования используют дистрибутив для внутреннего аудита и проверки приложений;
- «этичные» хакеры (White Hat Hackers) находят и анализируют уязвимости в мирных целях;
- хакеры «в черной шляпе» (Black Hat Hackers) ищут слабые места и уязвимости системы, чтобы совершить атаки или другие мошеннические действия;
- частные специалисты используют дистрибутив в личных целях.
Кали Linux можно установить как с помощью ISO-файла, так и с помощью готового образа. В инструкциях ниже мы покажем оба способа настройки.
Как установить Kali Linux на VMware Workstation
Запустите Workstation Player и нажмите Create a New Virtual Machine:
Нажмите Browse и в локальной папке компьютера выберите ISO-образ Kali Linux. После этого кликните Next:
Кликните на строку Linux. Так как Kali Linux разработана на основе Debian, выберите в выпадающем списке Debian 10.x 64-bit и нажмите Next:
Введите имя виртуальной машины и выберите директорию для установки. Вы можете оставить параметры по умолчанию и нажать Next:
Выберите объём диска виртуальной машины. Для установки Kali Linux будет достаточно 20 ГБ. Также выберите тип диска — от него зависит, как будет храниться виртуальная машина:
- Storage virtual disk a single file — в одном большом файле. Если не планируете переносить виртуальную машину на другие компьютеры, выберите этот тип;
- Split virtual disk into multiple files — в нескольких файлах меньшего размера.
Затем кликните Next:
По умолчанию для виртуальной машины выделяется одно ядро процессора. Для лучшей производительности выделите как минимум два ядра. Для этого нажмите Customize Hardware:
Затем нажмите Processors и в выпадающем списке «Number of processor cores» выберите значение 2. После этого кликните Close:
Чтобы завершить настройку, нажмите Finish:
После этого запустите виртуальную машину:
Нажмите Enter, чтобы выбрать установку с графическим интерфейсом. Это самый простой способ установки ОС без работы в командной строке:
Готово, установка завершена.
Как запустить готовую виртуальную машину Kali Linux на VMware Workstation
Запустите WMware Workstation Player и нажмите Open a Virtual Machine:
Откройте папку с файлами виртуальной машины, выберите файл в формате .vmx и нажмите Открыть:
Виртуальная машина появится в списке. Запустите её:
Нажмите I copied It и дождитесь загрузки операционной системы:
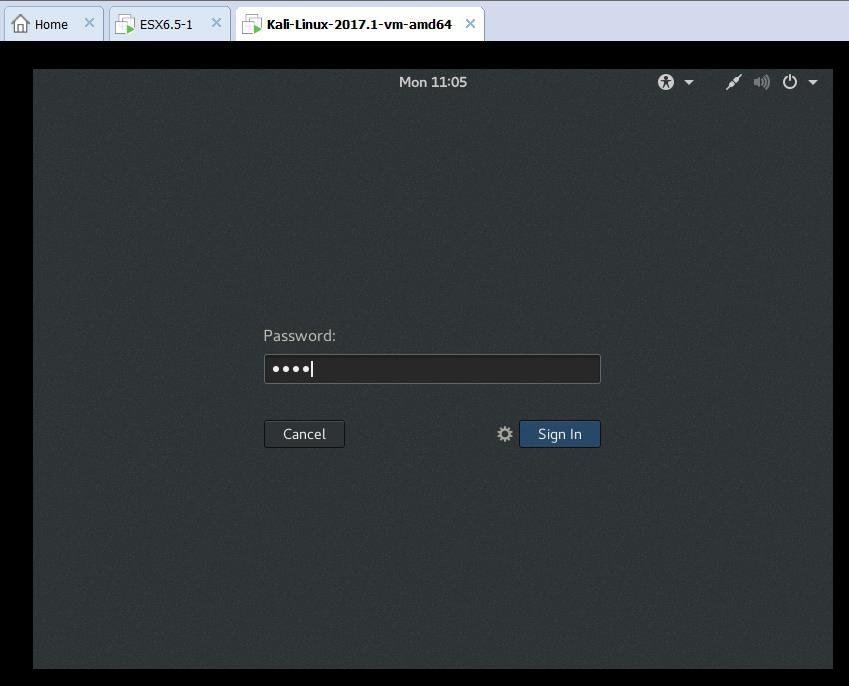
Введите логин и пароль для входа в систему:
Затем нажмите Log In:
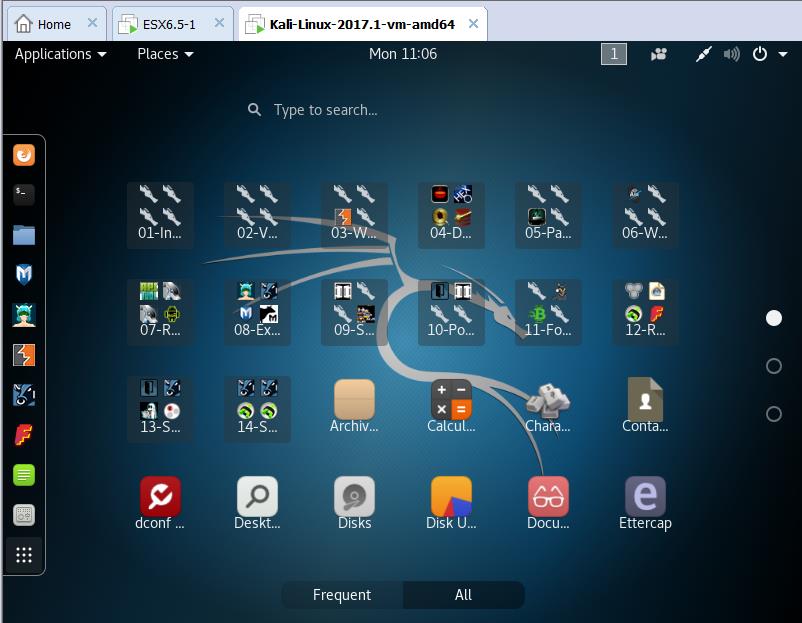
Готово, вы запустили операционную систему:
Теперь вы знаете, каким способом можно установить Kali Linux на VMware Workstation и сможете быстро создать виртуальную машину по одной из наших инструкции.
Источник
VMware Arena
Reserved Space for Virtualization
How to Download and Install Kali Linux on VMware

Kali Linux is a Debian-based Linux distribution aimed at advanced Penetration Testing and Security Auditing with more than 600 penetration testing tools. Kali contains several hundred tools which are geared towards various information security tasks, such as Penetration Testing, Security research, Computer Forensics and Reverse Engineering. Kali Linux is developed, funded and maintained by Offensive Security, a leading information security training company. Kali Linux is completely free and is very similar to BackTrack. One of the first things you may notice different about Kali is that it is built on Debian Linux instead of Ubuntu Linux.As infrastructure is moving towards virtualization and cloud computing, It is necessary for any operating system to be designed to run on top of the virtualization layer. Kali Linux also designed to run on top of Hypervisor as similar to other Linux operating systems. In this article, I am going to explain you the detailed procedure to download and Install Kali Linux on VMware especially VMware workstation.
How to Download and Install Kali Linux on VMware
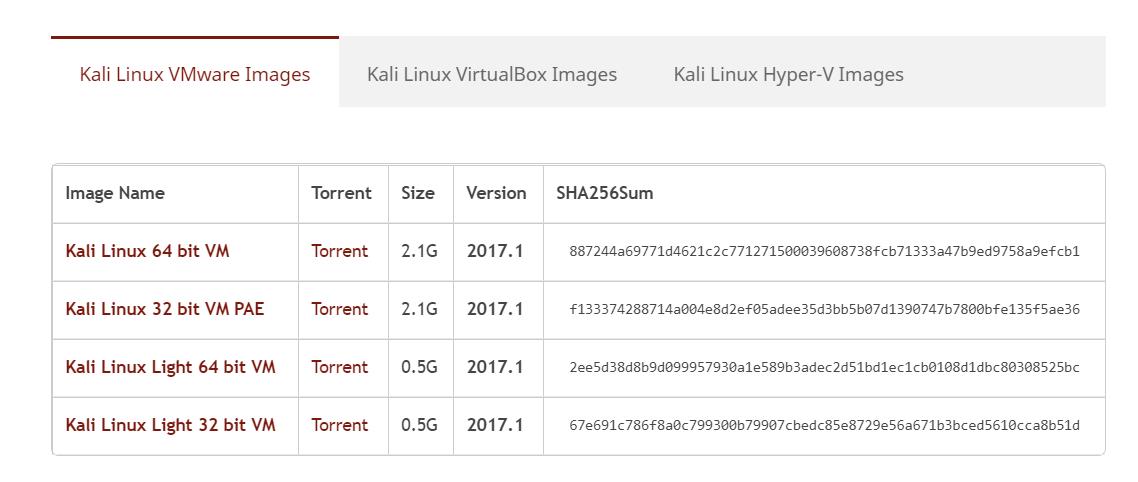
Kali Linux can be download in both 32 bit and 64-bit version as ISO image or you can Download Kali Linux VMware Images, Kali Linux VirtualBox images and also Kali Linux Hyper-V images. Let’s take a look at how to download and install Kali Linux on VMware.
Download Kali Linux ISO & VM Images
Since we are going to talk about the procedure to install Kali Linux on VMware, we will download Kali Linux VMware Images to proceed with our installation.
Install Kali Linux on VMware Workstation
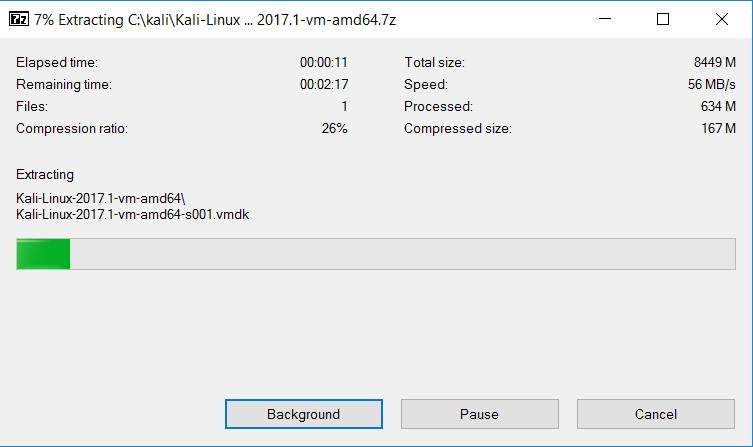
Once Kali Linux Image for VMware is downloaded, UnZip the VM image file using 7Zip.

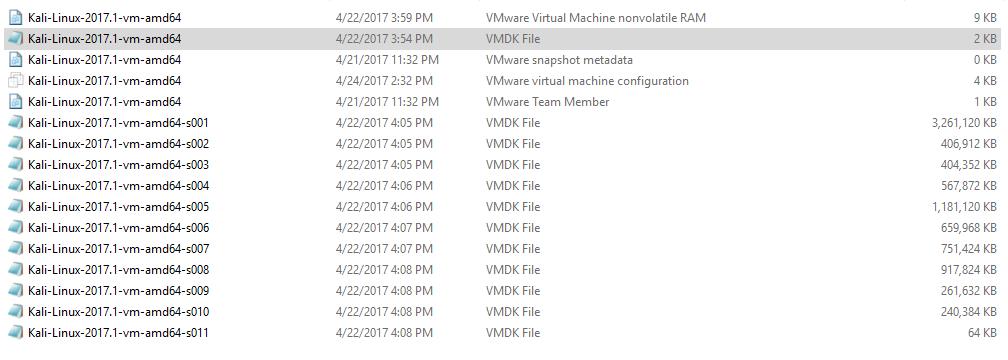
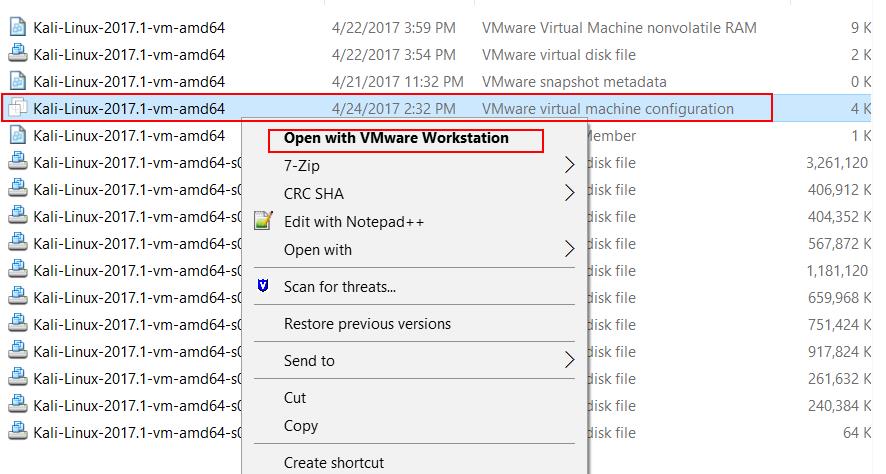
Extracted Kali Linux image for VMware folder contains multiple files such as VMX (Virtual Machine Configuration file) and multiple Virtual machine disk (.VMDK) files.
VMware has 2 different virtualization platform such as Hosted virtualization and Bare metal virtualization hypervisor. VMware Workstation & VMware Player belongs to hosted virtualization and VMware ESX/ESXi belongs to bare metal virtualization. Unfortunately, Kali website didn’t mention the Kali Linux image for VMware belongs to Which type of virtualization platform such as Hosted or bare metal virtualization.
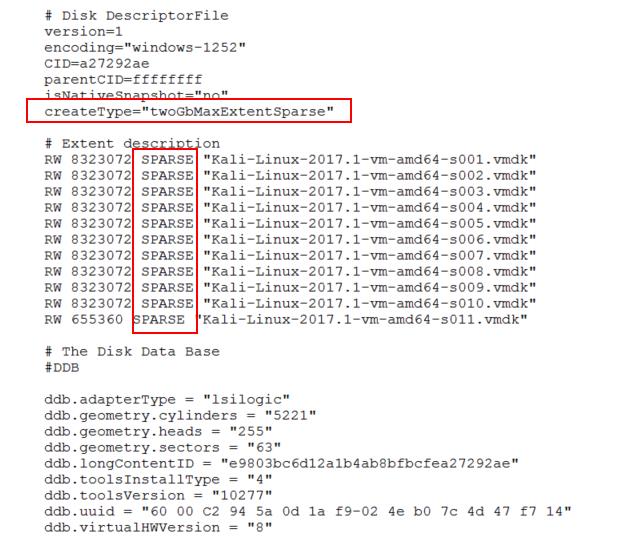
Let’s take a look at the virtual machine configuration file to understand better. Configuration file reveals that “virtualHW.productCompatibility = “hosted” is designed to run on Hosted platforms such as VMware Workstation and VMware Player.

In addition to that, VDMK is split into several files (2gbsparse). You cannot power on sparse disk with 2GB maximum extent size on an ESXi host till you reimport the disk with vmkfstools in a compatible format, such as thick or thin. You can power on the sparse disk on other VMware products such as VMware Workstation and VMware Player.
On the quick inspection of VM configuration file reveals that this Kali Linux Image for VMware is intended to run on VMware Workstation or VMware Player. Right-Click the virtual machine configuration file and Open with VMware Workstation. This option will be enabled if you have VMware Workstation installed on your system.
Once the virtual machine is opened in VMware Workstation, Click on “Power On this Virtual Machine” to power the Kali Linux virtual machine on VMware Workstation or VMware Player.
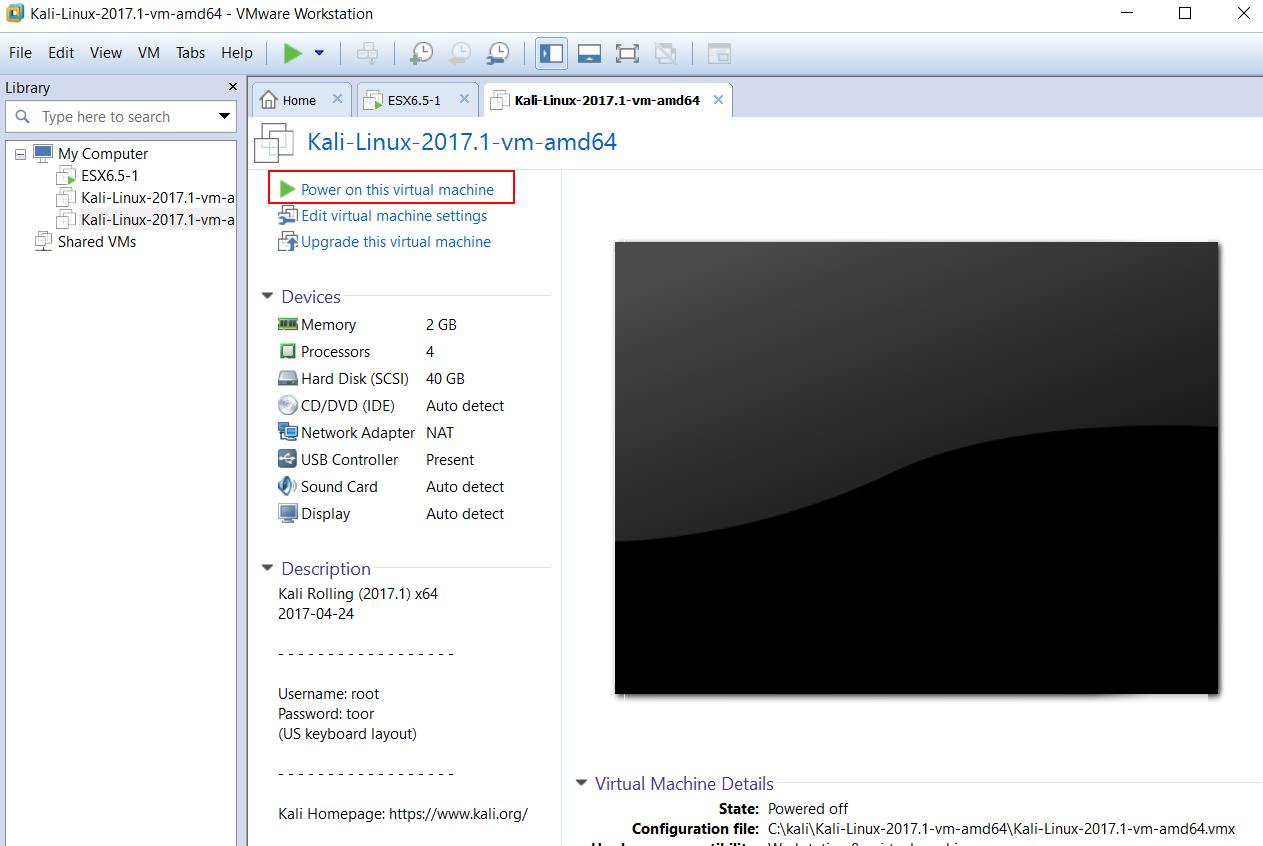
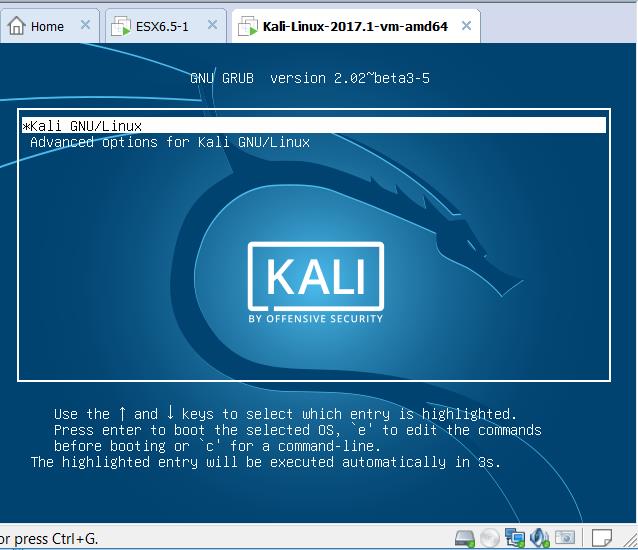
Kali Linux will boot up in VMware Workstation and complete in few seconds.
Login with the username “root” to log in to Kali Linux.
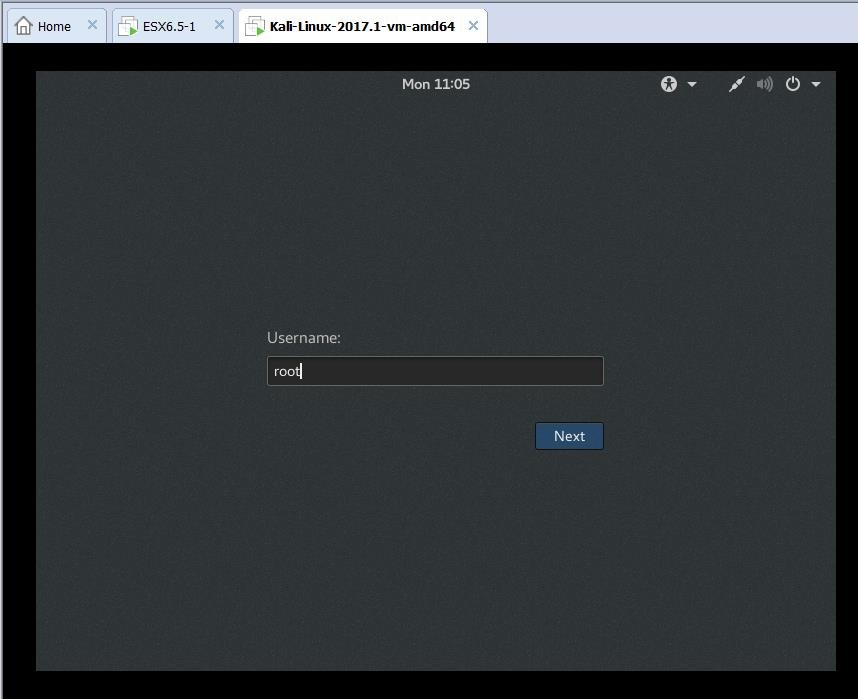
Default root password for Kali Linux is “toor“. Enter the password “toor” for root user account to log in to Kali Linux and click on Sign in.
That’s it. We are logged in to Kali Linux and we will be able to see the installed applications related to Penetration Testing and Security Auditing.
That’s it. We are done with the download and install Kali Linux on VMware using Kali Linux VMware image on VMware Workstation. You can use VMware Converter to convert the Kali Linux virtual machine running on VMware workstation to compatible to run on VMware ESXi hosts. I hope this is informative for you. Thanks for Reading. Be social and share it social media, if you feel worth sharing it.
Источник
Iso kali linux для vmware
IMPORTANT! Never download Kali Linux images from anywhere other than the official sources.
Always be sure to verify the SHA256 checksums of the file you’ve downloaded against our official values.
It would be easy for a malicious entity to modify a Kali installation to contain exploits or malware and host it unofficially.
Where to Get Official Kali Linux Images
ISO Files for Intel-based PCs
In order to run Kali “Live” from a USB drive on standard Windows and Apple PCs, you’ll need a Kali Linux bootable ISO image, in either 32-bit or 64-bit format.
If you’re not sure of the architecture of the system you want to run Kali on, on Linux or macOS, you can run the command uname -m at the command line. If you get the response, “x86_64”, use the 64-bit ISO image (the one containing “amd64” in the file name); if you get “i386”, use the 32-bit image (the one containing “i386” in the file name). If you’re on a Windows system, the procedure for determining whether your architecture is detailed on Microsoft’s website.
The Kali Linux images are available both as directly downloadable “.iso/.img” files or via “.torrent” files.
Building your own Kali Linux ISO, standard or customized, is a very simple process.
Virtual Machines Images
If you want to run Kali Linux as a “guest” under VMware or VirtualBox, Kali Linux is available as a pre-built virtual machines with any guest tools already installed. These image are available in a 64-bit (amd64), and 32-bit PAE (i*86) formats.
ARM Images
The hardware architectures of ARM-based devices vary considerably, so it is not possible to have a single image that will work across all of them. Pre-built Kali Linux images for the ARM architecture are available for a wide range of devices.
Scripts for building your own ARM images locally are also available on GitLab. For more details, see the articles on setting up an ARM cross-compilation environment and building a custom Kali Linux ARM chroot.
Verifying Your Downloaded Kali Image
Why do I need to do this?
Before you run Kali Linux Live, or install it to your hard disk, you want to be very sure that what you’ve got actually is Kali Linux, and not an imposter. Kali Linux is a professional penetration testing and forensics toolkit. As a professional penetration tester, having absolute confidence in the integrity of your tools is critical: if your tools are not trustworthy, your investigations will not be trustworthy, either.
Moreover, as the leading penetration testing distribution, Kali’s strengths mean that a bogus version of Kali Linux could do a tremendous amount of damage if it were deployed unwittingly. There are plenty of people with plenty of reason to want to stick very sketchy stuff into something that looks like Kali, and you absolutely do not want to find yourself running something like that.
Avoiding this is simple:
- Only download Kali Linux via the official download pages at kali.org/downloads/ or offensive-security.com/kali-linux-vmware-arm-image-download/ — you will not be able to browse to these pages without SSL; encrypting the connection makes it much harder for an attacker to use a “man-in-the-middle” attack to modify your download. There are a few potential weaknesses to even these sources — see the sections on verifying the download with the SHA256SUMS file and its signature against the official Kali Development team private key for something much closer to absolute assurance.
- Once you’ve downloaded an image, and before you run it, always validate that it really is what it’s supposed to be by verifying its checksum using one of the procedures detailed below.
There are several methods for verifying your download. Each provides a certain level of assurance, and involves a corresponding level of effort on your part.
- You can download an ISO image from an official Kali Linux “Downloads” mirror, calculate the ISO’s SHA256 hash and compare it by inspection with the value listed on the Kali Linux site. This is quick and easy, but potentially susceptible to subversion via a DNS poisoning: it assumes that the site to which, for example, the domain “kali.org” resolves is in fact the actual Kali Linux site. If it somehow were not, an attacker could present a “loaded” image and a matching SHA256 signature on the fake web page. See the section “Manually Verify the Signature on the ISO (Direct Download)”, below.
- You can download an ISO image through the torrents, and it will also pull down a file — unsigned — containing the calculated SHA256 signature. You can then use the shasum command (on Linux and macOS) or a utility (on Windows) to automatically verify that the file’s computed signature matches the signature in the secondary file. This is even easier than the “manual” method, but suffers from the same weakness: if the torrent you pulled down is not really Kali Linux, it could still have a good signature. See the section “Verify the Signature on the ISO Using the Included Signature File (Torrent Download)”, below.
- To be as close to absolutely certain as possible that the Kali Linux download you’ve obtained is the real thing, you can download both a cleartext signature file and and version of the same file that has been signed with the official Kali Linux private key and use GNU Privacy Guard (GPG) to first, verify that the computed SHA256 signature and the signature in the cleartext file match and second, verify that the signed version of the file containing the SHA256 hash has been correctly signed with the official key.
If you use this more complicated process and successfully validate your downloaded ISO, you can proceed with pretty complete assurance that what you’ve got is the official image and that it has not been tampered with in any way. This method, while the most complex, has the advantage of providing independent assurance of the integrity of the image. The only way this method can fail is if the official Kali Linux private key is not only subverted by an attacker, but also not subsequently revoked by the Kali Linux development team. For this method, see the section on verification using the SHA256SUMS file.
What do I need to do this?
If you’re running on Linux, you probably already have GPG (GNU Privacy Guard) installed. If you’re on Windows or macOS, you’ll need to install the appropriate version for your platform.
- If you’re on a PC running Windows, download and install GPG4Win from here. Certain versions of Windows do not have the native ability to calculate SHA256 checksums. To check this, you can open the command prompt and run certutil -? . If you do have this installed, you can run certutil -hashfile kali-linux-2021.3-live-amd64.iso sha256 to verify your download. If you do not have certutil installed, you will also need a utility such as Microsoft File Checksum Integrity Verifier or Hashtab to verify your download.
- If you’re on a Macintosh running macOS, download and install GPGTools from here. Alternatively, if you have Homebrew installed, just run brew install gnupg
Once you’ve installed GPG, you’ll need to download and import a copy of the Kali Linux official key. Do this with the following command:
Your output should look like this:
Verify that the key is properly installed with the command:
The output will look like this:
You’re now set up to validate your Kali Linux download.
How Do I Verify My Downloaded Image?
Manually Verify the Signature on the ISO (Direct Download)
If you downloaded the ISO directly from the downloads page, verify it using the following procedure.
On Linux, or macOS, you can generate the SHA256 checksum from the ISO image you’ve downloaded with the following command (assuming that the ISO image is named “kali-linux-2021.3-live-amd64.iso”, and is in your current directory):
The output should look like this:
The resulting SHA256 signature, “e316b27025922e9f6bca0cacee6dde83dbfd4a549ad18026526f5824af639fc1”, can be seen to match the signature displayed in the “sha256sum” column on the official download page for the 64-bit Intel architecture Kali Linux 2021.3 ISO image:

Verify the Signature on the ISO Using the Included Signature File (Torrent Download)
If you downloaded your copy of the Kali Linux ISO image via the torrents, in addition to the ISO file (e.g. kali-linux-2021.3-live-amd64.iso), there will be a second file containing the computed SHA256 signature for the ISO, with the extension “.txt.sha256sum” (e.g. kali-linux-2021.3-live-amd64.txt.sha256sum). You can use this file to verify the authenticity of your download on Linux or macOS with the following command:
If the image is successfully authenticated, the response will look like this:
IMPORTANT! If you are unable to verify the authenticity of the Kali Linux image you have downloaded as described in the preceding section, do NOT use it! Using it could endanger not only your own system, but any network you connect to as well as the other systems on that network. Stop, and ensure that you have downloaded the images from a legitimate Kali Linux mirror.
Verify the ISO Using the SHA256SUMS File
This is a more complex procedure, but offers a much higher level of validation: it does not rely on the integrity of the web site you downloaded the image from, only the official Kali Linux development team key that you install independently. To verify your image this way for an Intel architecture version of Kali, you will need to download three files from the Kali “Live CD Image” site for the current release (v2021.3, as of this writing):
- The ISO image itself (e.g. kali-linux-2021.3-live-amd64.iso)
- The file containing the calculated SHA256 hash for the ISO, SHA256SUMS
- The signed version of that file, SHA256SUMS.gpg
Before verifying the checksums of the image, you must ensure that the SHA256SUMS file is the one generated by Kali Linux. That’s why the file is signed by Kali’s official key with a detached signature in SHA256SUMS.gpg. If you have not already done so, Kali’s official key can be downloaded and imported into your keychain with this command:
or this command
Your output should look like this:
You should verify that the key is properly installed with the command:
The output will look like this:
Once you have downloaded both SHA256SUMS and SHA256SUMS.gpg, you can verify the signature as follows:
If you do not get that “Good signature” message or if the key ID does not match, then you should stop and review whether you downloaded the images from a legitimate Kali Linux mirror. The failed verification strongly suggests that the image you have may have been tampered with.
If you did get the “Good signature” response, you can now be assured that the checksum in the SHA256SUMS file was actually provided by the Kali Linux development team. All that remains to be done to complete the verification is to validate that the signature you compute from the ISO you’ve downloaded matches the one in the SHA256SUMS file. You can do that on Linux or macOS with the following command (assuming that the ISO is named “kali-linux-2021.3-live-amd64.iso” and is in your working directory):
If the image is successfully authenticated, the response will look like this:
If you do not get “OK” in response, then stop and review what’s happened: the Kali image you have has apparently been tampered with. Do NOT use it.
Once you’ve downloaded and verified your image, you can proceed to create a bootable “Kali Linux Live” USB drive.
Updated on: 2021-Sep-27
Authors: g0tmi1k , gamb1t
Источник


