- Ubuntu Documentation
- UNetbootin (Automated, graphical approach)
- Manual Approach
- MacBook Air 3,2
- Other procedure
- Installing ubuntu mac os
- Apple hardware considerations
- 2. Requirements
- 3. Prepare the USB stick
- 4. Install and run Etcher
- 5. Etcher configuration
- 6. Write to device
- 7. Boot your Mac
- Finding help
- Как установить Ubuntu на Apple M1 и ничего не сломать
- В чем сложность
- Установка Ubuntu
- Опыт использования
- Заключение
Ubuntu Documentation
UNetbootin (Automated, graphical approach)
UNetbootin for Mac OS X can be used to automate the process of extracting the Ubuntu ISO file to USB, and making the USB drive bootable. The resulting USB drive, however, can be booted on PCs only. If attempting to make a USB drive that can be booted from a Mac, follow the instructions below.
Manual Approach
We would encourage Mac users to download Ubuntu Desktop Edition by burning a CD for the time being. But if you would prefer to use a USB, please follow the instructions below.
Note: this procedure requires an .img file that you will be required to create from the .iso file you download.
TIP: Drag and Drop a file from Finder to Terminal to ‘paste’ the full path without typing and risking type errors.
- Download the desired file
Open the Terminal (in /Applications/Utilities/ or query Terminal in Spotlight)
Convert the .iso file to .img using the convert option of hdiutil
Note: OS X tends to put the .dmg ending on the output file automatically.
Run to get the current list of devices
Insert your flash media
Run again and determine the device node assigned to your flash media (e.g. /dev/disk2)
(replace N with the disk number from the last command; in the previous example, N would be 2)
If you see the error «Unmount of diskN failed: at least one volume could not be unmounted», start Disk Utility.app and unmount the volume (don’t eject).
Execute (replace /path/to/downloaded.img with the path where the image file is located; for example, ./ubuntu.img or ./ubuntu.dmg).
Using /dev/rdisk instead of /dev/disk may be faster.
If you see the error dd: Invalid number ‘1m’, you are using GNU dd. Use the same command but replace bs=1m with bs=1M.
If you see the error dd: /dev/diskN: Resource busy, make sure the disk is not in use. Start Disk Utility.app and unmount the volume (don’t eject).
Run and remove your flash media when the command completes
Restart your Mac and press alt while the Mac is restarting to choose the USB-Stick
MacBook Air 3,2
Please notice: While all of the info and above commands are executed properly on a MacBook Air 3,2 (that is the 2010 version 13″ version of the Air) the end result will not produce a bootable USB device, at least not with the image for Ubuntu 10.10 64-bit. When booting of the USB device the following message or something similar will appear: «Missing operating system» and the process is auto-magically halted.
To get the USB device (e.g. a USB stick) to show up at all in the boot menu you also may have to reboot/turn on/off the computer a couple of times and also resync the partition tables using rEFIt. After doing this the USB should then appear as a bootable device while holding in the alt or c key when you are rebooting the computer. Notice that both the computers built in bootloader and rEFIt will identify the USB device as a Windows device, but that’s not a problem and expected.
A workaround to the-usb-device-is-not-booting-problem is to:
- Install rEFIt.
- Create a bootable start disk using Ubuntu and a USB stick.
- Create a separate partition on the Airs HD.
- dd the whole USB stick to that partition.
- Resync with rEFIt. Turn power off and on.
- Select Pingo/Windows logo: Install should start. (Here you might want to press F6 to change parameters, e.g. use nomodeset)
Alternatively, burning a CD and installing via an external CD-drive will work fine on the Macbook Air 3,2.
Other procedure
We would encourage Mac users to download Ubuntu Desktop Edition by burning a CD for the time being. But if you would prefer to use a USB, please follow the instructions below. Note: this procedure requires an .img file that you will be required to create from the .iso file you download. TIP: Drag and Drop a file from Finder to Terminal to ‘paste’ the full path without typing and risking type errors.
- Download the desired file
Open the Terminal (in /Applications/Utilities/ or query Terminal in Spotlight)
Convert the .iso file to .img using the convert option of hdiutil (e.g., hdiutil convert -format UDRW -o
Note: OS X tends to put the .dmg ending on the output file automatically.
Run diskutil list to get the current list of devices
Insert your flash media
Run diskutil list again and determine the device node assigned to your flash media (e.g., /dev/disk2)
Run diskutil unmountDisk /dev/diskN (replace N with the disk number from the last command; in the previous example, N would be 2)
Execute sudo dd if=/path/to/downloaded.img of=/dev/rdiskN bs=1m (replace /path/to/downloaded.img with the path where the image file is located; for example, ./ubuntu.img or ./ubuntu.dmg).
Using /dev/rdisk instead of /dev/disk may be faster.
If you see the error dd: Invalid number ‘1m’, you are using GNU dd. Use the same command but replace bs=1m with bs=1M.
If you see the error dd: /dev/diskN: Resource busy, make sure the disk is not in use. Start the ‘Disk Utility.app’ and unmount (don’t eject) the drive.
Run diskutil eject /dev/diskN and remove your flash media when the command completes
How to install Ubuntu on MacBook using USB Stick (последним исправлял пользователь waitingallday 2013-04-30 12:21:08)
The material on this wiki is available under a free license, see Copyright / License for details
You can contribute to this wiki, see Wiki Guide for details
Источник
Installing ubuntu mac os
With a bootable Ubuntu USB stick, you can:
- Install or upgrade Ubuntu, even on a Mac
- Test out the Ubuntu desktop experience without touching your PC configuration
- Boot into Ubuntu on a borrowed machine or from an internet cafe
- Use tools installed by default on the USB stick to repair or fix a broken configuration
Creating a bootable USB stick is very simple, especially if you’re going to use the USB stick with a generic Windows or Linux PC. We’re going to cover the process in the next few steps.
Apple hardware considerations
There are a few additional considerations when booting the USB stick on Apple hardware. This is because Apple’s ‘Startup Manager’, summoned by holding the Option/alt (⌥) key when booting, won’t detect the USB stick without a specific partition table and layout. We’ll cover this in a later step.
2. Requirements
- A 2GB or larger USB stick/flash drive
- An Apple computer or laptop running macOS
- An Ubuntu ISO file. See Get Ubuntu for download links
3. Prepare the USB stick
To ensure maximum compatibility with Apple hardware, we’re going to first blank and reformat the USB stick using Apple’s ‘Disk Utility’. But this step can be skipped if you intend to use the USB stick with only generic PC hardware.
- Launch Disk Utility from Applications>Utilities or Spotlight search
- Insert your USB stick and observe the new device added to Disk Utility
- Select the USB stick device (you may need to enable the option View>Show All Devices) and select Erase from the tool bar (or right-click menu)
- Set the format to MS-DOS (FAT) and the scheme to GUID Partition Map
- Check you’ve chosen the correct device and click Erase

Warning: Disk Utility needs to be used with caution as selecting the wrong device or partition can result in data loss.
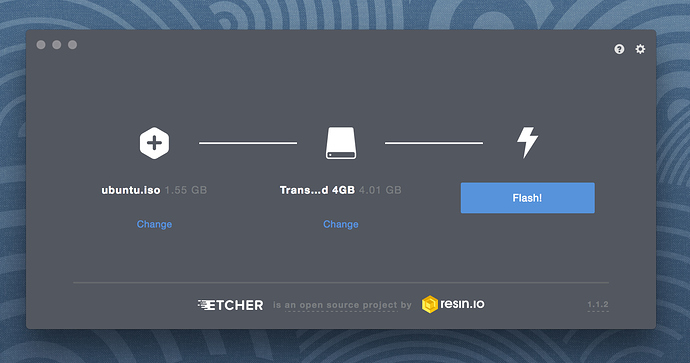
4. Install and run Etcher
To write the ISO file to the USB stick, we’re going to use a free and open source application called Etcher. After downloading this and clicking to mount the package, Etcher can either be run in-place or dragged into your Applications folder.
By default, recent versions of macOS block the running of applications from unidentified developers. To side-step this issue, enable ‘App Store and identified developers’ in the ‘Security & Privacy’ pane of System Preferences. If you are still warned against running the application, click ‘Open Anyway’ in the same pane.

5. Etcher configuration
Etcher will configure and write to your USB device in three stages, each of which needs to be selected in turn:
Select image will open a file requester from which should navigate to and select the ISO file downloaded previously. By default, the ISO file will be in your Downloads folder.
Select drive, replaced by the name of your USB device if one is already attached, lets you select your target device. You will be warned if the storage space is too small for your selected ISO.
Flash! will activate when both the image and the drive have been selected. As with Disk Utility, Etcher needs low-level access to your storage hardware and will ask for your password after selection.
6. Write to device
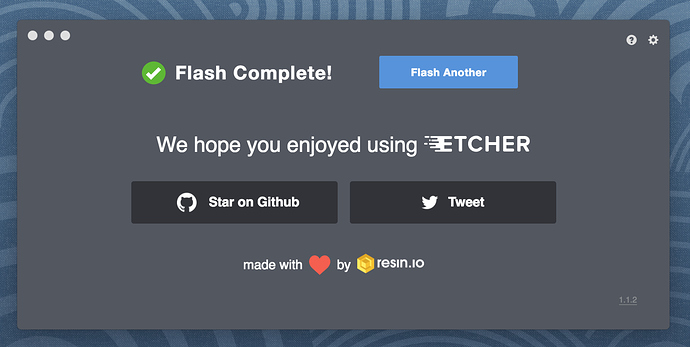
After entering your password, Etcher will start writing the ISO file to your USB device.
The Flash stage of the process will show progress, writing speed and an estimated duration until completion. This will be followed by a validation stage that will ensure the contents of the USB device are identical to the source image.
When everything has finished, Etcher will declare the process a success.
Congratulations! You now have Ubuntu on a USB stick, bootable and ready to go.
Warning: After the write process has completed, macOS may inform you that ‘The disk you inserted was not readable by this computer’. Don’t select Initialise. Instead, select Eject and remove the USB device.
7. Boot your Mac
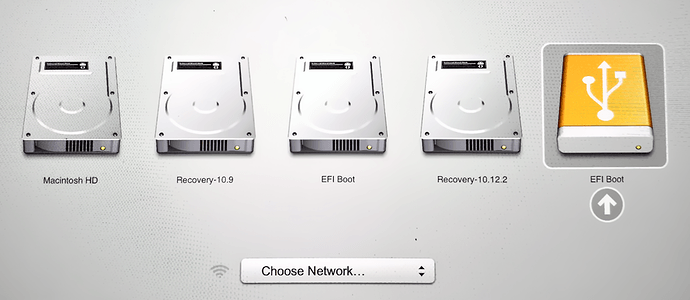
If you want to use your USB stick with an Apple Mac, you will need to restart or power-on the Mac with the USB stick inserted while the Option/alt (⌥) key is pressed.
This will launch Apple’s ‘Startup Manager’ which shows bootable devices connected to the machine. Your USB stick should appear as gold/yellow and labelled ‘EFI Boot’. Selecting this will lead you to the standard Ubuntu boot menu.
Finding help
If your Mac still refuses to boot off your USB stick you may find it easier to boot and install off an Ubuntu DVD instead. See our How to burn a DVD on macOS for further details.
Alternatively, if you feel confident using the macOS command line, see the community documentation on How to install Ubuntu on MacBook using USB Stick for a more manual approach.
If you want to install Ubuntu, follow our install Ubuntu desktop tutorial.
Finally, if you get stuck, help is always at hand:
Источник
Как установить Ubuntu на Apple M1 и ничего не сломать

Corellium ранее работала над проектом Project Sandcastle, который позволяет установить ОС Android на iPhone 7 благодаря уязвимости checkm8. Установкой Android на iPhone не занимались со времени iDroid Project и iPhone 3G. Как и iDroid Project, Project Sandcastle не предоставляет ОС для повседневного использования, это скорее масштабный Proof-of-Concept с открытым исходным кодом.
Подобные проекты очень трудоемки с точки зрения разработки, сложны для эксплуатации обычными пользователями и вряд ли будут использоваться широкой аудиторией. Тем не менее, стоит воспользоваться возможностью посмотреть все своими глазами.
В чем сложность
Наиболее подробно — в соответствующей статье в блоге Corellium.
Ни для кого не секрет, что Apple отступается от принятых стандартов и часто использует собственные решения. Для начала отметим, что macOS загружается несколько иначе, чем операционные системы семейств Windows и *nix. В качестве загрузчика в «яблочных» устройствах используется iBoot. Он загружает ядро в формате Mach-O, которое может быть сжато, подписано и лежать в контейнере IMG4.
Более сложные вещи начинаются, когда появляется необходимость запустить остальные ядра процессора. В обычных ARM64-процессорах это производится через интерфейс Power State Coordination Interface (PSCI). Но в M1 другие ядра запускаются со смещения, которое указано в соответствующем Memory-mapped I/O (MMIO) регистре.
Но даже это еще не все. Apple создали свой собственный контроллер прерываний, который не соответствует ни одному стандарту ARM Generic Interrupt Controller (GIC). Также прерывания, генерируемые таймером, используют специальный тип запросов FIQ (Fast Interrupt Request) вместо IRQ, что пока не поддерживается ядром Linux.
Для взаимодействия процессорных ядер между собой используются специальные прерывания — Inter-Processor Interrupt (IPI), которые в M1 формируются также с помощью FIQ. Таким образом, поддержка FIQ — один из наиболее важных моментов в этом порте.
Ядро Linux на M1 (источник twitter.com)
Сотрудникам Corellium пришлось разработать собственный драйвер для обработки прерываний через FIQ, написать «обертку», которая позволила бы запустить все ядра, и решить еще несколько аппаратных проблем. Только после этого они смогли запустить ядро Ubuntu.
Впрочем, запуск ядра — это только начало. Для успешной эксплуатации необходимо подключить устройства ввода, такие как клавиатура и мышь. Есть три способа: использовать USB-хост в чипе M1 (для ThunderBolt/USB Type-C), использовать xHСI-хост (для USB Type-A) или воспользоваться Bluetooth.
Bluetooth работает на нестандартном PCIe-подобном протоколе, поэтому разработка собственного модуля ядра для неизвестного протокола могла затянуться. В Corellium приняли решение настроить USB, и через пару дней работы им удалось подключить устройства ввода.
На момент написания статьи уже доступен Proof-of-Concept, который можно попробовать самостоятельно. Учтите, что все дальнейшие действия вы можете делать исключительно на свой страх и риск.
Установка Ubuntu
Для начала использования Ubuntu нам потребуется следующее:
- Mac с процессором Apple M1 (поддерживаются Mac Mini, Macbook Pro и Macbook Air);
- флешка с разъемом USB Type-C объемом от 16 ГБ;
- USB-клавиатура и USB-мышь.
В качестве флешки я использовал Kingston DataTraveler microDuo 3C объемом 32 ГБ, поддерживающую USB Type-A и USB Type-C. Инструкция Corellium настаивает на использовании Type-C флешки, так как загрузка с Type-A не поддерживается на момент написания данной статьи. Мышь и клавиатуру я подключал по USB Type-A.
Есть и менее очевидные требования. Во-первых, на Mac Mini должна быть установлена macOS 11.2 или выше. В старых версиях ОС в утилите kmutil отсутствует команда configure-boot, необходимая для корректной «подмены» ядра.
Также необходимо «отвязать» Mac от Find My Mac. Наличие «привязки» не позволяет отключить системы безопасности в полной мере и выполнить все необходимые команды.
В первую очередь подготовим образ для флешки. Скачиваем, а затем распаковываем архив. Подготовку следует выполнять в терминале Mac, на котором планируем запустить Ubuntu.
Далее разворачиваем образ на флешку:
Обратите внимание, что необходимо указать именно флешку, а не раздел на ней. Например, /dev/rdisk6. Далее копируем драйвера на Wi-Fi:
Если вы используете проводное подключение к Интернету, то флешку можно подготовить на компьютере под управлением ОС Linux.
Далее подключаем флешку в USB Type-C порт и перезагружаемся в Recovery OS, известную как 1TR (the One True Recovery), и открываем терминал. На новых Mac это происходит следующим образом:
- Выключаем Mac;
- Удерживаем кнопку включения до появления текста «Загрузка параметров запуска»;
- Выбираем опцию «Параметры» и нажимаем «Продолжить»;
- В верхнем меню открываем «Утилиты» — «Терминал».
Обратите внимание, что Recovery при запуске не должен просить ввести пароль от ОС или от Apple ID. Если он все же просит, то необходимо отключить Find My Mac в настройках macOS.
Устанавливаем ядро Ubuntu:
Данный скрипт проверяет политики загрузки (BootPolicy) и отключает системы проверки целостности macOS, если это необходимо. После этого скрипт загружает ядро Linux в формате Mach-O в корень системного диска и настраивает iBoot на ядро Linux.
В процессе выполнения скрипта будет запрос пароля для получения прав суперпользователя macOS. Выполняемые команды также предупредят вас о том, что выполняемые действия значительно снижают безопасность Mac. Но если вы хотите запустить Ubuntu, то придется принять это как должное.
После завершения скрипта можно перезагрузить Mac, далее начнется загрузка Ubuntu 20.04.
Опыт использования
Первый запуск Ubuntu будет не очень быстрым. В логах загрузки «упадет» четыре-пять сервисов и еще шесть «подвиснут». Ubuntu загружается относительно долго: несколько минут. Более того, первое время отзывчивость ОС будет очень низкой. Запуск новых приложений, даже без графической оболочки, может занимать минуты. Эта проблема самоустраняется вскоре после загрузки.
Нетрудно заметить, что образ сделан на основе Ubuntu для Raspberry Pi. Поэтому в системе пользователи root и pi имеют пароль raspberry. К сожалению, сделать красивый и показательный скриншот с выводом screenfetch не получается. ОС не определяет модель процессора, поэтому в выводе лишь безликое Unknown.
То, что это образ ОС для RPi, будет заметно при попытке установить ПО из пакетного менеджера. Он попытается установить не только требуемый администратором софт, но и обновление ОС с созданием initramfs для «малинки». Подобные действия приведут к появлению ошибок в логах, несмотря на успешность установки запрошенного ПО.
Как и ожидалось, в ОС присутствует минимально необходимый набор драйверов. Звуковая карта, модуль Bluetooth и графический ускоритель не поддерживаются. Большинство системных утилит, таких как lspci, lsusb и lshw, выдают очень скудную информацию о железе.
Несмотря на множество ограничений, я решил провести тест sysbench.
| Устройство | Количество вычислений в секунду |
|---|---|
| Mac Mini (Ubuntu 20.10) | 838 |
| Lenovo ThinkPad E14 (Ubuntu 20.04) | 483 |
Хотя данный тест нельзя считать идеальным и показательным, восьмиядерный Apple M1 в два раза превосходит восьмиядерный Intel Core i5-1045U. К сожалению, мне не удалось запустить sysbench на macOS.
Заключение
Установка альтернативных операционных систем на Mac — это всегда увлекательный с технической точки зрения процесс. Новые процессоры Apple M1 стали отличным вызовом для энтузиастов.
А вам приходилось использовать Windows или Linux на Mac?
Источник


