- Installing TensorFlow with GPU on Windows 10
- Getting Python and pip
- Checking your Windows GPU
- Installing the CUDA drivers
- Installing TensorFlow nightly build
- Installing the CuDNN libraries
- Testing TensorFlow
- Laurence Moroney
- Install Tensorflow 2 GPU version in Windows
- Requirements
- Steps
- Install Microsoft Visual C++ Redistributable for Visual Studio 2015, 2017 and 2019:
- Install the 64-bit Python 3:
- Install TensorFlow-GPU + CUDA in Windows 10, with easy to follow instructions.
- off99555 / install-tensorflow-gpu-windows.md
Installing TensorFlow with GPU on Windows 10
Dec 31, 2017 · 6 min read
In an earlier article I showed how to test your Linux system to see if you have a GPU that supports TensorFlow, with the promise that I’d next do Windows and MacOS. So, in this article, I will show how you can test a Windows system for a supported GPU, and if you have one, how you can then install and configure the required drivers, before getting a TensorFlow nightly build and ensuring that it works.
But before you go any further, you’ll also need Python and pip, which don’t typically come with Windows machines.
Getting Python and pip
There ’ s quite a few ways to install Python and pip for Windows, but I found the easiest to be to go to the python site and download the executible installer: https://www.python.org/downloads/windows/
Once you’ve downloaded it, launch it and be sure to select the custom option for install. This takes you into a configuration dialog where you can select pip as an option to install.

I’d recommend you just choose them all.
Once you’ve finished installing, you can open a command prompt and type ‘python’ to see which version you’re using. As you can see from the above I downloaded 3.6.4, and my python command matches this.

You can exit the Python interpreter with
And then test your pip install with
You should see something like this:

You’re now good to go with the Python runtime and pip installer for Windows. You’ll use these to install TensorFlow, but first, let’s check on your GPU to see if it is supported.
Checking your Windows GPU
From your command prompt you can launch Device Manager with this command:
Then look for the Display Adapter setting, open it and read the name of your adapter. You should see something like this:

As you can see, my system has a GTX 980 Ti. Take note of yours, and visit NVidia’s site of GPUs that support CUDA here. If your card is on the list (my GTX 980 Ti is), then you know that TensorFlow can support GPU operations on your machine, but before you can install and run TensorFlow, you’ll need to install the CUDA drivers for your machine and the CUDNN updates for it.
Installing the CUDA drivers
At the time of writing, the TensorFlow nightly builds support CUDA 9.0, and the release builds support 8.0. If you visit the cuda downloads site here, you’ll notice that it will take you to the latest version (right now it’s 9.1), so be sure to download the right version of the driver by selecting the Legacy link at the bottom of the downloads screen:

Of course as CUDA gets updated, and as TensorFlow gets updated, these versions will change. If you have the incorrect version, TensorFlow will warn you (I’ll show you where, later in this article), and you’ll have to go back to this site to get the correct version. Download the drivers for your system and install them using defaults. It takes a little while, and a couple of reboots, so while you’re waiting, check out a couple of episodes of Coffee With A Googler 🙂
You’ll also need a version of CuDNN that matches your version of CUDA before you can run TensorFlow, but, I’ve found it easier not to install it yet — you want to ensure that you have the right CUDA first, so, while it might seem counterintuitive, you should install TensorFlow first, and try to get it to run. One of two things will happen:
- It will fail on the CUDA drivers, so you’ll need to repeat this step
- It will fail on the CuDNN drivers, so you know your CUDA drivers are good, and you will get the version of CuDNN that you need.
So let’s install TensorFlow next:
Installing TensorFlow nightly build
I’m assuming here you’re using TensorFlow with GPU, so, to install it, from a command prompt, simply type:
(Replace with tf-nightly if you don’t want the GPU version)
Then, once it’s completed, in your command prompt window type
to open the python editor, and within it type
If you are using the GPU version you should get an error. That’s good.
If you have the wrong CUDA drivers, it will likely show that cudart64_XX.dll fails, where ‘XX’ is a version number. At time of writing it is cudart_90.dll, which tells you that you need version 9.0 of the CUDA drivers. Check this version carefully, and repeat the previous step (downloading and installing the drivers) until this error goes away. Be sure to close the command prompt window, and open a new one to test the new installation so your paths are up to date.
When you have the right CUDA drivers, but the wrong or missing CuDNN drivers, you’ll see an error saying something like cudnn64_X.dll is missing, where X is a version number. Take note of that, and you’ll use it in the next step. Exit python and close the command prompt window before continuing. In my case it told me that cudnn64_7.dll was missing, so I know I need version 7.
Installing the CuDNN libraries
The CuDNN libraries are an update to CUDA for Deep Neural Nets, and used by TensorFlow to accelerate deep learning on NVidia GPUs. You can download them from here: https://developer.nvidia.com/cudnn. You’ll have to sign up for an NVidia developer account first, but it’s pretty quick and costs nothing. Once you’ve signed in you’ll see a variety of CUDNN downloads. Here’s where you’ll have to match to the version of CUDA that you downloaded in the previous section. So, for example, I used CUDA 9.0, so made sure I used a CuDNN that matches both this and the required version you saw in the last step (in my case version 7), so I chose cuDNN v7.0.5 for CUDA 9.0

This will download a ZIP file with several folders, each containing the CuDNN files (one DLL, one header and one library). Find your CUDA installation (should be at something like: C:\Program Files\NVIDIA GPU Computing Toolkit\CUDA\v9.0)
You’ll see the directories from the ZIP file are also in this directory — i.e. there’s a bin, and include, a lib etc. Copy the files from the zip to the relevant directory. So, for example, drag cudnn64_7.dll to C:\Program Files\NVIDIA GPU Computing Toolkit\CUDA\v9.0\bin, and do the same for the others. You can see more here: http://docs.nvidia.com/deeplearning/sdk/cudnn-install/index.html#install-windows
Once you’re done, re-open a command prompt window, and test TensorFlow again!
Testing TensorFlow
If all goes to plan, you can now open a command prompt window, and type ‘python’ to open the Python interpreter. Then type:
And if you have the right versions of the libraries, you should see no error, like this:

If you see errors in cudart64_xx.dll or cudnn64_x.dll, go back to the previous steps and make sure you’ve downloaded and installed the correct versions of the drivers that cause these errors. It takes a bit of trial and error I’m afraid 🙁
Then, you can check your TensorFlow version by typing
Note that there are 2 underscores before and after ‘version’. TensorFlow will output it’s version #, as shown here:

You now have a full TensorFlow runtime environment with GPU support on Windows! Congratulations. Time to do some deep learning…
Laurence Moroney
Developer Advocate at Google for Artificial Intelligence. Host of YouTube Show ‘Coffee with a Googler’. Author of lots of books, comics, screenplays and more!
Install Tensorflow 2 GPU version in Windows

Aug 6, 2020 · 4 min read
Although the installation process is described on https://www.tensorflow.org/install/pip#virtual-environment-install and https://www.tensorflow.org/install/gpu, I have followed these tutorials to install TensorFlow, but some people make mistakes while installing TensorFlow, so I have described the process which I had followed to install TensorFlow GPU successfully (August,2020)
Note: With every version of Tensorflow, requirement of software’s versions also change so please confirm at GPU support | TensorFlow , also, every time you need to upgrade Tensorflow you will have to need upgrade all required software accordingly, this article was writen on august 2020, but it is very helpful.
Requirements
- Python 3.5–3.8 (64-bit) (I have used python 3.8)
- Windows 7 or later (64-bit) (I have used windows 10)
- CUDA®-enabled card (I have NVidia GeForce GTX 1050 ti)
Steps
Install Microsoft Visual C++ Redistributable for Visual Studio 2015, 2017 and 2019:
- Go to the Microsoft Visual C++ downloads,
- Scroll down the page to the Visual Studio 2015, 2017 and 2019 section.
- Download and install the Microsoft Visual C++ Redistributable for Visual Studio 2015, 2017 and 2019 for your platform.
Install the 64-bit Python 3:
Make sur e long paths are enabled on Windows.
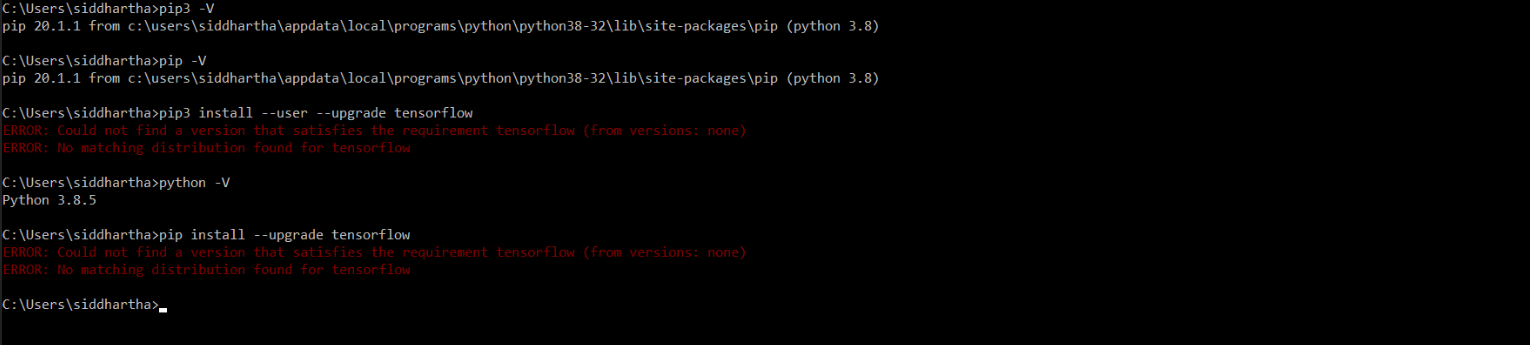
Make sure your python version should be 64-bit, most people install default python from the 32-bit download link, select specific version at https://www.python.org/downloads/windows/
add python to path variable while installing
Install TensorFlow-GPU + CUDA in Windows 10, with easy to follow instructions.

Installing CUDA and TensorFlow-GPU can be a very challenging task, in this article I will show to install it in a few simple steps.
Before getting started with this installation we need to make sure that your graphics card is CUDA enabled. If it is not then using GOOGLE COLLAB can be a great alternative.Check if your Graphics card is CUDA enabled( link), scroll down and click on CUDA enabled Ge-force and Titan Products. Search for your graphics card from the list.
If you don’t know your graphics card specs:
- Go to Desktop
- Right Click and Select NVIDIA Control Panel
- Click Help and Select System Information from the drop down
- Under Items you can view your graphics card version.
Check the latest version of CUDA supported by TensorFlow. Click on this link . Scroll down to Software Requirements to check for the latest supported build.
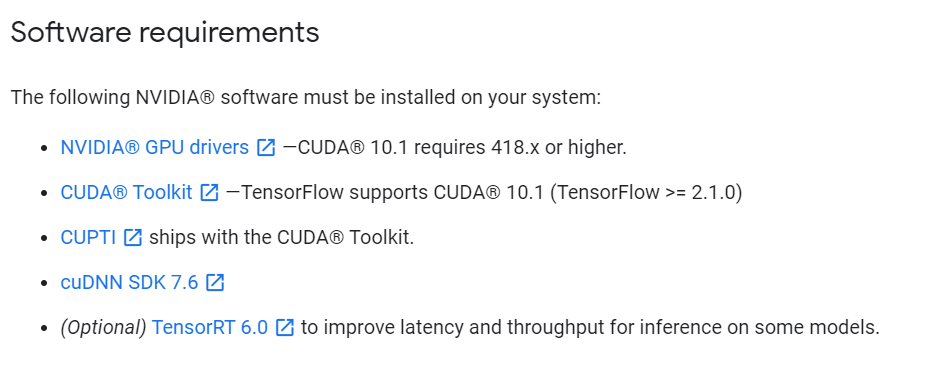
Here CUDA 10.1 and cuDNN SDK 7.6 are the latest supported version by TensorFlow, you can ignore the rest of the things for now.
Okay now that we know what we have to install we first need to clean our system of any NVIDIA programs. That means removing all installation of NVIDIA from our system.
- Go to My Computer/C Drive/Program Files and remove all files having the name NVIDIA.
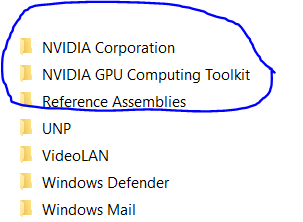
2. Again Go to My Computer/C Drive/Program Files(x86) and do the same thing remove all files having the name NVIDIA.

After removing all the files from your System perform a reboot.
Now Lets Download all the required software
- The First thing we need to download is Visual Studio, as it is a prerequisite for CUDA installation and without this our installation will fail. Go to this linkand download the latest Visual Studio Community Edition. Just follow the default installation settings until you reach Step 4(Choosing Workloads) don’t select any workload and just click on Install.
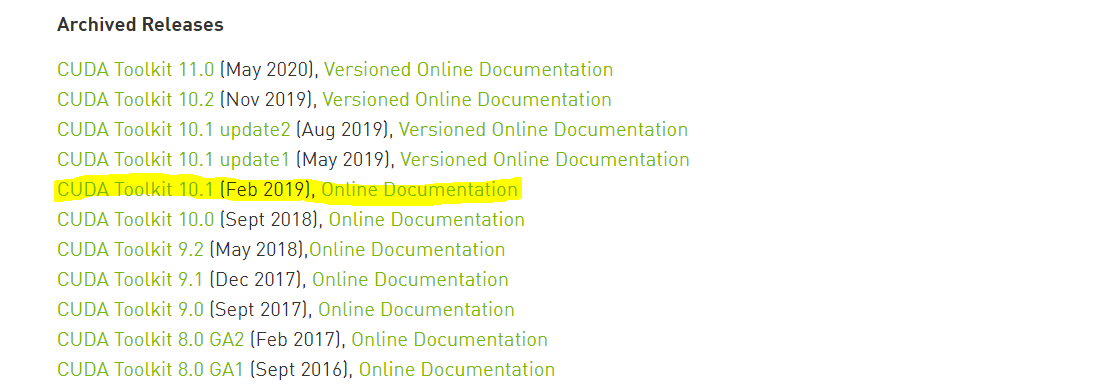
- Next we need to download CUDA Toolkit(link ). Recall the CUDA Toolkit Version from the TensorFlow Software Requirements(the latest supported build during the time of writing this article is 10.1, but if any new supported build is mentioned on the TensorFlow website go ahead and select it).
Select your Operating System( I have selected mine as Windows)
off99555 / install-tensorflow-gpu-windows.md
Follow this guide to install TensorFlow GPU on Windows (without the need to manually install CUDA Toolkit): https://www.pugetsystems.com/labs/hpc/How-to-Install-TensorFlow-with-GPU-Support-on-Windows-10-Without-Installing-CUDA-UPDATED-1419 CUDA will be installed for you automatically using Anaconda.
Or just follow the Fast Instructions I wrote below.
If you want to install CUDA toolkit on your own, or if you want to install the latest tensorflow version, then you need to follow official installation guide.
Go download and install Anaconda (with built-in python) from Google. (I know you can do it!) Then create a new conda environment using the following command:
It will create a new environment tf-gpu with anaconda scientific packages (python, flask, numpy, pandas, spyder, pytest, h5py, jupyterlab, etc) and tensorflow-gpu.
Tensorflow is now installed. Open a new command prompt and type
You will see it is reporting tensorflow version. That’s it!
Just make sure to always activate the environment using conda before calling any command. conda activate tf-gpu Otherwise you will not be able to import tensorflow in your python code.
Jupyter Notebook/Lab integration
If you are working with Jupyter Notebook or Jupyter Lab, there are extra steps you need to do after installation of tensorflow.
Create tensorflow-gpu kernel for Jupyter Notebook using following commands:
If you have installed wrong ipykernel, you can remove it using jupyter kernelspec uninstall THE_KERNEL_TO_REMOVE where THE_KERNEL_TO_REMOVE can be found from jupyter kernelspec list
Now when you launch your jupyter notebook or jupyter lab you will find that you can change your python kernel to TensorFlow-GPU on the top right.

- Check https://anaconda.org/search?q=tensorflow-gpu for the channel that released the latest version of tensorflow-gpu . Suppose anaconda provided the latest version, you can run conda install -c anaconda tensorflow-gpu to install from anaconda channel.
- Make sure that when you run python kernel inside Jupyter Lab/Notebook, only one instance of Tab is run at a time. Otherwise multiple tabs will try to access the GPU at the same time and cause deadlock problem (the program will freeze).
- If you cannot install a particular package using conda , just use pip .
- Right now, the latest version of tensorflow-gpu provided by Anaconda is 1.14. If you want to use tensorflow2.0 then you need to check the official installation guide, and manually install CUDA toolkit. Personally, I install both tensorflow1.14-gpu and tensorflow2.0-gpu in separate environments. (some old programs from tensorflow requires tensorflow 1) I also install tensorflow2.0 (CPU version) at the base environment for inference tasks.
- I suggest you to stick with either pip install or conda install for each environment as it could cause dependency conflict if you use them interchangeably often.
- ImportError: Could not find ‘cudart64_100.dll’. TensorFlow requires that this DLL be installed in a directory that is named in your %PATH% environment variable. Download and install CUDA 10.0 from this URL: https://developer.nvidia.com/cuda-90-download-archive , fixed by activating tf-gpu environment before launching Jupyter Notebook.
I got about 20x speedup using GTX 1060 GPU compared to my CPU i7-3770 @ 3.4GHz 3.9GHz. The GPU utilization was around 40%. The neural network architecture plays a very big part on how much speed you will gain. If your network is too small you won’t gain any speedup. I tried with the simple MNIST model example on TensorFlow tutorial and the GPU runs roughly at the same speed as the CPU. That mistake made me thought that I installed GPU version incorrectly until I try LeNet-5 model and saw 20 times speedup.
To reproduce my result and make sure that your GPU is really working, run test_mnist_lenet5.py attached below for this benchmark. Uncomment os.environ[‘CUDA_VISIBLE_DEVICES’] = ‘-1’ to use CPU. Or just activate the environment with tensorflow CPU.
You should see significant speedup.
Make sure to checkout tensorflow/models repo on the tag that match your tensorflow version. E.g. if you install tensorflow 1.13 then use models at tag v1.13.0. If you checkout the master branch you might experience problem that the code does not run on GPU like I did.
I got around 6,000 examples/sec using GTX 1060 while only around 270 examples/sec using CPU i7-3770 (not compiled from source to use AVX instruction).
My Opinionated Advice from Experience
- Use Anaconda, instead of a combination of python , virtualenv , pyenv , and pipenv . It’s one simple program that roughly does everything those 4 things do. It allows you to setup multiple python versions in your system similar to pyenv . It allows you to setup multiple environment like virtualenv and pyenv . Most of all, it eliminates your headache.
- Installing tensorflow without CUDA is just for getting started quickly. But after you want to get serious with tensorflow, you should install CUDA yourself so that multiple tensorflow environments can reuse the same CUDA installation and it allows you to install latest tensorflow version like tensorflow 2.0. Currently, the latest tensorflow GPU version on Anaconda is only 1.14.
- Depends on your need you might need to install multiple tensorflow environments. For me I install tensorflow1 CPU, tensorflow1 GPU, tensorflow2 CPU, and tensorflow2 GPU on 4 separate environments. ( tf1-cpu , tf1-gpu , tf2-cpu , tf2-gpu )
- Install tensorflow 2 CPU (not GPU) on the base environment, so that it is quick to experiment a small model or test inference on CPU. TensorFlow GPU initializes slowly so it can be annoying when you want to test something quick.
Most important advice
Always install all packages again inside the new environment even if you can still access the package from the base environment. For example, if you install a new environment tf-gpu , you will be able to reuse the python.exe from base environment. But this will likely cause problem later. So make sure that you install python again on the tf-gpu . (You can simply install anaconda package so that it install python and other related packages in one command)
This advice applies to other packages like numpy , opencv-python , pandas , scikit-learn , spyder , jupyter , jupyterlab , etc as well! If you are using Spyder or Jupyter Notebook as your main IDE, it’s very important that you install them on every environment you want to use the IDE. Because these IDE will be able to access the packages inside the same environment only. It will be quite troublesome to try to install one IDE instance and reuse it on all environments. (I tried)
You can check the location of the package that you have installed using where command e.g. where python , where jupyter , etc. This will allow you to check if you have installed things correctly when you are faced with bugs.
This approach consumes more disk space but it will reduce your headache. If you don’t have enough disk space, buy a new one or remove some of your junk files.


