- How to Install TeamViewer on Ubuntu 20.04 LTS
- Installation of TeamViewer Through Ubuntu Command Line
- Step 1: Download and add TeamViewer repository key
- Step 2: Add the TeamViewer repository
- Step 3: Install TeamViewer through the apt command
- Step 4: Launch TeamViewer
- Uninstall TeamViewer
- TeamViewer Installation on Ubuntu Through Graphical Installer
- Launch TeamViewer
- Uninstall
- Karim Buzdar
- Как установить TeamViewer в Ubuntu 20.04
- Подготовка
- Установка TeamViewer в Ubuntu 20.04
- Запуск TeamViewer
- Обновление TeamViewer
- Выводы
- How to Install TeamViewer on Linux/Ubuntu?
- Downloading TeamViewer debian Package(.deb)
- Installing TeamViewer
- What if an Error occurs?
- How to Install TeamViewer on Ubuntu
- Install Teamviewer by downloading debian package:
- Install TeamViewer by using repository:
- Upgrade TeamViewer:
- Conclusion:
- About the author
- Fahmida Yesmin
How to Install TeamViewer on Ubuntu 20.04 LTS
TeamViewer is a popular software for remote access over the Internet to and from your system for Linux, MacOS and Windows. This application can connect to any personal computer or server so that you can use it as if you were sitting right in front of it. TeamViewer works as a remote control for your partner’s computer system and allows you to establish a remote session. Both you and your partner must have this small application installed and running, even if you are not an administrator. All you need to know is your partner’s ID and password to control his computer.
In this article, we will explain how to install the TeamViewer application on your Ubuntu system, both from the user interface and from the command line.
The commands and procedures mentioned in this article were executed on a Ubuntu 20.04 LTS system, the same instructions can be used for the older Ubuntu 18.04 version as well.
Installation of TeamViewer Through Ubuntu Command Line
If you prefer the command line over the graphical interface, follow these steps in order to install TeamViewer through the Ubuntu Terminal application:
Step 1: Download and add TeamViewer repository key
Open the Terminal either through the system Dash or the Ctrl+Alt+T shortcut.
First, you need to download the TeamViewer repository key as we will installing TeamViewer through its official website. Run the following command in order to download the key:

The .asc key file will be downloaded to your Downloads folder by default.
Please add this key to your system through the following apt-key command as sudo:

Step 2: Add the TeamViewer repository
Run the following command to add the official TeamViewer repository from where we will be installing TeamViewer.
For TeamViewer Stable version:
For TeamViewer Preview version:
We are adding the repository for TeamViewer Preview version in this tutorial.

Now, enter the following command as root in order to update your system’s repository index with that on the internet:

Step 3: Install TeamViewer through the apt command
Finally, run the following command as sudo in order to install TeamViewer to your system:

The system will prompt you with a Y/n option in order to continue the installation procedure. Please enter Y and hit Enter to continue. TeamViewer will then be installed on your system.
Step 4: Launch TeamViewer
If you wish to launch TeamViewer through the command line, enter the following command in your Terminal:
Uninstall TeamViewer
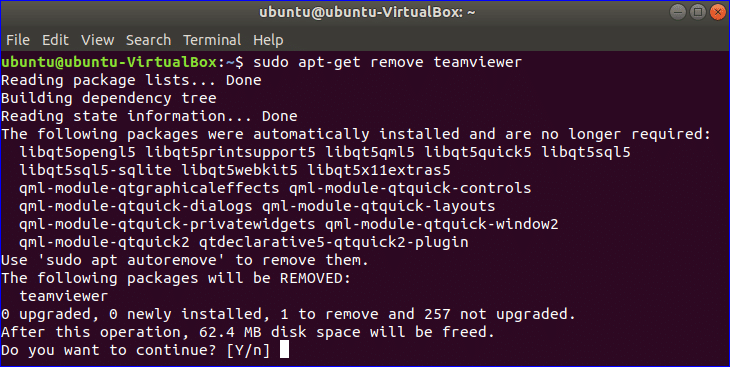
In order to uninstall TeamViewer from your system without removing any configurations you might have made, enter the following command as sudo:

The system will prompt you with a Y/n option in order to begin the uninstall procedure. Please enter Y and hit Enter to begin. TeamViewer will then be removed from your system.
If you have made any configurations, you can remove TeamViewer and all those by using the following command:
$ sudo apt purge teamviewer
TeamViewer Installation on Ubuntu Through Graphical Installer
For a person who does not want to open the Command Line much, installing a software present in the Ubuntu repository through the UI is very simple. For Teamviewer, we will be downloading the .deb package and then install it through the Ubuntu Software Install.
You can download the official .deb installation package from the following website:
Scroll down on the page and click on the download link for Ubuntu, Debian (stable version) or TeamViewer Preview version.

Save the file on your system, which will be saved to the Downloads folder by default.
Open the Downloads folder where you will be able to see the TeamViewer .deb package.

Right click on the package and select the Open with Software Install option from the menu. This will open the following installer:

Click the Install button on the above window. The following authentication dialog will display for you to provide the authentication details for a sudo user as only an authorized user can install a software on Ubuntu.

Enter your password and click the Authenticate button. After that, the installation process will begin, displaying a progress bar as follows.

TeamViewer will then be installed to your system and you will get the following message after a successful installation:

Launch TeamViewer
You can launch TeamViewer any time you want by entering ‘TeamViewer’ in the Ubuntu Dash or access it from the Applications list.


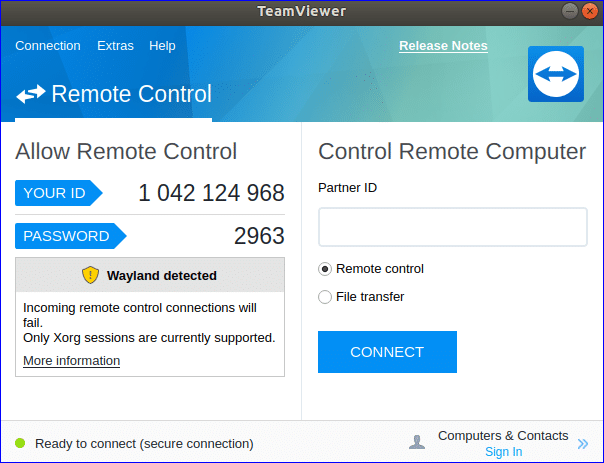
TeamViewer will open in the following view; through which you can connect or be connected to a remote computer.
Uninstall
Uninstalling Teamviewer through the UI is fairly simple. On your Ubuntu desktop Activities toolbar, click the Ubuntu Software icon.
The Ubuntu Software manager will open in the following view:

Click on the Installed tab and locate the TeamViewer entry from the list of installed software.

Click the Remove icon against the TeamViewer entry.

A dialog will ask you if you are sure about removing the software from your system. Please enter the Remove button to uninstall TeamViewer. An authentication dialog will display for you to provide the authentication details for a sudo user as only an authorized user can install a software on Ubuntu. Enter your password and click the Authenticate button. After that, the uninstall process will begin, removing TeamViewer from your system.
By following the steps described in this article, you can learn to download and install the latest version of TeamViewer on your Ubuntu system, both through the graphical user interface and the command line.
Karim Buzdar
About the Author: Karim Buzdar holds a degree in telecommunication engineering and holds several sysadmin certifications. As an IT engineer and technical author, he writes for various web sites. You can reach Karim on LinkedIn
Источник
Как установить TeamViewer в Ubuntu 20.04
TeamViewer — это кроссплатформенное решение, которое используется для удаленного управления, веб-конференций, совместного использования рабочего стола и передачи файлов между компьютерами.
В этой статье описывается, как установить TeamViewer в Ubuntu 20.04.
Подготовка
Вам нужно будет войти в систему как root или пользователь с доступом sudo, чтобы иметь возможность устанавливать пакеты в вашей системе Ubuntu.
Установка TeamViewer в Ubuntu 20.04
TeamViewer — это проприетарное компьютерное программное обеспечение, которое не входит в репозитории Ubuntu. Мы загрузим и установим пакет TeamViewer из официального репозитория TeamViewer APT .
Откройте свой терминал и загрузите последний пакет TeamViewer .deb , используя следующую команду wget :
После завершения загрузки установите TeamViewer, запустив:
При появлении запроса Do you want to continue? [Y/n] , введите Y чтобы продолжить установку.
Вот и все, TeamViewer установлен на вашем компьютере с Ubuntu, и вы можете начать его использовать.
Запуск TeamViewer
Приложение TeamViewer можно запустить либо из командной строки, набрав teamviewer либо щелкнув его значок в меню «Приложения».
При первом запуске TeamViewer вам будет предложено принять лицензионное соглашение. Примите условия лицензионного соглашения, нажав кнопку «Принять лицензионное соглашение».
Откроется TeamViewer, и отобразится окно, подобное приведенному ниже:
Обновление TeamViewer
В процессе установки в вашу систему будет добавлен официальный репозиторий TeamViewer. Вы можете использовать команду cat для проверки содержимого файла:
Когда будет выпущена новая версия, вы можете обновить установку TeamViewer с помощью инструмента обновления программного обеспечения на рабочем столе или из командной строки.
Выводы
Мы показали вам, как установить TeamViewer на ваш настольный компьютер с Ubuntu 20.04. Теперь вы можете подключиться к своему другу или клиентскому компьютеру и оказать немедленную помощь.
Не стесняйтесь, чтобы оставить комментарий ниже.
Источник
How to Install TeamViewer on Linux/Ubuntu?
TeamViewer is one of the best cross-platform remote support application. Its available for Windows, Mac, Chrome OS, Raspberry Pi, iOS, Android, and Linux Operating Systems.
TeamViewer is used for:
- Controlling Remote Computer via GUI (Graphical User Interface).
- File Transfer.
If your mode of usage is for personal and non-commercial its completely free to download. For commercial usage, a licensed version is required.
In this article, we will help you with the installation of TeamViewer on Ubuntu 20.04 and can be used in previous & future Ubuntu versions.
Downloading TeamViewer debian Package(.deb)
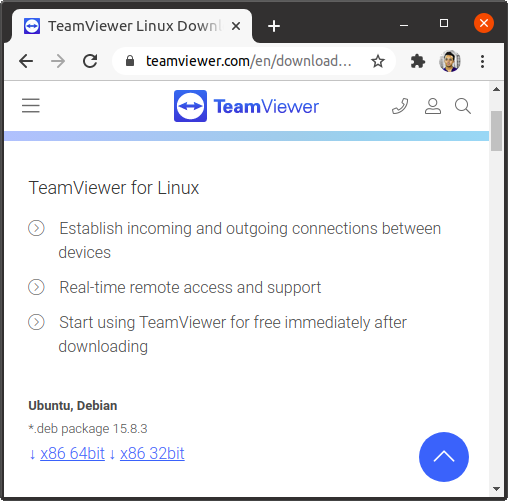
Go to TeamViewer for Linux Download page, you will see x86 64bit and x86 32bit versions. Choose as per your system.
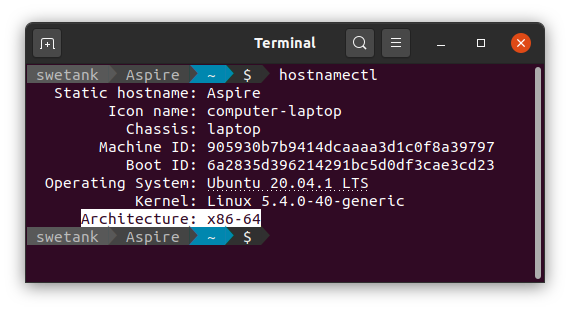
You can use, hostnamectl in terminal to get your architecture version.
Installing TeamViewer
After you have successfully downloaded .deb package you have two methods to install it.
Method 1: Via GUI
Head over to your downloads folder and right-click on it to open options. Select Open With Software Install. You can also hit Enter to Install it.
Method 2: Via Terminal
Step 1: Open Terminal by pressing Ctrl + Alt + T. Use the below command to update and upgrade the package manager:
sudo apt-get upgrade
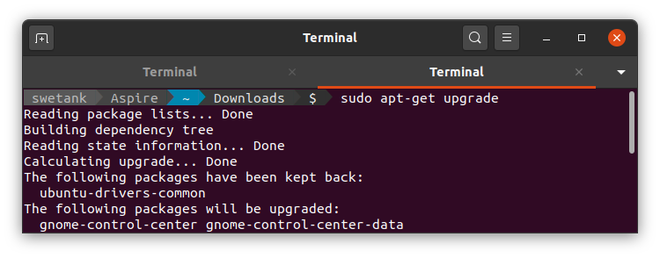
Step 2: Then go to Downloads folder by entering cd Downloads command.
Step 3: Then enter ls to list folder contents.
Step 4: Type the following command:
sudo dpkg -i teamviewer_15.8.3_amd64.deb
Change 15.8.3 with your file version as shown. Hit Enter.
Step 5: Install and Uninstall require superuser privileges. Enter your password.
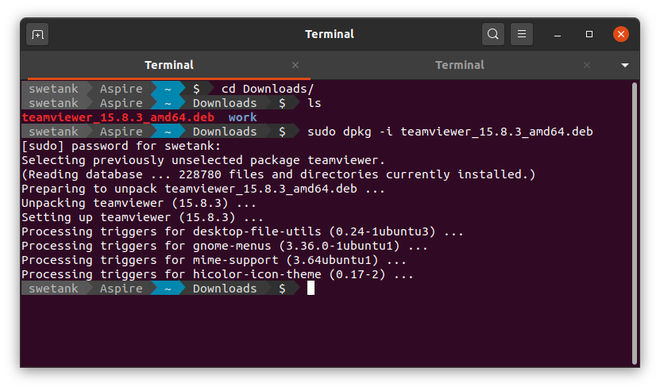
Step 6: If everything went well now TeamViewer is Installed on your Ubuntu.
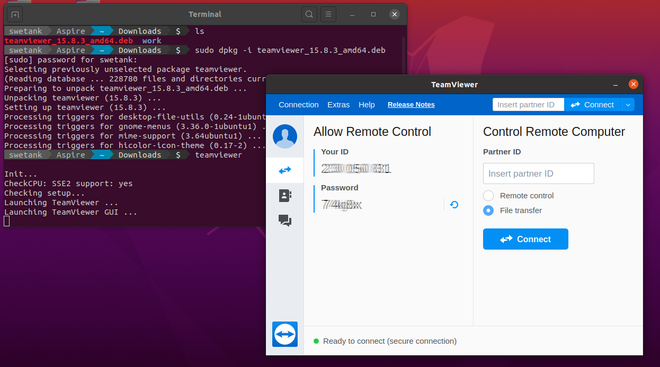
Step 7: Type teamviewer . Hit Enter. This command will open Installed TeamViewer.
What if an Error occurs?
If you are getting an error of missing dependencies, these are the packages that TeamViewer will need before installing.
Type the below command and it will install all dependencies that your previous installation missed.
sudo apt-get install -f
Источник
How to Install TeamViewer on Ubuntu
You can install TeamViewer on your Ubuntu operating system by two ways. These are:
- By downloading Debian package
- By using repository
Both installation steps are shown in this tutorial. You can follow any of the ways to install it on your system.
Install Teamviewer by downloading debian package:
If you are a new user and you are less familiar with Linux commands then it will be better for you to follow the following steps for installing TeamViewer.
Step-1:
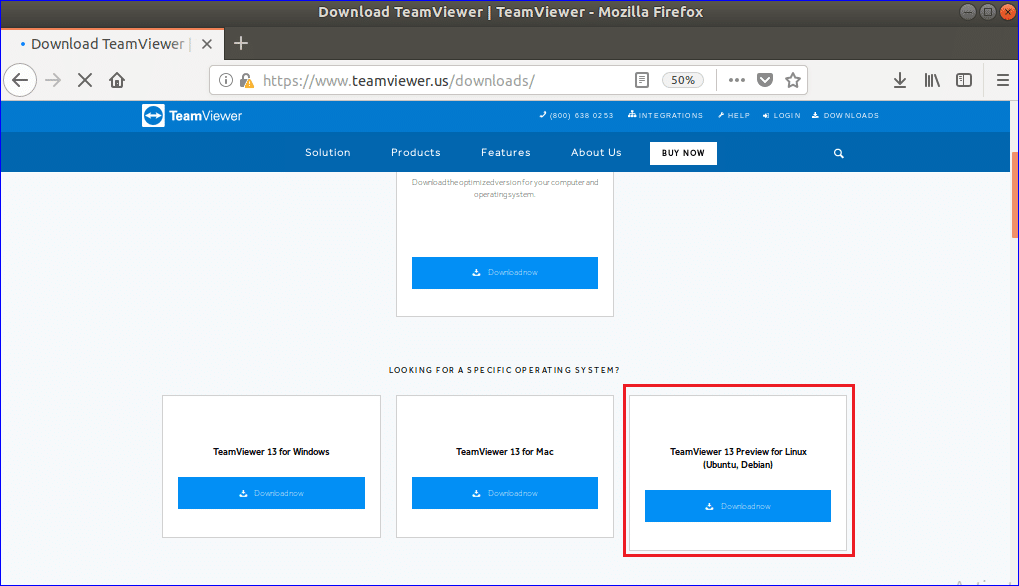
Open any browser and go to the following URL address to download TeamViewer installer according to the configurations and operating system of the computer. You can download the software by selecting AUTOMATED OPTIMIZED DOWNLOAD or by selecting SPECIFIC OPERATING SYSTEM. Ubuntu operating system is used in this tutorial, so click the download link for Linux (Ubuntu, Debian).
Step-2:
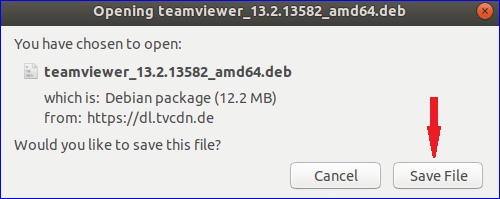
When the following window will appear then click on ‘Save File’ button to start the download process.
Step-3:
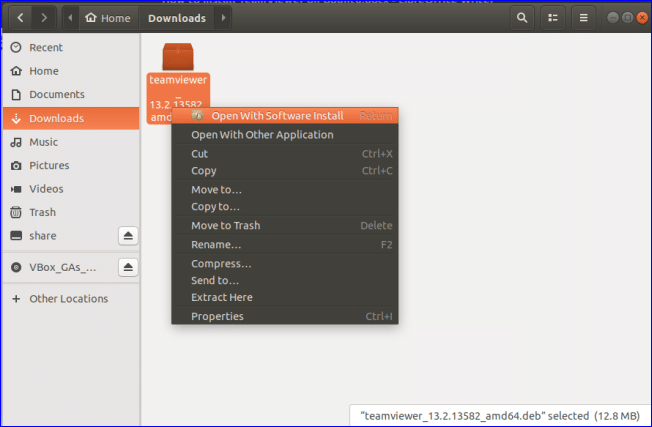
By default, any package file downloads on Downloads folder. Open the Files browser and click on Downloads folder to find out the downloaded package. Right click on the package file and click ‘Open with Software Install’ from the pop-up menu.
Step-4:
After opening the Ubuntu Software window, click on Install button to start the installation process of TeamViewer.

Step-5:
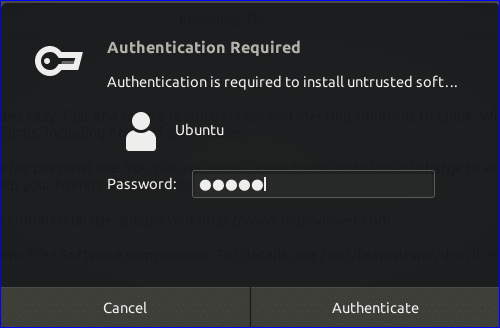
You need to provide root password for giving permission to install untrusted software. The above package is downloaded from the outside of ubuntu.com. So, provide root password in the following window to authenticate the package.
***Note:
You can omit the steps from 3 to 5 by running the following commands from the terminal. If you want to test the following commands after completing step 5 then you must remove Teamviewer first and then try the following commands. The remove command is given in the last section of this tutorial.
Go to the folder where the package is downloaded and run dpkg command with –i option to install TeamViewer from terminal. Here, the package is stored in Downloads folder.
Step-6:
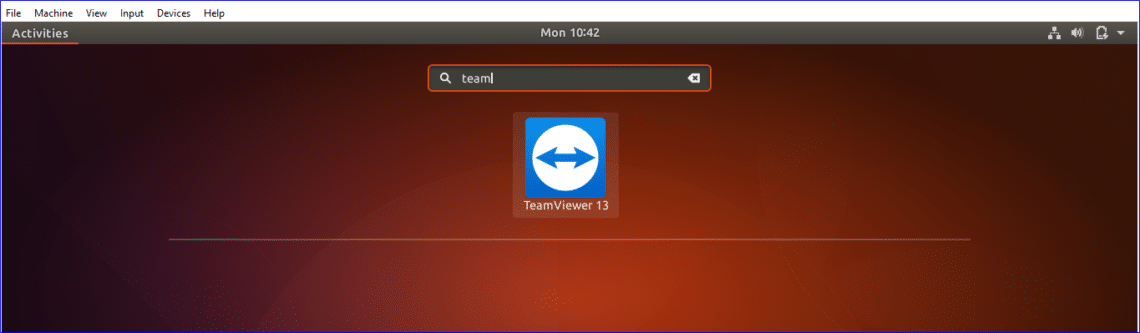
Click on ‘Show Applications’ icon and type teamviewer to find the installed TeamViewer application. If the installation completes successfully in the previous steps then the following icon will appear.
Step-7:
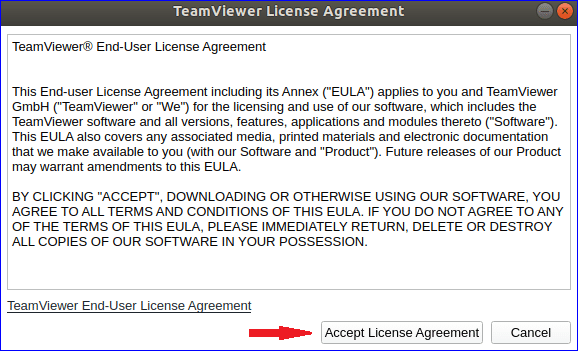
Click on TeamViewer icon to run the application. Click ‘Accept License Agreement’ button to run the software.
Step-8:
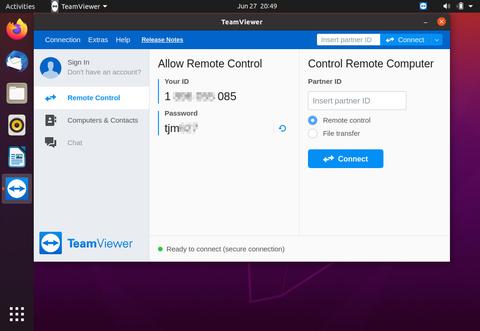
You will get your id and password to communicate with the remote computer. You have to set your partner id to access or control the computer of your partner remotely. If you get the following window then TeamViewer is installed and working properly.

Install TeamViewer by using repository:
If you want to install TeamViewer by using command line then you can follow the following steps for the installation.
Step-1:
Open the terminal by pressing ‘Alt+Ctrl+T’ and run the following commands to download the repository key of TeamViewer. You can download the file on any folder. Here, Downloads folder is used.

Step-2:
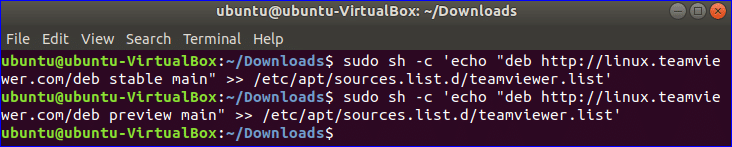
Run the following commands to add the repository.
$ sudo sh -c ‘echo «deb http://linux.teamviewer.com/deb stable main» >>
/etc/apt/sources.list.d/teamviewer.list’
$ sudo sh -c ‘echo «deb http://linux.teamviewer.com/deb preview main» >>
/etc/apt/sources.list.d/teamviewer.list’
Step-3:
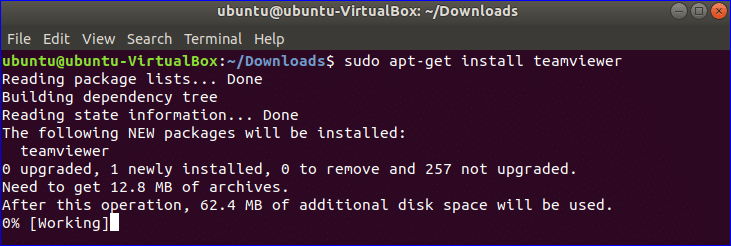
Run the command to install TeamViewer with root privilege.
Step-4:
Run the command to check Teamviewer is running or not.
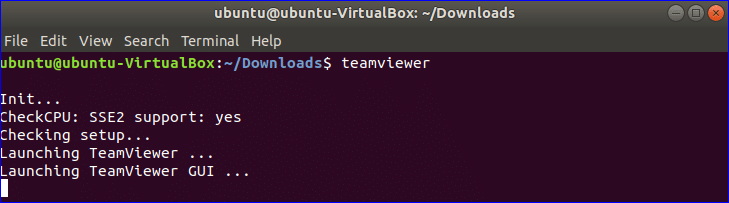
The following window will appear like previous installation.
Upgrade TeamViewer:
If you want to re-install or upgrade TeamViewer then you have to remove the previously installed version of this software from the system. You can run any of the following command from the terminal to remove the application.
After removing the previously installed TeamViewer, follow any of the ways which are mentioned above to re-install the new version of TeamViewer on Ubuntu.
Conclusion:
You can use this software to share your computer related problems with your friends or colleagues for getting solution easily. After reading this tutorial, hope you will be able to install and use TeamViewer on Ubuntu and know the advantages of using this software.
About the author
Fahmida Yesmin
I am a trainer of web programming courses. I like to write article or tutorial on various IT topics. I have a YouTube channel where many types of tutorials based on Ubuntu, Windows, Word, Excel, WordPress, Magento, Laravel etc. are published: Tutorials4u Help.
Источник


